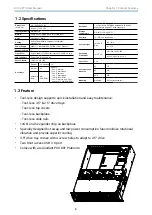
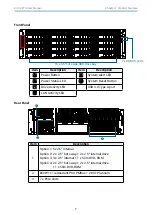
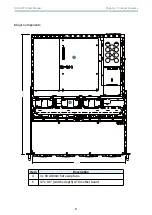
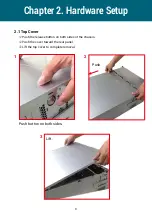
background image

UM_RSC-3ETS_v1.2_081319

RSC-3ETS  

Rackmount Storage Chassis

User's Manual

Summary of Contents for RSC-3ETS

Page 1: ...UM_RSC 3ETS_v1 2_081319 RSC 3ETS Rackmount Storage Chassis User s Manual...

Page 2: ...2 Hardware Setup 9 2 1 Top Cover 9 2 2 Power Supply Unit Module 10 2 3 Fan Module 11 2 4 Hard Disk Drive 12 2 5 HDD Backplane Module 15 2 6 Slide Rail 18 Chapter 3 Hardware Specifications 21 3 1 HDD B...

Page 3: ...Document Release History Release Date Version Update Content October 2017 1 1 Content update August 2019 1 2 New Cover...

Page 4: ...Copyright 2017 AIC Inc All Rights Reserved This document contains proprietary information about AIC products and is not to be disclosed or used except in accordance with applicable agreements...

Page 5: ...le for compliance could void your authority to operate the equipment Disclaimer AIC shall not be liable for technical or editorial errors or omissions contained herein The information provided is prov...

Page 6: ...from humidity Carefully mount the equipment into the rack in such manner that it won t be hazardous due to uneven mechanical loading This equipment is to be installed for operation in an environment...

Page 7: ...equipment does not work well or will not work according to its user manual 5 The equipment has been dropped and or damaged 6 The equipment has obvious signs of breakage 7 Please disconnect this equipm...

Page 8: ...ll layout of the product including the fundamental components of the rackmount chassis design specifications and noteworthy features Chapter 2 Hardware Setup This chapter displays an easy installation...

Page 9: ...e shipping carton may indicate that the contents of the carton are damaged If any damage is found do not remove the components contact the dealer where the subsystem was purchased for further instruct...

Page 10: ...oling 3 x 80x38mm PWM low power consumption hot swap fans Power Supply 800W 1 1 redundant PSU PMBus 1 2 80 Platinum Expansion Slots 7 Front Panel System power on off System reset and 2 x USB 3 0 ports...

Page 11: ...vity LED USB 3 0 Type A port LAN Activity LED Rear Panel Item Description 1 Option 1 5 x2 5 internal Option 2 2 x 2 5 hot swap 2 x 2 5 internal drive Option 3 3 x 2 5 internal 1 x Slim DVD ROM Option...

Page 12: ...8 Chapter 1 Product Features RSC 3ETS User Manual Major Components Item Description 4 3 x 80 x38mm hot swap fans 5 12 x 9 6 width x depth ATX mother board...

Page 13: ...C 3ETS User Manual Push the release button on both sides of the chassis Push the cover toward the rear panel Lift the top cover to complete removal 1 Push button on both sides 2 Push 3 Lift Chapter 2...

Page 14: ...it by pushing the ejector while pulling the power supply unit Pull the module completely out of the chassis Install the new power supply unit by pushing it into the chassis Ensure that the module is a...

Page 15: ...rs Lift the fan module upward Check to carefully dislodge the rubber connectors from the attached bracket Insert the new fan into the chassis Verify to align the rubber connectors with the appropriate...

Page 16: ...are Setup RSC 3ETS User Manual Press the release button on the tray lever to loosen the lever Pull the tray lever outward completely Pull the tray out of the chassis 2 4 Hard Disk Drive 1 Press button...

Page 17: ...13 Chapter 2 Hardware Setup RSC 3ETS User Manual Remove the HDD by pushing the HDD out from the backside of the HDD tray 4 Push HDD out Remove HDD...

Page 18: ...he HDD tray Make certain that the HDD is not damaged during installation or removal process HDD can also be screwed on HDD tray by fastening two screws Insert the drive tray into chassis HDD cage Make...

Page 19: ...ter 2 Hardware Setup RSC 3ETS User Manual Unplug cables 2 Detach the cables and hard disk drives from the backplane module Release the module by shifting the hook 2 5 HDD Backplane Module 1 Shift the...

Page 20: ...16 Chapter 2 Hardware Setup RSC 3ETS User Manual Hold the module on both sides Lift the module upward 3 4 Lift Hold...

Page 21: ...17 Chapter 2 Hardware Setup RSC 3ETS User Manual Align the new backplane module and insert it into the chassis Secure the module with the lock pin to complete installation 5 6...

Page 22: ...xactly match the rail for your system Please refer to the spefications or quick installation guide that came with your purchased product CAUTION They rack may tilt and fall due to incorrect installati...

Page 23: ...19 Chapter 2 Hardware Setup RSC 3ETS User Manual Attach inner rail to the system Reserved screw hole Make sure spring lock firmly Slide inner rail to lock...

Page 24: ...er Manual Verify that the ball bearing retainer is locked forward Pull out the intermediate rail until iit is locked out Slide the release tab and push system into rack to complete installation Attach...

Page 25: ...1 1 Placement Chapter 3 Hardware Specifications JPWR1 JPWR1 JPWR2 JPWR2 JI2C3 JFAN1 JFAN1 JFAN2 JFAN2 JI2C4 JI2C4 JI2C0 JEXP2 JEXP_UART JEXP_UART JFAN3 JFAN3 JFAN4 JFAN4 JMCU_DBG JMCU_DBG JMCU_UART JM...

Page 26: ...S_ON_L 6 GND Power Connector JPWR2 Pin Description Pin Description 8 12V 1 GND 9 12V 2 GND 10 12V 3 GND 11 12V 4 GND 12 5V 5 GND 13 5V 6 GND 14 5V 7 GND PMBUS Connector JPMBUS Pin Description 1 GND 2...

Page 27: ...e for MCU JMCU_DBG Pin Description 1 MCU_RXD 2 GND 3 MCU_TXD 2 54mm Header for Front I O JFRONT Fan number select Pin 5 6 Pin 3 4 Pin 1 2 Fan no support Active Fan Locate Close Close Close No Fan Clos...

Page 28: ...Fault Status LEDs Off Normal Red Blinking Re build status Red On HDD Fault or Locate HDD SAS HD Link Status Blue On Link up Blue Blinking Activity detected Off Link down Expander Blink LED5 Blue Blink...

Page 29: ...25 Chapter 3 Hardware Specification RSC 3ETS User Manual 3 1 4 Jumper JMCU_RST Open Normal default Close Reset MCU JMD_SEL Open Normal default Close Boot loader mode JMCU_RST JMCU_RST JMD_SEL JMD_SEL...

Page 30: ...26 Chapter 3 Hardware Specification RSC 3ETS User Manual 3 1 5 Drive Slot Map...

Page 31: ...Support Email support ru aicipc com tw North California United States Address 48531 Warm Springs Boulvard Suite 404 Fremont CA 94539 United States Tel 1 510 573 6730 Fax 1 510 573 6729 Sales Email sa...

Reviews: