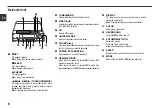
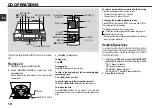
background image

Compact Disc
Stereo System

EZ

XR-X7

8B-CL2-906-01

010325AYK-H-M

En 

(English)

OPERATING INSTRUCTIONS

(Español)

MANUAL DE INSTRUCCIONES

(Français)

MODE D'EMPLOI

(Deutsch)

BEDIENUNGSANLEITUNG

(Italiano)

ISTRUZIONI PER L’USO

NL 

(Nederlands)

GEBRUIKSAANWIJZING

Cz 

(

Č

esky)

NÁVOD K OBSLUZE

(Magyar)

HASZNÁLATI UTASÍTÁS

Po 

(Polski)

INSTRUKCJA OBS

Ł

UGI

Summary of Contents for XR-X7

Page 1: ... English OPERATING INSTRUCTIONS E Español MANUAL DE INSTRUCCIONES F Français MODE D EMPLOI D Deutsch BEDIENUNGSANLEITUNG I Italiano ISTRUZIONI PER L USO NL Nederlands GEBRUIKSAANWIJZING Cz Česky NÁVOD K OBSLUZE M Magyar HASZNÁLATI UTASÍTÁS Po Polski INSTRUKCJA OBSŁUGI ...

Page 2: ...g Instructions Electric Power 1 Power sources Connectthisunitonlytopowersources specified in the Operating Instructions and as marked on the unit 2 AC power cord When disconnecting the AC power cord pull it out by the AC power plug Do not pull the cord itself Never handle the AC power plug with wet hands as this could result in fire or shock Power cords should be firmly secured to avoid being seve...

Page 3: ...eakers cords Remote control Lithium battery CR2025 FM antenna MW LW antenna TABLE OF CONTENTS PRECAUTIONS 2 PREPARATIONS 4 PARTS AND CONTROLS 5 ADJUSTMENTS BEFORE OPERATION 8 CD OPERATIONS 10 RADIO OPERATIONS 12 SOUND ADJUSTMENTS 15 TIMER OPERATIONS 16 REFERENCE 18 ...

Page 4: ...AC power socket after all other connections are made 1 Connect the speaker cords to the speakers Connect the amber cords to the terminals and the silver cords to the terminals 2 Connect the speakers to the main unit Connect the right speaker to the SPEAKERS R terminals and the left to theSPEAKERSLterminals Theambercords go to the terminals PREPARATIONS 3 Connect the supplied antennas Connect the F...

Page 5: ...pmentusinganoptionalconnecting cable with RCA phono plugs red plug to the R jack white plugtothe Ljack Referalsototheoperatinginstructions for your equipment To switch function to external input press VIDEO AUX AUX on the remote control to select the AUX VIDEO or TV function Tip To change a source name in the display hold down VIDEO AUX and press POWER while the power is on AUX VIDEO TV 6 LINE OUT...

Page 6: ...OSE Opens or closes the disc compartment 6 PHONES jack Plug in optional headphones set with a stereo mini plug ø3 5 mm Speaker output is cancelled 7 POWER 6STANDBY ON Switches the unit on and off standby 8 DEMO ECO RDS When the unit is turned off selects DEMO mode ECO mode or displays the clock When the unit is turned on selects DEMO mode Also takes advantage of the RDS Radio data system features ...

Page 7: ...ayback mode DISPLAY TIMER Selects timer playback setting mode SLEEP Selects sleep timer setting mode CLOCK Selects clock setting mode MONO TUNER Switches between stereo or monaural FM reception 3 T BASS 4 SHIFT Hold down when pressing a numbered button to change its function to that printed above the number 5 aSET cPRESET f r t g TUNING DOWN UP sCLEAR 6 POWER 7 TUNER BAND Selects radio function an...

Page 8: ...hpressofthisbuttonchangesthedisplaystatusasfollows 1 Demo display power economizing mode cancelled 2 Power economizing mode 3 Clock display power economizing mode cancelled When power economizing mode is activated When the unit turns off ECO MODE is displayed for 4 seconds and everything on the display clears Only the red indicator on the POWER button lights to show that power is being supplied to...

Page 9: ...tween select colour mode and function colour mode Presetting select colour mode 1 Press COLOR to display SELECT CL while the power is on 2 Within 4 seconds turn VOLUME MULTI JOG until COLOR M 1 COLOR M 2 or COLOR M 3 is displayed 3 Press COLOR A G B is displayed and A flashes 4 Turn VOLUME MULTI JOG to select A G or B A adjust amber colour G adjust green colour B adjust blue colour 5 Press COLOR 6...

Page 10: ... select track 25 press 10 10 and 5 To select track 10 press 10 and 0 To change the display in playback mode Press DISPLAY hold down SHIFT and press DISPLAY on the remote control during play The display changes in the following order 1 Track number being played and elapsed playing time 2 Remaining time of play Remaining time of play cannot be displayed during random play or programmed play Random R...

Page 11: ...ay you cannot select a track with the numbered buttons Can t USE is displayed when you try to select a track If the total playing time of the program exceeds 99 minutes and 59 seconds or if a track with a track number exceeding 30 is programmed the playing time is displayed as You cannot program more than 30 tracks FULL is displayed To check the program Press f or g repeatedly in stop mode The tra...

Page 12: ...tions You cannot store more than 32 preset stations FULL is displayed If power is interrupted for more than approximately 12 hours all settings stored in memory after purchase need to be reset Automatic presetting Scans the receivable frequency range and stores tuned stations automatically with the preset number 1 Press TUNER BAND 2 Hold down DEMO ECO RDS for 4 seconds until AUTO PRESET is display...

Page 13: ...n is tuned in Radio Text RT You can see text information such as the title of a song on the display Press DEMO ECO RDS when tuning in an RDS station If the tuned station is not transmitting text information NO RT will be displayed To return to the regular display Press DEMO ECO RDS again Program Type PTY This is an identification to specify the program being broadcast currently Press DEMO ECO RDS ...

Page 14: ...repeatedly until the program type of the currently tuned station is displayed 2 Press f or g to select a program type If f or g is not pressed within 10 seconds the PTY search will be cancelled 3 Press a If a is not pressed within 10 seconds the PTY search will be cancelled EON ON is displayed for 3 seconds and then the unit enters the standby mode while EON flashes When the unit leaps to another ...

Page 15: ... preset stations are cleared BASS Adjusts the bass level 1 Press MODE EQ on the remote control repeatedly so that BASS is displayed 2 Within 7 seconds turn VOLUME MULTI JOG press VOLUME N M on the remote control to adjust the bass level The bass level can be adjusted from 5 to 5 If the sound becomes distorted with the BASS effect cancel the effect SOUND ADJUSTMENTS VOLUME MULTI JOG T BASS VOLUME N...

Page 16: ...the Q SURROUND system is activated the sound may be distorted If this happens decrease the volume TIMER OPERATIONS Sleep timer Turns off the unit automatically after a specified time 1 Press MODE repeatedly hold down SHIFT and press SLEEP on the remote control SLEEP is displayed 2 Press f or g repeatedly to set the sleep timer duration With each press the timer duration changes in 5 minute steps b...

Page 17: ...down to 20 when the unit is turned on by the timer 7 Prepare the source To play CD insert a disc To play the radio select the band and tune in the desired station To play external equipment connected to the VIDEO AUX IN jacks set an external timer for the equipment so that playback begins at the same time 8 Press POWER to turn the unit off 5 remains on the display to indicate the timer standby mod...

Page 18: ...eded to optimize the performance of your unit To clean the cabinet Use a soft and dry cloth If the unit surfaces are extremely dirty use a soft cloth lightly moistened with mild detergent solution Do not use strong solvents such as alcohol benzine or thinner Care of CDs When a CD becomes dirty wipe it from the centre out with a cleaning cloth After playing a CD store it in its case Do not keep it ...

Page 19: ...ual Signal to noise ratio 85 dB 1 kHz 0 dB Harmonic distortion 0 08 1 kHz 0 dB Wow and flutter Unmeasurable GENERAL Power requirements 230 V AC 50 Hz Power consumption 50 W Power consumption in standby mode With ECO mode on 1 2 W With ECO mode off 13 W Dimensions W H D 249 92 353 mm Weight 3 5 kg SPEAKER SYSTEM SX LX7 Speaker system 2 way bass reflex magnetic shielded Speaker units Woofer 80 mm co...

Page 20: ...undet med lysnettet så længe stikket er tilsluttet til stikkontakten selv om afbryteren er slået fra Hvis apparatet ikke bruges i længere tid skal netledningen trækkes ud ADVARSEL Lithiumbatteri Eksplosionsfare ved fejlagtig håndtering Udskiftning må kun ske med batteri af samme fabrikat og type Lever det brugte batteri tilbage til laverandøren ADVARSEL Lithiumbatteri Eksplosjonsfare Ved utskiftin...

Reviews: