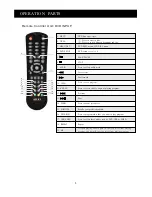
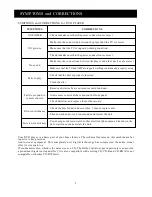
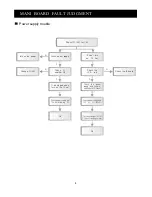
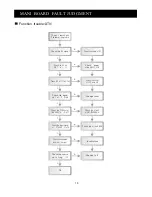
Akai LTC-16RSX3M, Service Manual
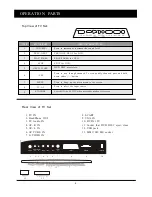
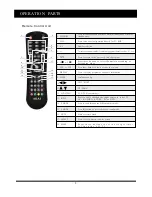
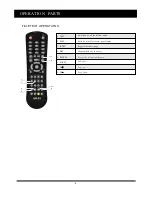
The Akai LTC-16RSX3M Service Manual is an essential resource for users of this versatile product. Easily downloadable for free from our website, this comprehensive manual provides step-by-step instructions and detailed diagrams, ensuring seamless operation and maintenance. Enhance your experience with the Akai LTC-16RSX3M by downloading the manual today. [Website]
Share
Download


Reviews:
No comments
Related manuals for LTC-16RSX3M

HLC24XSL2
Brand: Haier Pages: 28

PT250
Brand: Kanto Pages: 16

EW24T8FW
Brand: Westinghouse Pages: 88

TV-32LE80T2S2
Brand: Vivax Pages: 104

SJC24FH-ZMA
Brand: Sansui Pages: 14

Direct-View Concierge H27H38DT
Brand: Zenith Pages: 60

SENTRY 2 SLS9550S
Brand: Zenith Pages: 30

Neptune Partial Sun Series
Brand: peerless-AV Pages: 96

TVH24R506STWEB
Brand: Gogen Pages: 150

Universal Tilting TV Mount - 23" to 42
Brand: SIIG Pages: 8

LE24D3140_30
Brand: AOC Pages: 64

M40/57G-GB-FTCU-UK
Brand: UMC Pages: 29

DA110BD
Brand: August Pages: 16

LE24C2380a
Brand: Haier Pages: 57

21WHP3/BN
Brand: akira Pages: 59

L26A01
Brand: Hitachi Pages: 35

C15-LC880SNT
Brand: Hitachi Pages: 38

L22HP04E
Brand: Hitachi Pages: 36


