background image

Alcatel-Lucent 1665

1665 DATA MULTIPLEXER | RELEASE 7.1

INSTALLATION MANUAL

365-372-304R7.1

CC109666487

NOVEMBER 2007

ISSUE 1

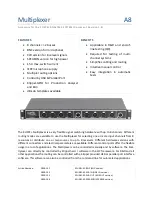
Summary of Contents for Data Multiplexer Explore 1665

Page 1: ...Alcatel Lucent 1665 1665 DATA MULTIPLEXER RELEASE 7 1 INSTALLATION MANUAL 365 372 304R7 1 CC109666487 NOVEMBER 2007 ISSUE 1 ...

Page 2: ...used in accordance with the guidelines in this document the equipment may cause harmful interference to radio communications Operation of this equipment in a residential area is likely to cause harmful interference in which case the user will be required to correct the interference at the expense of the user Security Statement In rare instances unauthorized individuals make connections to the tele...

Page 3: ... xxii Packaging collection and recovery requirements xxii Recycling take back disposal of product xxii Part I 1665 Data Multiplexer 1665 DMX physical installation and powering 1 Equipment and cable installation for 1665 Data Multiplexer 1665 DMX Planning 1 3 Connector references 1 7 Inspection 1 8 1665 DMX High Capacity shelf installation 1 9 Heat baffle installation 1 14 Power cable and cable bra...

Page 4: ...tallation for low speed packs 1 90 1000Base F and 100Base F fiber installation 1 92 Fibre channel fiber installation 1 94 CIT cable installation 1 96 Final operations 1 99 2 Powering and initial circuit pack installation for 1665 Data Multiplexer 1665 DMX Description 2 2 Powering 2 3 Circuit pack compatibility 2 7 Initial circuit pack installation 2 12 Part II 1665 Data Multiplexer 1665 DMX stand ...

Page 5: ...OC 3 low speed testing 4 43 OC 12 low speed testing 4 47 OC 48 low speed testing 4 52 LED test 4 56 Additional optical tests optional 4 57 5 Operational tests Office alarm test 5 4 Automatic protection switching and alarm test 5 8 Manual switching tests 5 11 External timing verification 5 13 Miscellaneous environmental discrete telemetry test 5 16 Modem connection test 5 19 Final operations 5 21 P...

Page 6: ...ing inspecting optical connectors B 6 Cleaning pluggable optics modules B 12 C Installing fiber connectors and LBOs LBOs C 2 Fiber connections C 5 D Backplane pin replacement Pin and connector background D 2 Repair kits and tools D 4 Simple repair methods D 5 Replacement methods D 7 E Installation checklist Overview E 1 F Fiber labeling Fiber description F 2 Fiber labels F 4 G Pluggable transmissi...

Page 7: ...Contents v i i 365 372 304R7 1 Issue 1 November 2007 GL Glossary Acronyms and abbreviations GL 1 Terms and definitions GL 15 IN Index ...

Page 8: ... Contents v i i i 365 372 304R7 1 Issue 1 November 2007 ...

Page 9: ...fle position 1 15 1 6 Cable brackets 1 17 1 7 Power connector mounting positions 1 19 1 8 Alternating power cable routing 1 20 1 9 Power connection 1 21 1 10 Power cable routing with cable bracket 1 22 1 11 Power cable routing without cable bracket 1 23 1 12 DS1 cable installation 1 35 1 13 DS1 cable routing 1 36 1 14 DS3 EC1 and 48TMUX cable installation 1 42 1 15 DS3 EC1 and 48TMUX cable routing...

Page 10: ...259 channel positions 2 15 Part II 1665 Data Multiplexer 1665 DMX stand alone installation tests 4 Installation tests 4 1 Optical test set arrangement 4 59 4 2 Optical test arrangement RX fiber moved 4 60 5 Operational tests 5 1 1665 DMX Shelf Backplane 5 14 5 2 Miscellaneous Environmental Discrete Functions 5 17 Part IV 1665 Data Multiplexer 1665 DMX supplementary information and installation che...

Page 11: ... Type Connector Port C 4 C 5 LC Type Fiber Connector C 5 C 6 LC Type Fiber Connection C 6 G Pluggable transmission module installation G 1 Pluggable Transmission Module With Dust Plug Optical PTMs Only G 6 G 2 Examples of Dust Plugs G 7 G 3 Module Types G 7 G 4 Latch Type 3 Opened and Closed G 9 G 5 Latch Type 4 5 6 7 and 8 Opened and Closed G 10 ...

Page 12: ... List of figures x i i 365 372 304R7 1 Issue 1 November 2007 ...

Page 13: ...S3 EC1 or TMUX cable assemblies 1 44 1 8 DS3 EC1 and TMUX transmission connections 1 50 1 9 12TMUX transmission connections 1 57 1 10 10 100BaseT Ethernet cable assemblies 1 60 1 11 10 100BaseT Ethernet connections 1 61 1 12 GbE Ethernet cables 1 63 1 13 LAN 10BaseT cable assemblies 1 67 1 14 LAN 10BaseT cross over cable connections 1 68 1 15 LAN 10BaseT straight through cable connections 1 68 1 1...

Page 14: ...2 4 Installation tests 4 1 Cable lengths feet 4 5 4 2 DS1 Cross Connections 4 18 4 3 DS3 Cross Connections 4 33 4 4 Transmission rate 4 59 5 Operational tests 5 1 Office Alarm Connections 5 5 5 2 Miscellaneous Environmental Discrete Telemetry Connections 5 18 6 Ring setup and testing integration procedures 6 1 Attenuation Table 6 6 6 2 Attenuation table Pluggable Transmission Modules 6 7 A Laser s...

Page 15: ...ovember 2007 E Installation checklist E 1 Installation Acceptance Checklist E 1 G Pluggable transmission module installation G 1 Alcatel Lucent Approved Pluggable Transmission Modules G 2 G 2 Insert Pluggable Transmission Module Into Socket G 11 ...

Page 16: ... List of tables x v i 365 372 304R7 1 Issue 1 November 2007 ...

Page 17: ...ou may receive a mixture of the company logo and product names on any of these items For example a document may say 1665 DMX while the software says Metropolis DMX Despite the name change rest assured that Metropolis DMX and 1665 DMX are the same product with the same product features interoperability and operations remain unchanged Reason for reissue This document is being reissued to include inf...

Page 18: ...d DS1 and DS3 capacity Chapter 2 Powering and initial circuit pack installation for 1665 Data Multiplexer 1665 DMX This chapter provides information for verifying that the shelf is being supplied with the proper power and provides instructions for circuit pack installation Part II 1665 Data Multiplexer 1665 DMX stand alone installation tests Chapter 3 Software download and circuit pack installatio...

Page 19: ...tput ports found on the 1665 DMX circuit packs Appendix D Backplane pin replacement This appendix provides information and the procedures used when a pin or blade on the 1665 DMX backplane has been bent or broken Appendix E Installation checklist This appendix provides a checklist to ensure that all necessary procedures have been completed Use of the installation checklist is required to ensure a ...

Page 20: ...the minimum 1 megohm resistance Plug in storage Circuit packs should be stored in static safe packaging or in a grounded cabinet For additional safety precautions please see the 1665 Data Multiplexer 1665 DMX User Operations Guide Laser safety For more detailed information and safety precautions refer to Appendix A Laser safety and classifications and Electrostatic Discharge ESD considerations Con...

Page 21: ...ation Manual 365 372 306R7 1 1665 Data Multiplexer Release 7 1 TL1 Message Details 1665 Data Multiplexer Software Release Description Paper 109665943 CD ROM 109665950 1665 DMX drawings ED8C871 10 1665 Data Multiplexer Release 1 0 7 1 0 Engineering and Ordering Information ED8C871 20 1665 Data Multiplexer Release 1 0 7 1 0 Interconnect Information Document support Alcatel Lucent provides a referral...

Page 22: ...r from the waste stream Additionally reuse recovery and or recycling targets for the return and or collection of the packaging waste may be established For more information regarding collection and recovery of packaging and packaging waste within specific jurisdictions please contact the Alcatel Lucent Field Services Installation Environmental Health and Safety organization For installations not p...

Page 23: ...3 August 2005 Moreover in compliance with legal requirements and contractual agreements where applicable Alcatel Lucent will offer to provide for the collection and treatment of Alcatel Lucent products at the end of their useful life Alcatel Lucent will also offer to provide for the collection and treatment of existing products displaced by Alcatel Lucent equipment For information regarding take b...

Page 24: ... About this document x x i v 365 372 304R7 1 Issue 1 November 2007 ...

Page 25: ...also covers initial circuit pack installation not seated Important The high capacity shelf does not require the installation of an additional fan shelf since the fan unit is integral to the shelf itself Check Figure 1 1 1665 DMX High Capacity shelf backplane p I 2 to determine if the shelf is a 1665 DMX High Capacity shelf shelf If the shelf you are installing is NOT equipped with the additional m...

Page 26: ... OUT J4 B IN J2 A IN J13 ALM MULT J12 ALM J18 DLAN J10 X 25 J5 C IN J7 D IN NC DMX 156 J22 C IN J23 D IN J26 C OUT J27 D OUT J20 A IN J21 B IN J24 A OUT J25 B OUT IN OUT EXP2 EXP1 IN OUT CTL 48RTNB P15 J14 SYNC2 J11 MISC J17 MODEM J9 SYNC1 P14 48RTNA 48VA 48VB CTL J15 FAN Equipment and cable installation for 1665 Data Multiplexer 1665 DMX Chapter 1 Powering and initial circuit pack installation fo...

Page 27: ...ing the 1665 DMX shelf to the frame It is also used when reattaching the mounting brackets to the 1665 DMX shelf 1 Multimeter Optional ITE 6379C The voltmeter must be capable of measuring DC voltage in the 40 to 60 volt range The use of the voltmeter is optional since the shelf will alarm or shut down if the proper voltage is not supplied 1 Ohmmeter ITE 6379C An ohmmeter is required to verify that...

Page 28: ...esting of the individual ports 2 20 dB LC Type LBO ITE 7196 108279530 Two 20 dB LBOs are required when optically looping the 1665 DMX shelf equipped with LNW60 2 LC Type Optical Fiber Jumper 108918269 Two optical fiber jumpers with LC type connectors are required to optically loop the 1665 DMX shelf for test purposes Noyes OFS 300 200X Optical Fiber Scope ITE 7129 Optical Fiber Scope 2 5 mm Univer...

Page 29: ...Type A Reel Luminex Stick Port Cleaners ITE 7134 ITE 7135 1 25 mm and 2 5 mm sizes Luminex Cloth R 6033 5 5 x 5 5 Registered trademark of Thomas Betts Corporation Registered trademark of Paladin Corporation Quantity Description Comments Quantity Description Comments 1 Personal Computer PC See PC minimum requirements below 1 CIT Interface Cable 8 ft long RJ45 to 9 pin D sub serial cable Comcode 848...

Page 30: ...ocessor type and speed and the memory size will all factor into CIT performance Components Minimum Recommended Processor Pentium 266 MHz Pentium III 500 MHz RAM 1 system view 128 MB 256 MB RAM up to 5 system views 256 MB 256 MB Virtual Memory 139 MB 267 MB Available Hard Disk Space Available hard disk space required to install and store the CIT and Generic Software is approximately 250 MB it is 55...

Page 31: ...Inspection 1 8 1665 DMX High Capacity shelf installation 1 9 Heat baffle installation 1 14 Power cable and cable bracket installation 1 16 Fiber management installation optional 1 27 Installing the fiber ducts optional 1 31 Cable and optical fiber installation 1 32 DS1 cable installation 1 34 DS3 EC1 and 48TMUX cable installation 1 41 12TMUX LNW18 cable installation 1 54 10 100BaseT backplane Ethe...

Page 32: ...allation 1 72 Office alarm cable installation 1 78 Miscellaneous environmental discrete telemetry cable installation 1 84 Main optical fiber installation OC 12 OC 48 OC 192 1 88 Fiber installation for low speed packs 1 90 1000Base F and 100Base F fiber installation 1 92 Fibre channel fiber installation 1 94 CIT cable installation 1 96 Final operations 1 99 ...

Page 33: ...lling the interfacing cables and for setting the circuit breakers to the OFF position 1 Thomas Betts R 5648B Crimping Tool The crimping tool wire stripper and soldering iron are only required if installing DS3 cables The replacement cassette is for the wire stripper tool 1 Paladin Coaxial Wire Stripper R 5648B D5 Replacement Paladin Cassette R 5648B D5 1 Wire Wrap Gun R 4496A The wire wrap gun is ...

Page 34: ...ed to the Lambda Unite MSS configurations In order for the 1665 DMX shelf to be placed in a NEBS 2000 Cabinet frame combined with Lambda Unite MSS mounting kit 848856514 is required For a more complete view of mounting the 1665 DMX into the Lambda Unite Frame see SIG L WW 161A 1665 DMX added to the Lambda Unite MSS Configurations Cabling checklist This section briefly describes cabling information...

Page 35: ...semblies are required for each Function Unit equipped for 28 DS1 service LNW6 LNW7 Four DS1 Cable Assemblies are required for each Function Unit equipped for 56 DS1 service LNW8 Each DS1 Cable Assembly consists of two separate cable assemblies both containing 28 pairs of 24 gauge cable One cable is for input and the other cable is for output Cable assembly description Required See note Power Yes 1...

Page 36: ... One cable is required for channels 1 through 12 and another for channels 13 through 24 LNW66 and LNW71 LNW74 provides only ports 1 through 16 8 When cabling the 1665 DMX High Capacity shelf for office alarm applications one Office Alarm Cable Assembly is required for the bottom 1665 DMX shelf in a bay frame One Office Alarm Mult Cable Assembly is required for each additional 1665 DMX shelf in the...

Page 37: ...f some of the connectors used to interface with the 1665 DMX Figure 1 1 Connector types and pinouts DB 9 male type connector DB 15 male type connector DB 25 male type connector DB 62 male type connector 1 5 6 9 1 8 9 15 1 13 14 25 1 21 43 62 22 42 DB 9 female type connector DB 15 female type connector DB 25 female type connector DB 62 female type connector 1 5 6 9 8 1 15 9 13 1 24 14 21 1 62 43 42...

Page 38: ...before installing the 1665 DMX High Capacity shelf and cables Procedure 1 Inspect the shelf for visible damage including bent or touching backplane pins Important If any backplane pins are damaged refer to Appendix D Backplane pin replacement for instructions on repairing the damaged pin s 2 Check off the appropriate box in Appendix E Installation checklist E N D O F S T E P S ...

Page 39: ...e Proceed as follows 1 Determine the mounting configuration for the 1665 DMX High Capacity shelf Type of bay frame 23 inch or 19 inch wide Mounting position front or rear Position in bay bottom to top Important The 1665 DMX High Capacity shelf is shipped with the mounting brackets positioned for mounting to the rear of a 23 inch wide network bay frame The 1665 DMX High Capacity shelf mounting brac...

Page 40: ...pacity shelf installation Equipment and cable installation for 1665 Data Multiplexer 1665 DMX 1 1 0 365 372 304R7 1 Issue 1 November 2007 Figure 1 2 1665 DMX High Capacity shelf mounting bracket positions 23 inch frame ...

Page 41: ...ting arrangements p 1 12 shows the recommended mounting positions Start at the bottom of the bay and add shelves from bottom to top Important There is a switch on the fan unit controller board It is labeled CF ALM ON Clogged Filter Alarm ON and CF ALM OFF Clogged Filter OFF The fan ships with the switch in the disable position which prevents the filter alarm from working To enable the filter alarm...

Page 42: ... in the frame and secure it to the frame using the thread forming screws included with the shelf 4 screws per side Tighten the screws to 21 in lb minimum 30 in lb maximum Important Be sure to mount the shelf using the thread forming screws provided with the shelf to ensure a solid ground connection from the bay to the shelf Figure 1 4 Typical 1665 DMX High Capacity shelf bay mounting arrangements ...

Page 43: ...ce ground lug on the bay frame Requirement The ohmmeter reads less than 1 ohm 6 If the Ohmmeter reading is not less than 1 ohm a secondary ground should be used for each shelf Use an 8 AWG wire from the UL Green M5 Screw safety ground on the side of the shelf to bay frame or office ground Important It is important to remove the paint in the area where the wire is to be connected to the bay and to ...

Page 44: ... wide Mounting position front or rear Position in bay below shelf mounted above non DMX heat generating equipment Important The heat baffle is shipped with the mounting brackets positioned for mounting to the rear of a 23 inch wide network bay frame The heat baffle mounting brackets may have to be repositioned and remounted depending on the frame type and mounting position front or rear 2 If neces...

Page 45: ...Heat baffle installation Equipment and cable installation for 1665 Data Multiplexer 1665 DMX 365 372 304R7 1 Issue 1 November 2007 1 1 5 Figure 1 5 Heat baffle position E N D O F S T E P S ...

Page 46: ...Two feeders A and B are required from the battery distribution fuse board BDFB or battery distribution circuit breaker bay BDCBB to the 1665 DMX bay Table 1 2 Power cable assemblies p 1 25 and Table 1 3 Power connections p 1 26 list the available power cable assemblies and power connections respectively Procedure Proceed as follows 1 Install cable brackets two per 1665 DMX High Capacity shelf 1 on...

Page 47: ... 1 November 2007 1 1 7 Figure 1 6 Cable brackets Important Depicted above is the 1665 DMX shelf for reference purposes only the cable bracket is the same for the 1665 DMX High Capacity shelf 2 If installation is on raised floors rotate the power connectors on each side of the shelf 180 degrees as shown CABLE BRACKET sold separately ...

Page 48: ...ity shelf chassis as shown in Figure 1 7 Power connector mounting positions p 1 19 It is recommended that if multiple shelves are being installed in a frame the power connector positions be alternated as shown in Figure 1 8 Alternating power cable routing p 1 20 Determine if the power connector needs to be moved to the other mounting position If so move the power connector to the other mounting po...

Page 49: ...r 1665 DMX High Capacity shelf shelves in a standard bay frame The side view shows the power connectors for shelves 3 and 1 mounted closest to the rear of the shelves default position with the cabling for shelf 1 bending away from the power connector on shelf 3 and running over it until the power cables exit the bay The power connectors for shelves 4 and 2 are mounted in the alternate position on ...

Page 50: ...installation for 1665 Data Multiplexer 1665 DMX 1 2 0 365 372 304R7 1 Issue 1 November 2007 Figure 1 8 Alternating power cable routing 4 Connect power cable to the power connector housing on the 1665 DMX High Capacity shelf chassis Figure 1 9 Power connection p 1 21 ...

Page 51: ...n in Figure 1 10 Power cable routing with cable bracket p 1 22 or Figure 1 11 Power cable routing without cable bracket p 1 23 Important The 1665 DMX High Capacity shelf is powered by 48 V DC CAUTION Equipment damage Ensure that the 4 pins inside the connector attached to the power cable are properly aligned before inserting the connector into the power connector housing Failure to do so may resul...

Page 52: ...Figure 1 10 Power cable routing with cable bracket Important The shelf shown in Figure 1 10 is the 1665 DMX and not the 1665 DMX High Capacity shelf however the power cabling remains the same and is depicted here for reference CAUTION Verify that the BDCBB breakers are off or that the BDFB fuses are not installed POWER CABLE POWER CONNECTOR CABLES BRACKET ...

Page 53: ...The shelf shown in Figure 1 10 is the 1665 DMX and not the 1665 DMX High Capacity shelf however the power cabling remains the same and is depicted here for reference 6 Splice feeders from the BDCBB or BDFB to the 1665 DMX High Capacity shelf power cable Refer to Table 1 3 Power connections p 1 26 Important Four cables are spliced to each power cable 1 BAT A 2 BAT A RTN 3 BAT B 4 BAT B RTN POWER PO...

Page 54: ... the BDCBB should be rated 1 25 times the rating of the circuit breaker on the shelf For the BDFB the fuse rating should be 1 5 times the rating of the circuit breaker on the shelf 8 Leave the BDCBB breakers off or BDFB fuses out until you are ready to perform the procedures in Chapter 2 Powering and initial circuit pack installation for 1665 Data Multiplexer 1665 DMX of this manual 9 Check off th...

Page 55: ... Cable gauge Cable assembly Cable length feet 1665 DMX High Capacity shelf backplane connections Power cable 10 848841839 12 Connectors mounted on sides of the shelf BAT A and BAT B 6 848635009 12 848635033 50 848635041 75 848635058 100 4 848935268 35 848634986 55 848635025 100 2 848935276 55 848634978 85 848635017 100 Cable connector kit 2 848635231 4 848635249 6 848635934 Cable bracket 846593002...

Page 56: ...T A 2 W 48RTNA BAT A RTN P15 BAT B 1 R 48VB BAT B 2 W 48RTNB BAT B RTN Notes 1 Power cables for shelves 4 and 2 are mounted using the connector mounting holes located closest to the rear of the shelves with the cabling for shelf 2 bending away out from the power connector in shelf 4 and running over it until the power cables exit the bay The power runs for shelves 1 and 3 are run in the same manne...

Page 57: ...h side This is typically done using base fillers Comcode numbers are in parentheses next to the part number Procedure 1 Locate three spools 106738156 one fiber radius control module 321 1B one left fiber spool bracket 848919213 and 3 M4 X 6 bracket mounting screws 901340059 for each shelf being installed 2 For each spool put a nylach fastener through the middle Then insert a pin halfway through Im...

Page 58: ...007 4 Spin the spool until the peg on its back fits into the smaller hole on the arm of the bracket This will keep the spool from spinning any further 5 Push the pin until it is completely fastened 6 Repeat Step 3 through Step 5 for all the spools with three per bracket 7 Attach one fiber radius control module to the bottom of each bracket as shown ...

Page 59: ... halfway through Important It is very important that the pin is not completely inserted This will deform the fastener and prevent it from being assembled to the bracket 12 Line up the nylach fastener in one of the spools with the large holes on the top arm of the bracket 13 Spin the spool until the peg on its back fits into the smaller hole on the arm of the bracket This will keep the spool from s...

Page 60: ...4R7 1 Issue 1 November 2007 19 Using a label maker create 16 labels LS and 8 labels HS 20 Attach the HS labels to the uppermost spool on each of the brackets 21 Attach the LS labels to the middle and lower spools on each of the brackets 22 Check off the appropriate box in Appendix E Installation checklist E N D O F S T E P S ...

Page 61: ...From the 848920476 Fiber Duct Components Kit locate 2 fiber ducts 848955845 6 metal fiber duct brackets 848915153 12 12 24 X 3 8 HWH screws 901211177 and 6 M5 X 8 901340547 2 Using the 12 24 X 3 8 screws secure the metal brackets to the front of the bay three on each side using the holes in between shelf 1 and shelf 2 shelf 2 and shelf 3 shelf 3 and shelf 4 3 Position one of the fiber ducts along ...

Page 62: ...st spool b Fiber management of low speed fibers should start with the lowest spool Once full fiber should be routed along the fiber radius control module and then up to the middle spool c As shown in the picture below fiber from the lowest spool low speed is routed in the outermost section of the fiber duct the middle spool low speed to the middle section and the upper spool high speed to the inne...

Page 63: ...fiber installation Equipment and cable installation for 1665 Data Multiplexer 1665 DMX 365 372 304R7 1 Issue 1 November 2007 1 3 3 2 Check off the appropriate box in Appendix E Installation checklist E N D O F S T E P S ...

Page 64: ...lf end and must be wire wrapped at the DSX end A total of four function groups fully cabled will have 224 DS1 drop capacity when the higher density DS1 circuit packs become available Important The connectorized cable end is grounded to the 1665 Data Multiplexer 1665 DMX frame ground through the backplane Alcatel Lucent recommends that the shield at both ends of the cable be grounded Ground at the ...

Page 65: ...ure 1 12 DS1 cable installation p 1 35 Important DS1 cable retaining screws must be tightened to a maximum of 6 5 in lb Do not overtighten Figure 1 12 DS1 cable installation 3 Route the cables along the backplane and out of the bay to the DSX per Figure 1 13 DS1 cable routing p 1 36 48RTNA 48VA P14 J9 SYNC1 J15 FAN J11 MISC J14 SYNC2 P15 J17 MODEM 48RTNB 48VB J16 IAOLAN J19 INTEROP J10 X 25 J18 DL...

Page 66: ...uting 4 Route the cables along the cable rack and into the terminating bay 5 Remove slack and cut the DS1 cables to the desired length at the DSX 6 Referring to Table 1 5 DS1 transmission connections p 1 38 carefully observe color codes and wire wrap the cables at the DSX 7 Check off the appropriate box in Appendix E Installation checklist E N D O F S T E P S ...

Page 67: ...55 848790788 Notes 1 Each group listed includes all the DS1 cables for one function group 2 One code provides one input and one output cable for 28 DS1 s i e for one DS1 function group e g J1 A OUT J2 A IN 3 For Input connections use cable CA1 DS1 IN and for Output connections use cable CA2 DS1 OUT 4 Cables are terminated in J1 through J8 and J20 through J27 connectors at the 1665 DMX High Capacit...

Page 68: ...B6 B5 B4 B3 B2 B1 W BL W O W G W BR 19 40 18 39 60 59 17 38 J2 A In J1 A Out J4 B In J3 B Out J5 C In J6 C Out J7 D In J8 D Out 2 1 5 2 6 3 7 4 8 B8 B7 B6 B5 B4 B3 B2 B1 W S R BL R O R G 58 57 16 37 15 36 14 35 3 1 9 2 10 3 11 4 12 B8 B7 B6 B5 B4 B3 B2 B1 R BR R S BK BL BK O 56 55 13 34 54 53 12 33 4 1 13 2 14 3 15 4 16 B8 B7 B6 B5 B4 B3 B2 B1 BK G BK BR BK S Y BL 11 32 10 31 52 51 9 30 5 1 17 2 1...

Page 69: ...1 R BR R S BK BL BK O 56 55 13 34 54 53 12 33 4 1 41 2 42 3 43 4 44 B8 B7 B6 B5 B4 B3 B2 B1 BK G BK BR BK S Y BL 11 32 10 31 52 51 9 30 5 1 45 2 46 3 47 4 48 B8 B7 B6 B5 B4 B3 B2 B1 Y O Y G Y BR Y S 50 49 8 29 7 28 6 27 6 1 49 2 50 3 51 4 52 B8 B7 B6 B5 B4 B3 B2 B1 V BL V O V G V BR 48 47 5 26 46 45 4 25 7 1 53 2 54 3 55 4 56 B8 B7 B6 B5 B4 B3 B2 B1 V S W BL W O W G 3 24 2 23 44 43 1 22 DSX 1 conn...

Page 70: ...wice White binder cables are for Channel 1 through 25 and 29 through 53 blue binder cables are for Channels 26 27 28 54 55 and 56 DSX 1 connections 1665 DMX High Capacity shelf backplane connections G r o u p Chan DS1 T R term T R color 62 pin conn Pin T R Function group A conn Function group B conn Function group C conn Function group D conn In Out In Out In Out In Out ...

Page 71: ...X cable assemblies p 1 44 DS3 EC1 and TMUX transmission connections are in Table 1 8 DS3 EC1 and TMUX transmission connections p 1 50 A total of four function groups fully cabled will have 192 DS3 drop capacity Procedure Proceed as follows 1 Refer to the engineering job specification Obtain the DS3 cables per Table 1 7 DS3 EC1 or TMUX cable assemblies p 1 44 and note the function group where each ...

Page 72: ... DS3 EC1 and 48TMUX cable routing p 1 43 Function group Associated connectors A A IN J2 and J20 A OUT J1 and J24 B B IN J4 and J21 B OUT J3 and J25 C C IN J5 and J22 C OUT J6 and J26 D D IN J7 and J23 D OUT J8 and J27 J8 D OUT J6 C OUT J19 INTEROP J16 IAOLAN J3 B OUT J1 A OUT J4 B IN J2 A IN J13 ALM MULT J12 ALM J18 DLAN J10 X 25 J5 C IN J7 D IN NC DMX 156 J22 C IN J23 D IN J26 C OUT J27 D OUT J20...

Page 73: ...ength and install the BNC connectors shipped with the cable assemblies Important When installing BNC connectors follow the manufacturer s instruction carefully to ensure a proper connection Failure to do so may result in faulty DS3 signals as a result of improperly installed BNC connectors 7 Connect the cables to their respective positions on the terminating equipment Important The 12 port cable a...

Page 74: ...embly Cable length feet 1665 DMX backplane connections DS3 1 12 Cables with ITT Canon BNC s for LNW16 LNW18 only 12 individual 735A coaxial cables with 12 ITT Canon 75ohm BNC plugs shipped loose 848955407 10 J1 J24 J2 J20 A OUT A IN J3 J25 J4 J21 B OUT B IN J6 J26 J5 J22 C OUT C IN J8 J27 J7 J23 D OUT D IN 848955415 20 848955423 30 848955431 40 848548277 50 848980504 60 848548285 100 848548293 150...

Page 75: ...nd lengths 450ft use 10ft 735A spliced to 734D cable and 900ft is the maximum amount of 734D allowed between two DMX s This splice is factory made Stagger the splices in the cable rack to save space 849040688 10 J1 J24 J2 J20 A OUT A IN J3 J25 J4 J21 B OUT B IN J6 J26 J5 J22 C OUT C IN J8 J27 J7 J23 D OUT D IN 849040696 20 849040704 30 849040712 40 849040720 50 849040738 60 849040746 100 849040753...

Page 76: ...BNC plugs shipped loose 848923124 10 J1 J24 J2 J20 A OUT A IN J3 J25 J4 J21 B OUT B IN J6 J26 J5 J22 C OUT C IN J8 J27 J7 J23 D OUT D IN 848923132 20 848923140 30 848923157 40 848839478 50 848923165 60 848923173 70 848923181 80 848923199 90 848839486 100 848923207 110 848923215 120 848923223 140 848838494 150 848923231 160 848923249 180 848923256 200 848839502 250 848923264 300 848923272 400 84883...

Page 77: ...loose 849040886 10 J1 J24 J2 J20 A OUT A IN J3 J25 J4 J21 B OUT B IN J6 J26 J5 J22 C OUT C IN J8 J27 J7 J23 D OUT D IN 849040894 20 849040902 30 849040910 40 849040928 50 849040936 60 849040944 70 849040951 80 849040969 90 849040977 100 849040985 110 849040993 120 849041009 140 849041017 150 849041025 160 849041033 180 849041041 200 849041066 250 849041074 300 849041082 400 849041090 450 Descripti...

Page 78: ...018 275 848932026 300 848932034 325 848932042 350 848932059 375 848932067 400 848932075 425 848839528 450 848839536 750 848839544 900 DS3 1 24 Cables with no BNC Similar to above except no BNC s are shipped loose 849041785 250 J1 J24 J2 J20 A OUT A IN J3 J25 J4 J21 B OUT B IN J6 J26 J5 J22 C OUT C IN J8 J27 J7 J23 D OUT D IN 849041793 275 849041801 300 849041819 325 849041827 350 849041835 375 849...

Page 79: ... J7 J23 109508333 50 109508341 75 109508358 100 109508366 125 109508374 150 109508382 175 109508390 200 109508408 250 Notes 1 All the DS3 EC1 or TMUX cable assemblies can be used for any function group 2 1665 DMX High Capacity shelf connectors J1 through J8 and J20 through J27 can be used for either DS1 DS3 EC1 or TMUX 3 Each Cable assembly listed above contains two cable assemblies therefore a qu...

Page 80: ... Ground 19 2 DS3 2R 2T Signal 17 FRG2 Ground 38 3 DS3 3R 3T Signal 57 FRG3 Ground 58 4 DS3 4R 4T Signal 13 FRG4 Ground 34 5 DS3 5R 5T Signal 53 FRG5 Ground 54 6 DS3 6R 6T Signal 10 FRG6 Ground 31 7 DS3 7R 7T Signal 51 FRG7 Ground 52 8 DS3 8R 8T Signal 6 FRG8 Ground 27 9 DS3 9R 9T Signal 47 FRG9 Ground 48 10 DS3 10R 10T Signal 4 FRG10 Ground 25 11 DS3 11R 11T Signal 24 FRG11 Ground 3 12 DS3 12R 12T...

Page 81: ... 19R 19T Signal 9 FRG19 Ground 30 20 DS3 20R 20T Signal 49 FRG20 Ground 50 21 DS3 21R 21T Signal 28 FRG21 Ground 7 22 DS3 22R 22T Signal 5 FRG22 Ground 26 23 DS3 23R 23T Signal 45 FRG23 Ground 46 24 DS3 24R 24T Signal 43 FRG24 Ground 44 Connectors J20 J27 Ports 25 48 25 DS3 25R 25T Signal 40 FRG25 Ground 19 26 DS3 26R 26T Signal 17 FRG26 Ground 38 27 DS3 27R 27T Signal 57 FRG27 Ground 58 28 DS3 28...

Page 82: ...Ground 48 34 DS3 34R 34T Signal 4 FRG34 Ground 25 35 DS3 35R 35T Signal 24 FRG35 Ground 3 36 DS3 36R 36T Signal 1 FRG36 Ground 22 37 DS3 37R 37T Signal 59 FRG37 Ground 60 38 DS3 38R 38T Signal 16 FRG38 Ground 37 39 DS3 39R 39T Signal 36 FRG39 Ground 15 40 DS3 40R 40T Signal 55 FRG40 Ground 56 41 DS3 41R 41T Signal 12 FRG41 Ground 33 42 DS3 42R 42T Signal 32 FRG42 Ground 11 43 DS3 43R 43T Signal 9 ...

Page 83: ... 45 DS3 45R 45T Signal 28 FRG45 Ground 7 46 DS3 46R 46T Signal 5 FRG46 Ground 26 47 DS3 47R 47T Signal 45 FRG47 Ground 46 48 DS3 48R 48T Signal 43 FRG48 Ground 44 Notes 1 Lead designation for EC1 connection for cable x should be read as EC1 xR xT instead of DS3 xR xT where x is a number from 1 to 48 Coaxial cable Lead designation Name Connector pin ...

Page 84: ...lane connects to the IN of the DSX and the OUT of the 1665 DMX High Capacity shelf backplane connects to the OUT of the DSX TMUX cable options are listed in Table 1 7 DS3 EC1 or TMUX cable assemblies p 1 44 TMUX transmission connections are in Table 1 9 12TMUX transmission connections p 1 57 Total of four function groups fully cabled will have 48 DS3 drop capacity Procedure Proceed as follows 1 Re...

Page 85: ...ation for 1665 Data Multiplexer 1665 DMX 365 372 304R7 1 Issue 1 November 2007 1 5 5 Figure 1 16 12TMUX cable installation 3 Route the cables along the backplane and out of the bay to the DSX per Figure 1 17 TMUX cable routing p 1 56 OUT IN OUT IN IN OUT IN OUT ...

Page 86: ...ong the cable rack and into the terminating bay DSX or other terminating transmission equipment 5 Cut the cables to desired length and install the BNC connectors shipped with the cable assemblies Important When installing BNC connectors follow the manufacturer s instruction carefully to ensure a proper connection Failure to do so may result in faulty DS3 signals as a result of improperly installed...

Page 87: ...le Lead designation Name Connector pin 1 DS3 1R 1T Signal 40 FRG1 Ground 39 2 DS3 2R 2T Signal 17 FRG2 Ground 18 3 DS3 3R 3T Signal 57 FRG3 Ground 58 4 DS3 4R 4T Signal 13 FRG4 Ground 14 5 DS3 5R 5T Signal 53 FRG5 Ground 54 6 DS3 6R 6T Signal 10 FRG6 Ground 11 7 DS3 7R 7T Signal 51 FRG8 Ground 50 8 DS3 8R 8T Signal 6 FRG8 Ground 7 9 DS3 9R 9T Signal 47 FRG9 Ground 46 10 DS3 10R 10T Signal 4 FRG10 ...

Page 88: ...ted directly to SFP modules on circuit pack faceplates if applicable Procedure Proceed as follows 1 Refer to the engineering job specification Obtain the 100BASE TX Ethernet cables per Table 1 10 10 100BaseT Ethernet cable assemblies p 1 60 and note the function group where each cable will be used Label the cables indicating bay shelf and function group A B C or D at each end 2 Connect the functio...

Page 89: ...1 15 DS3 EC1 and 48TMUX cable routing p 1 43 4 Route the cables along the cable rack and into the terminating bay 5 Cut cable to length and punch down cable to the 110 block Refer to Table 1 11 10 100BaseT Ethernet connections p 1 61 for pin out assignments OUT IN OUT IN IN OUT IN OUT CAUTION The LNW66 LNW71 and LNW74 10 100BaseT Ethernet packs do not have lightning protection for the metallic con...

Page 90: ...n Appendix E Installation checklist E N D O F S T E P S Table 1 10 10 100BaseT Ethernet cable assemblies Description Cable assembly Cable length feet 1665 DMX backplane connections 10 100baseT Ethernet cable 848819090 8 J1A ports 1 12 J2A ports 13 24 J3B ports 1 12 J4B ports 13 24 J6C ports 1 12 J5C ports 13 24 J8D ports 1 12 J7D ports 13 24 NOTE LNW74 has only ports 1 12 and ports 13 16 848778114...

Page 91: ...5 26 T T 3 6 15 3 R BL 7 28 R R 1 2 W S 6 27 T T 3 6 16 4 R G 46 45 R R 1 2 R O 4 25 T T 3 6 17 5 R S 56 55 R R 1 2 R BR 13 34 T T 3 6 18 6 BK O 11 32 R R 1 2 BK BL 10 31 T T 3 6 19 7 BK BR 54 53 R R 1 2 BK G 12 33 T T 3 6 20 8 Y BL 52 51 R R 1 2 BK S 9 30 T T 3 6 21 9 Y G 19 40 R R 1 2 Y O 18 39 T T 3 6 22 10 Y S 58 57 R R 1 2 Y BR 16 37 T T 3 6 23 11 V O 60 59 R R 1 2 V BL 17 38 T T 3 6 24 12 V ...

Page 92: ...ssue 1 November 2007 Ethernet cabling to SFP modules on circuit pack faceplates Description Use this section to run Category 5e cables to the SFP modules on the front of LNW63 LNW64 LNW70 or LNW170 Ethernet circuit packs Refer to Figure 1 19 Procedure Proceed as follows 1 Refer to Figure 1 19 Figure 1 19 Ethernet cable routing to faceplate SFP modules ...

Page 93: ...S T E P S Description Cable assembly Cable length feet GbE Ethernet cables CAT5e Gigabit Ethernet shielded connectorized on both ends with straight RJ45 connector 849010483 5 849010491 10 849010509 15 849010517 20 849010525 25 849010533 30 849010541 40 849010558 50 849010566 60 849010574 70 849010582 80 849010590 90 849010608 100 849010616 110 849010624 120 849010632 130 849010640 140 849010657 15...

Page 94: ...e cable is available in two configurations cross over and straight through and may be connected to either the front or rear of the 1665 DMX High Capacity shelf The following tables provide additional information Table 1 13 LAN 10BaseT cable assemblies p 1 67 Table 1 14 LAN 10BaseT cross over cable connections p 1 68 Table 1 15 LAN 10BaseT straight through cable connections p 1 68 Procedure Proceed...

Page 95: ...ion to front of 1665 DMX High Capacity shelf Important The above Figure shows a standard 1665 DMX shelf as reference only The placement of the packs and PC lan port are the same on the 1665 DMX High Capacity shelf OUT IN OUT IN OUT IN OUT IN OUT IN 1 1 1 1 2 2 2 2 3 3 4 4 OFF ON BRK A 20A ON OFF ON BRK B 20A ON OUT IN To PC LAN port cross over cable or hub port straight thru cable ...

Page 96: ...007 Figure 1 21 IAO LAN TCP IP cable installation to rear of 1665 DMX High Capacity shelf 3 If a cross over cable is used route the cable to the desired PC LAN port If a straight through cable is used route the cable to the desired hub port location 4 Check off the appropriate box in Appendix E Installation checklist E N D O F S T E P S LAN Cable ...

Page 97: ...s over cable 109321810 10 SYSCTL LAN jack J16 IAO LAN 848605028 50 848605036 100 848605051 150 848605069 200 848605077 300 LAN 10BaseT straight through cable 109321836 20 SYSCTL LAN jack J16 IAO LAN 109321844 30 109321851 40 848604948 50 109321869 60 109321877 70 109321885 80 109321893 90 848604955 100 109321901 110 109321919 120 109321927 130 109321935 140 848604963 150 109321943 160 109321950 18...

Page 98: ...ovember 2007 Table 1 14 LAN 10BaseT cross over cable connections Table 1 15 LAN 10BaseT straight through cable connections Connection 1665 DMX High Capacity shelf f bkpl Color Other side J16 IAO LAN 1 BL W 3 2 W BL 6 3 O W 1 6 W O 2 Connection 1665 DMX High Capacity shelf bkpl Color Other side J16 IAO LAN 1 BL W 1 2 W BL 2 3 O W 3 6 W O 6 ...

Page 99: ...city shelf to be accessed remotely via dial up Important Perform this procedure for the shelf that will be directly connected to a modem or a distribution frame if specified in the order Procedure Proceed as follows 1 Obtain the modem cable per Table 1 16 Modem cable assemblies p 1 71 Connect the RJ45 end of the modem cable to the MODEM port J17 of 1665 DMX High Capacity shelf See Figure 1 22 Mode...

Page 100: ...r 2007 Figure 1 22 Modem cable installation 2 Route the modem cable out of the 1665 DMX High Capacity shelf bay to the modem or distribution frame 3 Dress and tie the modem cable to the 1665 DMX High Capacity shelf backplane per Figure 1 22 Modem cable installation p 1 70 4 Connect the modem cable to the modem or distribution frame ...

Page 101: ...stallation checklist E N D O F S T E P S Table 1 16 Modem cable assemblies Table 1 17 Modem cable connections Description Cable assembly Cable length feet 1665 DMX High Capacity shelf connections Modem cable 848756508 50 J17 MODEM 848756524 100 848756516 150 848756532 250 Connection RJ45 connector pin Color DB25 Connector Pin Modem cable J17 1 W O 8 2 BR 20 3 W BL 3 5 O Shield 7 6 G 2 ...

Page 102: ...ed This procedure should be performed on each 1665 DMX High Capacity shelf requiring an external timing source There are two types of cables available 1 Sync cable with a molded D Sub 9 Pin DB 9 connector 2 Sync cable with a wire wrap DB 9 connector Important Each of the Sync connections on the backplane provides an input gray and output red termination for timing Refer to Table 1 19 Synchronizati...

Page 103: ...or installation 2 Route the cable to proper location and cut to desired length 3 Terminate the wires in the red jacket for an output signal 4 Terminate the wires in the gray jacket for an input signal 5 Repeat Step 1 through Step 4 to connect the Sync cable to the SYNC2 J14 port TO DS1 SYNCHRONOUS TIMING REFERENCE CABLE TIE TYPICAL TIE CABLE ASSY S TO CABLE SUPPORT BAR AS REQUIRED ...

Page 104: ...nc cable with wire wrap DB 9 connector procedure Perform the following steps when using the Sync cable with the wire wrap DB 9 connector 1 Connect the wire wrap DB 9 connector to SYNC1 J9 Refer to Figure 1 24 Sync cable with wire wrap connector installation p 1 74 Figure 1 24 Sync cable with wire wrap connector installation TO DS1 SYNCHRONOUS TIMING REFERENCE CABLE TIE TYPICAL TIE CABLE ASSY S TO ...

Page 105: ...D Sub connector for an output signal 3 Wire wrap Rx2 and Tx2 gray cable on the D Sub connector for an input signal 4 Route the cable to proper location and cut to desire length 5 Terminate the other end to a clock source or equipment 6 Repeat Step 1 through Step 5 for SYNC2 J14 connection 7 Check off the appropriate box in Appendix E Installation checklist E N D O F S T E P S ...

Page 106: ...100 848923371 125 848839635 150 848923389 175 848923439 200 848923447 225 848839643 250 848923454 275 848923462 300 848839650 450 Sync cable with wire wrap DB 9 connector DS1 timing reference for DS1 external sync in out timing 848631255 50 848631271 100 848631289 150 848631297 250 848631305 450 Sync cable with filter connector sync input signal only DS1 timing reference for DS1 external sync in t...

Page 107: ...304R7 1 Issue 1 November 2007 1 7 7 Table 1 19 Synchronization cable DS1 timing reference connections Conn Jacket Color 9 Pin conn Special conn Designation Name Sync1 J9 Sync2 J14 Red BL 1 Rx1 RGO1 RGO2 Sync Output W 6 Tx1 TPO1 TPO2 Gray BL 2 Rx2 RGI1 RGI2 Sync Input W 7 Tx2 TPI1 TPI2 Drain 5 GND GRD ...

Page 108: ...n the voltage and current limits If these protection devices are not sufficient an external buffer relay MUST be provided In all cases and as a matter of good practice suppression devices such as diodes or contact protection networks must be provided across any external relay coil being driven by the 1665 DMX High Capacity shelf to limit transient voltages and currents Office alarm cable assemblie...

Page 109: ...arm cable to ALM J12 of the bottom 1665 DMX High Capacity shelf 2 Route the office alarm cable from the bottom shelf out of the 1665 DMX High Capacity shelf bay per Figure 1 25 Office alarm cable installation p 1 79 to the office alarm panel Figure 1 25 Office alarm cable installation 3 Inspect the office alarm panel and add a contact protection network if required CABLE TIE TYPICAL TIE CABLE ASSY...

Page 110: ...office alarms in a bay to the bottom shelf In this procedure the bottom shelf is multed to the shelf immediately above That shelf is then multed to the shelf above it Continue until the top shelf is connected Important In order for office alarms in a shelf other than the bottom shelf to be reported all office alarm cable mults from that shelf to the bottom shelf must be in place No shelf should be...

Page 111: ...65 372 304R7 1 Issue 1 November 2007 1 8 1 Figure 1 26 Office alarm mult cable installation 848589602 CABLE ASSEMBLY CONNECT THIS END OF CABLE ASSEMBLY AS FOLLOWS FROM TO PATCH CONNECTOR TO PANEL POSITION OFFICE ALARM MULT J13 ALM MULT CONNECT OTHER END OF CABLE ASSEMBLY TO SUCCEEDING DMX SHELF J12 ALM ...

Page 112: ... 4 Check off the appropriate box in Appendix E Installation checklist E N D O F S T E P S Table 1 20 Office alarm cable assemblies Description Cable assembly Cable length feet 1665 DMX backplane connections Office alarm cable 848558193 50 J12 848562286 100 848562294 150 848562302 250 Office alarm mult cable DMX to DMX 848589602 3 J13 Office alarm mult cable DMX to Lambda Unite 848861530 3 J13 ...

Page 113: ... RYMNV2 RYMNA1 RYMNA2 Minor Alarm Visible Minor Alarm Visible Return Minor Alarm Audible Minor Alarm Audible Return 9 10 11 12 S W W S BL R R BL RYCRV1 RYCRV2 RYCRA1 RYCRA2 Critical Alarm Visible Critical Alarm Visible Return Critical Alarm Audible Critical Alarm Audible Return Notes 1 The SYSCTL circuit pack reports office alarms 2 The connection to the central office alarms from P12 is run for e...

Page 114: ... to remotely initiate up to four contact closures at the remote terminal RT for equipment operation such as pumps generators etc The environmental alarm status indications allow up to 23 miscellaneous user settable alarm status indications SI at the remote terminal for transmission toward the central office Miscellaneous environmental discrete telemetry cable assemblies and the length options are ...

Page 115: ... Miscellaneous discrete cable installation p 1 85 to the telemetry panel 3 Cut the miscellaneous environmental discrete telemetry cable to the desired length at the telemetry panel 4 Wire wrap the loose end of the miscellaneous environmental discrete telemetry cable to the wire wrap terminal strip making connections per Table 1 23 Miscellaneous environmental discrete telemetry connections p 1 87 T...

Page 116: ... input common and the other lead should be connected to the appropriate alarm indication For each output one lead should be connected to output common and the other lead should be connected to the appropriate alarm indication 5 Check off the appropriate box in Appendix E Installation checklist E N D O F S T E P S Table 1 22 Miscellaneous discrete cable assemblies Description Cable assembly Cable l...

Page 117: ... Input 4 5 6 7 8 G W W G BR W W BR TLMI5 TLMI6 TLMI7 TLMI8 Env Input 5 Env Input 6 Env Input 7 Env Input 8 9 10 11 12 S W W S BL R R BL TLMI9 TLMI10 TLMI11 TLMI12 Env Input 9 Env Input 10 Env Input 11 Env Input 12 13 14 15 16 O R R O G R R G TLMI13 TLMI14 TLMI15 TLMI16 Env Input 13 Env Input 14 Env Input 15 Env Input 16 17 18 19 20 BR R R BR S R R S TLMI17 TLMI18 TLMI19 TLMIC48VTRN Env Input 17 En...

Page 118: ... OLIUs Important The optical fiber cable is fragile and must be protected The fibers should be placed in a protective tube or channel such as PVC tubing or PANDUIT cable channel when running the cable from the 1665 DMX High Capacity shelf to the cable rack The fibers should be placed in the cable rack in a protective channel with nothing on top of them Cable ties should NOT be used with the optica...

Page 119: ...1 Route the optical fiber cables from the interconnecting equipment into the 1665 DMX High Capacity shelf Important Protective covers must be left on fibers 2 Place the optical fiber cables in a protective tube or channel 3 Label the optical fiber cables indicating bay shelf pack and direction IN or OUT 4 Check off the appropriate box in Appendix E Installation checklist E N D O F S T E P S ...

Page 120: ...e protected The fibers should be placed in a protective tube or channel such as PVC tubing or PANDUIT cable channel when running the cable from the 1665 DMX to the cable rack The fibers should be placed in the cable rack in a protective channel with nothing on top of them Cable ties should NOT be used with the optical fiber cables Important Ensure only ANGLED LC connectors appear at IN ports of op...

Page 121: ...ill be inserted The OC 3 OC 12 OC 48 pack can be inserted into any of the function slots including the growth slots 2 Label the optical fiber cables indicating bay shelf function group pack and direction IN or OUT 3 Route optical fiber cables from the interconnecting equipment into the OC 3 OC 12 OC 48 optical ports 4 Place the optical fiber cables in a protective tube or channel 5 Check off the a...

Page 122: ...ective tube or channel such as PVC tubing or PANDUIT cable channel when running the cable from the 1665 DMX High Capacity shelf to the cable rack The fibers should be placed in the cable rack in a protective channel with nothing on top of them Cable ties should NOT be used with the optical fiber cables Unterminated optical connectors may emit laser radiation Do not view an unterminated optical con...

Page 123: ...ports can be used when LNW74 is located in the Growth 1 position 2 Label the optical fiber cables indicating bay shelf function group pack and direction IN or OUT 3 Route optical fiber cables from the interconnecting equipment into the optical ports 4 Place the optical fiber cables in a protective tube or channel 5 Check off the appropriate box in Appendix E Installation checklist E N D O F S T E ...

Page 124: ...channel such as PVC tubing or PANDUIT cable channel when running the cable from the 1665 DMX to the cable rack The fibers should be placed in the cable rack in a protective channel with nothing on top of them Cable ties should NOT be used with the optical fiber cables Unterminated optical connectors may emit laser radiation Do not view an unterminated optical connector with optical instruments Inv...

Page 125: ...9 5 2 Label the optical fiber cables indicating bay shelf function group pack and direction IN or OUT 3 Route optical fiber cables from the interconnecting equipment into the optical ports 4 Place the optical fiber cables in a protective tube or channel 5 Check off the appropriate box in Appendix E Installation checklist E N D O F S T E P S ...

Page 126: ...serial port This will allow communications between the PC and the CIT port located on the LNW2 Procedure 1 Connect the RJ45 end of the CIT cable to the CIT jack located on the LNW2 SYSCTL Refer to Figure 1 28 CIT cable installation p 1 97 Important The LNW2 SYSCTL is not in the shelf at this time this procedure is here to demonstrate the placement of the cable once the circuit pack is in place 2 C...

Page 127: ...ovember 2007 1 9 7 Figure 1 28 CIT cable installation 3 Check off the appropriate box in Appendix E Installation checklist E N D O F S T E P S Table 1 24 CIT Cable Assembly Description Cable assembly Cable length 1665 DMX High Capacity shelf connections Front CIT cable 848748869 8 feet CIT RS 232 jack on SYSCTL LNW2 ...

Page 128: ...G 5 Ground 5 FTXD O 2 Receive Data 6 FRXD G 3 Transmit Data Notes 1 The connection and the colors shown above are for a standard Lucent made cable If you use a RJ 45 to DB 9 connector with a standard straight through 10BaseT LAN cable refer to Table 1 26 RJ 45 to DB 9 connector connections p 1 98 From RJ45 connector To 9 pin D type connector Pin Color Pin 1 Blue 6 3 Black 4 4 Red 5 5 Green 2 6 Yel...

Page 129: ...tion Final check on equipment and cable installation Procedure Proceed as follows 1 Verify that all the cables are properly dressed connected 2 Verify that all cables are properly labeled 3 Verify that designations where cables were wire wrapped are properly labeled 4 Check off the appropriate box in Appendix E Installation checklist E N D O F S T E P S ...

Page 130: ... Final operations Equipment and cable installation for 1665 Data Multiplexer 1665 DMX 1 1 0 0 365 372 304R7 1 Issue 1 November 2007 ...

Page 131: ...orming the following Shelf powering Circuit pack option settings and installation Detailed information on the function of each circuit pack is contained in 365 372 300 1665 Data Multiplexer Applications and Planning Guide Contents This chapter provides information on the following topics Description 2 2 Powering 2 3 Circuit pack compatibility 2 7 Initial circuit pack installation 2 12 ...

Page 132: ...nting brackets installing the interfacing cables and for setting the circuit breakers to the OFF position 1 ESD Wrist Strap A wrist strap must be worn when handling circuit packs Use the electrostatic discharge ESD jack provided on the shelf 1 Multimeter Optional The voltmeter must be capable of measuring DC voltage in the 40 to 60 volt range The use of the voltmeter is optional since the shelf wi...

Page 133: ...y that the frame or structure into which the 1665 DMX High Capacity shelf is installed is properly grounded 2 Verify that both circuit breakers on the 1665 DMX High Capacity shelf are in the ON position These breakers are located on the front of the 1665 DMX High Capacity shelf 3 Disconnect the power cables from the backplane connectors P15 from J15 and P14 from J14 Item Description Voltage range ...

Page 134: ...reakers are being used use circuit breakers that are rated 1 25 times higher than the circuit breaker value on the shelf in the BDCBB that powers the 1665 DMX High Capacity shelf Then switch the breakers to the ON position for the 1665 DMX High Capacity shelf A and B feeders Important The 30 ampere shelf is comcode 848793287 The 20 ampere shelf is comcode 848935193 J8 D OUT J6 C OUT J19 INTEROP J1...

Page 135: ...s to the OFF position 8 Reconnect the A feed of the power cable to the backplane connector P14 to J14 and reconnect the B feed of the power cable to the backplane connector P15 to J15 9 Place both circuit breakers on the 1665 DMX High Capacity shelf in the ON position 10 Verify that the fans have started running 11 At the BDFB either remove the fuse or put the circuit breaker associated with the B...

Page 136: ...s lighted with only the B feed powered 15 At the BDFB either insert the fuse or put the circuit breaker associated with the A feed of the 1665 DMX High Capacity shelf in the ON position 16 Verify that the both the PWR A LED and PWR B LED on the 1665 DMX High Capacity shelf user panel are lighted with both the A and B feeds powered 17 Verify that the fans are still running and are moving air 18 Che...

Page 137: ...7 1 circuit pack compatibility Slot name A1 A2 B1 B2 G1 M1 CTL G2 M2 C1 C2 D1 D2 LNW2 LNW6 LNW6 LNW6 LNW6 LNW7 LNW7 LNW7 LNW7 LNW8 LNW8 LNW8 LNW8 LNW16 LNW16 LNW16 LNW16 LNW18 LNW18 LNW18 LNW18 LNW19 LNW19 LNW19 LNW19 LNW19B LNW19B LNW19B LNW19B LNW20 LNW20 LNW20 LNW20 LNW20 LNW20 LNW27 LNW27 LNW29 LNW29 LNW31 LNW31 LNW31 LNW31 LNW31 LNW31 LNW32 LNW32 LNW36 LNW36 LNW36 LNW36 LNW36 LNW36 LNW37 LNW3...

Page 138: ...66 LNW66 LNW66 LNW66 LNW67 LNW67 LNW67 LNW67 LNW67 LNW67 LNW68 LNW68 LNW68 LNW68 LNW68 LNW68 LNW70 LNW70 LNW70 LNW70 LNW70 LNW70 LNW71 LNW71 LNW71 LNW71 LNW73 LNW73 LNW73 LNW73 LNW73 LNW73 LNW73C LNW73C LNW73C LNW73C LNW73C LNW73C LNW74 LNW74 LNW74 LNW74 LNW74 LNW74 LNW76 LNW76 LNW78 LNW78 LNW78 LNW78 LNW78 LNW78 LNW80 LNW80 LNW82 LNW82 LNW93 LNW93 LNW93 LNW93 LNW94 LNW94 LNW94 LNW94 LNW97 LNW98 L...

Page 139: ...e alarm would be raised Important LNW26B LNW28 LNW77 and the LNW1xxB series circuit packs are not supported in R7 1 OC 12 Circuit Packs with 12 STS 1 switch fabric LNW48 LNW50 LNW54 OC 48 Circuit Packs with 12 STS 1 switch fabric Important LNW26B LNW28 LNW77 and the LNW1xxB series circuit packs are not supported in R7 1 LNW202 LNW202 LNW221 to LNW259 LNW221 to LNW259 LNW421 to LNW459 LNW421 to LNW...

Page 140: ...it Packs with 48 STS 1 switch fabric LNW27 LNW29 LNW32 LNW76 LNW202 LNW221 259 OC 192 Circuit Packs with 48 STS 1 switch fabric LNW56 LNW57 LNW58 LNW60 LNW502 LNW523 LNW527 LNW554 LNW555 Main Switch Pack no optics with 96 STS 1 switch fabric LNW80 OC 192 Circuit Packs with 192 STS 1 switch fabric VLF LNW59 LNW82 Once a high speed OLIU is installed and placed in service another OLIU with a differen...

Page 141: ...Circuit pack compatibility Powering and initial circuit pack installation for 1665 Data Multiplexer 1665 DMX 365 372 304R7 1 Issue 1 November 2007 2 1 1 Figure 2 2 1665 DMX High Capacity shelf ...

Page 142: ...erforming the procedures in this section to prevent spurious alarms from being reported Reconnect the office alarm cable after completion of all testing To protect against damage due to electrostatic discharge a properly grounded ESD wrist strap must be worn when handling equipment Important When only one main OLIU OC 12 OC 48 OC 192 or main switch pack LNW80 is required it must be installed in th...

Page 143: ...elf LNW27 LNW29 LNW32 LNW76 LNW202 SFP optics LNW221 259 Important From your work orders determine the wavelength that you wish to set on the LNW221 LNW259 Use the Channel Select Option Label on the faceplate of the circuit pack to determine the correct channel Refer to Figure 2 3 LNW221 259 channel positions p 2 15 for channel jumper location 1 Remove the first OC 48 OLIU circuit pack from the pa...

Page 144: ...lf See Figure 2 2 1665 DMX High Capacity shelf p 2 11 6 Place the second OLIU circuit pack into the M2 slot on the 1665 DMX High Capacity shelf Do NOT engage the circuit pack in the backplane connector Important If any of the Main slots are to remain unequipped install a blank circuit pack to provide proper air flow for cooling 7 Check off the appropriate box in Appendix E Installation checklist E...

Page 145: ...ue 1 November 2007 2 1 5 Figure 2 3 LNW221 259 channel positions OC192 main OLIU installation Follow this procedure to install the following OC 192 OLIU circuit packs in the 1665 DMX High Capacity shelf LNW56 LNW57 LNW58 LNW59 VLF LNW60 LNW502 SFP optics LNW523 LNW527 LNW554 LNW555 Connector Side nc dmx 244 Faceplate Side X Y CH X CH Y ...

Page 146: ... M2 slot on the 1665 DMX High Capacity shelf See Figure 2 2 1665 DMX High Capacity shelf p 2 11 6 Place the second OLIU circuit pack into the M2 slot on the 1665 DMX High Capacity shelf Do NOT engage the circuit pack in the backplane connector Important If any of the Main slots are to remain unequipped install a blank circuit pack to provide proper air flow for cooling Always use Main 1 M1 for she...

Page 147: ...slot on the 1665 DMX High Capacity shelf Do NOT engage the circuit pack in the backplane connector Important If any of the Main slots are to remain unequipped install a blank circuit pack to provide proper air flow for cooling Always use Main 1 M1 for shelves equipped with only one main pack 7 Check off the appropriate box in Appendix E Installation checklist E N D O F S T E P S 8OC 3 8OC 12 2OC 4...

Page 148: ...apacity shelf p 2 11 6 Place the second OLIU circuit pack into the M2 slot on the 1665 DMX High Capacity shelf Do NOT engage the circuit pack in the backplane connector Important If any of the Main slots are to remain unequipped install a blank circuit pack to provide proper air flow for cooling Always use Main 1 M1 for shelves equipped with only one main pack 7 Check off the appropriate box in Ap...

Page 149: ...ipped install a blank circuit pack to provide proper air flow for cooling 7 Check off the appropriate box in Appendix E Installation checklist E N D O F S T E P S LNW785 OMD5 8 8 channel low loss DWDM Optical Mux Demux Follow this procedure to install the LNW785 circuit packs in the 1665 DMX High Capacity shelf The LNW785 OMD5 8 circuit pack multiplexes demultiplexes up to 8 DWDM optical channels ...

Page 150: ...DS1E1 circuit packs into the 1665 DMX High Capacity shelf Important LNW6 and LNW7 are not supported with LNW59 VLF main circuit packs 1 Refer to the engineering job specification Identify the proper function group slots where LNW6 LNW7 or LNW8 circuit packs will be installed 2 Remove the LNW6 LNW7 or LNW8 from the packing material 3 Place the circuit pack into the shelf slot A1 B1 C1 or D1 as requ...

Page 151: ...NW19B 48 DS3 EC1 supporting Terminal Loopbacks or LNW20 48TMUX circuit packs into the 1665 DMX shelf 1 Refer to the engineering job specification Identify the proper function group s where LNW16 LNW18 LNW19 LNW19B or LNW20 circuit packs will be installed 2 Remove the LNW16 LNW18 LNW19 LNW19B or LNW20 from the packing material 3 Place the circuit pack into the shelf slot A1 B1 C1 D1 or G1 as requir...

Page 152: ...NW16 LNW18 LNW19 LNW19B or LNW20 circuit packs 8 Check off the appropriate box in Appendix E Installation checklist E N D O F S T E P S LNW36 OC 3 OLIU low speed installation optional Follow this procedure only if installing LNW36 OC3 OLIU circuit packs into the 1665 DMX shelf Important LNW36 and LNW37 may be used as a protection pair LNW36 may be replaced with LNW37 and vice versa as long as the ...

Page 153: ... packs 8 Check off the appropriate box in Appendix E Installation checklist E N D O F S T E P S LNW37 4 OC 3 SFP OLIU LNW45 8 OC 3 SFP OLIU LNW49 4 OC 12 SFP OLIU LNW55 12OC 3 12OC12 4 OC48 SFP OLIU or LNW62 4 OC 48 SFP OLIU low speed installation optional Follow this procedure only if installing the LNW37 4 OC 3 SFP OLIU LNW45 8 OC 3 SFP OLIU LNW49 4 OC 12 SFP OLIU LNW55 12 OC 3 12 OC 12 4 OC 48 ...

Page 154: ...tinue with Step 5 If not install a blank circuit pack into the companion circuit pack slot A2 B2 C2 D2 or G2 as required then proceed to Step 7 Important Blank circuit packs are required in all unused slots to provide proper air flow for cooling 5 Remove the second OLIU from the packing material 6 Place the circuit pack into the shelf slot A2 B2 C2 D2 or G2 as required Do NOT engage the circuit pa...

Page 155: ... into the shelf slot A1 B1 C1 D1 or G1 as required Do NOT engage the circuit pack in the backplane connector 4 If a companion circuit pack is required continue with Step 5 If not install a blank circuit pack into the companion circuit pack slot A2 B2 C2 D2 or G2 as required then proceed to Step 7 Important Blank circuit packs are required in all unused slots to provide proper air flow for cooling ...

Page 156: ... into the shelf slot A1 B1 C1 D1 or G1 as required Do NOT engage the circuit pack in the backplane connector 4 If a companion circuit pack is required continue with Step 5 If not install a blank circuit pack into the companion circuit pack slot A2 B2 C2 D2 or G2 as required then proceed to Step 7 Important Blank circuit packs are required in all unused slots to provide proper air flow for cooling ...

Page 157: ...portant The LNW66 or LNW71 circuit pack can only be installed in slot 1 of any function group 2 Remove the LNW66 or LNW71 from the packing material 3 Place the circuit pack into the shelf slot A1 B1 C1 or D1 as required Do NOT engage the circuit pack in the backplane connector 4 Install a blank circuit pack into the companion circuit pack slot A2 B2 C2 or D2 as required Important Blank circuit pac...

Page 158: ...roup slot A1 A2 B1 B2 C1 C2 D1 D2 G1 or G2 where the LNW70 LNW74 LNW63 LNW64 LNW78 or LNW170 circuit pack will be installed Important When LNW74 is installed in the G1 or G2 position only the faceplate optical 100 Base F ports are available for use The LNW70 LNW74 LNW63 LNW64 LNW78 and LNW170 circuit packs can only be installed in slot 1 of any function group unless the mains are equipped with LNW...

Page 159: ...entify the proper function group slot A1 A2 B1 B2 C1 C2 D1 D2 and or growth slot G1 or G2 where the LNW67 circuit pack will be installed Important Unless equipped with LNW59 VLF mains the LNW67 circuit pack can only be installed in slot 1 of any function group or growth slot 1 2 Remove the LNW67 from the packing material 3 Place the circuit pack into the shelf fn slot as required Do NOT engage the...

Page 160: ...stallation Powering and initial circuit pack installation for 1665 Data Multiplexer 1665 DMX 2 3 0 365 372 304R7 1 Issue 1 November 2007 6 Check off the appropriate box in Appendix E Installation checklist E N D O F S T E P S ...

Page 161: ...helf fn slot as required Do NOT engage the circuit pack in the backplane connector 4 Install a blank circuit pack into the companion circuit pack slot as required Important Blank circuit packs are required in all unused slots to provide proper air flow for cooling 5 Repeat Step 1 through Step 4 for each additional function group and or growth slot to be equipped with or LNW68 circuit packs 6 Check...

Page 162: ...ion group or growth slot 1 2 Remove the LNW73 or LNW73C from the packing material 3 Place the circuit pack into the shelf fn slot as required Do NOT engage the circuit pack in the backplane connector 4 Install a blank circuit pack into the companion circuit pack slot as required Important Blank circuit packs are required in all unused slots to provide proper air flow for cooling 5 Repeat Step 1 th...

Page 163: ... an unequipped slot on the shelf 4 Continue with the next unequipped slot until all the unused slots are equipped with an 177D Apparatus Blank or LNW98 Detectable Blank 5 Check off the appropriate box in Appendix E Installation checklist E N D O F S T E P S 177E LNW97 blank CP installation optional Follow this procedure to install 177E Apparatus Blank s or LNW97 Detectable Blank s into the 1665 DM...

Page 164: ...ed with a dust plug installed into the ports to maintain cleanliness during storage and or transportation It is recommended that the dust plug be kept in place to maintain cleanliness With proper care and handling cleaning the pluggable modules should not be necessary 2 Check the ports for cleanliness and clean the pluggable module if necessary See Appendix B Fiber cleaning 3 Insert the pluggable ...

Page 165: ...stallation Powering and initial circuit pack installation for 1665 Data Multiplexer 1665 DMX 365 372 304R7 1 Issue 1 November 2007 2 3 5 5 Check off the appropriate box in Appendix E Installation checklist E N D O F S T E P S ...

Page 166: ... Initial circuit pack installation Powering and initial circuit pack installation for 1665 Data Multiplexer 1665 DMX 2 3 6 365 372 304R7 1 Issue 1 November 2007 ...

Page 167: ...plexer 1665 DMX stand alone installation tests to verify correct interconnect cabling alarm cabling and as required external timing and communication cabling This section also covers circuit pack installation fully seated Contents This section is organized into the following chapters Software download and circuit pack installation Chapter 3 Installation tests Chapter 4 Operational tests Chapter 5 ...

Page 168: ... 1665 Data Multiplexer 1665 DMX stand alone installation tests I I 2 365 372 304R7 1 Issue 1 November 2007 ...

Page 169: ...ies Listed below are the required tools test equipment and accessories Software installation 3 4 Circuit pack installation 3 5 Use of WaveStar CIT software 3 9 Circuit pack firmware version verification 3 12 1665 DMX shelf initialization 3 13 Provision enable disable TCP IP on an IAO LAN port 3 14 Reset system date and time 3 17 Provision Enable disable the 1665 DMX as a TL1 TCP IP GNE 3 18 Quanti...

Page 170: ...front of the SYSCTL circuit pack CAT5 Ethernet cable with either a 10 100 hub or a cross over cable for the LAN CIT or IAO LAN ports LBOs 20 dB for LNW60 15 dB 10 dB and 5 dB LBOs are required when looping back the main OLIUs on themselves Components Minimum Recommended Processor Pentium 266 MHz Pentium IV 1 GHz RAM 1 system view 128 MB 512 MB RAM up to 5 system views 256 MB 1 GB Virtual Memory 13...

Page 171: ...multiple NE types the processor type and speed and the memory size will all factor into CIT performance Internet Browser Internet Explorer 5 0 5 5 6 0 7 0 Internet Explorer 5 0 5 5 6 0 7 0 _________________________________________________________ Available hard disk space required to install and store the CIT and Generic Software is approximately 250 MB it is 550 MB if all graphical packages are i...

Page 172: ...Software installation Description Software installation is accomplished by performing the appropriate software download procedures in the Software Release Description SRD which is shipped with the software When the software installation is complete check off the appropriate box in Appendix E Installation checklist ...

Page 173: ... to prevent being inserted into the wrong shelf position Installing circuit packs requires some force When a circuit pack is installed its FAULT LED will light for several seconds to possibly several minutes then extinguish A properly grounded ESD wrist strap MUST be worn when handling circuit packs Important The UPD INIT pushbutton on the SYSCTL circuit pack is recessed and will require a pointed...

Page 174: ...ck with no optics If equipped continue with Step 6 2 For circuit packs in the main slots determine if PTMs are required If the installation calls for optical interfaces to the mains locate and install the PTMs 3 Insert the proper LBO into the IN connectors of each MAIN OLIU Refer to Appendix A Laser safety and classifications and Electrostatic Discharge ESD considerations for maximum and minimum t...

Page 175: ...attached in the back of the shelf The ACTIVE and FAULT LEDs should light when circuit packs are inserted and the FAULT LED should extinguish after a short period of time Some circuit packs such as LNW67 LNW68 may take several minutes before their FAULT LEDs extinguish 7 Continue seating the circuit packs with slot A2 and then on to B1 B2 G1 G2 C1 C2 D1 and D2 8 Fully seat Blank packs in any other ...

Page 176: ...LEDs on or flashing on any of the inserted circuit packs press the UPD INIT pushbutton on the SYSCTL circuit pack Result The operation of the UPD INIT pushbutton on the SYSCTL circuit pack will update the system and should clear all standing alarms 11 If FAULT LEDs remain lit on any of the inserted circuit packs replace the respective circuit pack 12 Any other alarms will be cleared later on in th...

Page 177: ...nstallation p 3 4 Login procedure 1 Connect the PC Serial cable to the RS232 Serial jack on the front of the SYSCTL circuit pack Or connect a PC LAN cable cross over to the LAN OSI connector on the front of the SYSCTL circuit pack 2 Start the WaveStar CIT software on the PC by double clicking on the WaveStar icon that was created by the installation procedure 3 Enter the following in the Login win...

Page 178: ...Type click on the drop down menu arrow and choose Serial or OSI depending on the type of connection you are using Important An IP address must be assigned to the NIC card on the PC or laptop Otherwise you may experience login problems To assign an IP address start the DOS prompt on the computer and type the command ipconfig all The command will show an IP address line If there is no address line o...

Page 179: ...ember 2007 3 1 1 9 Click on the Graphical button The following screen appears 10 Enter the Login for the shelf User Id LUC01 Password DMX2 5G10G case sensitive 11 Click OK Result The 1665 DMX system view is displayed 12 Check off the appropriate box in Appendix E Installation checklist E N D O F S T E P S ...

Page 180: ...t packs have been installed in the shelf as described in the preceding sections Circuit pack firmware version verification procedure 1 Log on to the 1665 DMX shelf using the CIT 2 Select View Equipment 3 For each circuit pack listed in the View Equipment window highlight the CP and click Select 4 Compare the Program Version to the information provided in the Software Release Description SRD 5 If t...

Page 181: ...on assume that the SYSCTL is installed and software has been successfully downloaded and the circuit packs have all been installed in the shelf as described in the preceding sections Shelf initialization procedure 1 Log on to the 1665 DMX shelf using the CIT software as described in the Use of WaveStar CIT software p 3 9 2 Select Fault Reset Initialize System 3 Click OK and then Yes to the Warning...

Page 182: ... the IP Default Router Address if you are connecting to a router Be able to log in to a 1665 DMX with the WaveStar CIT and be familiar with the functions of the WaveStar CIT Procedure Proceed as follows 1 Use the WaveStar CIT to log in to the 1665 DMX shelf being provisioned using a Graphical connection 2 Determine which IAO LAN Port s you want to use front or rear Important If you are using the r...

Page 183: ...menu and identify the duplication then assign correct addresses as necessary Important If you select Enable and click OK to apply any changes then execute the command when requested the system may reset and you will be logged off the system Selecting Disable allows you to stay logged on to the system to perform more provisioning You can then come back to this window and enable the TCP IP function ...

Page 184: ...le disable TCP IP on an IAO LAN port Software download and circuit pack installation 3 1 6 365 372 304R7 1 Issue 1 November 2007 9 Check off the appropriate box in Appendix E Installation checklist E N D O F S T E P S ...

Page 185: ... select Administration Set Date and Time to bring up the Set Systems Date and Time screen for 1665 DMX 3 From the Date panel select the Year and Month from the pull down menus Result A calendar is displayed for the month and year selected 4 Click on the Date from the calendar 5 From the Time panel select the Hour Minute and Second from the pull down menus based upon a 12 hour clock 6 Select am or ...

Page 186: ...recautions prior to performing this task Use a static ground wrist strap whenever handling circuit packs or working on a system to prevent electrostatic discharge damage to sensitive components Before you begin Prior to performing this task you must Obtain the work instructions for this task Complete the Circuit pack firmware version verification procedure to provision and enable TCP IP for the se...

Page 187: ...red LAN port s 5 In the Data Communications window click on the TCP IP Gateway tab at the top of the window Result The TCP IP Gateway parameters display 6 From your work instructions determine which IP calling addresses will be allowed to access the 1665 DMX TL1 TCP IP GNE 7 Use the instructions on the screen to add modify or delete a gateway host from the TCP IP Gateway Host List The following pa...

Page 188: ... the TCP IP Gateway or select Disable to disable the TCP IP Gateway 9 Click Apply at the bottom of the window Result A warning window opens and asks if you want to execute this command 10 Click Yes to execute the command then click Close to exit the window if desired 11 Repeat this procedure for each TL1 TCP IP GNE to be modified enabled or disabled 12 Check off the appropriate box in Appendix E I...

Page 189: ...ltiplexer User Operations Guide Contents This chapter provides information on the following topics LBO software settings 4 4 Clearing alarms 4 7 Local equipment and cross connect tests 4 9 DS1 protection switching 4 14 DS1 cleanup procedures 4 18 DS3 EC1 and TMUX testing procedure 4 22 DS3 protection switching 4 28 DS3 cleanup procedures 4 32 LNW66 LNW71 and LNW74 10 100T TX Ethernet cabling testi...

Page 190: ...e the electrostatic discharge ESD jack provided on the shelf 1 DS1 Error Rate Test Set A DS1 error rate test set is required for testing of DS1 cabling A T BERD 2209 or equivalent is recommended 1 DS3 Error Rate Test Set A DS3 error rate test set is required for testing of DS3 EC1 and TMUX cabling A T BERD 2209 or equivalent is recommended 1 SONET Optical Test Set An OC 3 OC 12 or OC 48 test set a...

Page 191: ...oping the 1665 DMX shelf equipped with LNW60 1 Personal Computer PC Required to run the WaveStar CIT software See Chapter 3 Software download and circuit pack installation PC minimum requirements p 3 2 1 CIT Interface Cable 8 ft long RJ45 to 9 pin D sub serial cable Comcode 848748869 Required to connect the PC to the CIT jack on the front of the SYSCTL circuit pack 2 LAN 10BaseT Straight through C...

Page 192: ...S1 DS3 EC1 and TMUX circuit packs 1 Log on to the 1665 DMX shelf using the CIT software as described in the Chapter 3 Use of WaveStar CIT software p 3 9 2 Refer to the following table of cable lengths and LBO values Determine the LBO value corresponding to the DS1 cables installed 3 From the CIT GUI select Configuration Equipment 4 Select the desired DS1 port by clicking the sign next to the CP an...

Page 193: ... provisioned for DS3 Set DS3 LBO values as follows 1 Refer to the following table of cable lengths and LBO values Determine the LBO value corresponding to the DS3 TMUX cables installed Table 4 1 Cable lengths feet 2 From the CIT GUI select Configuration Equipment 3 Select the desired DS3 port by clicking the sign next to the CP 4 Highlight the port and click Select 5 Next to Line Build Out choose ...

Page 194: ... LBO software settings Installation tests 4 6 365 372 304R7 1 Issue 1 November 2007 7 Check off the appropriate box in Appendix E Installation checklist E N D O F S T E P S ...

Page 195: ...prevent DCC alarms from being generated due to the optical loopback on the main OLIUs 1 Select Configuration Timing Sync Result From the Timing Mode pull down choose Free Running 2 Click OK 3 Select Configuration DCC Terminations 4 From the Port AID pull down select dcc m1 1 5 Next to OSI Over DCC click disabled 6 Click Apply 7 From the Port AID pull down select dcc m2 1 8 Next to OSI Over DCC cli...

Page 196: ...circuit pack require either a 75 ohm termination or a loopback at the DSX 3 on all ports If loopbacks are used make sure to take down any cross connections 12 If there are still FAULT LEDs on replace the respective circuit pack 13 Disconnect the office alarm cable until all procedures and testing have been completed 14 Check off the appropriate box in Appendix E Installation checklist E N D O F S ...

Page 197: ...s installed and synchronization set to free running On initial installation turn up of 1665 DMX there are no default cross connects All cross connects need to be entered for these tests Upon completion of this test all cross connections will be deleted Important If the shelf is not fully equipped move circuit packs to unequipped function slots and repeat the test Test all circuit pack positions wh...

Page 198: ...helves If the 1665 DMX shelf is not fully populated it may be necessary to move the circuit pack s from slot to slot in order to test all DS1 cabling Procedure This command creates a cross connect to map the first DS1 of a DS1 circuit pack in a Function Unit to the first VT1 5 within the first VT Group of STS1 of the Main OLIUs 1 Log on to the 1665 DMX shelf using the CIT software as described in ...

Page 199: ...lots that are cabled to a DSX 1 and not to any terminating equipment A Function Unit slot cabled to the DSX 1 must contain a 28DS1 LNW6 or LNW7 circuit pack or a 56DS1 E1 LNW8 circuit pack in order to perform these tests If the 1665 DMX shelf is not fully populated it may be necessary to move the circuit pack s from slot to slot in order to test all DS1 cabling This procedure requires the use of a...

Page 200: ...n error free signal is not received Verify that the DS1 line coding format is set to B8ZS using the View Equipment command Verify that the LBOs are set according to cable length using the View Equipment command see Setting DS1 LBOs p 4 4 Check DS1 cabling for proper connections 7 Check off the appropriate box in Appendix E Installation checklist E N D O F S T E P S DS1 non terminating equipment tr...

Page 201: ...he DS1 terminating equipment which will verify that the cabling is correct Important A test set can be applied at the DSX 1 to test cabling toward the facility loopback 5 Once the test is complete remove the loopback Select Fault Analysis Loopback 6 Choose the DS1 port to test and click Select 7 Select Release and Loopback Type Facility and click Apply 8 Repeat Step 1 through Step 7 for each DS1 c...

Page 202: ...ocate the Function Group equipped with the DS1 circuit pack 2 Determine the system is alarm free by clicking on the Alarm List button on the system view 3 Unseat the active circuit pack The active circuit pack has an ACTIVE LED lit Monitor the test set connected to the DSX patch panel Result The ACTIVE LED on the other circuit pack in the Function Group will light The MN alarm and the NE LED lamps...

Page 203: ...on the second circuit pack will light for several seconds then extinguish On the SYSCTL the MN alarm extinguishes 7 Check off the appropriate box in Appendix E Installation checklist E N D O F S T E P S DS1 function unit protection switching test command This test will initiate switching commands from the CIT and verify proper switching and LED indications Important It is not necessary to perform ...

Page 204: ...s as the previous step 7 Check off the appropriate box in Appendix E Installation checklist E N D O F S T E P S DS1 path switching test manual Important It is not mandatory to perform this test on each vt cross connection however this procedure should be performed on each Function Unit Slot pair 1 Select Fault Protection Switch 2 Under Path Protection click on Path m 1 1 1 1 3 Click Select 4 At th...

Page 205: ...Installation tests 365 372 304R7 1 Issue 1 November 2007 4 1 7 8 Repeat Step 1 through Step 7 to verify a switch back to the original ring 9 Check off the appropriate box in Appendix E Installation checklist E N D O F S T E P S ...

Page 206: ... Update All Result This command will remove alarms generated by removing the test signals from the DSX 1 5 Repeat the DS1 terminating equipment loopback testing p 4 10 or the DS1 non terminating equipment transmission testing optical main OLIU p 4 11 procedure and the Delete any existing DS1 cross connections p 4 18 procedure to test each of the remaining DS1 tributaries of the Function Unit This ...

Page 207: ... a 1 3 4 13 m 1 1 4 1 a 1 4 1 14 m 1 1 4 2 a 1 4 2 15 m 1 1 4 3 a 1 4 3 16 m 1 1 4 4 a 1 4 4 17 m 1 1 5 1 a 1 5 1 18 m 1 1 5 2 a 1 5 2 19 m 1 1 5 3 a 1 5 3 20 m 1 1 5 4 a 1 5 4 21 m 1 1 6 1 a 1 6 1 22 m 1 1 6 2 a 1 6 2 23 m 1 1 6 3 a 1 6 3 24 m 1 1 6 4 a 1 6 4 25 m 1 1 7 1 a 1 7 1 26 m 1 1 7 2 a 1 7 2 27 m 1 1 7 3 a 1 7 3 28 m 1 1 7 4 a 1 7 4 29 m 1 2 1 1 a 2 1 1 30 m 1 2 1 2 a 2 1 2 31 m 1 2 1 3 ...

Page 208: ...1 2 2 3 a 2 2 3 36 m 1 2 2 4 a 2 2 4 37 m 1 2 3 1 a 2 3 1 38 m 1 2 3 2 a 2 3 2 39 m 1 2 3 3 a 2 3 3 40 m 1 2 3 4 a 2 3 4 41 m 1 2 4 1 a 2 4 1 42 m 1 2 4 2 a 2 4 2 43 m 1 2 4 3 a 2 4 3 44 m 1 2 4 4 a 2 4 4 45 m 1 2 5 1 a 2 5 1 46 m 1 2 5 2 a 2 5 2 47 m 1 2 5 3 a 2 5 3 48 m 1 2 5 4 a 2 5 4 49 m 1 2 6 1 a 2 6 1 50 m 1 2 6 2 a 2 6 2 51 m 1 2 6 3 a 2 6 3 52 m 1 2 6 4 a 2 6 4 53 m 1 2 7 1 a 2 7 1 54 m 1...

Page 209: ...cross connects removed 1 Select View Cross Connections 2 Choose shelf 1665 DMX and click Select 3 Verify that there are no cross connections on the shelf 4 Select Configuration Update System Update All Result This command will remove alarms generated by removing the test signals from the DSX 1 5 Check off the appropriate box in Appendix E Installation checklist E N D O F S T E P S ...

Page 210: ...to move the circuit pack s from slot to slot in order to test all DS3 EC1 and TMUX cabling This procedure requires the use of a DS3 test set Important The LNW16 and LNW19 LNW19B circuit packs are provisioned on a per port basis for DS3 or EC1 The default setting for all ports is DS3 Tests in the section will verify proper cabling by using a DS3 test set with all ports provisioned as DS3 TMUX is on...

Page 211: ...ical cabling to the 1665 DMX NE Follow the procedure below to perform a facility loopback test at the 1665 DMX shelf When the 1665 DMX is cabled to other DS3 terminating equipment in order to complete the loopback testing it will be necessary to contact the Customer Network Control Center and have a signal established at the port s under test 1 Log on to the 1665 DMX shelf using the CIT software a...

Page 212: ... not received Check the LBOs settings using View Equipment see Setting DS3 EC1 and TMUX LBOs p 4 5 Verify that the pack is provisioned for the framing format being sent from the test set CBIT or M13 Verify that the port is provisioned for DS3 See Verify provisioning p 4 22 Check the DS3 EC1 cabling for proper connections 9 Once the test is complete remove the loopback Select Fault Analysis Loopbac...

Page 213: ...elect Operate and Loopback Type Facility and click Apply 4 Once the loopback is up a test signal shall be generated at the DS3 terminating equipment which will verify that the cabling is correct Important A test set can be applied at the DSX 3 to test cabling toward the facility loopback 5 While observing the error free transmission grasp the DS3 cable about two inches from the BNC connector head ...

Page 214: ...dure for all Function Groups equipped with LNW16 12DS3 EC1 LNW19 LNW19B 48DS3 EC1 LNW18 TMUX or LNW20 48TMUX circuit packs that are terminated at a DSX3 patch panel 1 Select Configuration Cross Connections 2 Use the Cross Connection Wizard to enter a new cross connection at the STS1 rate UPSR Ring Add Drop between m 1 1 and fn 1 fn will be a b c or d depending on the slot where the DS3 or TMUX CP ...

Page 215: ...al to the port 6 While observing the error free transmission at the DSX grasp the DS3 cable about two inches from the BNC connector head and gently rotate twist the cable in a clockwise and counter clockwise direction about 45 degrees gently Result If any errors are detected while performing this wiggle test the BNC connector must be cut off and replaced If an error free signal is not received Che...

Page 216: ...ped with the DS3 TMUX circuit pack 2 Unseat the active circuit pack The active circuit pack has an ACTIVE LED lit Result The ACTIVE LED on the other circuit pack in the Function Group will light The MN alarm and the NE LED lamps on the SYSCTL will light Transmission at the test set will take a momentary hit and then re establish 3 Unseat the second circuit pack of the pair Result On the SYSCTL the...

Page 217: ... will initiate switching commands from the CIT and verify proper switching and LED indications while monitoring transmission at a test set Important It is not necessary to perform this test on each sts cross connection however this procedure should be performed on each Function Unit Slot pair 1 Select Fault Protection Switch 2 Click on 1 1 Equip fn x x is a b c or d corresponding to the function g...

Page 218: ... a test set is connected path switching will be verified Important It is not mandatory to perform this test on each sts cross connection however this procedure should be performed on each Function Unit Slot pair 1 Select Fault Protection Switch 2 Under Path Protection click on Path m 1 1 3 Click Select 4 At the Switch Type pull down select Manual 5 Click Apply Result The Active Path indicates a ch...

Page 219: ...e 1 November 2007 4 3 1 8 Repeat Step 1 through Step 7 to verify a switch back to the original ring 9 Repeat Step 1 through Step 7 to verify a switch back to the original ring 10 Check off the appropriate box in Appendix E Installation checklist E N D O F S T E P S ...

Page 220: ...and will remove alarms generated by removing the test signals from the DSX 3 5 Repeat the DS3 terminating equipment loopback testing optical main OLIUs p 4 23 or the DS3 non terminating transmission optical main OLIU p 4 26 procedure and the Delete the existing DS3 cross connections p 4 32 procedure to test each of the remaining DS3 tributaries of the Function Unit substituting the following addre...

Page 221: ... 3 4 m 1 4 a 4 5 m 1 5 a 5 6 m 1 6 a 6 7 m 1 7 a 7 8 m 1 8 a 8 9 m 1 9 a 9 10 m 1 10 a 10 11 m 1 11 a 11 12 m 1 12 a 12 13 m 1 13 a 13 14 m 1 14 a 14 15 m 1 15 a 15 16 m 1 16 a 16 17 m 1 17 a 17 18 m 1 18 a 18 19 m 1 19 a 19 20 m 1 20 a 20 21 m 1 21 a 21 22 m 1 22 a 22 23 m 1 23 a 23 24 m 1 24 a 24 25 m 1 25 a 25 26 m 1 26 a 26 27 m 1 27 a 27 28 m 1 28 a 28 29 m 1 29 a 29 ...

Page 222: ... 7 Verify there are no existing DS3 cross connections Use the View Cross Connections command 8 Select Configuration Update System Update All 30 m 1 30 a 30 31 m 1 31 a 31 32 m 1 32 a 32 33 m 1 33 a 33 34 m 1 34 a 34 35 m 1 35 a 35 36 m 1 36 a 36 37 m 1 37 a 37 38 m 1 38 a 38 39 m 1 39 a 39 40 m 1 40 a 40 41 m 1 41 a 41 42 m 1 42 a 42 43 m 1 43 a 43 44 m 1 44 a 44 45 m 1 45 a 45 46 m 1 46 a 46 47 m...

Page 223: ...on tests 365 372 304R7 1 Issue 1 November 2007 4 3 5 Result This command will remove alarms generated by removing the test signals from the DSX 3 9 Check off the appropriate box in Appendix E Installation checklist E N D O F S T E P S ...

Page 224: ...in an LNW66 LNW71 or LNW74 10 100T circuit packs with cabling for testing 3 Identify the RJ45 patch panel associated with the function groups identified above 4 Connect the RJ45 cable from the first RJ45 on the patch panel to the Ethernet port on your PC 5 Watch for the link LED to light on the PC s Ethernet card or wait for 30 seconds and then disconnect the RJ45 cable from the patch panel 6 The ...

Page 225: ...tion testing Important Continue with the following section only for LNW66 circuit packs Testing is complete for LNW71 and LNW74 packs 1 If not still connected serially from the last procedure then connect the Front CIT cable between the PC and the CIT RS 232 jack of System Controller and login to the shelf using the serial connection 2 Select Configuration Data Create Virtual Switch 3 Choose the L...

Page 226: ...L to the first position on the RJ45 Ethernet patch panel 17 Connect a second RJ45 Ethernet cable from the PC Ethernet port to the second position on the RJ45 Ethernet patch panel 18 Watch for the link LED to light on the PC s Ethernet card or wait for 30 seconds 19 Login to the shelf using the OSI connection Result Successful login to the 1665 DMX 20 Log out of the 1665 DMX shelf 21 At the RJ45 Et...

Page 227: ...remaining Ethernet connections on the RJ45 patch panel connected to the LNW66 under test then continue on to Step 27 27 Disconnect the PC from the RJ45 patch panel and the 1665 DMX LAN port from the RJ45 patch panel 28 Connect the Front CIT cable between the PC and the CIT RS 232 jack of System Controller and login to the shelf using the serial connection 29 Select Configuration Update System Upda...

Page 228: ...ts 4 4 0 365 372 304R7 1 Issue 1 November 2007 33 Log out and disconnect the PC from the 1665 DMX serial port 34 Repeat this procedure for every slot containing and LNW66 LNW71 and LNW74 35 Check off the appropriate box in Appendix E Installation checklist E N D O F S T E P S ...

Page 229: ... of the first SFP equipped Refer to Appendix C Installing fiber connectors and LBOs Connect the fibers labeled IN and OUT from the LGX to the OLIU Port 1 3 Connect the Port 1 IN connector to the Port 1 OUT connector at the LGX of the OC 3 OC 12 or OC 48 OLIU using an optical fiber jumper cable Refer to Appendix B Fiber cleaning for proper fiber cleaning instructions Requirement The FAULT LED on th...

Page 230: ... port being tested 6 Select Configuration Update System Update All Requirement The flashing FAULT LED should extinguish on the OLIU There should be no alarm indications on the 1665 DMX shelf 7 From the system view click Alarm List to verify that the circuit pack alarm is cleared 8 Repeat this entire procedure for each LNW37 LNW45 LNW49 LNW55 or LNW62 SFP equipped in the 1665 DMX shelf 9 Replace al...

Page 231: ...nnector Port 1 of the OC 3 OLIU Refer to Appendix C Installing fiber connectors and LBOs Connect the fibers labeled IN and OUT from the LGX to the OLIU Port 1 3 Connect the Port 1 IN connector to the Port 1 OUT connector at the LGX of the OC 3 OLIU using an optical fiber jumper cable Refer to Appendix A Laser safety and classifications and Electrostatic Discharge ESD considerations for proper fibe...

Page 232: ...lace it on the IN connector directly below it Port 2 Connect the fibers labeled IN and OUT from the LGX to the OLIU Port 2 8 Connect the Port 2 IN connector to the Port 2 OUT connector at the LGX of the OC 3 OLIU using an optical fiber jumper cable Requirement The FAULT LED on the OC 3 OLIU will begin flashing and the MN and NE LEDs should be lit on the SYSCTL circuit pack After approximately 20 s...

Page 233: ...lit on the SYSCTL circuit pack After approximately 20 seconds the flashing FAULT LED should extinguish on the OC 3 OLIU and the FAULT MJ and NE LEDs should be lit on the SYSCTL circuit pack 14 Remove the optical fiber jumper from the OC 3 OLIU at the LGX Result The FAULT LED should begin flashing on the OC 3 OLIU and only the MN and NE LEDs should be lit on the SYSCTL circuit pack 15 From the syst...

Page 234: ...sult The FAULT LED should begin flashing on the OC 3 OLIU and only the MN and NE LEDs should be lit on the SYSCTL circuit pack 20 From the system view click Alarm List to verify that the circuit pack alarm is associated with the optical port being tested 21 Select Configuration Update System Update All Requirement The flashing FAULT LED should extinguish on the OC 3 OLIU There should be no alarm i...

Page 235: ... dB LC type LBO into the top IN connector Port 1 of the OC 12 OLIU Refer to Appendix C Installing fiber connectors and LBOs Connect the fibers labeled IN and OUT from the LGX to the OLIU Port 1 3 Connect the Port 1 IN connector to the Port 1 OUT connector at the LGX of the OC 12 OLIU using an optical fiber jumper cable Refer to Appendix B Fiber cleaning for proper fiber cleaning instructions Requi...

Page 236: ...on the IN connector directly below it Port 2 Connect the fibers labeled IN and OUT from the LGX to the OLIU Port 2 8 Connect the Port 2 IN connector to the Port 2 OUT connector at the LGX of the OC 12 OLIU using an optical fiber jumper cable Requirement The FAULT LED on the OC 12 OLIU will begin flashing and the MN and NE LEDs should be lit on the SYSCTL circuit pack After approximately 20 seconds...

Page 237: ...D O F S T E P S OC 12 facility loopback testing Facility Loopback testing allows the installer to verify cabling to the OC 12 equipment This test is only required if the 1665 DMX shelf is connected to OC 12 equipment If the shelf is NOT connected to OC 12 equipment skip this section and continue to the section on OC 48 low speed testing procedure p 4 52 Important An optical test set with the capab...

Page 238: ...l 5 Select Configuration Cross Connections 6 Use the Cross Connection Wizard to Delete leg s of an existing cross connection associated with CP main 1 Port 1 the OC 12 cross connection 7 Verify loss of transmission at the patch panel This should be evident by a SONET alarm and a loss of pattern alarm 8 Select Fault Analysis Loopback 9 Choose the correct port on the OC 12 CP and click Select 10 Cli...

Page 239: ...n the OC 12 CP and click Select 15 Click on Release 16 Click Apply 17 Verify loss of transmission at the patch panel This should be evident by a SONET alarm and a loss of pattern alarm 18 Repeat this section for all OC 12 ports 19 Check off the appropriate box in Appendix E Installation checklist E N D O F S T E P S ...

Page 240: ...lit on the OC 48 OLIU 2 Insert a 15 dB LC type LBO into the IN connector of the OC 48 OLIU Refer to Appendix C Installing fiber connectors and LBOs Connect the fibers labeled IN and OUT from the LGX to the OLIU Port 1 3 Connect the IN connector to the OUT connector at the LGX of the OC 48 OLIU using an optical fiber jumper cable Refer to Appendix B Fiber cleaning for proper fiber cleaning instruct...

Page 241: ...eplace all protective dust covers on the OC 48 OLIU connectors that were removed to perform this procedure 9 Repeat this entire procedure for each OC 48 OLIU in the 1665 DMX shelf 10 Check off the appropriate box in Appendix E Installation checklist E N D O F S T E P S OC 48 facility loopback testing Facility Loopback testing allows the installer to verify cabling to the OC 48 equipment This test ...

Page 242: ...a cross connect to map the first STS 48 of an OC 48 circuit pack to the first STS 48 of the Main OLIUs 4 Verify transmission at the patch panel There should be no alarms at the test set 5 Select Configuration Cross Connections 6 Use the Cross Connection Wizard to Delete leg s of an existing cross connection associated with CP main 1 Port 1 the OC 48 cross connection 7 Verify loss of transmission a...

Page 243: ...Select Fault Analysis Loopback 14 Choose the correct port on the OC 48 CP and click Select 15 Click on Release 16 Click Apply 17 Verify loss of transmission at the patch panel This should be evident by a SONET alarm and a loss of pattern alarm 18 Repeat this section for all OC 48 ports 19 Check off the appropriate box in Appendix E Installation checklist E N D O F S T E P S ...

Page 244: ...lf and replace the faulty unit Important If the shelf is not fully equipped move circuit packs around and repeat the test for all valid circuit pack positions LED test procedure 1 Select Fault Test LED 2 Choose shelf 1665 DMX 3 Click Select 4 Choose Number of Iterations 1 5 Click OK Result All LEDs on the shelf should light for 10 seconds then extinguish for 10 seconds and then the proper LEDs wil...

Page 245: ... the dcc disabled to prevent dcc alarms The dcc can be verified with the View DCC GUI command If the high speed packs are no longer looped back do so at the LGX panel The dcc should also be disabled at the function unit slot under test since it will be connected to a test set and will register alarms The dcc can be provisioned with the Provision DCC Terminations GUI command Change the dcc on M2 an...

Page 246: ...lace the pack with a spare and return the suspect pack back through the RMA process If levels meet specifications check the fiber to the LGX panel for continuity 3 Ensure that the optical packs to be tested have 15 dB attenuators inserted to the IN port of the port under test Failing to insert attenuators may overdrive the circuitry and cause permanent damage to the circuit packs Start testing in ...

Page 247: ... This is due to the fact that we have not established a cross connection Enter a cross connection either through the GUI using the cross connect wizard Enter the command according to the optical pack and function slot under test TX RX 1x2 splitter RX RX TX OC3 OC12 OC48 Optical Test Set TX Standby FN 2 Active FN 1 OC 3 LNW36 LNW37 LNW45 LNW55 OC 12 LNW46 LNW49 LNW55 OC 48 LNW31 LNW55 LNW62 LNW425 ...

Page 248: ...ve and slot 1 is standby reseat the pack in slot 2 switching the active path to slot 1 9 At the LS LGX Bay move the Test Set RX cable to the Standby TX Port refer to Figure 4 2 Examine the test traffic received by the test set Look for errors or any other signal information that the test set is capable of indicating The Standby OCN card should be running without errors Figure 4 2 Optical test arra...

Page 249: ...ransmission hit indicating the switch but should clear and show good transmission 11 Return the Test Set TX Cable to normal operation and ensure that the LOS alarm clears 12 Delete any cross connects through the GUI Cross Connection Wizard 13 Select Configuration Update System Update All 14 Repeat this test on all OCN ports for all optical packs which will reside in the shelf 15 Check off the appr...

Page 250: ... Additional optical tests optional Installation tests 4 6 2 365 372 304R7 1 Issue 1 November 2007 ...

Page 251: ...lems are encountered refer to 365 373 302 1665 Data Multiplexer Alarm Messages and Trouble Clearing Guide for detailed troubleshooting procedures Contents This chapter provides information on the following topics Office alarm test 5 4 Automatic protection switching and alarm test 5 8 Manual switching tests 5 11 External timing verification 5 13 Miscellaneous environmental discrete telemetry test 5...

Page 252: ...lied 1 DS1 Error Rate Test Set A DS1 error rate test set is required for testing of DS1 cabling A T BERD 211 or equivalent is recommended 1 DS3 Error Rate Test Set A DS3 error rate test set is required for testing of DS3 cabling A T BERD 305 or equivalent is recommended 1 SONET Optical Test Set An ONC3 OC 12 or OC 48 test set is required for testing of optical circuit packs An Agilent OmniBER 718 ...

Page 253: ...rd CAUTION Laser Safety When connecting fiber loops between the IN and OUT ports on optical circuit packs always connect to the IN port first and then the OUT port This will prevent any optical radiation from being present at the fiber end CAUTION The operational tests in this section are run only in an out of service mode of operation Office alarms will normally be connected only during the offic...

Page 254: ...l be temporarily connected during this procedure Table 5 1 Office Alarm Connections p 5 5 lists the office alarms connections It is a requirement that alarms on the 1665 DMX do not affect and are not affected by other equipment via office alarm connections During this test the alarm state of other equipment connected to the same office alarms as the 1665 DMX should be examined after creating or cl...

Page 255: ...wnload and circuit pack installation 4 Select Configuration Cross Connections 5 Use the Cross Connection Wizard to enter a new cross connection at the STS 1 rate UPSR Ring Add Drop between m1 1 1 and fn1 1 fn will be a b c or d depending on the slot where the DS1 DS3 or TMUX CP is located Conn Pin Color Designation Name J12 J13 1 2 3 4 BL W W BL O W W O RYMJV1 RYMJV2 RYMJA1 RYMJA2 Minor Alarm Visi...

Page 256: ...nt Activated office alarms MN visual MN audible Important Alarms will not be activated until the alarm delay time has passed The default time is 2 seconds 10 Press the ACO pushbutton on the SYSCTL Requirement Activated office alarm MN visual The MN audible alarm clears 11 Using a small flat bladed screwdriver set one of the circuit breakers to OFF Requirement Activated office alarms MN visual MN a...

Page 257: ...was turned off in Step 11 Result After a few minutes all alarm indications should clear 17 Disconnect the office alarm cable connected in Step 1 for the remainder of the test procedures in this chapter 18 Select Configuration Alarms Alarm Configuration 19 Choose Power Alarm Level Minor 20 Click OK Important Do NOT delete the cross connect that was entered for this test 21 Check off the appropriate...

Page 258: ...k on itself that is with the IN of the OLIU M1 looped to the OUT of the OLIU M1 and the IN of the OLIU M2 looped to the OUT of the OLIU M2 Prior to performing each test the shelf under test must be clear of all alarms that is only green LEDs are lit A properly grounded ESD wrist strap MUST be worn when handling circuit packs Unterminated optical connectors may emit laser radiation Do not view beam...

Page 259: ...installation 2 Select View Cross Connections 3 Choose shelf 1665 DMX and click Select 4 Verify that the cross connection entered in the previous section is on the list If there is no cross connect remaining from the previous section then a cross connection must be established before continuing 5 Select Configuration Cross Connections 6 Use the Cross Connection Wizard to enter a new cross connectio...

Page 260: ... active receiver Result The MN and then NE alarm LED should light on the SYSCTL and the FAULT LED should flash on the OLIU 12 Click Refresh in the View Protection window Result The Active path has changed If m1 1 1 was active before m2 1 1 is active now 13 Reconnect the fiber at the OLIU Result After a short time the MN and NE alarm LEDs on the SYSCTL and the FAULT LED on the OLIU should extinguis...

Page 261: ...1 cross connect should still exist from the previous tests 1 Select Fault Protection Switch 2 Under Path Protection choose Path m 1 1 3 Click Select 4 Note the Active Path 5 In the Switch Type pull down choose Manual 6 Click Apply Requirement The ring that was active in Step 4 is no longer active and the other ring is now active 7 In the Switch Type pull down choose Clear 8 Click Apply 9 Repeat St...

Page 262: ... Manual switching tests Operational tests 5 1 2 365 372 304R7 1 Issue 1 November 2007 10 Check off the appropriate box in Appendix E Installation checklist E N D O F S T E P S ...

Page 263: ... the frame format SF or ESF and line code AMI or B8ZS of the DS1 timing signals being generated by the timing source 2 Select Configuration Timing Sync 3 In the Timing Mode pull down verify External Timing is displayed If not choose External and click OK and select Configuration Timing Sync 4 Click on the Timing Input Ports tab at the top of the window 5 Enter the DS1 Input and Output Format SF or...

Page 264: ... Shelf Backplane p 5 14 disconnect the input timing cable from the connector associated with the active reference Requirement The MN LED lights on the SYSCTL and the FAULT LED flashes on the MAIN OLIU circuit pack associated with that reference SYNC1 is associated with M1 and SYNC2 is associated with M2 Figure 5 1 1665 DMX Shelf Backplane MISCELLANEOUS DISCRETE CONNECTOR J11 TIMING CONNECTORS SYNC...

Page 265: ...he same for the 1665 DMX High Capacity shelf 10 Click Refresh in the View Timing Sync window Result The other reference is now the active reference 11 Reconnect the timing cable at the rear of the shelf Requirement The MN LED extinguishes on the SYSCTL and the FAULT LED on the OLIU stops flashing 12 Check off the appropriate box in Appendix E Installation checklist E N D O F S T E P S ...

Page 266: ...he miscellaneous discrete cable is connected to the J11 MISC connector on the shelf See Figure 5 1 1665 DMX Shelf Backplane p 5 14 3 Refer to Table 5 2 Miscellaneous Environmental Discrete Telemetry Connections p 5 18 to determine the wire color of the cable lead associated with the environmental input to be tested 4 At the far end of the cable short the associated environmental input lead to the ...

Page 267: ...ndix E Installation checklist E N D O F S T E P S Figure 5 2 Miscellaneous Environmental Discrete Functions Env Alarm Status Env Input 19 Env Input 2 Env Input 1 2 1 20 Water Fire etc High Temp High Inputs Open Door Remote Terminal Input Common 19 Env Output 3 Env Output 2 Env Output 1 Pump etc Generator 25 24 23 22 21 Env Output 4 J11 Output Common To ...

Page 268: ...BR TLMI5 TLMI6 TLMI7 TLMI8 Env Input 5 Env Input 6 Env Input 7 Env Input 8 9 10 11 12 S W W S BL R R BL TLMI9 TLMI10 TLMI11 TLMI12 Env Input 9 Env Input 10 Env Input 11 Env Input 12 13 14 15 16 O R R O G R R G TLMI13 TLMI14 TLMI15 TLMI16 Env Input 13 Env Input 14 Env Input 15 Env Input 16 17 18 19 20 BR R R BR S R R S TLMI17 TLMI18 TLMI19 TLMIC48VT RN Env Input 17 Env Input 18 Env Input 19 Input C...

Page 269: ...baud Full duplex 8 data bits No parity bits 1 start bit 1 stop bit No flow control Transparent data mode ON Direct operating mode ON Important Modems supporting a large set of options and error detection capabilities may require other options be set before using the modems to download generic software Refer to manufacture s manuals for instructions on setting modem parameters 2 Verify that the mod...

Page 270: ...ers 9 After a connection is established press the enter key Result SYSTEM TID LT DMX 10 Enter the command act user LT DMX LUC01 ctag DMX2 5G10G Result A message indicating that the command completed will be displayed along with the Alcatel Lucent disclosure 11 Enter the command canc user LT DMX LUC01 ctag Result A message indicating that the command completed will be displayed 12 Disconnect the Hy...

Page 271: ...n 3 Click Next and continue with the Cross Connection Wizard to delete the cross connections associated with CP main 1 Port 1 4 To verify that all cross connections are deleted select View Cross Connections 5 Choose shelf 1665 DMX and click select 6 Verify that no alarm LEDs are lit and no FAULT LED is lit on any circuit pack If any alarm is present refer to 365 373 302 1665 Data Multiplexer Alarm...

Page 272: ... Final operations Operational tests 5 2 2 365 372 304R7 1 Issue 1 November 2007 ...

Page 273: ...tion starts the process of integrating the 1665 Data Multiplexer 1665 DMX into the customer s network The section provides the procedures to connect inter office fibers and verify DCC communications and path switching Contents This section is organized into the following chapters Ring setup and testing integration procedures Chapter 6 ...

Page 274: ... 1665 Data Multiplexer 1665 DMX ring setup and testing I I I 2 365 372 304R7 1 Issue 1 November 2007 ...

Page 275: ...fer to 365 373 302 1665 Data Multiplexer Alarm Messages and Trouble Clearing Guide for detailed troubleshooting procedures If additional provisioning procedures are desired refer to 365 372 301 1665 Data Multiplexer User Operations Guide Contents This chapter provides information on the following topics Fiber installation 6 4 Optical transmission test OC 192 OC 48 OC 12 6 11 Automatic protection s...

Page 276: ...Multimeter Optional The voltmeter must be capable of measuring DC voltage in the 40 to 60 volt range The use of the voltmeter is optional since the shelf will alarm or shut down if the proper voltage is not supplied 1 DS1 Error Rate Test Set A DS1 error rate test set is required for testing of DS1 cabling A T BERD 2209 or equivalent is recommended 1 DS3 Error Rate Test Set A DS3 error rate test se...

Page 277: ... handling fiber Unterminated optical connectors may emit laser radiation Do not view beam with optical instruments WARNING Laser hazard CAUTION The operational tests in this section are run only in an out of service mode of operation Office alarms will normally be connected only during the office alarm test to prevent constant alarms throughout this section ...

Page 278: ...evious section Verify that the 1665 DMX shelf is clear of all alarms only green LEDs are lighted prior to and after completing this test CIT is still connected to the 1665 DMX The office alarm cable will remain disconnected during this procedure A properly grounded ESD wrist strap MUST be worn when handling circuit packs Unterminated optical connectors may emit laser radiation Do not view beam wit...

Page 279: ...ministration Set NE 5 Dress optical cables in the fiber tray at the bottom front of the shelf 6 Route the optical jumpers from the bottom of the shelf 7 Establish communications with the technician at the other end of the optical span 8 At both ends of the optical span remove protective covers from receive and transmit optical jumper cables and clean LC connectors Important The 1665 DMX OLIUs requ...

Page 280: ...helf the 1665 DMX is being connected to The Function Group slot A B C D or G 2 will connect to Main 1 10 At each end of the optical span connect the optical fiber transmit cables to the OLIU OUT connectors 11 At each end of the optical span measure the optical power of the optical fiber receive cables using an optical power meter 12 Determine the LBO value required based on the received optical po...

Page 281: ...OC 192 high speed LNW57 6 0 to 3 0 15 3 0 to 7 0 10 7 0 to 24 0 0 LNW60 12 5 to 6 0 20 6 0 to 3 0 15 2 0 to 7 0 10 7 0 to 24 0 0 LNW555 6 0 to 0 15 0 0 to 22 0 0 LNW523 LNW527 LNW554 6 0 to 1 0 15 1 0 to 7 0 10 7 0 to 24 0 0 LNW56 2 0 to 1 0 5 1 0 to 14 0 0 LNW58 1 0 to 11 0 0 SFP XFP optics Circuit Pack Received Power dBM LBO dB S15512 LNW37 LNW45 LNW55 LNW82 8 0 to 23 0 0 OC 3 IR1 I1 LNW37 LNW45...

Page 282: ...NW82 2 0 to 5 0 15 5 0 to 15 10 15 to 28 0 0 OC 48 SR I1 LNW55 LNW62 LNW82 LNW202 3 0 to 18 0 0 OC 48 LR I1 LNW55 LNW62 LNW82 LNW202 3 0 to 5 0 15 5 0 to 10 0 10 10 0 to 15 0 5 15 0 to 27 0 0 OC 48 LR2 I1 LNW55 LNW62 LNW82 LNW202 3 0 to 5 0 15 5 0 to 10 0 10 10 0 to 15 0 5 15 0 to 27 0 0 S2DxxC6 series LNW55 LNW62 LNW82 LNW202 3 0 to 5 0 15 5 0 to 10 0 10 10 0 to 15 0 5 15 0 to 27 0 0 OC192SR1 C1 ...

Page 283: ...AULT LED on the OLIU extinguishes 17 Disconnect the fiber cable from the OUT connector on the OLIU at one end of the span At the other end verify that the associated FAULT LED is flashing indicating a loss of signal Reconnect the fiber and repeat the process for the other direction of transmission 18 Enable communications with the adjacent 1665 DMX nodes Configuration DCC Terminations 19 Select Po...

Page 284: ...g 22 Verify proper communications with the adjacent 1665 DMX nodes Administration OSI Neighbor Map Result The adjacent node appears in the neighbor list 23 Perform steps in this procedure on all adjacent nodes in the ring 24 After all connections and tests have been made verify optical fiber cables are placed in fiber tray and properly routed in bay framework 25 Reconnect the office alarm cable di...

Page 285: ...oose CP main 1 Port 1 3 Click Select 4 Select Time Period 15 Min Monitored Date Current Date and Monitor Level 0 UP 5 Click Select All to move all Available Parameters to the Selected Parameters column 6 Click Apply Result The Response Window indicates no transmission errors 7 Repeat Step 1 through Step 6 substituting CP main 2 in Step 2 8 Repeat Step 1 through Step 7 for all 1665 DMX shelves at t...

Page 286: ...ust be clear of all alarms that is only green LEDs are lighted Main OLIU switch test 1 In order to perform path switching an add drop cross connection must be entered Select Configuration Cross Connections and use the Cross Connection Wizard to enter an add drop cross connection 2 Select View Protection 3 Under Path Protection choose Path m 1 1 and click Select 4 Note the Active Path m1 or m2 5 Di...

Page 287: ... Reconnect the optical fiber to the OLIU Result After a short time the MJ alarm LED on the SYSCTL and the FAULT LED on the OLIU should extinguish 9 Repeat Step 2 through Step 8 to verify a switch back to the OLIU that was originally active 10 Check off the appropriate box in Appendix E Installation checklist E N D O F S T E P S ...

Page 288: ...al switching test procedure 1 Enter an STS 1 add drop cross connection between an equipped Function Unit and the Main OLIU Select Configuration Cross Connections and use the Cross Connection Wizard to enter an add drop cross connection 2 Select Fault Protection Switch 3 Under Path Protection choose Path m 1 1 and click Select 4 Note the Active Path m1 or m2 5 Choose Switch Type Manual 6 Click Appl...

Page 289: ...ch 2 Click on 1 1 Equip fn x x is a b c or d corresponding to the function group equipped 3 Click Select 4 Note which Function Unit or Growth Slot circuit pack is the active circuit pack 5 In the Switch Type pull down select Manual Normal 6 Click Apply Result The pack that was active should now be the standby pack and the pack that was standby is now active Transmission should take a momentary hit...

Page 290: ...ng integration procedures 6 1 6 365 372 304R7 1 Issue 1 November 2007 9 Swap circuit packs from another function group to test any unequipped function slots 10 Check off the appropriate box in Appendix E Installation checklist E N D O F S T E P S ...

Page 291: ... leg s of an existing cross connection associated with CP main 1 Port 1 3 Select Configuration Update System Update All 4 Verify that no alarm LEDs are lit and no FAULT LED is lit on any circuit pack If any alarm is present refer to 365 373 302 1665 Data Multiplexer 1665 DMX Alarm Messages and Trouble Clearing Guide 5 Check off the appropriate box in Appendix E Installation checklist E N D O F S T...

Page 292: ... Final operations Ring setup and testing integration procedures 6 1 8 365 372 304R7 1 Issue 1 November 2007 3 Check off the appropriate box in Appendix E Installation checklist E N D O F S T E P S ...

Page 293: ...llation Manual The Installation Checklist is also contained in this part Contents This section is organized into the following sections Appendix A Laser safety and classifications and Electrostatic Discharge ESD considerations Appendix B Fiber cleaning Appendix C Installing fiber connectors and LBOs Appendix D Backplane pin replacement Appendix E Installation checklist Appendix F Fiber labeling Ap...

Page 294: ... 1665 Data Multiplexer 1665 DMX supplementary information and installation checklist I V 2 365 372 304R7 1 Issue 1 November 2007 ...

Page 295: ...charge ESD considerations Overview Purpose This appendix provides laser safety information and precautions Contents This appendix provides information on the following topics Laser safety A 2 Electrostatic Discharge ESD considerations A 5 Laser product classification A 9 1665 DMX optical specifications A 11 ...

Page 296: ...d in the Food and Drug Administration s Center for Devices and Radiological Health FDA CDRH regulations and the international standards IEC 60825 or DIN EN 60825 are met Please also refer to Laser product classification p A 9 Potential sources of danger Beware of the following potential sources of danger which will remain despite all safety measures taken Laser radiation can cause damage to the sk...

Page 297: ...lass and the maximum output power 3 Laser warning labels CAUTION Do not view directly with optical instruments CLASS 1M INVISIBLE LASER RADIATION WHEN OPEN AND FIBER DISCONNECTED ATTENTION RAYONNEMENT LASER DE CLASSE 1M INVISIBLE LORSQUE L APPAREIL EST OUVERT ET QUE LA FIBRE EST DÉCONNECT E Ne pas regarder directement au moyen d un instrument optique É 848950572 MA DMX 416 H H HAZARD LEVEL 1M 1 2 ...

Page 298: ...ollow the instructions Ignoring the instructions can result in exposure to dangerous radiation Do not view directly into the laser beam with optical instruments such as a fiber microscope because viewing of laser emission in excess of Class 1 limits significantly increases the risk of eye damage Never look into the end of an exposed fiber or an open connector as long as the optical source is still...

Page 299: ...sipating floor mat If a static dissipating floor mat is used be sure that it is clean to ensure a good discharge path Handle all circuit packs by the faceplate or latch and by the top and bottom outermost edges Never touch the components conductors or connector pins Observe warning labels on bags and cartons Whenever possible do not remove circuit packs from antistatic packaging until ready to ins...

Page 300: ...g this product When installing operating or maintaining this equipment basic safety precautions should always be followed to reduce the risk of fire electric shock and injury to persons including the following 1 Read and understand all instructions 2 Follow all warnings and instructions marked on this product 3 This product should be only operated from the type of power sources indicated on the ma...

Page 301: ... product 17 Slots and openings in the unit are provided for ventilation to protect it from overheating and these openings must not be blocked or covered This product should not be placed in a built in installation unless proper ventilation is provided 18 To reduce the risk of an electrical shock do not disassemble this product Service should be performed by trained personnel only Opening or removi...

Page 302: ...nnected to the unit Installation must include an independent frame ground drop to building ground This ground symbol is marked on the product adjacent to the ground earth area for the connection of the ground earth conductor This Equipment is to be installed only in restricted access Areas on business and customer premises applications in accordance with Articles 110 16 110 17 and 110 18 of the Na...

Page 303: ...nd laser systems in the infrared wavelength range greater than 700 nm are assigned to one of the following classes Class I Class IIIb or Class IV Laser classification is dependent upon operating wavelength output power and fiber modefield diameter core diameter IEC requirements There are five major differences between the FDA CDRH regulations and the IEC requirements According to the IEC classific...

Page 304: ...cal transmission equipment are assigned in either of the following two ways actual output power from the connector or fiber cut if automatic power reduction is used output power at the connector or fiber cut at one second after automatic power reduction takes place provided that maximum output and restart conditions are met Classification of optical telecommunication equipment Optical telecommunic...

Page 305: ...le Mode 9 LC I LN50 1 LNW48 1310 8 0 Single Mode 9 LC I LN50 1 LNW50 1310 2 0 Single Mode 9 LC I LN50 1 LNW54 1550 2 0 Single Mode 9 LC I LN50 1 LNW27 1310 3 0 Single Mode 9 LC I LN50 1 LNW29 1550 3 0 Single Mode 9 LC I LN50 1 LNW31 1310 0 0 Single Mode 9 LC I LN50 1 LNW32 1310 1 5 Single Mode 9 LC I LN50 1 LNW76 1310 3 0 Single Mode 9 LC I LN50 1 LNW223 1558 98 1558 17 2 0 Single Mode 9 LC I LN50...

Page 306: ...ode 9 LC I LN50 1 LNW427 1555 75 1554 94 2 0 Single Mode 9 LC I LN50 1 LNW447 1540 56 1539 77 2 0 Single Mode 9 LC I LN50 1 LNW449 1538 98 1538 19 2 0 Single Mode 9 LC I LN50 1 LNW453 1535 82 1535 04 2 0 Single Mode 9 LC I LN50 1 LNW455 1534 25 1533 47 2 0 Single Mode 9 LC I LN50 1 LNW459 1531 12 1530 33 2 0 Single Mode 9 LC I LN50 1 LNW56 1550 2 0 Single Mode 9 LC I LN50 1 LNW57 1550 6 0 Single M...

Page 307: ... Circuit Pack Code Wavelength nm Maximum Output Power dBm Fiber Type µm Connector Type FDA Class IEC Class Module Code Supported Circuit Pack s Wavelength nm Output Power dBm Fiber Type µm Connector Type FDA Class IEC Class 100BASE LX L1 LNW70 LNW74 LNW78 LNW170 1310 8 0 Single Mode 9 LC I LN50 1 1000BASE SX C1 LNW70 LNW78 850 0 0 Multimode 50 and 62 5 LC I LN50 1 1000BASE ZX I1 LNW63 LNW64 LNW70 ...

Page 308: ...imode 50 and 62 5 LC I LN50 1 GE 1X2XFC SX I1 LNW63 LNW64 LNW70 LNW73 73C LNW78 LNW170 850 2 5 Multimode 50 and 62 5 LC I LN50 1 S15512 LNW37 LNW45 LNW55 LNW82 1310 8 0 Single Mode 9 LC I LN50 1 OC3IR1 I1 LNW37 LNW45 LNW55 LNW82 1310 8 0 Single Mode 9 LC I LN50 1 OC3LR1 I1 LNW37 LNW45 LNW55 LNW82 1310 0 0 Single Mode 9 LC I LN50 1 OC12IR1 I1 LNW49 LNW55 LNW82 1310 8 0 Single Mode 9 LC I LN50 1 Mod...

Page 309: ...de 9 LC I LN50 1 OC48LR2 I1 LNW55 LNW62 LNW82 LNW202 1550 3 0 Single Mode 9 LC I LN50 1 OC48SR1 I1 LNW55 LNW62 LNW82 LNW202 1310 3 0 Single Mode 9 LC I LN50 1 S2D23C6 LNW82 LNW202 1558 983 4 0 Single Mode 9 LC I LN50 1 S2D25C6 LNW55 LNW62 LNW82 LNW202 1557 363 4 0 Single Mode 9 LC I LN50 1 S2D27C6 LNW55 LNW62 LNW82 LNW202 1555 747 4 0 Single Mode 9 LC I LN50 1 S2D31C6 LNW82 LNW202 1552 524 4 0 Sin...

Page 310: ...LN50 1 S2D47C6 LNW55 LNW62 LNW82 LNW202 1539 766 4 0 Single Mode 9 LC I LN50 1 S2D49C6 LNW82 LNW202 1538 186 4 0 Single Mode 9 LC I LN50 1 S2D53C6 LNW55 LNW62 LNW82 LNW202 1535 036 4 0 Single Mode 9 LC I LN50 1 S2D55C6 LNW55 LNW62 LNW82 LNW202 1533 465 4 0 Single Mode 9 LC I LN50 1 S2D59C6 LNW55 LNW62 LNW82 LNW202 1530 334 4 0 Single Mode 9 LC I LN50 1 OC192IR2 C1 LNW59 LNW502 1550 2 0 Single Mode...

Page 311: ...and Electrostatic Discharge ESD considerations 365 372 304R7 1 Issue 1 November 2007 A 1 7 OC192SR1 C1 LNW59 LNW502 1310 1 0 Single Mode 9 LC I LN50 1 Module Code Supported Circuit Pack s Wavelength nm Output Power dBm Fiber Type µm Connector Type FDA Class IEC Class ...

Page 312: ... 1665 DMX optical specifications Laser safety and classifications and Electrostatic Discharge ESD considerations A 1 8 365 372 304R7 1 Issue 1 November 2007 ...

Page 313: ...ination to assure proper performance and reliability of lightwave systems With the modern high speed high power and wider bandwidth optical transmission systems clean connectors along the optical path are essential for successful operation Contents This appendix provides information on the following topics Objectives This chapter provides information to perform the following 1 Properly clean an op...

Page 314: ...course on connector cleaning and the connector inspection process is now offered through Alcatel Lucent University Course Code LMC200H Understanding Fiber Optic Cleaning Inspection and Testing To learn more about this course consult your local Alcatel Lucent Account Representative ...

Page 315: ...712900 2 5mm Universal adapter cap For use with the Noyes OFS 300 200X 408197044 ITE 7129D1 33712901 1 25mm Universal adapter cap For use with the Noyes OFS 300 200X 408197069 ITE 7129D2 33712902 Video Fiber Scope1 Noyes VFS 1 TBD TBD TBD Individual presaturated alcohol wipes 99 pure isopropyl alcohol 901375147 ITE 7136 33713600 CLETOP Cleaning Cassette Type A Reel 901375154 ITE 7137 33713700 CLET...

Page 316: ... this procedure Substitution of equipment or materials is at the discretion of the user and is not recommended Luminex Cloth 5 5 x 5 5 408201226 R6033 23603300 Notes 1 This equipment may not be necessary at all locations It is to be used when the ports need to be verified for cleanliness If care is exercised when cleaning fibers the video scope may not be needed Product Model Description Comcode I...

Page 317: ...tical connectors may emit invisible laser radiation and direct exposure can severely injure the eye If inspecting the endface of a connector with a fiberscope be absolutely certain that the system is deactivated Alcohol is flammable and is harmful if swallowed inhaled or absorbed through the skin Keep alcohol away from heat sparks or flame Avoid contact with eyes skin and clothing WARNING Laser ha...

Page 318: ...e located longitudinally down the center of its axis allowing enough tolerance for a fiber to pass through All optical connectors should be cleaned prior to being connected Keep the protective ferrule dust cap on the connector until initiating the cleaning process Cleaning procedure The following cleaning procedure is acceptable for field service installation activities 1 Remove the dust cap from ...

Page 319: ...rwise hold the CLETOP cassette cleaner in the palm of your hand with the cassette shutter door facing up See Figure B 2 CleTop Cleaner p B 8 Rotate the cassette lever all the way down with your thumb Do not release the lever The lever advances the dry Luminex cleaning cloth inside the case and simultaneously opens the shutter The CLETOP cassette shutter door is now open and ready for cleaning the ...

Page 320: ...pressed snug against the cleaning cloth while dragging the ferrule to assure the proper cleaning action 6 Release the cassette lever allowing the shutter door to close to its initial position Continue with Step 5 7 Wrap a Luminex cleaning cloth around the ferrule and rotate the connector housing cleaning the outside periphery of ferrule Follow this by folding an unused portion of the cloth over th...

Page 321: ...e ferrule and fiber as observed by the inspection system scope should be free of any contaminates See Figure B 3 Acceptability Criteria for Fiber Cleaning p B 10 Repeat the Cleaning Procedure if the fiber endface does not meet the following requirements Requirement No fixed type of contamination contaminates that remain at the same location after three wet dry cleaning cycles regardless of size is...

Page 322: ...imes Following this procedure carefully place the cap over the ferrule When the cleaned connector is ready for assembly it should be re inspected for cleanliness prior to connection E N D O F S T E P S Fiber adapters or circuit pack connectors During testing and or trouble shooting activities it may be necessary to clean the optical buildout adapter or the circuit pack connector The following proc...

Page 323: ... the connector Apply slight pressure upon contact and rotate stick 360 degrees at least three 3 times 2 Remove the stick cleaner rotating it upon removal 3 Using a dry CLETOP stick cleaner of appropriate diameter repeat the above cleaning procedure This procedure will clean the side walls of the adapter and the endface of the circuit pack connector 4 Gently insert the Video Fiber Scope probe into ...

Page 324: ...extremely important to clean the connector ferrule end surface each time before making connections Procedure Complete the following steps to clean a pluggable optics module 1 Remove the protective process plug from the pluggable optics module Keep the process plug clean until reinstalled later if required When performing this step hold the canned dry nitrogen or air upright If the canned dry nitro...

Page 325: ...peat Step 4 6 If required reinstall the process plug into the optical ports to maintain cleanliness E N D O F S T E P S CAUTION This step should only be performed on the transmit TX port if the air blows did not work Do not perform this step on the receive RX port The receive RX port contains a lens for focusing a wide input The lens is more easily scratched than cleaned CAUTION It is recommended ...

Page 326: ... Cleaning pluggable optics modules Fiber cleaning B 1 4 365 372 304R7 1 Issue 1 November 2007 ...

Page 327: ...al circuit packs Contents This appendix provides information on the following topics Objectives This appendix provides information to perform the following Install and remove LC type LBOs onto and from LC type ports Install and remove LC type fiber connections Fiber cleaning Refer to Appendix B Fiber cleaning for fiber cleaning information Do not attempt to clean LBOs as they may be damaged by a c...

Page 328: ...Dust caps should be applied on all LBOs when not installed in connector ports LC type connector port The LC type connector port will only accept LC type LBOs for external fiber connection Figure C 1 LC Type Connector Ports on Circuit Pack LC type LBO 1665 DMX utilizes Alcatel Lucent s state of the art AllWave ADVANTAGE Fiber Optic Attenuators These attenuators reduce optical power from the transmi...

Page 329: ...C Type LBO Assembly of LC type LBO into LC block The LC type LBOs are installed into the LC type connector by aligning the alignment key with the slot in the connector port and pushing the LBO into the port until it snaps into place Figure C 3 LC Type LBO Inserted Into LC Type Connector Port Removal of LC type LBO from LC block The LC type LBOs are removed from the LC type connector port by depres...

Page 330: ... LBOs Installing fiber connectors and LBOs C 4 365 372 304R7 1 Issue 1 November 2007 Figure C 4 Removing LC Type LBO From LC Type Connector Port DEPRESS TAB TO RELEASE LBO ...

Page 331: ... Appendix B Fiber cleaning for Fiber Cleaning information Dust caps should be applied to all fiber connectors when not installed in a connector port LC type connections LC type fiber connectors use a snap action lever tab locking method to join the fiber connector to the port connector Figure C 5 LC Type Fiber Connector The LC type fiber connector is assembled onto an LC type connector port of a c...

Page 332: ... Fiber connections Installing fiber connectors and LBOs C 6 365 372 304R7 1 Issue 1 November 2007 Figure C 6 LC Type Fiber Connection ALIGNMENT SLOT DEPRESS LEVER TO RELEASE THE SNAP ACTION TAB ...

Page 333: ...5 DMX backplane has been bent or broken Contents This appendix provides information on the following topics Objectives This appendix provides information and procedures to do the following Identify a bent or broken pin Determine the correct replacement pin and pin kit Straighten bent pin Replace broken pins Pin and connector background D 2 Repair kits and tools D 4 Simple repair methods D 5 Replac...

Page 334: ...have been press fit into the backplane Should these connectors be damaged beyond simple repair methods contact your next level of support for the replacement procedure RJ45 jacks Interface cabling to and from the 1665 DMX shelves is connected through RJ45 connectors jacks which have been press fit into the backplane Should these jacks be damaged beyond simple repair methods contact your next level...

Page 335: ...372 304R7 1 Issue 1 November 2007 D 3 Table D 1 Backplane Locations of METRAL Pins Row Column Type Mating Length mm Tail Length mm 001 154 156 162 GND Signal Pin 5 75 4 30 001 154 156 162 a b c d e Signal Pin 8 00 4 30 All others All others Signal Pin 5 75 4 30 ...

Page 336: ...ent pins are available These pins are defined by the mating length extending beyond the inside of the plastic shroud and by their tail length for press fitting into the backplane The tail length includes a compliant press fit section needed to achieve a gas tight connection in four contact areas All the METRAL pins used on the 1665 DMX shelves have the same tail length of 4 30 mm 0 169 in Addition...

Page 337: ... reliable connection If the visual examination suggests that the connector pins are loose or are damaged beyond repair replace the connector pin METRAL backplane pins Follow the instructions and use the tools provided in the MT370 01 Shelf Level Press Fit Repair Kit to straighten METRAL pins which may have been bent out of position Guide pins and keying pins If a stainless steel guide pin or keyin...

Page 338: ...e manner that the exposed pin terminals of a plug might be bent The damage concern for these receptacle terminals is that they may be crushed or otherwise distorted out of shape Attempts to straighten these terminals may result in fracturing them If a receptacle terminal has been damaged to the extent that the mating plug connector cannot be connected then the recommended alternative is to replace...

Page 339: ...65 DMX backplane A second removal and replacement in the same plated through hole may not meet the long term reliability objectives If a replacement is needed for a previously replaced connector pin contact your next level of support before proceeding Important Protect the surrounding area from any debris which may be generated during the pin removal and replacement Procedure for METRAL pins Use t...

Page 340: ...eplace Guide or Keying Pins contact your next level of support for tooling replacement parts and detailed replacement procedures The replacements will need to installed with screws and washers D subminiature pin procedure If it becomes necessary to replace either the D Subminiature pins or connector contact your next level of support for detailed replacement procedures RJ45 jacks If it becomes nec...

Page 341: ... as to the reason why This checklist should be turned in as part of your job complete paperwork Contents This chapter contains the following Table E 1 Installation Acceptance Checklist Overview E 1 Section and Chapter Procedure Required Completed Yes No Part I 1665 Data Multiplexer 1665 DMX physical installation and powering Chapter 1 Equipment and cable installation for 1665 Data Multiplexer 1665...

Page 342: ...ble installation p 1 64 See Note 1 Modem cable installation p 1 69 See Note 1 Sync cable installation p 1 72 Sync cable with molded DB 9 connector procedure p 1 72 See Note 1 Sync cable with wire wrap DB 9 connector procedure p 1 74 See Note 1 Office alarm cable installation p 1 78 See Note 1 Miscellaneous environmental discrete telemetry cable installation p 1 84 See Note 1 Main optical fiber ins...

Page 343: ...5 8 8 channel low loss DWDM Optical Mux Demux p 2 19 See Note 1 LNW6 28DS1 LNW7 28DS1PM LNW8 56DS1E1 low speed installation optional p 2 20 See Note 1 LNW16 12DS3 EC1 LNW18 TMUX LNW19 LNW19B 48 DS3 EC1 LNW20 48TMUX low speed installation optional p 2 21 See Note 1 LNW36 OC 3 OLIU low speed installation optional p 2 22 See Note 1 LNW37 4 OC 3 SFP OLIU LNW45 8 OC 3 SFP OLIU LNW49 4 OC 12 SFP OLIU LN...

Page 344: ...ee Note 1 Install pluggable transmission modules p 2 34 See Note 1 Part II 1665 Data Multiplexer 1665 DMX stand alone installation tests Chapter 3 Software download and circuit pack installation Software installation p 3 4 See Note 1 Circuit pack installation p 3 5 See Note 1 Use of WaveStar CIT software p 3 9 Yes Circuit pack firmware version verification p 3 12 See Note 1 1665 DMX shelf initiali...

Page 345: ...path switching test manual p 4 16 See Note 1 DS1 cleanup procedures p 4 18 Delete any existing DS1 cross connections p 4 18 See Note 1 Verify cross connects removed p 4 21 See Note 1 DS3 EC1 and TMUX testing procedure p 4 22 Verify provisioning p 4 22 See Note 1 DS3 terminating equipment loopback testing optical main OLIUs p 4 23 See Note 1 DS3 non terminating transmission optical main OLIU p 4 26...

Page 346: ...eed testing p 4 43 OC 3 testing procedure p 4 43 See Note 1 OC 12 low speed testing p 4 47 OC 12 testing procedure p 4 47 See Note 1 OC 12 facility loopback testing p 4 49 See Note 1 OC 48 low speed testing p 4 52 OC 48 low speed testing procedure p 4 52 See Note 1 OC 48 facility loopback testing p 4 53 See Note 1 LED test p 4 56 LED test procedure p 4 56 See Note 1 Additional optical tests option...

Page 347: ...tion p 5 13 Timing verification test procedure p 5 13 See Note 1 Miscellaneous environmental discrete telemetry test p 5 16 Miscellaneous discrete telemetry test procedure p 5 16 See Note 1 Modem connection test p 5 19 Modem connection test procedure p 5 19 See Note 1 Final operations p 5 21 Procedure p 5 21 Yes Section and Chapter Procedure Required Completed Yes No ...

Page 348: ...re p 6 5 Optical transmission test OC 192 OC 48 OC 12 p 6 11 Transmission test procedure p 6 11 Automatic protection switching test p 6 12 Main OLIU switch test p 6 12 Manual switching tests p 6 14 Manual switching test procedure p 6 14 Yes Function units growth slots switching test p 6 15 Final operations p 6 17 Procedure p 6 17 Clear PM registers p 6 17 Notes 1 Only required if equipped Section ...

Page 349: ...372 304R7 1 Issue 1 November 2007 Appendix F Fiber labeling Overview Purpose This chapter describes the labeling of the fiber Contents This chapter contains the following Fiber description F 2 Fiber labels F 4 ...

Page 350: ...tallation is covered in Chapter 1 Chapter 2 Chapter 3 and Chapter 6 Yellow fiber Yellow fiber is made up of a single mode yellow colored fiber equipped with LC connectors at both ends The Yellow Fibers come in different lengths as well as custom lengths The length is given on the protection boot of the LC connector These fibers are used to make connections from the circuit pack to the LGX Installa...

Page 351: ...ll cable tags shall be removed A 1310 nm or 1550 nm test source and an ITE 7116 or equivalent optical power meter shall be used to perform all tests The light source shall first be measured for a reference point baseline No fiber jumper may have a measured loss of more than 2 dB CAUTION Equipment Damage Fiber is constructed of glass and should be treated with care It should not be pulled or stretc...

Page 352: ...bel maker 2 Apply the label to the strain relief boot close to the body of the LC connector 3 Adhere the end of the label with the printed text first 4 The label must be oriented perpendicular to the main axis of the connector 5 Wrap the label around the boot so that the second wrap is directly on top of the first wrap The label will wrap around the boot approximately two times The text is printed...

Page 353: ... pack PTMs are sometimes referred to as SFP small form pluggable modules Contents This chapter contains the following CAUTION Laser Safety When connecting fiber loops between the IN and OUT ports on optical circuit packs always connect to the IN port first and then the OUT port This will prevent any optical radiation from being present at the fiber end Pluggable transmission modules G 2 Install pl...

Page 354: ...nt approved RJ 45 Cat 5 E cable maximum span length of 100 meters LNW63 LNW64 LNW70 LNW78 LNW170 OC 3IR1 I1 109453894 OC 3 PTM TRCVR Intermediate Reach 1 3 IR 1 1310nm LNW37 LNW45 LNW55 LNW82 OC 3LR1 I1 109453886 OC 3 PTM TRCVR Long Reach 1 3 LR 1 1310nm LNW37 LNW45 LNW55 LNW82 S15512 109602599 OC 3 PTM TRCVR Short Reach 1 3 SR 1 1310 nm LNW37 LNW45 LNW55 LNW82 OC 12IR1 I1 109453902 OC 12 PTM TRCV...

Page 355: ...82 LNW202 S2D27C6 109610410 OC48 STM16 OTU1 DWDM 192 7THz 1555 747nm LNW55 LNW62 LNW82 LNW202 S2D31C6 109610451 OC48 STM16 OTU1 DWDM 193 1THz 1552 524nm LNW82 LNW202 S2D33C6 109610477 OC48 STM16 OTU1 DWDM 193 3THz 1550 918nm LNW82 LNW202 S2D35C6 109610493 OC48 STM16 OTU1 DWDM 193 5THz 1549 315nm LNW82 LNW202 S2D37C6 109610519 OC48 STM16 OTU1 DWDM 193 7THz 1547 715nm LNW82 LNW202 S2D45C6 109610600 ...

Page 356: ...09537555 OC 192 XFP TRCVR Long Reach 1 5 LR 2 80 km 1550 nm LNW59 LNW502 100BASE LX I1 FE TX 109527812 Optical Fast Ethernet PTM LC type connectors FE 1310SM LNW74 LNW70 LNW78 LNW170 GE 1X2XFC LX C1 1000BASE LX 1Gbps and 2 Gbps Fibre Channel FICON 109527804 GbE long reach Single Mode PTM supports Ethernet FICON and Fibre Channel traffic LC type connectors GbE FC 2FC 1310 LNW64 LNW70 LNW73 LNW73C L...

Page 357: ...2FC 850 LNW63 LNW64 LNW70 LNW73 LNW73C LNW78 LNW170 GE 1X2XFC LX I1 1000BASE LX 1 Gbps 109568782 GbE long reach Single Mode PTM supports Ethernet FICON and Fibre Channel traffic LC type connectors OSP hardened GbE FC 2FC 1310 LNW63 LNW64 LNW70 LNW73 LNW73C LNW78 LNW170 1000BASE ZX I1 1000BASE ZX 1Gbps 109541862 GbE Short reach Single Mode PTM supports Ethernet LC type connectors OSP hardened GbE 1...

Page 358: ...ld the connector latch end of the module in your left hand with the gold fingers facing you The module should be positioned in manner similar to Figure G 1 Pluggable Transmission Module With Dust Plug Optical PTMs Only p G 6 Figure G 1 Pluggable Transmission Module With Dust Plug Optical PTMs Only Important Do not remove the dust plug unless you are ready to connect fibers or if you need to clean ...

Page 359: ...sue 1 November 2007 G 7 Figure G 2 Examples of Dust Plugs 3 Referring to Figure G 3 Module Types p G 7 below determine the type of latching mechanism on the pluggable transmission module you have Figure G 3 Module Types MA DMX 421 Gold Fingers Gold Fingers MA DMX 445 1 2 3 Gold Fingers Port Port Port ...

Page 360: ... into the optical ports to maintain cleanliness during storage and or transportation It is recommended that the dust plug be kept in place to maintain cleanliness until the cabling is connected With proper care and handling cleaning the pluggable transmission modules should not be necessary Gold Fingers Gold Fingers Gold Fingers MA DMX 439 4 5 6 Port Port Port 7 8 MA DMX 442 Gold Fingers Port Gold...

Page 361: ... port opening and latch mechanism may vary Figure G 4 Latch Type 3 Opened and Closed 6 Proceed to Step 8 7 Before inserting the module the latch must be in the closed position With the dust plug in place the latch is in the closed position Figure G 5 shows the open and closed position of the latch Depending on your PTM type the appearance of the port opening and latch mechanism may vary If Then Ty...

Page 362: ...u Do not insert pluggable transmission module 9 Rotate the module the dust plug or port end is facing you and the gold fingers are pointing away from you and are facing to the right Do not insert pluggable transmission module 10 Insert the pluggable transmission module in the required socket of the circuit pack faceplate Confirm that the pluggable transmission module is locked in the socket Verify...

Page 363: ...mission module has unique internal data for warranty purposes If this data for any reason is not unique both pluggable transmission modules with the duplicated information will be declared failed Refer to the 1665 Data Multiplexer Alarm Messages and Trouble Clearing Guide 365 372 302 11 Push on the dust plug or port end to insert the module The latch automatically catches when the module is insert...

Page 364: ... lighted on the SYSCTL circuit pack 15 From the System View window select Configuration Update System Update All Result The port LED stops flashing All alarms are cleared 16 Repeat Step 1 to Step 15 for additional pluggable transmission modules 17 If all pluggable transmission modules are installed then from the System View menu click on the Alarm List button to verify that no alarms are present f...

Page 365: ...is chapter provides important technical assistance information for the 1665 Data Multiplexer 1665 DMX Contents This appendix contains the following sections Technical assistance H 2 Accessing and navigating the On Line Customer Support OLCS web site H 7 Other technical support services H 13 ...

Page 366: ...rt Services are available 24 hours a day 7 days a week For additional information regarding Alcatel Lucent Worldwide Services refer to the Alcatel Lucent web site at http www alcatel lucent com solutions Select the appropriate category Service Providers Enterprise Important Use the appropriate steps below for the above categories Service Providers 1 Select Service Providers 2 Select Services 3 Sel...

Page 367: ...atel Lucent Welcome Center operator can direct the request to engineers that are highly trained and skilled in resolving issues involving Alcatel Lucent products Technical assistance is available 24 hours a day 7 days a week On line customer support Overview On Line Customer Support OLCS is the Customer Support web site for our customers technical support needs This customer web access tool provid...

Page 368: ...Users can choose a method for receiving updates email text messaging messages or none Users can choose when updates are wanted when the state of the AR changes any update to the investigation field occurs or any time any text field is modified Users can log into the OLCS web site and view ARs 24 hours a day 7 days a week Data Drop Box The Data Drop Box feature allows Alcatel Lucent support technic...

Page 369: ...ich are technical documents that explain the operation of a particular part of the system The following documents are available in this section Change Notice CN Ethernet Management Guide Method of Procedure MOP Planning Guide Service Assurance Guide Engineering Change Procedure ECP Feature Contents Operations Interworking OI Guide Screen Help White Papers These documents will vary from product to ...

Page 370: ...nce or preventive nature Alcatel Lucent Alerts contain detailed text descriptions and urgency of Alcatel Lucent product issues that need to be quickly communicated to customers after the deployment of a release or product Product Change Notices The Product Change Notices PCN area provides information on hardware changes for a product There is a selection of choices to help you search for Change No...

Page 371: ...irmation is sent within 2 business days The following steps tell you how to register for a login 1 Select Register Here on the top right just below the Login and Password boxes of the Online Customer Support https support lucent com portal olcsHome do web site 2 Follow this registration process Select the role and accept the terms of use Provide a business identification and enter in all of the re...

Page 372: ...me The changes take effect immediately There are two methods to find product information Click My Products to choose a product or click Documentation or Downloads to display a complete product listing When the full product list is displayed use the alphabetic listing default or the category list whichever you prefer Once a product is selected a Product Summary Page is displayed which describes all...

Page 373: ... are both legacy tools The new tools Alcatel Lucent Alerts and Ask AL Knowledge base are discussed in other sections of this document When you select CARES a general web page displays From that page a particular function can be selected from the left column To provide more information on the selected tool select More from the center column ARs can be viewed using Find an AR or Advanced query creat...

Page 374: ...tion Center CIC web site or to another OLCS webpage that contains the product documentation Within the Documentation and Downloads area the Technical Notes link brings you to a web page which contains documents that are not release specific and are technical in nature Also within the Documentation and Downloads area the Release Information link brings you to a Library of Release Notes web page tha...

Page 375: ...e to You have the option to click Modify Subscription or Cancel Subscription Modify Subscription allows you to modify the Urgency Type and or Products selected Cancel Subscription will stop future Alcatel Lucent Alerts email messages Product Change Notices PCNs You can access Product Change Notices PCNs from the left column on the Customer Support home page unless this view has been changed from t...

Page 376: ...S web site Technical support H 1 2 365 372 304R7 1 Issue 1 November 2007 Once on the RMA web page a table with contact information is displayed Use the contact information provided or choose to fill in the online RMA request form at the bottom of that web page ...

Page 377: ...ules will round out the understanding of the network element NE troubleshooting performed Objectives Each module has specific objectives Some overall series objectives are listed below Understand advanced network element security features Setup and understand interworking between Alcatel Lucent network elements Perform provisioning operations and remote trouble shooting using CIT EMS and TL1 inter...

Page 378: ...sed Workshop Location This workshop will be delivered in the Customer Advocate System Test Labs in Westford MA The format is 75 hands on lab exercises reinforced with 25 classroom instruction How to Sign Up To enroll in the training course Within the United States Visit https training lucent com Call 1 888 582 3688 Prompt 2 Outside the continental United States Visit https training lucent com Cont...

Page 379: ...O SW Alarm Cutoff and Test ADM Add Drop Multiplexer AGNE Alarm Gateway Network Element AIS Alarm Indication Signal AMI Alternate Mark Inversion ANSI American National Standards Institute APS Automatic Protection Switch ARM Access Resource Manager AS C Alarm Status and Control ASCII American Standard Code for Information Interchange ...

Page 380: ...olar 3 Zero Substitution B8ZS Bipolar 8 Zero Substitution BDFB Battery Distribution and Fuse Bay BER Bit Error Ratio BIP Bit Interleaved Parity BITS Building Integrated Timing Supply BRI Basic Rate Interface C CC Clear Channel CCITT International Telephone and Telegraph Consultative Committee CEV Controlled Environment Vault CD ROM Compact Disk Read Only Memory CDTU Channel and Drop Test Unit ...

Page 381: ...ntary Metal Oxide Semiconductor CMTS Cable Modem Termination System CO Central Office CP Circuit Pack CPE Customer Premises Equipment CR Critical alarm status CSA Carrier Serving Area CSU Channel Service Unit CS O Customer Support and Operations CV Coding Violation CVFE Coding Violation Far End D DCC Data Communications Channel DCE Data Communications Equipment DEMUX Demultiplexer ...

Page 382: ...lexer DSNE Directory Services Network Element DSX Digital Cross Connect Panel DT Distant Terminal DTE Data Terminating Equipment E EC 1 Electrical Carrier Level 1 ECI Equipment Catalog Item EEPROM Electrically Erasable Programmable Read Only Memory EIA Electronic Industries Association EMC Electromagnetic Compatibility EMI Electromagnetic Interference EOOF Excessive Out of Frame EPROM Erasable Pro...

Page 383: ...ST Environmental Stress Testing F FCC Federal Communications Commission FDDI Fiber Distribution Data Interface FE Far End FE ACTY Far End Activity FEBE Far End Block Error FE ID Far End Identification FEPROM Flash EPROM FERF Far End Receive Failure FE SEL Far End Select FIT Failures in 109 hours of operation G GbE Gigabit Ethernet GNE Gateway Network Element ...

Page 384: ...orm GUI Graphical User Interface H HECI Humans Equipment Catalog Item I IC Internal Clock ID Identifier IEC International Electrotechnology Commission IMF Infant Mortality Factor INC Incoming Status I O Input Output IP Internet Protocol IR Intermediate Reach IS In Service ISCI Intershelf control Interface ISI Intershelf Interface ISDN Integrated Services Digital Network ...

Page 385: ...telligent Vehicle Highway System L LAN Local Area Network LAPD Link Access Procedure D LBO Line Build Out LCN Local Communications Network LEC Local Exchange Carrier LED Light Emitting Diode LOF Loss of Frame LOP Loss of Pointer LOS Loss of Signal LR Long Reach LS Low Speed M MD Mediation Device MJ Major Alarm MM Multimode ...

Page 386: ... Failures MTBMA Mean Time Between Maintenance Activities Mult Multipling MUX Multiplex MXBIU Multiplexer and Backplane Interface Unit N NE Near End NE Network Element NE ACTY Near End Activity NEBS Network Equipment Building System nm Nanometer 10 9 meters NMA Network Monitoring and Analysis NMON Not Monitored provisioning state NRZ Nonreturn to Zero NNI Network Network Interface ...

Page 387: ...Optical Carrier Level 3 Signal 155 Mb s OC 12 Optical Carrier Level 12 Signal 622 Mb s OC 48 Optical Carrier Level 48 Signal OLIU Optical Line Interface Unit OOF Out of Frame OOL Out of Lock OPS INE Operations System Intelligent Network Element OS Operations System OSGNE Operations System Gateway Network Element OSI Open Systems Interconnection OSMINE Operations Systems Modifications for the Integ...

Page 388: ... Negative Field Effect Transistor PJC Pointer Justification Count PLL Phase Locked Loop PM Performance Monitoring PMN Power Minor Alarm POH Path Overhead POP Points of Presence POTS Plain Old Telephone Service PRM Performance Report Message PROTN Protection PRS Primary Reference Source PSU Power Supply Unit PTM Pluggable Transmission Module PVC Permanent Virtual Circuit ...

Page 389: ...t Regional Technical Assistance Center 1 866 LUCENT8 RZ Return to Zero S SA Service Affecting SCADA Supervisory Control and Data Acquisition SD Signal Degrade SDH Synchronous Digital Hierarchy SEFS Severely Errored Frame Seconds SEO Single Ended Operations SES Severely Errored Seconds SF Super Frame format for DS1 signal SFP Small Form Pluggable SID System Identification SLA Service Level Agreemen...

Page 390: ...S 1 SPE STS 1 Synchronous Payload Envelope STS 3c Synchronous Transport Level 3 Concatenated Signal STS 12c Synchronous Transport Level 12 Concatenated Signal SYSCTL System Controller circuit pack T T1X1 and T1M1 The ANSI committees responsible for telecommunications standards TA Telcordia Technologies Technical Advisory TABS Telemetry Asynchronous Byte Serial Protocol TARP Target ID Address Resol...

Page 391: ...age 1 TLB Timing Looped Back TOP Task Oriented Practice TR Telcordia Technologies Technical Requirement TSA Time Slot Assignment TSI Time Slot Interchange TSO Technical Support Organization U UAS Unavailable Seconds UNI User Network Interface UOC Universal Optical Connector UPD INIT Update Intialize UPSR Unidirectional Path Switched Rings V VF Voice Frequency VLAN Virtual Local Area Network ...

Page 392: ...tegration VM Violation Monitor VMR Violation Monitor and Removal VoIP Voice over Internet Protocol VONU Virtual Optical Network Unit VPN Virtual Private Network VT Virtual Tributary VT1 5 Virtual Tributary 1 5 1 728 Mb s VT G Virtual Tributary Group W WAN Wide Area Network ...

Page 393: ... single spare protection circuit pack 1x1 is a special case of 1xN with N 1 In 1x1 only one is active at a time A Active Active identifies a 1 1 protected OC N line which is currently selected by the receiver at either end as the payload carrying signal or a 1x1 or 1xN protected circuit pack that is currently carrying service See Standby AGNE Alarm Gateway Network Element A defined NE in an alarm ...

Page 394: ...oring over a specified number of bits that is BIP 3 or BIP 8 BITS Building Integrated Timing Supply A single clock that provides all the DS1 and DS0 synchronization references required by clocks in a building Broadband Any communications channel with greater bandwidth than a voice channel sometimes used synonomously with wideband Also refers to signals at the DS3 44 736 Mb s and higher Wideband re...

Page 395: ...in the SONET line It is used for end to end communications and maintenance It carries alarm control and status information between network elements in a SONET network DCE Data Communications Equipment In a data station the equipment that provides the signal conversion and coding between the data terminal equipment DTE and the line The DCE may be separate equipment or an integral part of the DTE or...

Page 396: ...per ring Can also be a GNE DSX Digital Cross Connect Panel A panel designed to interconnect to equipment that operates at a designated rate For example a DSX 3 interconnects equipment operating at the DS3 rate DTE Data Terminating Equipment That part of a data station that serves as a data source originates data for transmission a data sink accepts transmitted data or both Dual Homing A network to...

Page 397: ...the faceplate of the SYSCTL circuit pack FIT Failures in 109 hours of operation Free Running An operating condition of a clock in which its local oscillator is not locked to an internal synchronization reference and is using no storage techniques to sustain its accuracy FT 2000 Lucent s SONET OC 48 Lightwave System Function Unit Refers to any one of a number of different circuit packs that can res...

Page 398: ...t An equalizer network between the DMX 2 5G Multiplexer and the DSX panel It guarantees the proper signal level and shape at the DSX panel LED Light Emitting Diode Used on a circuit pack faceplate to show failure red or service state It is also used to show the alarm and status condition of the system Line Timing The capability to directly derive clock timing from an incoming OC N signal while pro...

Page 399: ...tal signal Mult Multipling The cascading of signals in a bay In the MULT mode the DS1 external reference can be cascaded to other shelves in a bay using Mult cables Normally starting with the bottom shelf Number 1 and working towards the top of the bay N NE Near End The network element the user is at or working on Also called local NE Network Element The basic building block of a telecommunication...

Page 400: ...cal Carrier Level 3 Concatenated Signal Low speed broadband equivalent to three STS 1s linked together with a single path overhead OC 12 Optical Carrier Level 12 Signal 622 Mb s OC 12c STS 12c Optical Carrier Level 12 Concatenated Signal High speed broadband equivalent to twelve STS 1s linked together with a single path overhead OC 48 Optical Carrier Level 48 Signal Operations Interface Any interf...

Page 401: ...ee Channel State Provisioning Proactive Maintenance Refers to the process of detecting degrading conditions not severe enough to initiate protection switching or alarming but indicative of an impending signal fail or signal degrade defect for example performance monitoring Protection Line As defined by the SONET standard the protection line is the pair of fibers one transmit and one receive that c...

Page 402: ... Operations The maintenance capability that provides remote access to all DMX 2 5G Multiplexer systems from a single location over the DCC Service Line On a DMX 2 5G Multiplexer system a service or working line is a pair of fibers one transmit and one receive that terminate on an OLIU circuit pack in the Main 1 A 1 B 1 C 1 or D 1 slots As defined by the SONET standard the SONET APS channel is not ...

Page 403: ...t Signal The basic building block signal with a rate of 51 840 Mb s for an STS 1 signal and a rate of n times 51 840 Mb s for an STS n signal STS 1 SPE STS 1 Synchronous Payload Envelope A 125 microsecond frame structure composed of STS path overhead and the STS 1 payload STS 3c Synchronous Transport Level 3 Concatenated Signal See OC 3c Subnetwork Group of SONET network elements that share a SONE...

Page 404: ...hich line the near end receiver has chosen so that an active indication may be made at the far end UOC Univeral Optical Connector Receptacles on the faceplate of some OLIUs that accept ST SC or FC connectors UPD INIT A push button on the SYSCTL faceplate V VM Violation Monitor A mode of the DS3 circuit pack in which it will monitor but not remove P bit parity violations on the DS3 signal from the ...

Page 405: ...BDFB 1 16 1 21 1 22 1 23 1 24 bay frame ground 6 bipolar 8 zero substitution B8ZS 5 13 BITS clock 5 13 C cable s 10 100Base T 1 58 1000Base T 1 92 1 94 1000Base T optical fiber optical fiber 1000Base T 1 93 1 95 CIT 3 2 CIT interface 2 2 4 3 5 2 6 2 discrete cables 1 84 DS1 1 34 1 36 1 41 1 54 DS1 color codes 1 36 DS3 EC 1 1 41 1 54 DS3 EC 1 cable connections 1 44 environmental 1 84 IAO LAN TCP IP...

Page 406: ... Extended superframe ESF 5 13 external buffer relay 1 78 F fan alarm 5 8 6 12 FDA CDRH A 2 21 CFR 1040 10 and 1040 11 A 2 FDA CDRH regulations A 9 fiber cleaning B 1 acceptable criteria B 10 function group 5 6 function unit 5 7 6 15 G ground 1 3 1 4 1 12 1 13 bay frame 6 I IAO LAN TCP IP cabling 1 64 IEC 60825 1 A 2 IEC requirements A 9 J jumper s optical fiber 1 4 4 2 4 43 4 44 4 45 4 46 4 47 4 4...

Page 407: ...mic network bay frame 1 4 serial port 1 96 single mode fiber 1 88 standards Pacific Bell Equipment Framework Standard PBS 000 102PT 1 4 Superframe SF 5 13 SYNC cable 1 74 cable s SYNC 1 72 SYNC cables DS1 timing 1 77 synchronization cable connections 1 77 timing 1 77 T technical support H 1 telemetry 1 84 5 16 connections 5 18 telemetry panel 1 85 test equipment CIT interface cable 2 2 DS1 error r...

Page 408: ...I N 4 365 372 304R7 1 Issue 1 November 2007 Index ...

Reviews: