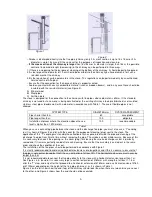
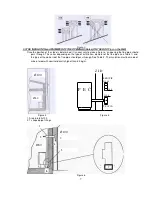
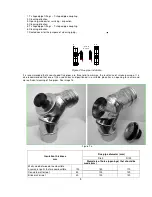
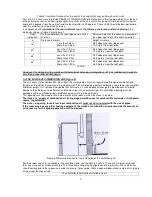
background image


1


PELLET STOVE 

“COMMO COMPACT” 


INSTALLATION, OPERATION AND MAINTENANCE MANUAL 


Pellet 


woody biomass 


biofuel


Summary of Contents for COMMO COMPACT

Page 1: ...1 PELLET STOVE COMMO COMPACT INSTALLATION OPERATION AND MAINTENANCE MANUAL Pellet woody biomass biofuel ...

Page 2: ... it into oxygen for air and carbon of the plant during its whole life The use of non renewable fossil fuels coal oil gas contrary to what happens with wood releases into the atmosphere enormous quantities of carbon dioxide CO 2 accumulated for millions of years thus causing the greenhouse effect The use of wood as fuel is therefore perfectly balanced with the environment because wood as renewable ...

Page 3: ...LFA PLAM Poor maintenance Unpredictable events Accidents occurred due to the use of spare parts that are not original spare parts or that are not intended for these models of the stove The installer of the stove shall take the full responsibility for the installation 2 1 THE BASIC CHARACTERISTICS OF THE USER The user must have the following basic characteristics To be a responsible adult To have c...

Page 4: ...stem grounding Always use the personal protective equipment and all the protective means prescribed by applicable local regulations Always ensure sufficient servicing space required for any maintenance and repairs of the stove 3 1 PLACING THE STOVE We advise you to unpack the stove only when it is put in the place where it is to be installed The stove stands on plastic legs with cast in screws M10...

Page 5: ...chimneys can be used or chimneys may be made of pipes that must be thoroughly insulated double wall and sealed in order to prevent condensation in them The discharge pipe must not be connected with other systems of any type such as the systems for discharging smoke from the combustion chamber exhaust grid or air distribution systems etc Furthermore the flue pipe must not be located in closed or se...

Page 6: ...t places where the elevation above the sea level is higher than 1 200 meters 100 recommendable Table 1 When you use a connecting pipe between the stove and the discharge flue pipe you must also use a T coupling as it is shown in Figures 5 and 6 with the cover for the purpose of cleaning plug next to the stove The application of this T coupling must enable the collection of ashes generated inside t...

Page 7: ...hrough This varies depending on the type of installation diameter of the flue pipe see Table 1 and the type of the wall or roof the flue pipe should pass through See Table 2 The insulation must be made of mineral wool with nominal density higher than 80 kg m 2 Z I D P E Ć O 8 0 T RAČVA O 1 0 0 REDUCIR O 8 0 Figure 4 Figure 5 1 Armature 80 100 2 T shaped pipe fittings Figure 6 5 4 3 6 1 2 7 Ø100 Ø8...

Page 8: ...nded that knee shaped flue pipes are three fold to minimise the resistance of smoke passage It is also recommended that one of the used knees and positioned in a suitable place has an opening for easier and more efficient cleaning of flue pipes See image 7a Figure 7a Insulation thickness mm Flue pipe diameter mm D 80 D 100 Diameters of holes openings that should be made mm Walls made of wood or co...

Page 9: ...moke discharge 3 4 THE INTAKE OF COMBUSTION AIR Figure 8 The air necessary for combustion taken from the surroundings must be regenerated through a ventilation grid located on the wall of the room and turned outwards This will provide a better combustion and a lower consumption of biofuel pellets It is not recommendable that external air is sucked directly through the pipe because it would decreas...

Page 10: ...ove will not be used for a longer period switch it off from the power supply or turn the switch into a switched off 0 position In the case of any breakdown or improper operation switch the stove off immediately or turn the switch into the switched off position 0 and contact the authorized service centre 4 0 IMPORTANT INSTRUCTIONS THESE ARE IMPORTANT OBLIGATORY INSTRUCTIONS FOR THE SAFETY OF PEOPLE...

Page 11: ...ISK OF BURN INJURIES Do not approach and touch the flue pipe there is a RISK OF BURN INJURIES Do not perform any kind of cleaning Do not open the door as the stove functions properly only when it is sealed Do not remove ashes when the stove is in the operational mode Children and pets must be away from the stove ADHERE TO ALL THE REGULATIONS STATED IN THIS DOCUMENT MANUAL In addition for the prope...

Page 12: ...uld be taken out for ensuring that there is no excessive ash accumulated at the bottom of the firebox Then place the firebox back in its place making it stable to ensure the safe operation of the stove If you have any doubts please do not hesitate to call the authorized service centre for further information and clarification as the manufacturer does not have any insight into the installation of t...

Page 13: ...e top The same rod can be inserted in the openings of the crank the pins where the springs for cleanings are connected and shake them after lifting them and lowering them for few times as shown in figure 14 Figure 14 Figure 15 LOWER SMOKE CHAMBER It should be cleaned manually at each consumed 90 100 kg of pellets two full tanks Raise the cover of the pellet tank In the tank in the front upper part...

Page 14: ...ensure the proper operation of the stove Figure 17 Figure 17 GENERAL CLEANING AT THE END OF THE HEATING SEASON The stove and ash must be completely cool unplug the power cable of the stove At the end of the heating season unplug the power cable of the stove for safety reasons It is very important to clean and check the stove as it is explained above The stove and ash must be completely cool After ...

Page 15: ...d thoroughly DANGER In the event of fire in the flue pipe evacuate all people and pets from the room turn the power supply off immediately using the main switch in the house or by unplugging the power cable the plug must always be easily accessible and free and immediately call firemen DANGER Classic fire wood cannot be used DANGER Do not use the stove for burning garbage 8 0 THE QUALITY OF FUEL P...

Page 16: ...on of the country in which the installation is performed ALFA PLAM disclaims any responsibility in case of material or physical damage or in case of malfunction if the above mentioned recommendation were not implemented Furnace is designed for both central heating for one storey and central heating for multiple storeys Furnace is prepared for closed heating system All installations should be in co...

Page 17: ...ce has a big advantage since you do not need additional room for components that are already built in 11 1 SAFETY VALVE Safety valve is positioned under the furnace lid on the pressure line Inlet connector is R1 2 Valve opens at water pressure of 3 bars To get to the valve you must take the right lateral side off facing the furnace Connector of the safety valve outlet which is positioned on the re...

Page 18: ...cause of the dirt inside it Make sure that all valves between furnace and installation are open Make sure to release air from the boiler and heating system prior to putting into operation During ignition and cooling fazes furnace might change in volume in response to a change in temperature and that might cause crackling noises That is absolutely normal since the construction is made out of steel ...

Page 19: ...ure SETTINGS Adjust decrease value of chosen menu OPERATION OFF Decreases room temperature 3 Menu MENU access MENU Access to the next level of submenu SETTINGS Sets the value and moves on to the next menu item 4 ON OFF unblocking WORK Two seconds long pressure turns the furnace on or off BLOCK Unblocks the furnace and sets off mode MENU SETTINGS Access to higher level of menu set modulations are m...

Page 20: ...mmediately after this the message LOAD PELLET appears figure 25 pellets are being inserted The next message is FIRE WAIT figure 26 we wait for the pellets to ignite and when the temperature of flue gases of 45ºC is achieved the message FLAME LIGHT appears figure 27 Figure 24 Figure 25 Figure 26 Figure 27 After this message stable flame is established the stove goes into operating mode and we get t...

Page 21: ...mperature in the boiler The temperature of water can be adjusted within the range from 40ºC to 80ºC We recommend that you do not adjust the water temperature below 50 55ºC due to possible condensation of the boiler neither above 75ºC Figure 29 By pressing the button 2 the message SET TEMP ROOM is shown figure 30 i e set value of the temperature in the room Thus with button 1 we increase and with b...

Page 22: ...re 33 The activity of the smoke motor ends 10 minutes after the stove switches off and after the smoke temperature has fallen below the value of 70ºC When the stove switches off a message OFF is shown on the display OFF Figure 34 Figure 34 15 2 9 Reigniting the stove It is not possible to reignite the stove before the temperature of the flue gasses falls below the value of 45ºC i e until the stove...

Page 23: ...e button SET and the button 5 to reach the menu 01 as shown in figure 35 Figure 35 Press the button SET and the buttons 1 or 2 to set the exact day in the week MONDAY TUESDAY figure 36 Press the button SET and the buttons 1 and 2 to set the clock time figure 37 Figure 36 Figure 37 Press the button SET and the buttons 1 and 2 to set the minutes figure 38 Press the button SET and the buttons 1 and 2...

Page 24: ...recisely set menu 01 The functions of switching on and switching off of the stove depend on these actions so for this reason you must compulsorily adjust the exact time First press the button SET and the button 5 and enter in the menu 02 as shown in figure 42 Figure 42 Press the button SET the shown indication is same as in figure 43 Figure 43 Press the button SET the shown indication on the displ...

Page 25: ...he display that the programming is active Figure50 Weekly programming The weekly programmer has 4 independent programs at its disposal 4 times switching off and ignition These 4 programs can be combined for each day in the week separately i e whether some of them will be active or not OFF or ON Make sure that the programs are carefully set in order to avoid overlapping of the time of switching on ...

Page 26: ... in the week starting from Monday up to Sunday as shown in figures 55 and 56 The transition from day to day is performed by pressing the button SET Figure 55 Figure 56 By pressing the button SET a transition is made towards setting of another program and its activation for every day in the week separately in the same manner as it was done for program 1 Repeat the same procedure for the remaining t...

Page 27: ... 57 By pressing the button SET we activate the weekend program as shown in figure 58 Figure 58 Figure 59 By pressing the button SET and then the button 1 we adjust the time of the stove s first ignition as shown in figure 59 Another pressing of the button SET and the button 1 sets the time of switching off of the stove and the display will look the same as in figure 60 Figure 60 The same procedure...

Page 28: ...or 3 it is possible to set that stand by mode activates following temperatures 1 Room temperature 2 Water temperature in the boiler 3 Room thermostat that can measure room temperature if available Attention We recommend that stand by mode in menu 4 keeps fabric settings 15 4 6 Menu 05 sound signal mode Choosing OFF option acoustic signalisation is disabled 15 4 7 Menu 06 initial filling Enables pr...

Page 29: ...s 15 5 4 Alarm for fire extinguishing during work mode If the fire extinguishes during working mode and smoke temperature fells below working threshold minimum 45ºC alarms activates Shutdown procedure immediately starts 15 5 5 Alarm for screw feeder safety pressure stat If pressure stat air input meter detects that pressure value is below activation threshold pressure stat stops screw feeder power...

Page 30: ...ned alarms activates check if the chamber is not clogged with ashes or that chimney is not partially clogged Main switch with power cable is shown in figure 70 Figure 69 Figure 70 15 5 7 Alarm for blower motor fan malfunction If the blower motor fan breaks furnace shuts down and message ALARM FAN FAILURE appears as in following figure Shutdown procedure immediately starts 15 5 8 Power outage occur...

Page 31: ...igher speed and the following message appears on the display figure 73 After finishing that process the display will show the indication as in figure 74 and the stove will be ready for new start Figure 74 15 6 CONNECTION SCHEME Bellow is given a typical connection scheme Figure 75 AL1 18 5ºC 55 BLACK OUT 07 37 18 5ºC 55 CLEANING FINAL 07 47 18 5ºC 35 OFF ...

Page 32: ...urnace automatically changes to alarm status 17 MALFUNCTION CAUSES SOLUTIONS PROBLEMS POSSIBLE CAUSES SOLUTIONS Wood pellets are not in the firebox in combustion chamber 1 Wood pellet reservoir is empty 2 Transport spiral is blocked 3 Helical geared motor is broken 4 Electric card is broken 1 Fill the reservoir 2 Empty the reservoir and unblock the spiral screw feeder 3 Replace helical geared moto...

Page 33: ... observe the applicable legal regulations of his own country related to the safety and protection of the environment The disassembly and disposal of the stove may be delegated to a third party provided that this third party is a company authorized for the collection and disposal of such materials NOTICE In all cases you must observe the applicable legal regulations of the country in which the stov...

Page 34: ...r has the right to ask the seller to repair that lack of conformity without any reimbursement by repair or change of the product in accordance with the valid legal regulations CONTENT 0 0 Technical Characteristics of the Stove 1 0 The Purpose of this Manual 1 1 Updating 2 0 The Responsibility of the Manufacturer 2 1 The Basic Characteristics of the User 2 2 The Transportation and Use of the Stove ...

Page 35: ... 4 Menu 15 5 Alarms 15 6 Connection scheme 16 0 Security measures 17 0 Malfunctions causes solutions 18 0 Information on the Disposal Discarding and Disassembly of the Stove 19 0 Time of guaranteed servicing ...

Reviews: