


Summary of Contents for R-volution Large
Page 1: ...R volution User manual AL RV 1 0 EN R volution...
Page 2: ......
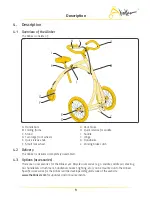
The ALINKER R-volution Large is a mobility aid designed for individuals with limited mobility. This innovative walker provides stability and support while promoting an active lifestyle. For detailed instructions on assembly and usage, download the user manual for free from our website. Start enjoying the freedom to move with ease.
Page 1: ...R volution User manual AL RV 1 0 EN R volution...
Page 2: ......


