background image


Mini-Mist® PRO Deluxe 


INSTRUCTION MANUAL 

(Not Suitable for Continuous Use) 


DO NOT USE EQUIPMENT BEFORE READING THIS MANUAL


This manual contains important warnings and instructions. 

Please read these instructions carefully and keep for your reference. 

©2011 (Apollo Sprayers International, Inc.) 

Summary of Contents for Mini-Mist PRO Deluxe T100

Page 1: ...Not Suitable for Continuous Use DO NOT USE EQUIPMENT BEFORE READING THIS MANUAL This manual contains important warnings and instructions Please read these instructions carefully and keep for your reference 2011 Apollo Sprayers International Inc ...

Page 2: ...ion Manual Congratulations on purchasing the T100 Mini Mist Pro DELUXE tanning system This product has been specially designed to provide an efficient application of tanning solution products Take a minute to read and understand how to operate your new T100 Mini Mist Pro tanning system and you will be able to provide the perfect tan with every application Your T100 is packaged with the following 1...

Page 3: ...ll ventilated Avoid all ignition sources such as static electricity sparks open flames hot objects sparks from connecting and disconnecting power cords and working light switches Follow the material and solvent manufacturers safety precautions and warnings Do not use liquids with flash points less than 100 degrees Fahrenheit 38 degrees Celsius Static electricity can be produced by HVLP spraying Ma...

Page 4: ... THE WIRE WITH GREEN INSULATION WITH OR WITHOUT A YELLOW STRIPE IS THE GROUNDING WIRE 1 For any question regarding proper installation of the ground plug consult a qualified licensed or certified electrician 2 Do not modify the plug provided If the plug does not fit the outlet have the proper outlet installed by a qualified electrician 3 This product is for use on a nominal 120 volt circuit and ha...

Page 5: ... not only damage your unit but also void your warranty 3 Next locate the male end of the air hose and connect it to the female quick connect on the T100 Mini Mist Pro tanning system a To insert the coupler pull back on the ring of the black coupler located on the Mini Mist Pro tanning system and connect it to the male connector on the hose Figure 6 Fig 6 b Release the ring to allow the coupler to ...

Page 6: ...eely d Look at Mist Applicator Patterns diagram below Note the position of the air cap and the direction of the spray pattern Pattern 1 is for spraying across from side to side Pattern 2 is for spraying up and down Pattern 3 will produce a spot or circle Patterns 1 and 2 are the most common positions for applying tanning solutions e Turn the air cap 2 to the position you want Turn the air cap ring...

Page 7: ...r away you hold the Spray Gun the more you will need to increase the solution flow thus causing abnormal amounts of airborne solution overspray f Holding the Spray Gun closer to the person being sprayed along with a minimum flow of solution will provide the best results no streaks or running solution and virtually no mist in the spray area g Be sure to move the Spray Gun at a slow steady speed kee...

Page 8: ...e air hose is connected c Open the Solution Flow Knob as described in item 4 d Set the mist pattern you wish to use by adjusting the air cap to the desired position Refer to Mist Pattern Diagram e Direct the Spray Gun to the area of the body that you want to start spraying f Pull back on the trigger 13 and move the Spray Gun as noted in the diagram below Do not wave the Spray Gun back and forth in...

Page 9: ...abs inward and pull the filter housing out Fig 1 Fig 2 c Pull the filter out of the filter housing to clean Fig 3 Fig 4 Fig 5 Air Filter Fig 1 Fig 2 Fig 3 Fig 4 Fig 5 2 Air Hose a Wipe the air hose daily with a damp cloth and store in a clean dry place 3 Spray Gun a It is important to clean your Spray Gun daily b At the end of the day or when the equipment will not be used any more disconnect the ...

Page 10: ...ion nozzle can be easily removed with an adjustable wrench or spanner Place the tip of your adjustable wrench or spanner on the two flat areas of the nozzle and twist anti or counter clockwise m The Solution needle 10 can also be removed for additional maintenance To remove Turn the Solution Flow Screw anti or counter clockwise until it comes out of the Spray Gun Be careful when removing the Solut...

Page 11: ...dle to stick and not spring back Try spraying again If leaking continues the Solution Needle Packing needs to be replaced Rare Remove Solution Needle Packing Nut 7 Pry out the Solution Needle Packing 4 Replace Reinstall Solution Needle Packing Nut Tighten all the way and then back off slightly 1 8 turn Test spray gun for leakage If you still have a problem call for technical support Q5 When T100 T...

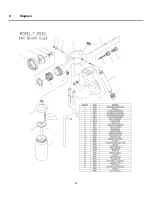
Page 12: ...12 8 Diagram ...
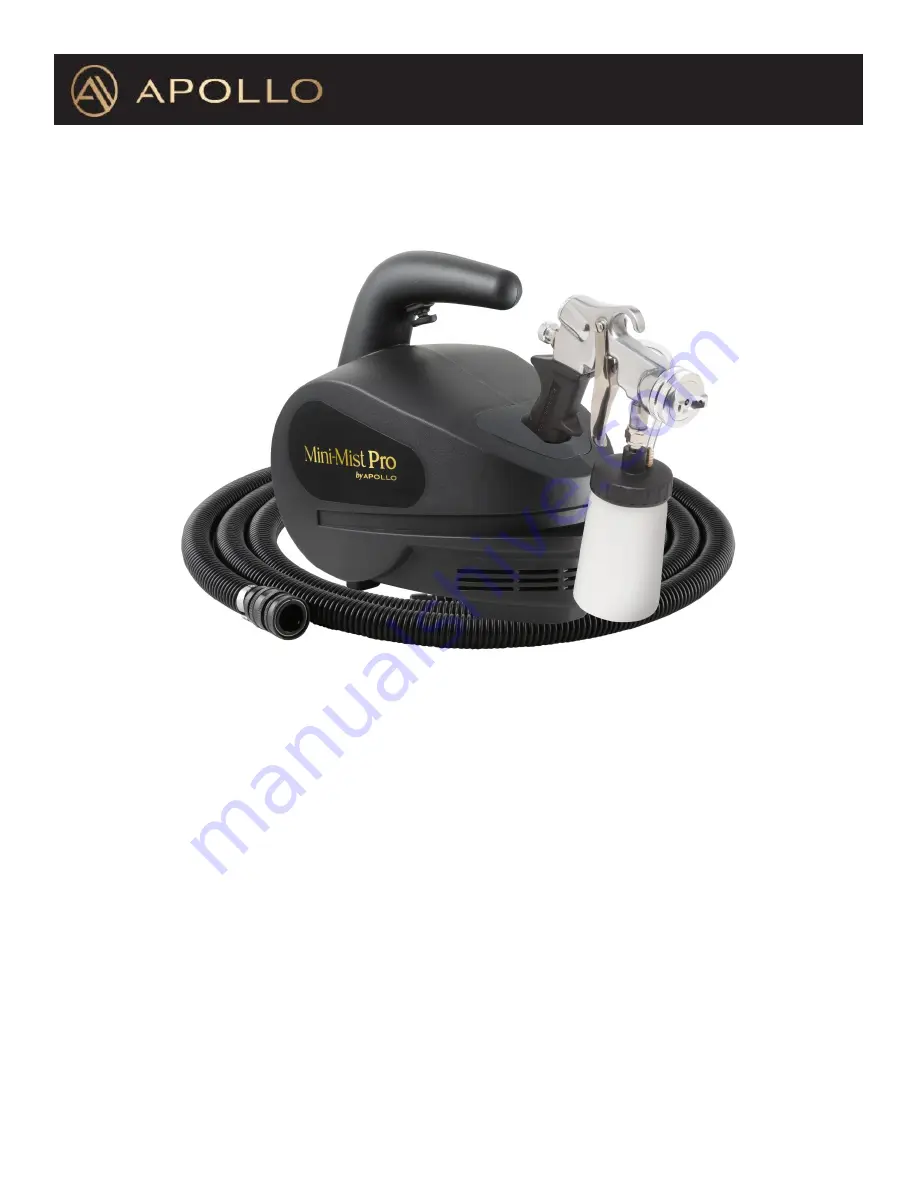
Page 13: ...w including but not limited to implied warranties of merchantability or fitness is excluded to the maximum extent permitted by law and if not excludable it is limited to the duration of the express Warranty No representative or person is authorized to extend this Warranty or to create for APOLLO SPRAYERS INTERNATIONAL INC any other liability in connection with the sale of any APOLLO SPRAYERS produ...

Reviews: