background image

Aquarius Intelligent Bidet Instruction Manual 


Page | 1 


Contents: 


02 – Technical Performance 

03 – Preparations for Installation 

05 – Installation Instructions 

08 – Bidet functions & operation 

11 – Safety, Maintenance & Cautions 

12 – Product Warranty & Contact Details 


Summary of Contents for Intelligent Bidet

Page 1: ...Bidet Instruction Manual Page 1 Contents 02 Technical Performance 03 Preparations for Installation 05 Installation Instructions 08 Bidet functions operation 11 Safety Maintenance Cautions 12 Product Warranty Contact Details ...

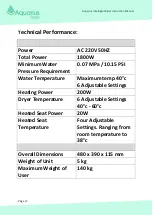
Page 2: ...nt 0 07 MPa 10 15 PSI Water Temperature Maximum temp 40 c 6 Adjustable Settings Heating Power 200W Dryer Temperature 6 Adjustable Settings 40 c 60 c Heated Seat Power 20W Heated Seat Temperature Four Adjustable Settings Ranging from room temperature to 38 c Overall Dimensions 480 x 390 x 115 mm Weight of Unit 5 kg Maximum Weight of User 140 kg ...

Page 3: ...lectrician before you continue with installation Electrical Supply Required The Intelligent Bidet must be earthed An approved residual Current Device RCD must be used When the Intelligent Bidet is being installed for use in a bathroom it most commonly is connected via a switched spur box no other appliance should share the spur with this product Please seek advice from a qualified electrician Manu...

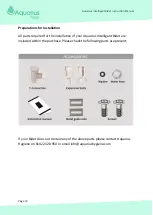
Page 4: ...l parts required for the installation of your Aquarius Intelligent Bidet are included within the purchase Please check the following parts are present If your Bidet does not contain any of the above parts please contact Aquarius Hygiene on 01422 328 950 or email info aquariushygiene com ...

Page 5: ...e existing seat and lid you ll see two bolts right behind the seat These are often covered by a cap or cover simply remove these to find the toilet s mounting holes where bolts are inserted to secure your existing seat to the toilet Simply unscrew and remove the bolts and if you lift the toilet seat it should raise straight off You will be left with a seat less toilet with the two mounting holes e...

Page 6: ...t You will then need to remove the mounting bracket bottom plate from the main bidet body Place the mounting bracket over the mounting holes on the toilet Next insert the rectangular metal guide rails on the left and right sides of the bracket Then guide the screws through the guide rails and into the white expansion bolts in the mounting holes and screw to secure Once the mounting bracket is secu...

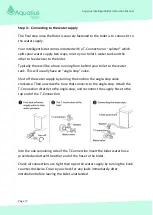
Page 7: ...to the water tank This will usually have an angle stop valve Shut off the water supply by turning the knob on the angle stop valve clockwise Then unscrew the hose that connects to the angle stop Attach the T Connection directly to the angle stop and reconnect the supply hose to the top end of the T Connection Into the one remaining side of the T Connection insert the bidet water hose provided and ...

Page 8: ...s this pressure sensor is triggered the only functions that will work are the nozzle cleaning and heated seat Once the user sits on the seat there is a noise to indicate the bidet is now active and the control panel will illuminate If the Bidet is being used with a shower chair or for any other purpose in which the user will not be in direct contact with the seat a damp cloth or similar placed on ...

Page 9: ...material which prevents bacteria from breeding and growing Bidet Wash Cycles The Bidet comes with three wash functions Spray is a light clean Bidet is your regular bidet wash and Turbo Wash is for when a stronger clean is required however if the wash cycle does not feel like it has been sufficient you can simply run the cycle again Adjustable Water Pressure Select the required wash cycle function ...

Page 10: ...lf automatically before and after every wash cycle When a bidet wash cycle is selected for a few seconds there will be a light trickle of water before the cycle starts this is the nozzle cleaning This eliminates the need to clean the bidet nozzles however If you wish to further clean the nozzle lightly rubbing with a small brush is recommended this is usually not necessary The Nozzle cleaning func...

Page 11: ...s will lead to a void of the guarantee The heating element has a fuse and temperature sensor the Intelligent Bidet water temperature is not designed to exceed 40 c If the thermostat within the heating element exceeds 45 c it will stop the heating element from operating for safety Be aware of low temperature burns Burns can still occur when the skin is in contact with an object at a low temperature...

Page 12: ...for repair or replacement for the first year from the original date of purchase Our obligations under this warranty are limited to repair or replacement for the first year from the original date of purchase provided the parts or product was properly installed and used in accordance with these instructions We are not responsible for the cost of removal or reinstallation of the product The warranty ...

Reviews: