


Summary of Contents for BBR 950
Page 1: ...OPERATING INSTRUCTIONS Refrigerator BBR 950 ...
Page 2: ...2 ...
Page 18: ...18 ...
Page 19: ...19 ...
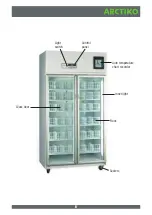
Introducing the Arctiko BBR 950, a powerful and reliable cold storage unit. Ensure efficient operation and hassle-free maintenance with the comprehensive Operating Instructions Manual. Download the manual for free from our website, providing detailed guidance on maximizing product performance and longevity. Your ultimate user manual destination!
Page 1: ...OPERATING INSTRUCTIONS Refrigerator BBR 950 ...
Page 2: ...2 ...
Page 18: ...18 ...
Page 19: ...19 ...


