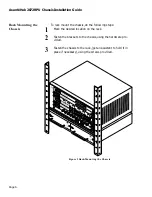
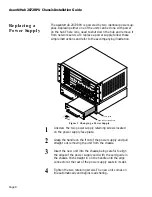
background image


AsantéHub 2072RPU

Chassis Installation

Guide


Introducing the Asanté 2072RPU Chassis 
on page 3

Installation on page 6

Replacing a Power Supply on page 8

Technical Specifications on page 9

Summary of Contents for AsanteHub 2072RPU

Page 1: ...AsantéHub 2072RPU Chassis Installation Guide Introducing the Asanté 2072RPU Chassis on page 3 Installation on page 6 Replacing a Power Supply on page 8 Technical Specifications on page 9 ...

Page 2: ... you Think There s always room for improvement and AsantéTechnologies is always interested in your comments and suggestions about our product documentation If you take the time to make suggestions we will take the time to read and consider them for new docu mentation releases Do us a favor and read through this Installation Guide and think about these questions 1 What do you like best about this G...

Page 3: ...o packets are dropped and there is no glitch in network service The hub designed with enterprise level features offers a seven slot architecture enabling you to add a variety of multiport repeater modules with several cabling options as well as an SNMP based network management module NMM Some mod ules which fill two slots provide twice as many ports for connect ing to other devices In complete com...

Page 4: ... slots for single or dou ble slotted multiport repeater modules and a network manage ment module Since all cables attach to the front of the modules you can easily access the connections in both rack mount and desktop installations Segment control lets you create separate Ethernet networks using the chassis s dual backplane Using the NMM s Segment Control buttons or using AsantéView software you c...

Page 5: ...preferably on sepa rate circuits Place the chassis within 100 meters if you are using twisted pair cable 10BaseT 185 meters for thin Ether net cable 10Base2 two kilometers for fiber optic cable 10BaseF Leave a two inch clearance around the ventilation grills Note Do not place the chassis near sources of electrical interferences such as motors or heavy current switches Normal office temperature and...

Page 6: ...desired location on the rack 2 Fasten the brackets to the chassis using the hardware pro vided 3 Fasten the chassis to the rack get an assistant to hold it in place if necessary using the screws provided Figure 2 Rack Mounting the Chassis Power Off Green Red Status No AC Normal Fail Power Off Green Red Status No AC Normal Fail ASANTE HUB ...

Page 7: ... outlet 3 Turn on the power switch Checking the Fuse A blown fuse usually indicates a serious problem in the power supply Contact technical support to help you determine the cause and whether you should replace the fuse or return the orig inal for testing and servicing To check the fuse do the following steps 1 Make sure the power is turned off and unplug the hub 2 Insert a small screwdriver under...

Page 8: ...r supply retaining screws located on the power supply face plate 2 Grasp the handle on the front of the power supply and pull straight out removing the unit from the chassis 3 Insert the new unit into the chassis being careful to align the edges of the power supply card with the card guide in the chassis Push straight in on the handle until the edge connector at the rear of the power supply seats ...

Page 9: ...romagnetic Emissions Meets FCC VDE Class A requirement Safety Designed in accordance with UL 1950 CSA 22 2 No 220 IEC 950 TUV and VDE requirements Physical Dimensions 17 W x 10 25 H x 12 L Weight Approximately 25 lbs without modules Environmental OperatingTemperature 0 to 40 C ambient Operating Humidity 5 to 85 noncondensing Operating Altitude 10 000 ft 3 048m maximum StorageTemperature 30 to 80 C...

Page 10: ...Page 10 AsantéHub 2072RPU Chassis Installation Guide Manual P N 06 00118 00 ...

Reviews: