

05/03/2013
Page 1 of 2
KRO_003
Using Kronos Time Clocks
Quick Reference Guide
Purpose:
This guide will instruct users how to properly use the Kronos clocks.
Audience:
Associates who use Kronos Time Clocks to record, review, and approve their time and request PTO.
To clock in and out with your badge:
1. Swipe your badge in the
Badge Reader
slot so that the
bar code or magnetic strip is facing the badge reader
(away from you).
2. The
green
indicator light, a single beep will occur and
the screen will
display “Accepted Punch” if the swipe is
successful.
3. The
orange
indicator light will flash, three beeps will
occur and the screen will display an error message if the
swipe is unsuccessful.
To cancel a meal deduction:
A meal deduction can be canceled at any time during a shift.
1. Press the blue key next to the
Cancel Meal Deduction
menu option.
2. Swipe your badge to
Enter Badge ID
. The screen will
display “Accepted Cancel Meal Deduction”.
Note
: If you are canceling your meal deduction when you
are clocking out, you will need to swipe your badge again to
clock out.
To view your schedule:
1. Press the blue key next to the
View Schedule
menu
option.
2.
Swipe your badge to
Enter Badge ID
. The screen will
display the Schedule from the current day plus the next
10 days. Use the blue
Navigation Keys
to scroll up and
down to view the entire schedule.
To clock in to another department, job code, or position:
1. Press the blue key next to the
Labor Transfer
menu
option.
2. Use the numeric keypad to enter the10-digit
BU-DEPT
(business unit and department) number (such as
2802966492). Press
Enter.
The BU-DEPT name
displays.
If you do not know the BU-DEPT number, press the blue
key next to the
List->
button to view a list of
departments. Use the blue down/up arrow keys to
navigate to desired department. Press
Enter
.
3. If moving to a different job type, use the numeric keypad
to enter the
JOB CODE
. Press
Enter
. The job code
name displays.
If
you don’t know the job code, press the blue key next to
the
List->
button to view a list of job codes. Use the
blue down/up arrow keys to navigate to desired job
code. Press
Enter
.
Note
: If you are not changing job codes, simply press
Enter
.
4. If moving to a secondary (concurrent) job, use the
numeric keypad to enter your job number (such as 0, 1,
etc.) in the
EMPLOYEE RECORD
field. Press
Enter
.
Note
: If this is your primary job, just press
Enter
.
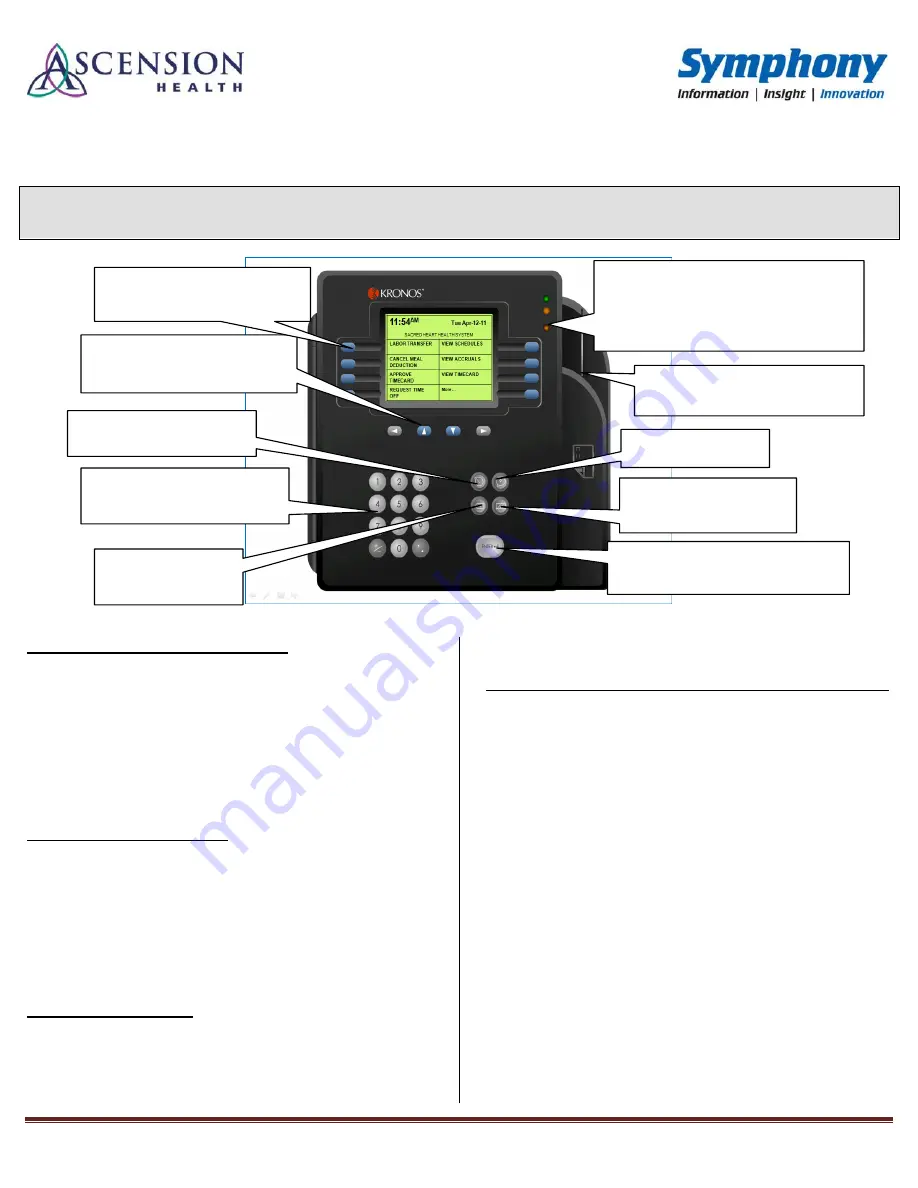
Clear
- button allows you to
remove all characters in an
entry field.
This button is
Inactive
and will
not be used.
Back
button allows you to exit
to the previous screen
Delete
button allows
you to erase one
character at a time
.
Enter -
button allows you to accept the
value entered in an entry field or accept
the information on the display
screen.
Number Keypad
allows you to
enter values into the entry fields of
a transaction.
Badge Reader
- Swipe your badge to
clock in/out or to identify yourself in a
transaction.
Navigation Keys
can also be used
to navigate through screen displays
within a view.
Indicator Lights
- The top button will flash
green off/on for successful transactions. The
middle button will flash orange off/on for
unsuccessful transactions. The bottom button
stays green to indicate the power is on.
Blue
Soft Keys
enable you to select
the menu options that are displayed
next to them.


