3834973
3834973
2
3
Installation and Maintenance Instructions
2
1
2
1
GB
2/2 solenoid valves NC-NO, direct operated,
brass or stainless steel body, series 262 1/8-1/4 / 263 3/8
DESCRIPTION
Series 262-263, 2/2 NC-NO:
• Solenoid valves with threaded 1/8-1/4 (262) /3/8 (263) con-
nections. Brass or stainless steel body.
ATEX 94/9/EC versions:
See “Special conditions for safe use”.
SPECIAL CONDITIONS FOR SAFE USE
For solenoid operators to ATEX 94/9/EC, the instructions
for use given in the specifi c Installation Instructions provided
with the product must be strictly followed.
Solenoid valves with threaded connections:
Standard
versions or versions equipped with solenoid operators, Ex d,
Ex e mb, Ex mb, for use in explosive atmospheres to ATEX-
IECEx.
ASSEMBLY
The components ASCO are intended to be used only with-
in the technical characteristics specifi ed on the nameplate
or in the documentation. To avoid damage to the equipment,
make sure to prevent the liquid from solidifying at low tem-
peratures and stay within the maximum and minimum tem-
perature limits.
Modifi cations to the equipment may only be made after
consulting the manufacturer or his representative.
Before installation, depressurise the piping system and clean
internally.
The solenoid valves may be mounted in any position with-
out affecting operation.
The direction of fl ow is indicated by markings on the valve’s
body and in the documentation.
Pipe connections have to be in accordance with the size
indicated on the body, label or in the product leafl et.
CAUTION :
• Reducing the connections may cause improper operation
or malfunction.
• For the protection of the equipment, install a strainer or fi lter
suitable for the service involved in the inlet side as close to
the product as possible.
• If tape, paste, spray or a similar lubricant is used when
tightening, avoid particles entering the system.
• Use proper tools and locate wrenches as close as possible
to the connection point.
• To avoid damage to the equipment, DO NOT OVERTIGHTEN
pipe connections. Observe a maximum tightening torque of
5 to 7 Nm.
• Do not use the valve or solenoid operator as a lever.
• Pipe connections should not apply any force, torque or strain
to the product.
ELECTRICAL CONNECTION
All electrical connections must only be made by trained and
qualifi ed personnel and have to be in accordance with the
local regulations and standards.
CAUTION:
• Before any intervention, turn off the electrical current to
power off the components.
• All screw terminals must be properly tightened before putting
into service.
• Depending on the voltage, electrical components must be
grounded according to local standards and regulations.
• To ensure ground continuity of the coil, make sure it is cor-
rectly positioned during assembly/disassembly (no. 1).
The equipment is electrically connected as follows:
• Detachable connector to ISO 4400 / EN 175301-803, form A
(On proper connection and when the (supplied or selected)
connector used is IP65- or IP67-rated, the solenoid valve
will have IP65 or IP67 protection).
PUTTING INTO OPERATION
Before pressurising the circuit, perform an electrical test. In
case of solenoid valves, energise the coil a few times and
notice a metal click signifying the solenoid operation.
FUNCTION
Most solenoid valves are equipped with coils for continuous
duty service. To prevent the risk of personal injury, do not
touch the solenoid operator which can become hot under
normal operating conditions. If the solenoid valve is easily
accessible, the installer must provide protection against
accidental contact.
Our solenoid valves and pilot valves are designed to operate
with devices compliant with EN 61131-2 standard.
SOUND EMISSION
The emission of sound depends on the application, fl uid
and type of equipment used. The exact determination of the
sound level can only be carried out by the user having the
valve installed in his system.
MAINTENANCE
Maintenance of ASCO products is dependent on service
conditions. Periodic cleaning is recommended, the timing of
which will depend on the fl uids used and the service condi-
tions. During servicing, the components must be checked for
excessive wear. A complete set of internal parts is available
as a spare parts or rebuild kit. If a problem occurs during
installation/maintenance or in case of doubt, please contact
ASCO or authorised representatives.
DISASSEMBLY
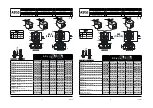
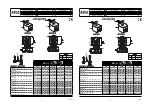
Disassemble the parts in the order indicated in the views in
these I&M Instructions
1 - Remove the retaining clip (1),
maintain pressure downwards
,
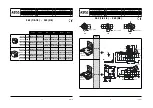
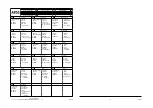
and the coil (2) (see coil codes on “CONNECTION” page).
2 - Remove the fl at spring (10).
2 - Unscrew the core-tube unit (3) and separate it from the
body (4).
3 - Remove the core/spring unit (5)(6) and the seal (8).
4 - Clean or replace all parts.
REASSEMBLY
Reassemble the parts in the reverse order of disasseambly.
Make sure the retaining clip is correctly positioned on the
coil (see drawing).
The exhaust must be connected to prevent contamination of
the inside of the solenoid valve.
NOTE:
1 - Grease the seal (8) and lightly coat the outer circumfer-
ence of the core with a lubricant conforming to standard
AFNOR ISO TR 3498 categories HL and FC.
2 - Make sure the core-tube unit is properly tightened at a
torque (a).
3 - Replace fl at spring, coil and retaining clip. Connect the
connector assembly.
4 - After reassembly, operate the solenoid valve several times
to ensure the valves open and close properly.
5 - Reassemble the piping connections and tighten at a
maximum torque of 5 to 7 Nm.
MISE EN SERVICE
Avant de mettre le circuit sous pression, effectuer un essai
électrique. Dans le cas d’une électrovanne, mettre la bobine
sous tension plusieurs fois et écouter le “clic” métallique qui
signale le fonctionnement de la tête magnétique.
FONCTIONNEMENT
La plupart des électrovannes comportent des bobinages
prévus pour mise sous tension permanente. Pour éviter
toute brûlure, ne pas toucher la tête magnétique qui, en
fonctionnement normal et en permanence sous tension,
peut atteindre une température élevée. Si l’électrovanne est
facilement accessible, l’installateur doit prévoir une protection
empêchant tout contact accidentel.
Nos électrovannes et électrovannes-pilotes sont prévues
pour fonctionner avec des dispositifs conformes norme
EN 61131-2
BRUIT DE FONCTIONNEMENT
Le bruit de fonctionnement varie selon l’utilisation, le fl uide et
le type de matériel employé. L’utilisateur ne pourra déterminer
avec précision le niveau sonore émis qu’après avoir monté
le composant sur l’installation.
ENTRETIEN
L’entretien nécessaire aux produits ASCO varie avec leurs
conditions d’utilisation. Il est souhaitable de procéder à un
nettoyage périodique dont l’intervalle varie suivant la nature
du fl uide, les conditions de fonctionnement et le milieu
ambiant. Lors de l’intervention, les composants doivent être
examinés pour détecter toute usure excessive. Un ensemble
de pièces internes est proposé en pièces de rechange pour
procéder à la réfection. En cas de problème lors du montage/
entretien ou en cas de doute, veuillez contacter ASCO ou
ses représentants offi ciels.
DEMONTAGE
Démonter les pièces en suivant l’ordre indiqué sur les vues
de cette notice.
1 - Oter le clip de maintien (1),
en maintenant une pression
vers le bas
, et enlever la bobine (2) (voir codes bobines,
pages suivantes).
2 - Retirer le ressort plat (10)
3 - Dévisser l'ensemble tube-culasse (3) et le séparer du
corps (4).
4 - Enlever l’ensemble noyau ressort (5)(6) et le joint d’étan-
chéité (8).
5 - Nettoyer ou remplacer toutes les pièces.
REMONTAGE
Remonter les pièces dans l’ordre inverse du démontage.
S’assurer que le clip de maintien est correctement positionné,
sur la bobine (voir dessin).
La purge doit être raccordée pour éviter toute pollution interne
de l'électrovanne.
NOTE :
1 - Lubrifi er le joint d’étanchéité (8) et lubrifi er légèrement le
diamètre extérieur du noyau avec une huile conforme aux
normes AFNOR ISO TR 3498 catégorie HL et FC.
2 - S'assurer du serrage correct de l'ensemble tube-culasse,
couple de serrage (a)
3 - Replacer le ressort plat, la bobine et le clip de maintien.
Raccorder le connecteur.
4 - Après remontage, faire fonctionner l'électrovanne plusieurs
fois afi n de s’assurer de son bon fonctionnement.
5 - Remonter les raccords de tuyauterie, couple de serrage
maximum entre 5 et 7 Nm.
Instructions de mise en service et d'entretien
2
1
2
1
FR
Electrovannes 2/2 NF-NO, à commande directe
corps laiton ou acier inox, séries 262 1/8-1/4 / 263 3/8
DESCRIPTION
Série 262-263, 2/2 NF-NO :
• Electrovannes, taraudé 1/8-1/4 (262) /3/8 (263). Corps laiton
ou acier inox.
Versions ATEX 94/9/CE :
Voir "conditions spéciales pour une utilisation sûre".
CONDITIONS SPECIALES POUR UNE UTILISATION SURE
Pour les têtes magnétiques ATEX 94/9/CE, suivre impé-
rativement les prescriptions d'utilisation décrites dans
chaque notice de mise en service spécifi que fournie avec
le produit.
Electrovannes, corps taraudé :
Versions standard ou
équipées de têtes magnétiques pour atmosphères explo-
sibles ATEX-IECEx, Ex d, Ex e mb, Ex mb.
MONTAGE
Les composants ASCO sont conçus pour les domaines
de fonctionnement indiqués sur la plaque signalétique ou la
documentation. Afi n de prévenir tout dommage sur le maté-
riel, éviter le risque de solidifi cation des liquides aux basses
températures et respecter les limites minimale et maximale.
Aucune modifi cation ne peut être réalisée sur le matériel
sans l’accord préalable du fabricant ou de son représentant.
Avant de procéder au montage, dépressuriser les canalisa-
tions et effectuer un nettoyage interne.
Les électrovannes peuvent être montées dans n’importe
quelle position.
Le sens de circulation du fl uide est indiqué par repères sur
le corps et dans la documentation.
La dimension des tuyauteries doit correspondre au raccor-
dement indiqué sur le corps, l’étiquette ou la notice.
ATTENTION :
• Une restriction des tuyauteries peut entraîner des dysfonc-
tionnements.
• Afi n de protéger le matériel, installer une crépine ou un fi ltre
adéquat en amont, aussi près que possible du produit.
• En cas d’utilisation de ruban, pâte, aérosol ou un lubrifi ant
lors du serrage, veiller à ce qu’aucun corps étranger ne
pénètre dans le circuit.
• Utiliser un outillage approprié et placer les clés aussi près
que possible du point de raccordement.
• Afi n d’éviter toute détérioration, NE PAS TROP SERRER
les raccords des tuyauteries. Couple de serrage maximum
entre 5 et 7 Nm.
• Ne pas se servir de la vanne ou de la tête magnétique
comme d’un levier.
• Les tubes de raccordement ne devront exercer aucun effort,
couple ou contrainte sur le produit.
RACCORDEMENT ÉLECTRIQUE
Le raccordement électrique doit être réalisé par un personnel
qualifi é et selon les normes et règlements locaux.
ATTENTION:
• Avant toute intervention, couper l’alimentation électrique
pour mettre hors tension les composants.
• Toutes les bornes à vis doivent être serrées correctement
avant la mise en service.
• Selon la tension, les composants électriques doivent être mis
à la terre conformément aux normes et règlements locaux.
• Afi n d'assurer la continuité de masse de la bobine, veuillez
à son positionnement correct lors d'une phase de montage/
démontage (rep. 1).
Le raccordement électrique s’effectue par:
• Connecteur débrochable ISO 4400 / EN 175301-803, forme
A (Quand le raccordement est correctement effectué et que
le modèle de connecteur fourni ou sélectionné est IP65 ou
IP67, alors le degré de protection de l'électrovanne est IP65
ou IP67).
3834973-B
A
v
ailability
, design and specifi
cations are subject to change without notice
. All r
ights reser
v
ed.
Summary of Contents for 262 Series
Page 13: ...3834973 3834973 26 27 ...

