background image

Dear ASKO Customer,
Thank you for choosing this quality product from Scandinavia,
which was made in Sweden.
We want you to feel assured that the inside of your new ma-
chine is just as good as the outside and that the ethics and
standards that went into the production of this machine are
just as high as the quality and performance that you will re-
ceive from it. We hope that this product will give you many
years of pleasure.
To ensure that you get the most out of your new machine, we
recommend that you read the operating instructions before
using the machine. The operating instructions also contain
information on how to avoid damaging the environment.

Operating Instructions

Tumble dryer

Save these instructions for future reference

ASKO T702

Summary of Contents for T702

Page 1: ...is machine are just as high as the quality and performance that you will re ceive from it We hope that this product will give you many years of pleasure To ensure that you get the most out of your new machine we recommend that you read the operating instructions before using the machine The operating instructions also contain information on how to avoid damaging the environment Operating Instructi...

Page 2: ...g program finished 13 Once drying has finished 14 Care and maintenance instructions 14 Cleaning the lint filter 14 Cleaning the outside of the machine 15 Troubleshooting 15 The machine will not start 15 Overheating cut off 15 Drying takes too long 15 The laundry does not dry or is too dry 15 Error messages 16 Technical information 16 Technical data 17 Service and guarantee 18 Warranty 18 How to co...

Page 3: ...ys check and follow the instructions on each item s laundry label You can find more infor mation in the Advice and tips before you tumble dry chapter Note When starting the tumble dryer for the first time or after a long period without use you may hear a slight thumping noise This noise is completely normal and will disappear after a few loads See the Quick guide on the last page 3 Customer Care C...

Page 4: ... vinyl plastic foam rubber or similarly textured rubberlike materials fiberglass or wool unless wool un less the label specifies washable Clean the lint filter before or after each load Keep the area around the exhaust opening and adjacent surrounding areas free from the accu mulation of lint dust and dirt The interior of the machine should be cleaned periodically by an authorized ASKO service age...

Page 5: ...ed space in a building B Grounding instructions for a permanently connected appliance This appliance must be connected to a grounded metal permanent wiring system or an equipment grounding conductor must be run with the circuit conductors and connected to the equipment grounding terminal or lead on the appliance Note This manual does not cover every possible condi tion and situation that may occur...

Page 6: ...he door closes for example if a child closes the door from inside The tumble dryer has a magnetic catch which allows the door to be opened from the inside The door has a door switch that automatically stops the tumble dryer when the door is opened Customer Care Center 6 1 800 898 1879 www askousa com Child safety ...

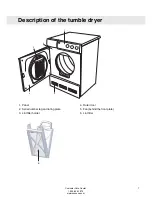
Page 7: ...Outer door 4 Panel 1 Fan behind the front plate 5 Serial number tag and rating plate 2 Lint filter 6 Lint filter holder 3 9 6 7 Customer Care Center 1 800 898 1879 www askousa com Description of the tumble dryer ...

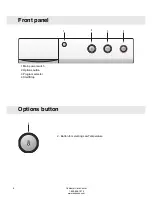
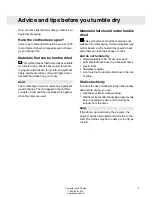
Page 8: ...1 2 3 4 Main power switch 1 Options button 2 Program selector 3 Start Stop 4 Options button 2 Button for selecting Low Temperature 2 Customer Care Center 8 1 800 898 1879 www askousa com Front panel ...

Page 9: ...umble dried This symbol means that the material is not suitable for tumble drying Certain materials may melt or become a fire hazard if exposed to heat and others can lose their shape or shrink And do not tumble dry materials labeled Do not dry near heat garments that have been dry cleaned at home plastic foam fiberglass material wool must not be tumble dried due to the risk of piling Static elect...

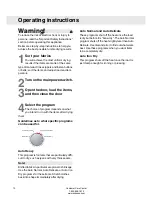
Page 10: ... specific programs can be used for Auto Delicate Auto Iron Dry Auto Heavy Auto Normal Auto Heavy This program is for items that are particularly diffi cult to dry such as jeans with very thick seams Note Knitted fabrics in particular are prone to shrinkage Use the Auto Normal Auto Delicate or Auto Iron Dry programs for these items Stretch clothes back into shape immediately after drying Auto Norma...

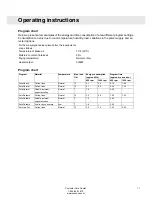
Page 11: ...ogram chart Program time approx hrs and min Energy consumption approx kWh Max load lb Temperature Material Program 1600 rpm 800 rpm 1600 rpm 800 rpm 1 45 2 10 3 2 4 1 13 Normal Cotton linen Auto Heavy 1 30 2 00 2 9 3 7 13 Normal Cotton linen Auto Normal 0 50 1 6 7 Normal Wrinkle resistant polyester cotton Auto Normal 1 25 1 50 2 6 3 5 13 Normal Cotton linen 1 Auto Delicate 0 50 1 5 7 Normal Wrinkl...

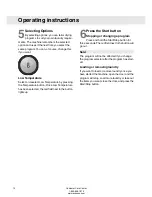
Page 12: ...o the button lights up 6Press the Start button Stopping or changing a program Press and hold the Start Stop button for three seconds The red field next to the button will go out Note The program will not be affected if you change the program selector after the program has start ed Loading or removing laundry If you want to load or remove laundry once you have started the machine open the door and ...

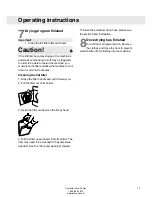
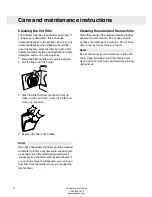
Page 13: ...ull it toward you 2 Pull the filter out of its holder 1 2 3 Open the filter and remove the lint by hand 4 Fold the filter up and insert it into its holder The filter may need to be cleaned if it has limescale deposits See the Care and cleaning chapter To install the automatic drain hose please see the section titled Installation 8Once drying has finished Turn off the main power switch Remove the c...

Page 14: ...n its holder Note If you have hard water the filter should be washed with water to remove any limescale deposits Use a sponge and a little dishwashing detergent if necessary Dry the filter carefully with a towel If you cannot remove the limescale you can buy a new filter from the retailer where you bought the tumble dryer Cleaning the outside of the machine Clean the outside of the machine and the...

Page 15: ...h caused by lint clogging the lint filter for instance Clean the filter The overheating cut off will reset automatically once the machine has cooled down Drying takes too long Check that the lint filter is not clogged see the Care and maintenance chapter The laundry does not dry or is too dry The door has been opened while the program is running which disrupts the moisture monitor ing function Err...

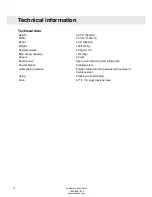
Page 16: ...rying capacity 52 rpm Speed See serial number tag and rating plate Rated power Stainless steel Drum material Powder coated and hot galvanized sheet steel or stainless steel Outer casing material Stacking or freestanding Setup 67 1 7m polypropylene hose Drain Customer Care Center 16 1 800 898 1879 www askousa com Technical information ...

Page 17: ...ll From date of purchase ASKO replacement parts and or repair labor to cor rect defect in materials or workmanship Service must be performed by an authorized ASKO service agent Third Year Full Complete your product warranty registration online at www askousa com customercare registration within 90 days from the date of purchase to extend the original warranty one additional year If you do not have...

Page 18: ...or units operated outside the continental United States Pickup and delivery ASKO washers are de signed to be repaired in the home In no event shall ASKO Appliances Inc be responsible for any incidental or con sequential damages Some states will not allow the exclusion or limita tion of incidental or consequential damages so this exclusion or limitation may not apply to you This warranty gives you ...

Page 19: ...oom is very small drying will take longer due to the limited quantity of air Caution For proper ventilation the machine should not be installed behind a door Caution The tumble dryer s toe kick ventilation must not be blocked by a rug or the like Tip If the unit must be installed behind a door should be louvered To improve ventilation the door where the tumble dryer is located should be left open ...

Page 20: ...2 mm The condensing models work best when they have good air circulation Install the dryer so the condensed water will continuously flow into a drain or sink you will need a drain outlet behind the unit The maximum drain height is 40 1016 mm Notes The height adjustment for the dryer is 33 1 2 to 34 1 2 850 mm to 876 mm Do not raise it higher than 34 1 2 876 mm Hole measure ments are from center of...

Page 21: ...e the paper from the self adhesive surface under the plastic cups A B A B 5 Fit the plastic cups so that the tags marked with arrows are against the front edge or side edge of the cover and press them firmly onto the cover Then break off the remaining tabs 6 Push out the knock out hole on the back of the dryer you don t have to completely remove the knockout just fold it up far enough for the stac...

Page 22: ...ght side The duct must not be assembled with screws or other fastenings that extend into the duct and trap lint To connect the exhaust duct to the rear outlet To connect the exhaust duct to the rear outlet follow the steps below 1 Push the duct onto the stub pipe and secure it with a clamp 2 With the duct attached insert the stub pipe into the hole It should snap into place 3 After you push the dr...

Page 23: ...haust duct with anything to catch lint except for UL approved vent basket Connecting to a ventilation duct You will need a UL CSA approved 4 inch ridged metal exhaust duct If a flexible duct is used it must comply with the Outline for Clothes Dryer Transition Duct Subject 2158A and maximum length of 2 4 m 8 feet Note The more bends and the longer the duct the less air will circulate through the ma...

Page 24: ...ct from the room a vent spacer must be fitted Vent spacer Electrical installation Warning The receptacle on the rear of the machine is de signed to accommodate ASKO washers ONLY rated 208 240 V To use this receptacle you must use the ready fitted plug supplied with the washing machine or an equivalent ASKO washers rated 208 240 V have two internal fuses of 15 A each The machine should only be conn...

Page 25: ...unding through the neutral 3 wire connection plus separate grounding connector where local codes do not permit grounding through the neu tral 4 wire connection Each of the above connections can be made with an approved power supply cord or by direct wiring Each connection instruction identifies the appro priate Power Supply Cord and covers require ments for direct wiring Note In Canada the dryer i...

Page 26: ...en cover To connect a 4 wire power cord to the dryer fol low the steps below Note The numbers in the illustration below correlate to the step numbers 1 Turn the power off at the breaker fuse box 2 Remove terminal block cover 3 Use the strain relief attached below the termi nal block opening 4 Remove center terminal block screw 4 6 7 8 5 Remove ground wire green with yellow stripes from external gr...

Page 27: ...he hinge pin To hinge the door on the right the hinge attachment must be turned upside down Hinge pin 4 Then move the hinge pin in the panel s lower edge 5 Next you must move the plastic plugs on the upper and lower edges of the door Use a flat screwdriver 6 Unscrew the two screws on the sides of the door by about a quarter inch to allow the door magnet and cover washer on the inside of the door t...

Page 28: ...using a con denser dryer you must also open the con denser panel 12 Then fit the door securely on the right side of the machine 13 Secure the hinge attachment using the screws in the sequence shown in the picture 1 3 2 14 Replace the screw you removed in step 11 15 Replace the lower front plate Customer Care Center 28 1 800 898 1879 www askousa com Reversing the door ...

Page 29: ...29 Customer Care Center 1 800 898 1879 www askousa com Notes ...

Page 30: ...Customer Care Center 30 1 800 898 1879 www askousa com Notes ...

Page 31: ...31 Customer Care Center 1 800 898 1879 www askousa com Notes ...

Page 32: ...m chart Program time approx hrs and min Energy consumption approx kWh Max load lb Temperature Material Program 1600 rpm 800 rpm 1600 rpm 800 rpm 1 45 2 10 3 2 4 1 13 Normal Cotton linen Auto Heavy 1 30 2 00 2 9 3 7 13 Normal Cotton linen Auto Normal 0 50 1 6 7 Normal Wrinkle resistant polyester cotton Auto Normal 1 25 1 50 2 6 3 5 13 Normal Cotton linen 1 Auto Delicate 0 50 1 5 7 Normal Wrinkle re...

Reviews: