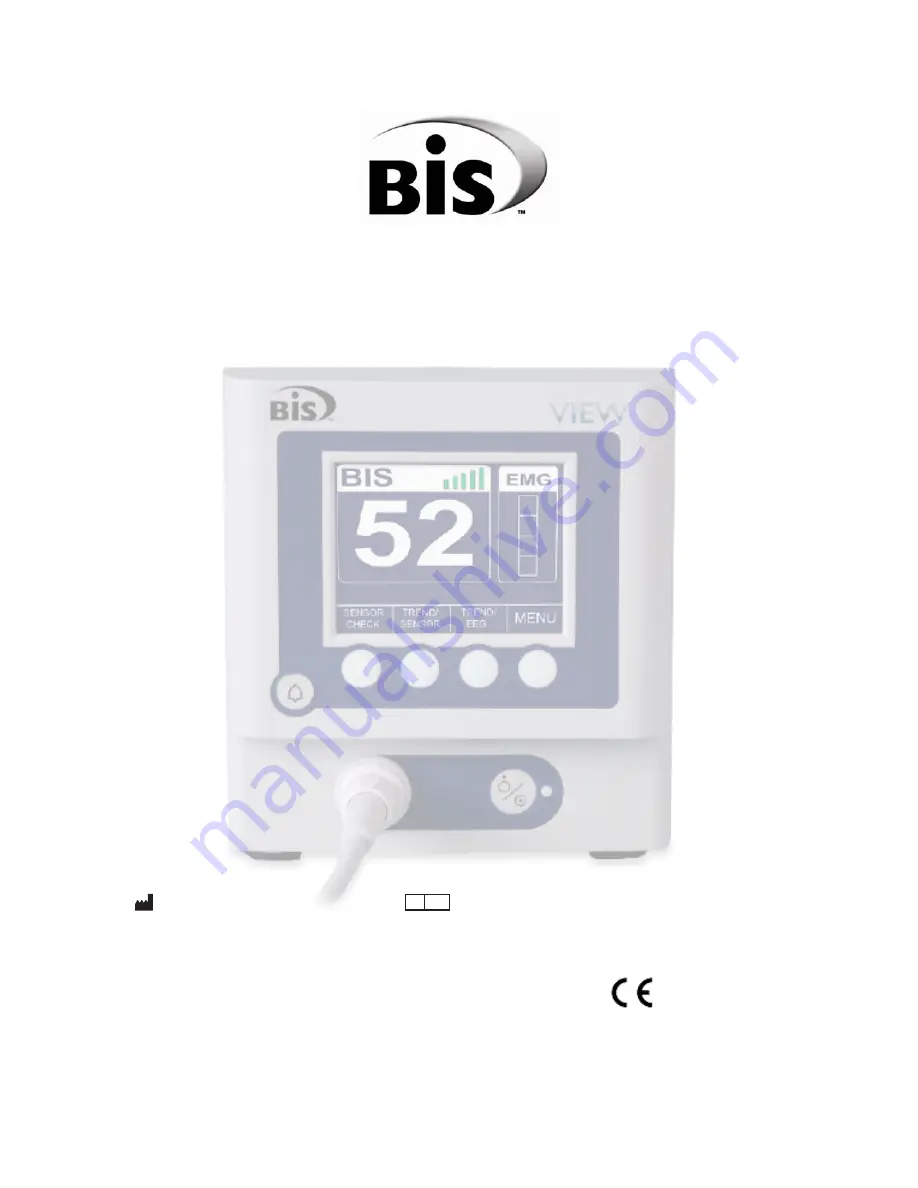
background image


BIS VIEW

 Monitoring System 

OPERATING MANUAL 


Rx only 


EC  REP


Aspect Medical Systems, Inc.   

Aspect Medical Systems International B.V. 

One Upland Road 


Rijnzathe 7d2 

Norwood, MA  02062   


3454 PV De Meern  

U.S.A. 

    The 

Netherlands  

(Tel) 617-559-7000 


Tel: +31.30.662.9140                       

0123


(Tel) 888-BIS INDE(X) (U.S. only)  Fax: +31.30.662.9150   


(Fax) 

617-559-7400 

  amsint@aspectms.com 

bis_info@aspectms.com    
www.aspectmedical.com      070-0089 

1.01 


Summary of Contents for BIS VIEW

Page 1: ...cal Systems International B V One Upland Road Rijnzathe 7d2 Norwood MA 02062 3454 PV De Meern U S A The Netherlands Tel 617 559 7000 Tel 31 30 662 9140 0123 Tel 888 BIS INDE X U S only Fax 31 30 662 9150 Fax 617 559 7400 amsint aspectms com bis_info aspectms com www aspectmedical com 070 0089 1 01 ...

Page 2: ......

Page 3: ...roduction of this document is prohibited without prior written consent of Aspect Medical Systems Inc BIS VIEW is a trademark of Aspect Medical Systems Inc Aspect Bispectral Index BIS the BIS logo BISx the BISx logo and Zipprep are trademarks of Aspect Medical Systems Inc and are registered in the U S A E U and other countries ...

Page 4: ......

Page 5: ... Requirements 2 4 2 2 5 Site Preparation Mounting the Monitor 2 4 2 2 5 1 Mounting the Monitor using the Pole Clamp 2 4 2 2 5 2 Optional Mounting Accessories 2 5 2 3 The BIS VIEW Monitoring System Equipment and Supplies 2 6 2 3 1 The BIS VIEW Monitor 2 7 2 3 1 1 Front Panel 2 7 2 3 1 2 Soft Keys 2 7 2 3 1 3 Alarm Key 2 7 2 3 1 4 ON Standby button 2 7 2 3 1 5 Rear Panel 2 8 2 3 1 6 Integral Battery...

Page 6: ...end Graph 3 10 3 4 2 Target Range 3 10 3 5 BIS Trend Display Screen with EEG 3 10 3 6 Menu Selections 3 11 3 6 1 Chart Data 3 11 3 6 2 Export Data 3 12 3 6 3 Setup 3 13 3 6 3 1 Screen Options 3 13 3 6 3 2 Alarms The Alarms Menu 3 14 3 6 3 2 1 Target Range 3 15 3 6 3 2 2 Alarm Volume Menu Test Alarm Volume 3 16 3 6 3 3 Smoothing Rate The Smoothing Rate Menu 3 16 3 6 3 4 Date Time 3 17 3 6 3 5 Setti...

Page 7: ...Software Update 6 1 6 1 2 Default Settings 6 2 6 1 3 Language 6 2 6 2 Diagnostics 6 3 6 2 1 Impedance Checking 6 3 6 2 2 Diagnostic Codes 6 4 6 2 3 System Configuration Information 6 4 6 2 4 Advanced Diagnostics 6 4 6 3 BIS VIEW System Messages and Corrective Actions 6 5 6 4 Using the Reset button 6 11 6 5 What to do if the BIS VIEW Monitoring System Requires Service 6 11 7 APPENDIX I MENUS PROCES...

Page 8: ...omagnetic Compatibility Specifications 8 5 8 2 1 Accessories 8 5 8 2 2 IEC 60601 1 2 2001 Electromagnetic Compatibility Guidance 8 6 8 3 Warranty 8 11 8 4 Software License Agreement 8 13 8 5 List of Patents 8 15 ...

Page 9: ...re 6 Connecting the PIC 3 3 Figure 7 Sensor Check Graphic Screen 3 4 Figure 8 BIS Number Display 3 6 Figure 9 Screen Features BIS Trend Display Screen with Sensor Status 3 9 Figure 10 BIS Trend Display Screen with EEG 3 10 Figure 11 Trend Display with Target Range 3 14 Figure 12 BIS Range Guidelines 3 21 Figure 13 Replacing the Power Supply 5 4 Figure 14 BIS VIEW Menu Map 7 1 ...

Page 10: ...ual is intended for trained medical personnel it does not assume prior knowledge or experience with operator programmable medical electronics devices Keep this Operating Manual with the BIS VIEW monitor for use by the operator This manual is also intended to be a service information manual for service technicians or biomedical engineering personnel Before attempting to set up or use the BIS VIEW s...

Page 11: ...ral Index or BIS which correlates with the patient s level of hypnosis The BIS VIEW monitor display consists of The current BIS number Trend graph of BIS values over time Raw EEG waveforms in real time Various signal quality indicators EMG SQI SR Alarm Indicator and Messages The system performs self tests to ensure that the monitor and its components are functioning properly and that impedance lev...

Page 12: ...gement is not recommended As with any monitored parameter artifacts and poor signal quality may lead to inappropriate BIS values Potential artifacts may be caused by poor skin contact high impedance muscle activity or rigidity head and body motion sustained eye movements improper sensor placement and unusual or excessive electrical interference BIS values should also be interpreted cautiously with...

Page 13: ...vides useful information regarding a function or procedure KEY TO SYMBOLS A key to the symbols used on the BIS VIEW system appears at the end of this section 1 1 Warnings EXPLOSION HAZARD DO NOT USE THE BIS VIEW SYSTEM IN A FLAMMABLE ATMOSPHERE OR WHERE CONCENTRATIONS OF FLAMMABLE ANESTHETICS MAY OCCUR MONITOR IS NOT DESIGNED FOR USE IN MRI ENVIRONMENT CONSIDERATIONS WHEN USING ELECTRO CONVULSIVE ...

Page 14: ...0601 1 1 LIMIT THE USE OF ACCESSORY EQUIPMENT NOT COMPLYING WITH THE EQUIVALENT SAFETY REQUIREMENTS OF THIS EQUIPMENT MAY LEAD TO A REDUCED LEVEL OF SAFETY OF THE RESULTING SYSTEM CONSIDERATION RELATING TO THE CHOICE SHALL INCLUDE USE OF THE ACCESSORY IN THE PATIENT VICINITY EVIDENCE THAT THE SAFETY CERTIFICATION OF THE ACCESSORY HAS BEEN PERFORMED IN ACCORDANCE TO THE APPROPRIATE IEC 60601 1 AND ...

Page 15: ... SHOCK HAZARD THE MANUFACTURER S INSPECTION OF THIS APPARATUS VERIFIED THAT THE GROUND LEAKAGE CURRENT AND THE PATIENT SAFETY CURRENT WERE LESS THAN THE SPECIFIED LIMITS ESTABLISHED BY THE APPLICABLE SAFETY STANDARDS AS A MATTER OF SAFE PRACTICE THE INSTITUTION SHOULD CONDUCT PERIODIC TESTS TO VERIFY THESE CURRENTS WHENEVER AN EVENT SUCH AS SPILLAGE OF BLOOD OR SOLUTIONS OCCURS RE TEST LEAKAGE CUR...

Page 16: ...e BIS VIEW monitor contains an internal Lithium ion battery The battery must be removed by a qualified service technician and disposed of or recycled in accordance with the national laws of the country Contact Aspect Medical Systems Inc or the local distributor for a replacement battery Aspect part number 186 0208 Avoid liquid ingress to the Patient Interface Cable Contact of fluids with the PIC s...

Page 17: ...nnect power cord from the power cord receptacle of the monitor then remove the battery from the monitor The BIS VIEW monitor may not power up entirely if battery power is low If that should occur connect unit to wall power and press the Reset button Refer to Section 6 4 Using the Reset Button Service or repairs must be performed only by qualified biomedical technicians Important The BIS VIEW syste...

Page 18: ...MM Latex free product PVC free product Recyclable Crossed out wheelie bin indicates separate treatment from general waste at end of life Manufacturer Date of Manufacture EC REP Authorized Representative in the European Community Catalog Number Batch Code Serial Number Conformité Européenne CE Marking of Conformity to European Medical Device Directive CEXXXX represents the Notified Body number Clas...

Page 19: ...______ 1 7 Operating on Battery No Battery is Installed in Monitor Ringing Bell Icon High Priority Alarm Condition exists The alarm sounds unless the alarm key has been pressed to silence it Yellow Bell with dotted X Alarms Paused Red Bell with X Alarms Silenced Figure 1 Symbol Key page 2 of 2 ...

Page 20: ...SECTION 1 SAFETY PRECAUTIONS ______________________________________________________________________ 1 8 ...

Page 21: ...Sx P N 185 0145 AMS PIC Patient interface cable connects BISx to patient Sensors are sold separately For a list of available sensors please contact Aspect Medical Systems Inc or your local distributor 2 Connect power cable to monitor plug power plug into appropriate wall outlet Verify that light to right of ON Standby button is yellow 3 Start up monitor by pressing the ON Standby button lower righ...

Page 22: ...ure changes that can lead to condensation within the instrument To minimize condensation avoid moving the system between heated buildings and outside storage Once moved inside allow the monitor to stabilize in the unopened shipping container at the inside ambient temperature before unpacking and placing into service Before operation wipe down all visible condensation and allow the system to reach ...

Page 23: ...TH GROUND IS IN DOUBT THE BIS VIEW MONITOR SHALL BE OPERATED FROM ITS INTERNAL BATTERY POWER SOURCE ONLY The BIS VIEW Monitoring unit does not contain a Protective Earth Stud GND Stud Since the exposed metal parts on the rear of the BIS VIEW Monitor Communication serial port and USB ports are separated from live parts by double insulation a ground continuity test does not apply to these parts The ...

Page 24: ...tic interference EMI If this occurs Increase separation between devices Re orient device cabling Plug devices into separate outlet circuit branches Refer to Section 8 2 Electromagnetic Compatibility Specifications 2 2 5 Site Preparation Mounting the Monitor Aspect Medical Systems Inc strongly recommends permanent mounting of the BIS VIEW monitor to the anesthesia machine to enhance safety and faci...

Page 25: ...of the clamp shoe should be seen well below the bottom of the pole clamp and the monitor should snap securely into place 2 Make sure that set screw hole on pole clamp aligns with corresponding hole on clamp shoe 3 Remove black knob screw from pole clamp 4 Using the Allen wrench supplied secure pole clamp to monitor with the set screw provided 5 Replace black knob screw 6 To attach to pole place po...

Page 26: ... P N 185 0145 AMS Patient Interface Cable PIC BIS Sensor Detachable Power Cord Sensors are sold separately For a list of available sensors please contact Aspect Medical Systems Inc or your local distributor A pole clamp is also included however its use is optional Contact Aspect or your local representative for information on additional equipment and accessories Figure 3 The BIS VIEW Monitoring Sy...

Page 27: ...o function even when the user is wearing examination gloves 2 3 1 3 Alarm Key The Alarm Key is used to pause silence or reinstate audible alarms 2 3 1 4 ON Standby button The ON Standby button is located in the lower right corner of the monitor and indicates whether the monitor is ON or in Standby mode When the small LED light to the right of the ON Standby button is green the unit is running and ...

Page 28: ...sed to export data to a removable drive It is also used to update monitor and BISx software The USB Type B port is for manufacturer s use only The clamp shoe allows the monitor to slide into the pole clamp so that it can be attached to a 1 diameter vertical pole The RS 232 serial port can be used to transfer data from the monitor WARNING WHEN CONNECTING EXTERNAL EQUIPMENT e g DATA CAPTURE COMPUTER...

Page 29: ...he power cord provided by the manufacturer It provides power to the monitor and to the BISx when it is attached Caution The BIS VIEW Monitoring System complies with the electromagnetic compatibility requirements of IEC60601 1 2 Operation of this device may affect or be affected by other equipment in the vicinity due to electromagnetic interference EMI If this occurs Increase separation between dev...

Page 30: ...cement is required The BIS VIEW monitor contains an internal lithium ion battery The battery must be removed by a qualified service technician and disposed of or recycled in accordance with the national laws of the country Contact Aspect Medical Systems Inc or the local distributor for a replacement battery Aspect part number 186 0208 2 3 2 BISx Figure 5 BISx and PIC The BISx receives filters and ...

Page 31: ...t and how to connect to the BIS Monitoring System refer to the BIS Sensor s instructions for use All sensors including the BIS Extend Sensor utilize the monitor s active settings such as smoothing rate 2 4 Cable Connections After you have familiarized yourself with the safety information in the introductory section of this manual and have prepared a suitable environment follow these steps to prepa...

Page 32: ... section of this manual When not in use the monitor should be placed in Standby mode To put the system in Standby mode press and hold the ON Standby button for two seconds before releasing The light will change from green to yellow If the monitor is running on battery the light will go off completely Caution To completely remove power from the unit put the monitor in Standby mode disconnect power ...

Page 33: ... not display the desired language follow these steps To change the language 1 Press MENU to access the Main Menu The MENU key is the soft key on the far right 2 Use the or key to highlight Maintenance Maintenance is the fourth selection on the list Press SELECT The Maintenance Menu appears 3 Highlight Language Language is the third selection on the list Press SELECT The Language Menu appears 4 Use...

Page 34: ...mory These settings appear in the Saved Settings list When a user changes a setting the change is recorded in the Active Settings list but does not become a default setting until it is saved to the Saved Settings list Note The following settings are not saved by the Save Settings option Impedance Checking always returns to ON Diagnostics Codes returns to OFF To access Settings 1 Press MENU to acce...

Page 35: ...ction of this manual prepared a suitable environment properly connected the BISx and PIC cables and completed the initial settings described in Section 2 follow these steps to prepare the BIS VIEW Monitoring System for operation 1 Startup and System Check Press the ON Standby button on the lower right corner of the monitor to start the monitor The light changes from yellow to green and the system ...

Page 36: ...REQUENCY SURGICAL EQUIPMENT THE SENSOR OR ELECTRODES SHOULD NOT BE LOCATED BETWEEN THE SURGICAL SITE AND THE ELECTRO SURGICAL UNIT RETURN ELECTRODE THE SENSOR MUST NOT BE LOCATED BETWEEN DEFIBRILLATOR PADS WHEN A DEFIBRILLATOR IS USED ON A PATIENT CONNECTED TO THE BIS VIEW SYSTEM TO MINIMIZE THE RISK OF PATIENT STRANGULATION THE PATIENT INTERFACE CABLE PIC MUST BE CAREFULLY PLACED AND SECURED 3 Se...

Page 37: ... into the PIC line up as shown and insert the sensor tab into the PIC sensor connector until an audible click is heard The blank side of the sensor tab i e the side without the computer chip should be facing up The Sensor Integrity Check is initiated each time that a sensor is connected to the PIC It checks to make certain that a valid unexpired sensor is in use PIC Sensor Connector Sensor tab Rel...

Page 38: ...een shows a sensor with a symbol inside each electrode The symbol indicates the status of that electrode A circle with a question mark indicates that no status is available Lead is off A green circle with a checkmark indicates that the electrode impedance is within the acceptable range If all electrodes contain a checkmark monitoring can begin A red circle with an X indicates that the electrode im...

Page 39: ...k will be considered successful NOISE If the signal from the electrode goes beyond the measurable range the label NOISE displays LEAD OFF If the impedance check indicates that the electrode is not in contact with the patient the label LEAD OFF displays If an electrode does not pass the impedance check press the edges of the sensor to ensure adhesion and then press each circle for 5 seconds to ensu...

Page 40: ...unning on battery power An alarm icon when the alarms are sounding or have been paused or silenced Signal quality indicator EMG indicator A unique case ID number System messages To set a different screen as the default screen see Section 3 6 3 1 Screen Options Figure 8 BIS Number Display 3 3 1 BIS Bispectral Index Value The current numeric value of the BIS is displayed in the upper left corner of ...

Page 41: ...er may press the alarm key on the front of the monitor to change the alarm status No Bell Icon Displayed Alarms Active When no bell icon is displayed all alarms are active Pressing the alarm key pauses all alarms for two minutes Alarms Paused A yellow bell with a dotted X over it indicates that all alarms have been silenced for two minutes When this icon is displayed pressing the alarm key changes...

Page 42: ...is low it indicates that EMG activity is low BIS monitoring is optimal when the bar is empty 1 bar represents power in the 30 38 range 2 bars represent power in the 39 47 range 3 bars represent power in the 48 55 range 4 bars represent power greater than 55 An EMG trend line can be added to the BIS Trend Display screens See Section 3 6 3 1 Screen Options 3 3 6 Case ID A new case number is assigned...

Page 43: ...The BIS Trend Display Screen can be displayed by pressing the TREND SENSOR soft key at the bottom of the screen The following information displays The BIS Number display in a smaller format Current Sensor Status A diagram of the sensor shows the PASS FAIL status of each electrode A graph of the BIS numbers plotted over a one hour time period Figure 9 Screen Features BIS Trend Display Screen with S...

Page 44: ...a displays as two horizontal lines showing the upper and lower target ranges If the BIS value falls outside of the target range a message displays in the Message Region of the screen and if an audible alarm was requested in the target range setup screen the alarm sounds unless alarms have been silenced The alarm continues to sound until the BIS value returns to the target range or the alarm is sil...

Page 45: ...ze yourself with the various menu options available This section describes the menu options available and how they work To make a selection from a menu use the Up or Down soft keys until the desired menu item is highlighted then press SELECT to make your selection To exit without making a selection or changing a setting press HOME Main Menu Press MENU to access the Main Menu The Main Menu options ...

Page 46: ...to a removable drive via the USB port Type A at the rear of the monitor or to a device connected to the monitor s serial port Recommended USB drives include Sandisk Cruzer Mini and Micro 128 256 512 MB or 1 G PNY Attache 256 or 512 MB Memorex TravelDrive 512 MB Kingston DataTraveler 512 MB Aspect 32 MB and Aspect 128 MB Data that may be exported include Live Data When this option is selected live ...

Page 47: ...e export press STOP Caution Do not remove drive while export is in progress 3 6 3 Setup The Setup Menu contains these options Screen Options Alarms set target range set and test alarm volume Smoothing Rate set smoothing rate to 10 15 or 30 seconds Date and Time Settings view or save settings 3 6 3 1 Screen Options The Screen Options Menu includes the following BIS Display The BIS VIEW may be set s...

Page 48: ...t settings 4 Highlight the screen option that you would like to change then press SELECT A new screen displays listing the available options 5 Highlight the desired option then press SELECT 6 Press BACK to go back to the previous screen 3 6 3 2 Alarms The Alarms Menu Alarms sound to alert the user to possible problems with the patient or the equipment Alarm conditions are prioritized so that high ...

Page 49: ... the High Limit unchanged press HOME To permanently save this change go to MENU Setup Settings and press SAVE ACTIVE See instructions in Section 3 6 3 5 Settings Target Range Low Limit To set the Low Limit for the BIS value 1 Use the or key to highlight BIS Low Limit Press SELECT 2 Press the key to raise the lower limit by 5 or press the key to decrease the lower limit by 5 A low limit of 0 none 3...

Page 50: ...T The Setup Menu displays 3 Highlight Alarms Press SELECT The Alarms Menu displays 4 Highlight Alarm Volume Press SELECT The Alarm Volume Menu appears 5 Highlight the desired volume High Medium or Low Press SELECT 6 Press BACK to return to the previous screen To test the alarm volume highlight Test Alarm Volume and press SELECT 7 Press BACK to exit To permanently save this change go to MENU Setup ...

Page 51: ...Daylight Time zone USA It will be necessary for you to change the time twice per year using the Date Time feature if you are located in a time zone that alters its clocks at the beginning or end of Daylight Savings Time When time is set to a time before the last recorded data the following message appears on the screen Processing the requested change will result in loss of all data collected since...

Page 52: ... the monitor and BISx software view and restore default monitor settings and change the language To display the Maintenance Menu 1 Press MENU to access the Main Menu 2 Use the or key to highlight Maintenance Press SELECT The Maintenance Menu appears Use of the Maintenance Menu is covered in Section 6 Diagnostics and Troubleshooting 3 6 5 Diagnostics Contact Aspect Medical Systems Inc for instructi...

Page 53: ...emove BIS sensor from patient Disposable sensors are single use only Be sure to leave the PIC with the monitor so that it is not inadvertently discarded If this is the last procedure of the day press and hold the ON Standby button for two seconds before releasing to put the BIS VIEW monitor in Standby mode a yellow light displays Clean the BIS VIEW system between uses See Section 5 1 WARNING SHOCK...

Page 54: ...CURRENT MUST BE CHECKED AND MUST BE LESS THAN THE IEC 60601 1 1 LIMIT 3 9 How the BIS VIEW Monitoring System Works A sensor placed on the patient s head transmits EEG signals to the BISx The BISx filters the data analyzes it for artifact and processes it using digital signal processing techniques then sends the data to the monitor for display The purpose of processing the EEG waveform data is to e...

Page 55: ...r each patient These goals and associated BIS ranges may vary over time and in the context of patient status and treatment plan Figure 12 BIS Range Guidelines 3 9 1 Bispectral Index BIS Range 0 100 The Bispectral Index is a continuous processed EEG parameter that correlates to the patient s level of hypnosis where 100 awake and 0 flat line EEG BIS was designed to correlate with hypnotic clinical e...

Page 56: ...nsor Integrity Check This test begins each time that a sensor is connected to the PIC It checks to make certain that a valid unexpired sensor is in use Information on the current sensor can be viewed in the System Configuration Screen Impedance Check Sensor Check Electrode impedance is tested when the BISx and PIC are connected and is monitored continuously unless the user has turned impedance che...

Page 57: ...or automatically switches to back up battery operation A fully charged battery will provide approximately 45 minutes of operation When the system is running on battery a battery icon displays above the BIS number indicating the battery status When the battery reaches a low power condition the monitor beeps and the battery symbol displayed on the screen changes color from green to orange In additio...

Page 58: ...SECTION 3 OPERATING THE BIS VIEW MONITORING SYSTEM ______________________________________________________________________ 3 24 ...

Page 59: ...ISx s long cable to the BISx port on the monitor The Patient Interface Cable to the BISx unit 2 Press the button in the right corner of the monitor to turn the monitor and BISx on The button light will turn from yellow to green The system will initiate a self test to ensure that all equipment is operating properly 3 Prepare sensor site and place BIS sensor on the patient in accordance with manufac...

Page 60: ...SECTION 4 QUICK REFERENCE GUIDE ______________________________________________________________________ 4 2 ...

Page 61: ...e lint free absorbent towels for spill cleanups Dampen the towel with detergent and lukewarm water to aid in cleaning After cleaning wipe the PIC connector ends with alcohol and allow to dry completely Residual moisture inside the connector may affect BISx performance Disinfecting the Monitor and BISx Use lint free absorbent towels dampened with a 10 bleach solution or a commercial disinfectant e ...

Page 62: ...ent be necessary Caution Service or repairs must be performed only by qualified biomedical technicians 5 2 1 Checking Cable Integrity The BIS VIEW System should be inspected periodically to ensure that all cables are in working order with no cuts in electrical insulation Cables can be flexed during the system checkout See Section 5 2 2 to ensure there are no loose wires 5 2 2 System Checkout A sys...

Page 63: ...WHENEVER INSTRUMENT CASE IS OPENED BY A QUALIFIED BIOMEDICAL ENGINEERING TECHNICIAN Caution Check the battery periodically by operating a BIS VIEW monitor that has been disconnected from the wall socket and that has been charged to full capacity at least 6 hours of charge time After long periods of storage e g more than 1 month it may be necessary to cycle charge then discharge the battery a few t...

Page 64: ... Supply cover and remove the cover Note the position of the battery cable 4 Squeeze the battery connector latch to disengage it from the back of the monitor and remove the old battery 5 Lay the new battery in the recess with the wires at the top and plug in the connector 6 Replace the cover and four screws hand tighten only and reconnect the A C power cord 5 2 5 Replacing the Power Supply Figure 1...

Page 65: ... monitor should be checked routinely for leakage current at least once a year Always have the leakage current checked after a saline or blood spill or immediately after a major surge in the house electrical system and after every time the monitor case has been opened Keep in mind that liquids such as saline and Ringer s as well as blood are all excellent conductors of electricity Avoid touching an...

Page 66: ...atient leakage current can be measured by connecting the patient connection terminals of a safety tester to the patient input connection the PIC of the BISx The BIS VIEW Monitor has been certified by Underwriters Laboratories to comply with IEC60601 1 as indicated on the labeling on the rear of the monitor 5 3 Technical Documentation The BIS VIEW Monitoring System is designed and manufactured usin...

Page 67: ...tent numbers power ratings cautions and the Aspect Medical Systems shipping address BISx The BISx identification information is permanently marked on the rear panel of the BISx The information includes instrument model and serial numbers patent numbers cautions and the Aspect Medical Systems shipping address Software Revision Numbers To view the software revision numbers and other system informati...

Page 68: ...SECTION 5 PREVENTIVE MAINTENANCE CARE AND CLEANING ______________________________________________________________________ 5 8 ...

Page 69: ...d on the screens To display the Maintenance Menu 1 Press MENU to access the Main Menu 2 Use the or key to highlight Maintenance Press SELECT The Maintenance Menu appears 6 1 1 Software Update The BIS VIEW system software may be updated by attaching a removable drive containing the update to the USB port on the rear of the monitor The progress of the update displays on the monitor screen When the u...

Page 70: ... complete the message Update Complete appears Press RESET The monitor and BISx will reset and you can then resume normal operation 6 1 2 Default Settings This option resets all settings to the factory default values To restore the original factory default settings 1 Press MENU to access the Main Menu 2 Use the or key to highlight Maintenance Press SELECT The Maintenance Menu appears 3 Highlight De...

Page 71: ... or OFF Diagnostic Codes ON or OFF System Configuration Information Advanced Diagnostics 6 2 1 Impedance Checking The BIS VIEW system continually checks impedance levels during a procedure by generating a 128 Hz test signal Occasionally this signal may interfere with other equipment If this becomes a problem you may turn off the continuous impedance checking Impedance levels will still be tested a...

Page 72: ...it 6 2 3 System Configuration Information This selection allows the user to view the current configuration of the system including the monitor BISx and sensor It also shows the revision of each language installed in the monitor To view System Configuration Information 1 Press MENU The Main Menu displays 2 Use the or key to highlight Diagnostics Press SELECT The Diagnostics Menu displays 3 Highligh...

Page 73: ...Actions None screen is blank Monitor has not completed its power ON diagnostics tests 1 Monitor may take up to three minutes to initialize trend memory Do not disconnect equipment or press keys during this time 2 If several minutes have passed restart monitor 3 Reset monitor 4 Replace monitor Connect BISx 1 BISx disconnected 2 Defective BISx cable 3 Defective BISx 4 Defective monitor 1 Connect BIS...

Page 74: ... Sensor Check Failed 0016 1 At least one element of sensor has too high impedance and EXIT pressed before sensor check completes 2 Incorrect sensor application 3 Poor sensor connection 4 Defective PIC 5 Defective BISx 1 Verify Sensor Check passes 2 Read Instructions on sensor package and re apply sensor 3 Check sensor connection 4 Replace the PIC 5 Replace the BISx Unrecoverable BISx Error 0024 1 ...

Page 75: ...by motion or eyeblinks is causing loss of EEG recognition 2 EMG Bar indicates electrical activity that may be interfering with EEG recognition 3 PIC is defective 4 BISx is defective Note This message may occur as a result of artifact non EEG signal such as those generated from motion patient movement or eyeblinks or the presence of electro cautery warming blankets or other devices 1 If ARTIFACT la...

Page 76: ...r the presence of electro cautery warming blankets or other devices 1 If ARTIFACT label appears above the EEG waveform box attempt to identify and eliminate artifact source 2 If EMG bar is illuminated attempt to determine and eliminate cause 3 Verify Sensor Check passes If not replace PIC 4 Replace BISx BIS Out of Target Range Low 0029 High 0030 The BIS has fallen outside the target range set by t...

Page 77: ...n any contamination present 2 Replace sensor if necessary 3 Replace PIC 4 Replace BISx Sensor Overcurrent 0094 Sensor is using too much current 1 Disconnect and examine sensor connection Clean any contamination 2 Replace sensor if necessary 3 Replace PIC 4 Replace BISx No more Uses for this Sensor 0095 Sensor has been connected and disconnected too many times Replace the sensor Sensor Invalid 0096...

Page 78: ...n again 3 Reset monitor 4 Replace monitor Hardware Timer Error 2902 A system timer error has occurred 1 Press Continue to restart monitor 2 Turn monitor off then on again 3 Reset monitor 4 Replace monitor Data Export Error 3000 3999 The data export was not successful 1 Make sure the removable drive is connected properly to the USB A port 2 Check to see if drive is already full Software Update Erro...

Page 79: ...the appropriate serial numbers and a detailed description of the problem If it becomes necessary to return a unit directly to Aspect Medical Systems follow the procedure below Contact Aspect s Technical Service Department to obtain a Returned Materials Authorization RMA number The Technical Service phone number is printed on the back cover of this manual The RMA number must appear on the outside o...

Page 80: ...SECTION 6 DIAGNOSTICS AND TROUBLESHOOTING ______________________________________________________________________ 6 12 ...

Page 81: ...p Main Menu Chart Data Export Data Setup Maintenance Diagnostics Demo Case HOME SELECT Setup Screen Options Alarms Smoothing Rate Date Time Settings HOME SELECT Maintenance Software Update Default Settings Language HOME SELECT Diagnostics Impedance Checking Diagnostic Codes System Configuration Advanced Diagnostics HOME SELECT Alarms Target Range Alarm Volume Test Alarm Volume BACK SELECT Advanced...

Page 82: ...erval Run Stop Setup Screen Options Alarms Smoothing Rate Date Time Settings 10 15 or 30 seconds Save Active or Restore Saved Screen Options BIS Display Sensor Check Values Charting Interval Display SR Secondary Variable BIS Number Trend Sensor Status Trend EEG Show or Hide Values 1 5 10 or 15 minute default chart interval On Off None EMG Alarms Target Range Alarm Volume Test Alarm Volume High Med...

Page 83: ...nge Bispectral Index BIS The output from a multivariate discriminate analysis that quantifies the overall bispectral properties frequency power and phase throughout the entire frequency range 0 100 Signal Quality Indicator SQI A measure of the signal quality for the EEG channel source s that is calculated based on impedance data artifact and other variables Not affected by Suppression Ratio 0 100 ...

Page 84: ...l unit that attaches to the BIS VIEW monitor via its own monitor cable and attaches to a BIS sensor via the Patient Interface Cable PIC It acquires and processes EEG information and sends it to the monitor for display Electroencephalogram EEG A visual representation of the rhythmic fluctuations of electric potential between parts of the brain brain waves Electromyelogram EMG A visual representatio...

Page 85: ...nel source that is calculated based on impedance data artifact and other variables Smoothing Rate The rate over which the BIS value is averaged Suppression Ratio SR A calculated parameter that indicates when an isoelectric flatline condition may exist Suppression ratio is the percentage of time over the last 63 second period that the signal is considered to be in the suppressed state isoelectric W...

Page 86: ...SECTION 7 APPENDIX I MENUS PROCESSED VARIABLES AND GLOSSARY ______________________________________________________________________ 7 6 ...

Page 87: ...pectral Index monitoring system for display of processed data and real time EEG waveforms Monitor Weight 2 65 lbs 1 2 kg Monitor Dimensions 6 in wide x 6 5 in high x 5 in deep 15 2 cm x 16 5 cm x 12 7 cm Display Size 3 6 in 9 1 cm Digital Output USB ports A B RS232 serial port Power Requirements 100 240 VAC 50 60 Hz 0 7 ampere max Electrical Safety Conforms to UL 60601 1 IEC 60601 2 26 CAN CSA C22...

Page 88: ...rtifact Rejection Automatic Input Amplifier Range 1 mV EEG Scales One Channel Display 25 μV div 50 μV full scale EEG Sweep Speed 25 mm sec Computed Parameters Bispectral Index EMG SR and Signal Quality Indicator User defined Displays Trend and real time EEG waveforms Update Rate 1 second for BIS number 10 seconds for Trend Alarms Auditory and visual user adjustable limits Filters 2 70 Hz with notc...

Page 89: ... cable 3 75 in diameter x 2 5 in thick 9 5 cm x 6 3 cm 9 ft 2 7 m Integral BISx Cable 4 ft 1 4 m from BISx to sensor connector Analog to Digital Converter Noise shaped sigma delta Sampling Rate 16 384 samples second Resolution 16 Bits at 256 samples second Input Impedance 50 Mohms typical Noise 0 3 μV RMS 2 0 μV peak to peak 0 25 Hz to 50 Hz Common Mode Rejection Isolation mode 110 dB at 50 60 Hz ...

Page 90: ...degree that the patient leakage current allowable in single fault condition is not exceeded when a voltage equal to 1 1 times the highest rated AC supply voltage is applied between the applied part and earth The circuitry inside the BIS VIEW monitor is isolated from the mains in accordance with IEC60601 1 Patient isolation is accomplished within the BISx Degree of Protection against effects of Car...

Page 91: ...utions provided in this manual 8 2 1 Accessories The BIS VIEW Monitoring System complies with the requirements of IEC 60601 1 2 2001 when used with the accessories listed in Section 2 of the Operating Manual In addition the BIS VIEW system must be used only with the power cord provided When using a removable drive to load new versions of software into the BIS VIEW monitor no cables or other access...

Page 92: ...tromagnetic Environment Guidance RF Emissions CISPR 11 Group 1 The BIS VIEW system uses RF energy only for its internal function Therefore its RF emissions are very low and are not likely to cause any interference in nearby electronic equipment RF Emissions CISPR 11 Class A Harmonic Emissions IEC 61000 3 2 Class A Voltage Fluctuations Flicker Emissions IEC 61000 3 3 Complies The BIS VIEW system is...

Page 93: ...hat of a typical commercial or hospital environment Surge IEC 61000 4 5 1 kV differential mode 2 kV common mode 1 kV differential mode 2 kV common mode Mains power quality should be that of a typical hospital environment Voltage dips short interruptions and voltage variations on power supply input lines IEC 61000 4 11 5 UT 95 dip in UT for 0 5 cycle 40 UT 60 dip in UT for 5 cycles 70 UT 30 dip in ...

Page 94: ...MHz 3 V m 80 MHz to 2 5 GHz 3 V 3 V m Portable and mobile RF communications equipment should be used no closer to any part of the BIS VIEW system including cables than the recommended separation distance calculated from the equation applicable to the frequency of the transmitter Recommended separation distance d 1 2 P d 1 2 P 80 MHz to 800 MHz d 2 3 P 800 MHz to 2 5 GHz where P is the maximum outp...

Page 95: ...lephones and land mobile radios amateur radio AM and FM radio broadcast and TV broadcast cannot be predicted theoretically with accuracy To assess the electromagnetic environment due to fixed RF transmitters an electromagnetic site survey should be considered If the measured field strength in the location in which the BIS VIEW system is used exceeds the applicable RF compliance level above the BIS...

Page 96: ...tput power of the communications equipment Rated maximum output power of equipment W Separation distance according to frequency of transmitter m 150 kHz to 80 MHz d 1 2 P 80 MHz to 800 MHz d 1 2 P 800 MHz to 2 5 GHz d 2 3 P 0 01 0 12 0 12 0 23 0 1 0 38 0 38 0 73 1 1 2 1 2 2 3 10 3 8 3 8 7 3 100 12 12 23 For transmitters rated at a maximum output power not listed above the recommended separation di...

Page 97: ...ed Product or part thereof If Aspect reasonably determines that a repair or replacement is covered by the warranty Aspect shall bear the costs of shipping the repaired or replacement Product to Purchaser All other shipping costs shall be paid by Purchaser Risk of loss or damage during shipments under this warranty shall be borne by the party shipping the Product Products shipped by Purchaser under...

Page 98: ... FITNESS FOR A PARTICULAR PURPOSE ASPECT S MAXIMUM LIABILITY ARISING OUT OF THE SALE OF THE PRODUCTS OR THEIR USE WHETHER BASED ON WARRANTY CONTRACT TORT OR OTHERWISE SHALL NOT EXCEED THE ACTUAL PAYMENTS RECEIVED BY ASPECT IN CONNECTION THEREWITH ASPECT SHALL NOT BE LIABLE FOR ANY INCIDENTAL SPECIAL OR CONSEQUENTIAL LOSS DAMAGE OR EXPENSE INCLUDING WITHOUT LIMITATION LOST PROFITS DIRECTLY OR INDIR...

Page 99: ...em you may not decompile reverse engineer disassemble or otherwise reduce the Licensed Software to a human perceivable form If you transfer the System you have the right to transfer the Licensed Software provided that the transferee agrees to be bound by the terms and conditions of this License Agreement 3 TERMINATION This License remains effective until terminated This License will terminate auto...

Page 100: ...eement will be construed under the laws of the Commonwealth of Massachusetts If any provision of this License Agreement shall be held by a court of competent jurisdiction to be contrary to law that provision will be enforced to the maximum extent permissible and the remaining provisions of this Agreement will remain in full force and effect Should you have any questions concerning this License Agr...

Page 101: ...0 109 Europe 0 610 365 0 898 234 Canada 2 122 032 2 434 275 Europe 0 665 728 US 5 381 804 Europe 0 738 496 Canada 2 146 979 US 5 458 117 Europe 0 764 001 Canada 2 191 594 US 5 792 069 Europe 0 957 761 Australia 732 539 Canada 2 275 901 US 6 298 255 Europe 1 182 965 Australia 780 076 Mexico 233 167 US 6 882 166 US 6 985 833 US 7 161 362 European patents may include those in each of the following co...

Page 102: ......

Page 103: ......

Page 104: ...559 7400 Customer Service 888 BIS INDE X press 6 or 800 442 7688 press 6 Technical Service 800 442 2051 Email bis_info aspectms com Web www aspectmedical com EC REP Aspect Medical Systems International B V Rijnzathe 7d2 3454 PV De Meern The Netherlands Main Business Phone 31 30 662 9140 Main Business Fax 31 30 662 9150 Email amsint aspectms com ...

Reviews: