background image

Revision 1.1 


     AT110 Quick Start Guide 


1.


An ASCII terminal is useful for initial testing and configuration.  If you already 
have one, skip to step 2, otherwise : 

a.


We recommend TeraTerm, which can be downloaded free of charge from: 

http://logmett.com/index.php?/download/tera-term-467.html


b.


Once downloaded, install TeraTerm and start up a session 

c.


Select 

Setup 

and then choose 

Serial Port

 from the drop down options 
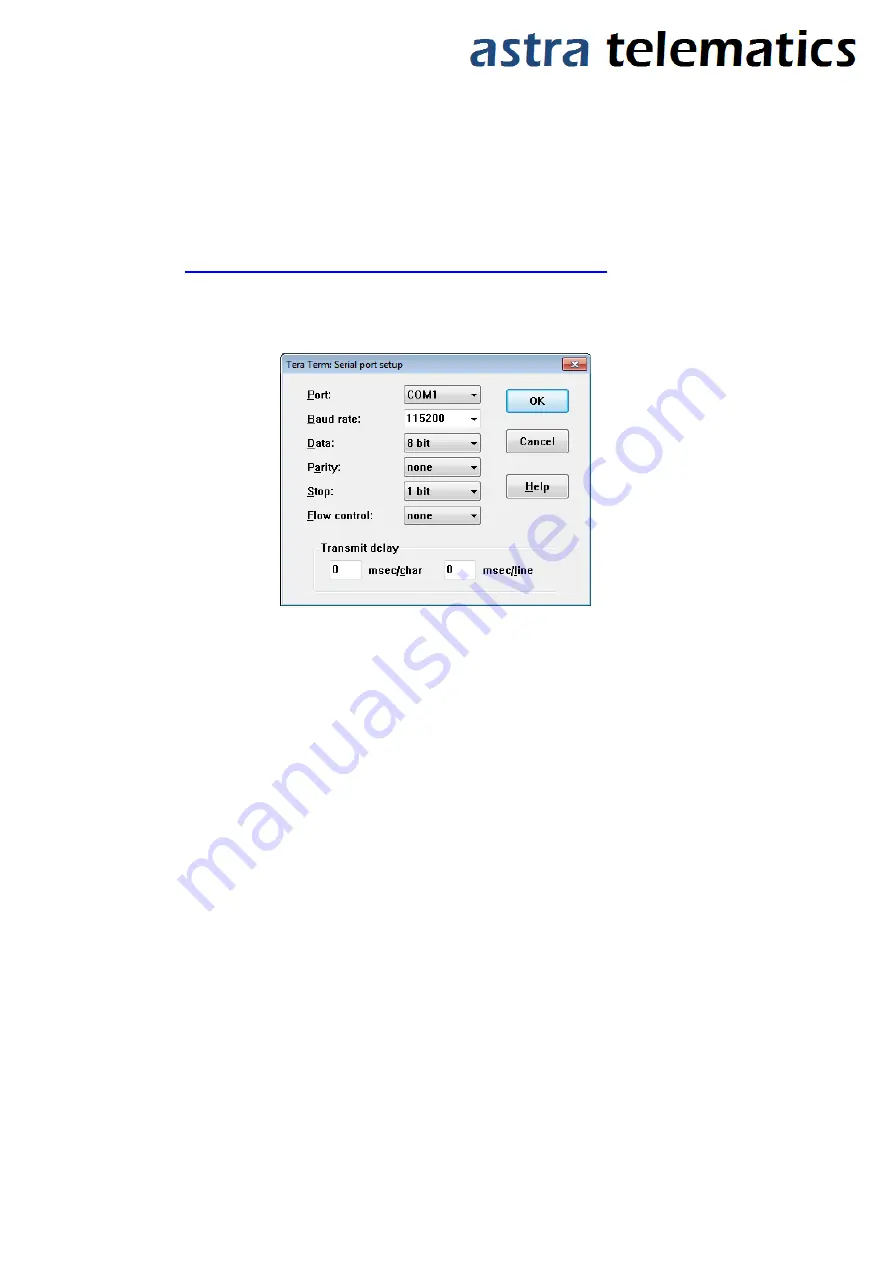
d.


Configure your serial connection as follows: 


e.


Choose the 

Port 

to suit your available COM ports on your PC.  This will usually be 

COM1 if you have a built in RS232 port.  If using a USB-RS232 adapter, go to the 
Windows® Device Manager and check which COM port has been assigned to your USB 
adapter (note: the assigned COM port will change if you plug into a different USB 
socket on your PC).


f.


Select 

Setup 

and then 

Save Setup 

from the drop down menu list to save this 

configuration


g.


Leave the TeraTerm window open whilst you now set up and connect the AT110


2.


Connect the Antennas 

a.


Plug in the GPS and GSM antennas to the SSMB and MCX coaxial connectors on the 
front edge of the AT110 

b.


Position the GPS antenna with a direct ‘view’ of the sky and the ‘SKY SIDE’ label facing 

up. 


3.


Connect the CB113 cable to the AT110 30-pin data connector


a.


The CB113 cable has a DB9 female RS232 connector for convenient access to the main 
RS232 port of the AT110, which is useful for configuration, diagnostics and debugging 
etc.


b.


Connect the DB9 serial connector to your PC COM port or USB-RS232 adapter


Summary of Contents for AT110

Page 1: ...eck which COM port has been assigned to your USB adapter note the assigned COM port will change if you plug into a different USB socket on your PC f Select Setup and then Save Setup from the drop down menu list to save this configuration g Leave the TeraTerm window open whilst you now set up and connect the AT110 2 Connect the Antennas a Plug in the GPS and GSM antennas to the SSMB and MCX coaxial...

Page 2: ...hand side as below b Ensure the SIM is pushed in all the way c Note that the AT110 will now power up d Both LEDs will illuminate e You should see text on your TeraTerm screen f To remove the SIM push it inwards and it will spring out 6 Configure Settings a Once the device is running and you can see output text scrolling in TeraTerm you are ready to configure the device by typing or pasting command...

Page 3: ...entations 10 Fixed protocol P Carrier Transicold Refrigerator data 14 Fixed protocol V Legacy not for new implementations 16 Modular protocol X RECOMMENDED for new implementations 17 Fixed packet protocol S Private client protocol 18 Modular Protocol Z Private client protocol please contact Astra Telematics for advice and documentation on the above protocols e Select the required reporting MODE UD...

Page 4: ...rk 3G service DOUBLE 100mS ON 2 SEC OFF Registered on roaming network 2G service 50mS ON 50mS OFF Registered on roaming network 3G service ON CONSTANTLY device is currently transmitting data on home network 800mS ON 200mS OFF device is currently transmitting data on roaming network 8 Further Information For more information please refer to the AT110 User Guide which can be downloaded from our webs...

Reviews: