background image

P3-P5G33

ASUS PC (Desktop Barebone)

Download the latest manual from the ASUS website: www.asus.com

Summary of Contents for P3-P5G33 - P Series - 0 MB RAM

Page 1: ...P3 P5G33 ASUS PC Desktop Barebone Download the latest manual from the ASUS website www asus com ...

Page 2: ...HANTABILITY OR FITNESS FOR A PARTICULAR PURPOSE IN NO EVENT SHALL ASUS ITS DIRECTORS OFFICERS EMPLOYEES OR AGENTS BE LIABLE FOR ANY INDIRECT SPECIAL INCIDENTAL OR CONSEQUENTIAL DAMAGES INCLUDING DAMAGES FOR LOSS OF PROFITS LOSS OF BUSINESS LOSS OF USE OR DATA INTERRUPTION OF BUSINESS AND THE LIKE EVEN IF ASUS HAS BEEN ADVISED OF THE POSSIBILITY OF SUCH DAMAGES ARISING FROM ANY DEFECT OR ERROR IN T...

Page 3: ... 4 Installing a CPU 2 5 2 4 1 CPU installation 2 5 2 4 2 Installing the CPU fan and heatsink assembly 2 8 2 5 Installing a DIMM 2 10 2 5 1 Memory configurations 2 10 2 5 2 Installing a DIMM 2 13 2 5 3 Removing a DIMM 2 13 2 6 Installing an expansion card 2 14 2 6 1 Expansion slots 2 14 2 6 2 Expansion card installation 2 14 2 7 Installing an optical drive 2 17 Uninstalling the optical drive 2 18 2...

Page 4: ... 3 2 5 ASUS Contact information 3 6 3 2 6 Other information 3 7 Chapter 4 Motherboard info 4 1 Motherboard overview 4 2 4 2 Jumper 4 3 4 3 Connectors 4 5 4 3 1 Rear panel connectors 4 5 4 3 2 Internal connectors 4 5 Chapter 5 BIOS setup 5 1 Managing and updating your BIOS 5 2 5 1 1 ASUS Update utility 5 2 5 1 2 Creating a bootable floppy disk 5 5 5 1 3 ASUS EZ Flash 2 utility 5 6 5 1 4 AFUDOS util...

Page 5: ...5 17 5 4 1 CPU Configuration 5 17 5 4 2 Chipset 5 18 5 4 3 OnBoard Devices Configuration 5 20 5 4 4 PCIPnP 5 21 5 4 5 USB Configuration 5 22 5 5 Power menu 5 23 5 5 1 Suspend Mode 5 23 5 5 2 Repost Video on S3 Resume 5 23 5 5 3 ACPI Version 5 23 5 5 4 ACPI APIC Support 5 23 5 5 5 APM Configuration 5 24 5 5 6 Hardware Monitor 5 25 5 6 Boot menu 5 27 5 6 1 Boot Device Priority 5 27 5 6 2 Boot Settin...

Page 6: ... harmful interference to radio or television reception which can be determined by turning the equipment off and on the user is encouraged to try to correct the interference by one or more of the following measures Reorient or relocate the receiving antenna Increase the separation between the equipment and receiver Connect the equipment to an outlet on a circuit different from that to which the rec...

Page 7: ... contact your dealer immediately To avoid short circuits keep paper clips screws and staples away from connectors slots sockets and circuitry Avoid dust humidity and temperature extremes Do not place the product in any area where it may become wet Place the product on a stable surface If you encounter technical problems with the product contact a qualified service technician or your retailer CAUTI...

Page 8: ... including introduction on the front and rear panel and internal components 2 Chapter 2 Basic installation This chapter provides step by step instructions on how to install components in the system 3 Chapter 3 Getting started This chapter helps you power up the system and install drivers and utilities from the support CD 4 Chapter 4 Motherboard info This chapter gives information about the motherb...

Page 9: ...n to aid in completing a task Where to find more information Refer to the following sources for additional information and for product and software updates 1 ASUS Websites The ASUS websites worldwide provide updated information on ASUS hardware and software products Refer to the ASUS contact information 2 Optional Documentation Your product package may include optional documentation such as warran...

Page 10: ...G33 barebone system with ASUS motherboard 220 W PFC power supply unit 6 in 1 storage card reader 2 Accessories Foot stand and screw 1 pair for vertical placement Rubber stand x 4 for horizontal placement Hard disk drive screw x 8 Optical drive screw x 2 Rubber washer x 8 3 Cables AC power cable Serial ATA signal cable x 2 IDE cable x 1 4 Support CD and Recover Pro CD 5 Installation manual ...

Page 11: ...5G33 Chapter 1 System introduction This chapter gives a general description of the barebone system The chapter lists the system features including introduction on the front and rear panel and internal components ...

Page 12: ...d up to 8 GB system memory With audio capabilities extensive connectivity and Fast Ethernet LAN P3 P5G33 is designed for the sophisticated The system s ergonomic design allows vertical or horizontal placement so you can maximize your desktop space With these and many more the P3 P5G33 definitely delivers the cutting edge technology for your computing and multimedia needs 1 2 Front panel The front ...

Page 13: ...l cover Refer to the illustration in the previous page 9 SmartMedia card slot This slot is for a SmartMedia storage card 10 Card reader LED This LED lights up when data is being read from or written to a storage card inserted in any of the card reader slots 11 Secure Digital MultimediaCard slot This slot is for a Secure Digital MultimediaCard storage card 12 Headphone port This port connects a hea...

Page 14: ...s port connects a tape player or other audio sources 9 Line Out port lime This port connects a headphone or a speaker In 4 6 8 channel configuration the function of this port becomes Front Speaker Out 10 Metal bracket lock Secures the expansion slot card metal brackets 11 Voltage selector Allows you to adjust the system input voltage according to the voltage supply in your area See the section 2 1...

Page 15: ...channel mode the function of this port becomes Surround Speaker The functions of the Line Out Line In and Microphone ports change when you select the 6 8 channel configuration Refer to the table below for audio ports function variation 20 Expansion slots You can insert expansion boards into these slots to add memory and graphics capabilities to the system 21 Power fan vent The fan vent allows air ...

Page 16: ...your reference Proceed to Chapter 2 for instructions on installing additional system components 1 5 25 inch empty optical drive bay 2 Front panel cover 3 Optical drive lock 4 Hard disk drive bays 5 Hard disk drive lock 6 Power supply unit 7 PCI Express x4 slot 8 PCI slots 9 PCI Express x16 slot 10 ASUS motherboard 11 Metal bracket lock 12 LGA775 socket 13 DIMM sockets 14 Chassis fan 1 3 7 5 8 2 6 ...

Page 17: ...ASUS P3 P5G33 Basic installation This chapter provides step by step instructions on how to install components in the system Chapter 2 ...

Page 18: ...s LED lights up to indicate that the system is ON in sleep mode or in soft off mode and not powered OFF Unplug the power cable from the power outlet and make sure that the standby power LED is OFF before installing any system component Use a grounded wrist strap or touch a safely grounded object or a metal object such as the power supply case before handling components to avoid damaging them due t...

Page 19: ...ing the covers 2 3 1 Removing the system cover To remove the cover and metal chassis support 1 On the rear panel locate the two thumb screws that secure the cover to the chassis 4 Lift the system cover then set aside 5 Lift the expansion card lock to a 90º 100º angle 6 Lift the chassis support bracket to a 45º angle then carefully pull to release Set the chassis support bracket aside ...

Page 20: ...cally 2 Locate the front panel assembly hooks 3 Pull the hooks outward to release the front panel assembly 4 Swing the left edge of the front panel assembly outward 5 Unhook the hinge like tabs from the holes on the right side of the chassis to detach Do not use too much force when removing the front panel assembly Hinge like tab ...

Page 21: ...cumentation follow the latter Check your motherboard to make sure that the socket contacts are not bent Contact your retailer immediately if you see any damage to the socket contacts motherboard components ASUS will shoulder the cost of repair only if the damage is shipment transit related The product warranty does not cover damage to the socket contacts resulting from incorrect CPU installation o...

Page 22: ... A and move it to the left B until it is released from the retention tab Retention tab Load lever This side of the cam box should face you PnP Cap A B 3 Lift the load lever in the direction of the arrow to a 135º angle 4 Lift the load plate with your thumb and forefinger to a 100º angle A then push the PnP cap from the load plate window to remove B Load plate A B ...

Page 23: ...entation DO NOT force the CPU into the socket to prevent bending the connectors on the socket and damaging the CPU 6 Close the load plate A then push the load lever B until it snaps into the retention tab A B The motherboard supports Intel Pentium 4 LGA775 processors with the Intel Enhanced Memory 64 Technology EM64T Enhanced Intel SpeedStep Technology EIST and Hyper Threading Technology Refer to ...

Page 24: ...nal heatsink and fan Your Intel Pentium 4 LGA775 heatsink and fan assembly comes in a push pin design and requires no tool to install If you purchased a separate CPU heatsink and fan assembly make sure that the Thermal Interface Material is properly applied to the CPU heatsink or CPU before you install the heatsink and fan assembly To install the CPU heatsink and fan 1 Place the heatsink on top of...

Page 25: ...ace connect the CPU fan cable to the connector on the motherboard Do not forget to connect the CPU fan connector Hardware monitoring errors can occur if you fail to plug this connector P5K VM P5K VM CPU fan connector CPU_FAN GND CPU FAN PWR CPU FAN IN CPU FAN PWM ...

Page 26: ...er than the recommended configurations may cause memory sizing error or system boot failure Use any of the recommended configurations in the table on the next page Install only identical the same type and size DDR2 DIMM in DIMM_A and DIMM_B Always install DIMMs with the same CAS latency For optimum compatibility we recommend that you obtain memory modules from the same vendor Due to chipset resour...

Page 27: ... DS M378T2953EZ3 CE6 256MB Hynix HY5PS121621CFP Y5 5 SS HYMP532U64CP6 Y5 1024MB Hynix HY5PS12821CFP Y5 5 DS HYMP512U64CP8 Y5 256MB CORSAIR MIII00605 N A SS VS256MB667D2 512MB CORSAIR 64M8CFEG N A SS VS512MB667D2 1024MB CORSAIR 64M8CFEG N A DS VS1GB667D2 256MB ELPIDA E2508AB 6E E 5 SS EBE25UC8ABFA 6E E 512MB ELPIDA E5108AE 6E E 5 SS EBE51UD8AEFA 6E E 512MB A DATA AD29608A8A 3EG 5 SS M2OAD5G3H3166I1...

Page 28: ... 5 SS M378T6553CZ3 CE7 512MB Hynix HY5PS12821CFP S5 5 5 5 SS HYMP564U64CP8 S5 1024MB Hynix HY5PS12821CFP S5 5 5 5 DS HYMP512U64CP8 S5 512MB MICRON D9GKX N A SS MT8HTF6464AY 80ED4 1024MB MICRON D9GKX N A DS MT16HTF12864AY 80ED4 1024MB CORSAIR Heat Sink Package 4 DS CM2X1024 6400C4 512MB Crucial Heat Sink Package 4 SS BL6464AA804 8FD 1024MB Crucial Heat Sink Package 4 DS BL12864AA804 16FD 1024MB Cru...

Page 29: ...ning clips snap back in place and the DIMM is properly seated 2 5 3 Removing a DIMM To remove a DIMM 1 Simultaneously press the retaining clips outward to unlock the DIMM 2 Remove the DIMM from the socket A DDR2 DIMM is keyed with a notch so that it fits in only one direction Do not force a DIMM into a socket to avoid damaging the DIMM The DDR2 DIMM sockets do not support DDR DIMMs DO not install ...

Page 30: ... 2 6 1 Expansion slots PCI slots The PCI slots support cards such as a LAN card SCSI card USB card and other cards that comply with PCI specifications PCI Express x16 slot This motherboard supports PCI Express x16 graphic cards that comply with the PCI Express specifications The following figure shows a graphics card installed on the PCI Express x16 slot PCI Express x4 slot This motherboard suppor...

Page 31: ...rive replace the chassis support bracket otherwise install other components before replacing the chassis support bracket 4 Align the card connector with the slot and press firmly until the card is completely seated on the slot 6 Replace the expansion card lock to secure the card to the chassis 2 Remove the chassis support bracket ...

Page 32: ...PT1 8 3 System CMOS Real Time Clock 9 4 IRQ holder for PCI steering 10 5 IRQ holder for PCI steering 11 6 IRQ holder for PCI steering 12 7 IRQ holder for PCI steering 13 8 Numeric data processor 14 9 Primary IDE channel 15 10 Secondary IDE channel These IRQs are usually available for PCI devices IRQ assignments for this motherboard A B C D E F G H PCI slot 1 shared PCI slot 2 shared LAN Marvell805...

Page 33: ...erface at the back of the drive Match the red stripe on the cable with Pin 1 on the IDE interface 6 Connect the optical drive audio cable to the 4 pin connector at the back of the optical drive To install an optical drive 1 Remove the front panel assembly following the instructions in section 2 3 2 Removing the front panel assembly The IDE and audio plugs are pre connected to the primary IDE and i...

Page 34: ...place a defective optical drive To uninstall the optical drive 1 Remove the front panel assembly following the instructions in section 2 3 2 Removing the front panel assembly 2 Locate the optical drive screw lock 4 Disconnect the IDE audio and power cables and plugs from the back of the drive 5 Pull out the drive completely from the bay then replace it following the instructions in the previous se...

Page 35: ...embly following the instructions in 2 3 2 Removing the front panel assembly 2 Locate the lock on both sides of the card reader assembly 3 Press the card reader lock inwards A then slightly pull the card reader assembly outward B until the USB cable and plug is exposed 4 Disconnect the USB cable and plug from the card reader assembly then set the card reader assembly aside A B ...

Page 36: ...e upper HDD bay 1 Insert the rubber washers to the HDD screws Refer to the illustration on the right 2 Drive four screws two on each side of the drive on the drive screw holes Rubber washer Rubberwashermat 1 2 2 HDD screw lock Screw rails 1 2 Screw rails 2 9 1 Hard disk drive bays The drive bays incorporate a screw less design that allows you to install and remove a hard disk drive without driving...

Page 37: ...onnectors 4 Connect the 15 pin SATA power plug from the power supply unit to the power connector at the back of the drive 5 Place the HDD on the tray Make sure that the HDD screws are aligned with the screw holes and rails 6 When the HDD screws align with the screw rails push the drive carefully until it is completely flushed on the bay The HDD screw lock clicks to indicate that the drive is prope...

Page 38: ...on the IDE interface 3 Connect a power cable from the power supply unit to the power connector at the back of the drive 4 Follow steps 5 to 6 of the previous section to complete installation 2 9 4 Uninstalling a hard disk drive In the future you may have to upgrade or replace a defective hard disk drive To uninstall the hard disk drive 1 Press the HDD screw lock A then push the drive out from the ...

Page 39: ...on 2 10 1 Replacing the front panel assembly To replace the front panel assembly 1 Hook the hinge like tabs to the holes on the right side of the chassis 2 Swing the left edge of the front panel inward then attach the front panel assembly hooks to the chassis until they snap in place Do not use too much force when replacing the front panel assembly Hinge like tabs ...

Page 40: ...s 2 10 2 Replacing the system cover To replace the metal chassis support 2 Match and insert the hooks of the cover to the elongated holes on the side of the chassis All eight hooks four hooks on both sides of the cover must properly fit the designated holes 1 Reinstall the metal chassis support and the expansion card lock ...

Page 41: ... a screw to secure the footstand to the chassis 5 Follow the same procedures when installing the second foot stand The photo on the right shows the system in a vertical desktop placement 1 Lay the system on its side on a flat stable and elevated surface then locate two screw holes on the left side of the system 2 Extend the left side of the system at least 3 cm from the edge of the surface to faci...

Page 42: ...e power connector Use this switch to select the appropriate system input voltage according to the voltage supply in your area If the voltage supply in your area is 100 127 V set the switch to 115 V If the voltage supply in your area is 200 240 V set the switch to 230 V Setting the switch to 115 V in a 230 V environment will seriously damage the system ...

Page 43: ...ASUS P3 P5G33 Chapter 3 Getting started This chapter helps you to power up the system and install drivers and utilities from the support CD ...

Page 44: ...ations and utilities that you can install to avail all motherboard features 3 2 1 Running the support CD Place the support CD to the optical drive The CD automatically displays the Drivers menu if Autorun is enabled in your computer Motherboard settings and hardware options vary Use the setup procedures presented in this chapter for reference only Refer to your OS documentation for detailed inform...

Page 45: ...SUS InstAll Drivers Installation Wizard Intel Chipset Inf Update Program Installs the Intel chipset Inf update program Intel Graphics Accelerator Driver Installs the Intel graphics accelerator driver Realtek Audio Driver Installs the Realtek ALC883 audio driver and application Marvell Yukon Gigabit Ethernet Driver Installs the Marvell Yukon Gigabit Ethernet LAN driver USB 2 0 Driver Installs the U...

Page 46: ...oad the latest version of the BIOS from the ASUS website Before using the ASUS Update make sure that you have an Internet connection so you can connect to the ASUS website ASUS AI Gear2 Installs the ASUS AI Gear2 application ASUS AI Nap Installs the ASUS AI Nap application ASUS PC Probe II This smart utility monitors the fan speed CPU temperature and system voltages and alerts you of any detected ...

Page 47: ...es the multimedia features of you computer so you can enjoy watching TV and movies capturing videos or playing games in your computer Visit the Microsoft website www microsoft com for updates Symantec Norton Internet Security The anti virus application detects and protects your computer from viruses that destroys data WinDVD Copy5 Trial Installs the WinDVD Copy5 Trial version Corel Snapfire Plus S...

Page 48: ...lick an item to open the folder of the user manual Most user manual files are in Portable Document Format PDF Install the Adobe Acrobat Reader from the ASUS Superb Software Library CD before opening a user manual file 3 2 5 ASUS Contact information Click the Contact tab to display the ASUS contact information ...

Page 49: ...e screen give additional information on the motherboard and the contents of the support CD Click an icon to display the specified information Motherboard Info Displays the general specifications of the motherboard Browse this CD Displays the support CD contents in graphical format ...

Page 50: ... Technical support Form Displays the ASUS Technical Support Request Form that you have to fill out when requesting technical support Filelist Displays the contents of the support CD and a brief description of each in text format ...

Page 51: ...US P3 P5G33 Motherboard info Chapter 4 This chapter gives information about the motherboard that comes with the system This chapter includes the motherboard layout jumper settings and connector locations ...

Page 52: ... Super I O CD PCIEX4_1 CLRTC Intel ICH9 EATXPWR CR2032 3V Lithium Cell CMOS Power Intel MCH G33 PCI1 PCIEX16_1 CHA_FAN1 SPDIF_OUT LGA775 IE1394_2 BIOS SATA1 ATX12V ALC883 PWR_FAN PCI2 F_USB34 KB_USB56 LAN1_USB12 VIA VT6308S PRI_EIDE KBPWR USB78 SB_PWR COM1 USBPW1 4 USBPW9 12 AUDIO USB910 USB1112 ASM4131 88E8056 USBPW5 8 SATA2 SATA4 SATA3 FLOPPY PARALLEL PORT SPDIF JMicron JMB368 Refer to 1 3 Conne...

Page 53: ...3 Keep the cap on pins 2 3 for about 5 10 seconds then move the cap back to pins 1 2 4 Reinstall the battery 5 Plug the power cord and turn ON the computer 6 Hold down the Del key during the boot process and enter BIOS setup to re enter data You do not need to clear the RTC when the system hangs due to overclocking For system failure due to overclocking use the C P R CPU Parameter Recall feature S...

Page 54: ...t 5VSB 1 2 2 3 5V Default 5VSB USBPW5 8 3 USB device wake up 3 pin USBPW1 4 USBPW5 8 USBPW9 12 Set these jumpers to 5V to wake up the computer from S1 sleep mode CPU stopped DRAM refreshed system running in low power mode using the connected USB devices Set to 5VSB to wake up from S3 and S4 sleep modes The USBPW1 4 jumpers are for the rear USB ports The USBPW5 8 and USBPW910 jumpers are for the in...

Page 55: ...tion of the rear panel I O ports 4 3 2 Internal connectors 1 Floppy disk drive connector 34 1 pin FLOPPY This connector is for the provided floppy disk drive FDD signal cable Insert one end of the cable to this connector then connect the other end to the signal connector at the back of the floppy disk drive Pin 5 on the connector is removed to prevent incorrect cable connection when using an FDD c...

Page 56: ...atch the covered hole on the Ultra DMA cable connector This prevents incorrect insertion when you connect the IDE cable Use the 80 conductor IDE cable for Ultra DMA 133 100 66 IDE devices If any device jumper is set as Cable Select make sure all other device jumpers have the same setting Drive jumper setting Mode of device s Cable connector Single device Cable Select or Master Black Two devices Ca...

Page 57: ...TA device Or you may connect the right angle side of SATA cable to the onboard SATA port to avoid mechanical conflict with huge graphics cards Right angle side P5K VM P5K VM SATA connectors SATA2 GND RSATA_TXP4 RSATA_TXN4 GND RSATA_RXP4 RSATA_RXN4 GND GND RSATA_TXP2 RSATA_TXN2 GND RSATA_RXP2 RSATA_RXN2 GND SATA4 GND RSATA_TXP3 RSATA_TXN3 GND RSATA_RXP3 RSATA_RXN3 GND GND RSATA_TXP1 RSATA_TXN1 GND ...

Page 58: ...to any of these connectors then install the module to a slot opening at the back of the system chassis These USB connectors comply with USB 2 0 specification that supports up to 480 Mbps connection speed Never connect a 1394 cable to the USB connectors Doing so will damage the motherboard P5K VM P5K VM USB 2 0 connectors USB1112 NC GND USB_P12 USB_P12 USB 5V GND USB_P11 USB_P11 USB 5V pin1 USB910 ...

Page 59: ...EEE 1394a connector Doing so will damage the motherboard You can connect the front panel 1394 cable to the ASUS Q Connector 1394 red first and then install the Q Connector 1394 to the 1394 connector onboard if your chassis supports front panel 1394 ports The IEEE 1394a module cable is purchased separately 7 Optical drive audio connector 4 pin CD These connectors allow you to receive stereo audio i...

Page 60: ...Insufficient air flow inside the system may damage the motherboard components These are not jumpers Do not place jumper caps on the fan connectors Only the CPU FAN connectors support the ASUS Q FAN feature P5K VM P5K VM Fan connectors CPU_FAN CHA_FAN1 GND Rotation 12V PWR_FAN GND CPU FAN PWR CPU FAN IN CPU FAN PWM GND Rotation 12V 9 Serial port connector 10 1 pin COM1 This connector is for a seria...

Page 61: ... for a chassis mounted front panel audio I O module that supports either HD Audio or legacy AC 97 audio standard Connect one end of the front panel audio I O module cable to this connector We recommend that you connect a high definition front panel audio module to this connector to avail of the motherboard s high definition audio capability If you want to connect a high definition front panel audi...

Page 62: ...U Intel Pentium Extreme 3 73GHz Memory 512 MB DDR2 x4 Graphics card ASUS EAX1900XT Parallel ATA device IDE hard disk drive Serial ATA device SATA hard disk drive x2 Optical drive DVD RW If you want to use two high end PCI Express x16 cards use a PSU with 500W to 600W power or above to ensure the system stability 12 ATX power connectors 24 pin EATXPWR 4 pin ATX12V These connectors are for ATX power...

Page 63: ...er The speaker allows you to hear system beeps and warnings ATX power button soft off button 2 pin PWRSW This connector is for the system power button Pressing the power button turns the system on or puts the system in sleep or soft off mode depending on the BIOS settings Pressing the power switch for more than four seconds while the system is ON turns the system OFF Reset button 2 pin RESET This ...

Page 64: ...s by only a few steps Directions below shows how to install ASUS Q Connector Step2 Properly install the ASUS Q Connector to the System panel connctor Step1 Connect correct front panel to ASUS Q Connector first You can refer to the marking on Q Connector itself to know the detail pin definition Step3 Front panel functions are enabled ...

Page 65: ...ASUS P3 P5G33 Chapter 5 BIOS setup This chapter tells how to change system settings through the BIOS Setup menus and descibes the BIOS parameters ...

Page 66: ...estore the BIOS in the future Copy the original motherboard BIOS using the ASUS Update or AFUDOS utilities Installing ASUS Update To install ASUS Update 1 Place the support CD in the optical drive The Drivers menu appears 2 Click the Utilities tab then click Install ASUS Update 3 The ASUS Update utility is copied to your system 5 1 1 ASUS Update utility The ASUS Update is a utility that allows you...

Page 67: ...raffic or click Auto Select Click Next Updating the BIOS through the Internet To update the BIOS through the Internet 1 Launch the ASUS Update utility from the Windows desktop by clicking Start Programs ASUS ASUSUpdate ASUSUpdate The ASUS Update main window appears 2 Select Update BIOS from the Internet option from the drop down menu then click Next ...

Page 68: ...te BIOS from a file option from the drop down menu then click Next 4 From the FTP site select the BIOS version that you wish to download Click Next 5 Follow the screen instructions to complete the update process The ASUS Update utility is capable of updating itself through the Internet Always update the utility to avail all its features 3 Locate the BIOS file from the Open window then click Open 4...

Page 69: ...Floppy Drive icon d Click File from the menu then select Format A Format 3 1 2 Floppy Disk window appears e Select Create an MS DOS startup disk from the format options field then click Start Windows Vista environment a Insert a formatted high density 1 44 MB floppy disk to the floppy disk drive b Click from the Windows desktop then select Computer c Right click Floppy Disk Drive then click Format...

Page 70: ...ves by pressing Tab before the correct file is found Then press Enter 3 You can launch the EZ Flash 2 by two methods 1 Insert the floppy disk USB flash disk that contains the BIOS file to the floppy disk drive or the USB port Press Alt F2 during POST to display the following This function can support devices such as USB flash disk or floppy disk with FAT 32 16 format and single partition only Do n...

Page 71: ...ht alphanumeric characters for the main filename and three alphanumeric characters for the extension name A afudos oOLDBIOS1 rom Make sure that the floppy disk is not write protected and has at least 1024KB free space to save the file The succeeding BIOS screens are for reference only The actual BIOS screen displays may not be same as shown The utility returns to the DOS prompt after copying the c...

Page 72: ...33 ROM AMI Firmware Update Utility Version 1 19 ASUS V2 07 03 11 24BB Copyright C 2002 American Megatrends Inc All rights reserved WARNING Do not turn off power during flash BIOS Reading file done Reading flash done Advance Check Erasing flash done Writing flash done Verifying flash done Please restart your computer A A afudos iP3 P5G33 ROM AMI Firmware Update Utility Version 1 19 ASUS V2 07 03 11...

Page 73: ...atically checks the CD for the BIOS file 4 Restart the system after the utility completes the updating process Only the USB flash disk with FAT 32 16 format and single partition can support ASUS CrashFree BIOS 3 The device size should be smaller than 8GB DO NOT shut down or reset the system while updating the BIOS Doing so can cause system boot failure When found the utility reads the BIOS file an...

Page 74: ...wish to enter Setup after POST reboot the system by doing any of the following procedures Restart using the OS standard shut down procedure Press Ctrl Alt Del simultaneously Press the reset button on the system chassis Press the power button to turn the system off then back on Using the power button reset button or the Ctrl Alt Del keys to force reset from a running operating system can cause dama...

Page 75: ...ation keys for that particular menu Use the navigation keys to select items in the menu and change the settings 5 2 1 BIOS menu screen Some of the navigation keys differ from one screen to another Select Screen Select Item Change Field Tab Select Field F1 General Help F10 Save and Exit ESC Exit v02 58 C Copyright 1985 2007 American Megatrends Inc BIOS SETUP UTILITY Main Advanced Power Boot Tools E...

Page 76: ...ge the value of a field select it then press Enter to display a list of options Refer to 5 2 7 Pop up window 5 2 7 Pop up window Select a menu item then press Enter to display a pop up window with the configuration options for that item 5 2 8 Scroll bar A scroll bar appears on the right side of a menu screen when there are items that do not fit on the screen Press the Up Down arrow keys or Page Up...

Page 77: ...BIOS menu screen for information on the menu screen items and how to navigate through them Select Screen Select Item Change Field Tab Select Field F1 General Help F10 Save and Exit ESC Exit v02 58 C Copyright 1985 2007 American Megatrends Inc BIOS SETUP UTILITY Main Advanced Power Boot Tools Exit Use ENTER TAB or SHIFT TAB to select a field Use or to configure system Time System Time 10 55 25 Syst...

Page 78: ...e device LBA Large Mode Auto Enables or disables the LBA mode Setting to Auto enables the LBA mode if the device supports this mode and if the device was not previously formatted with LBA mode disabled Configuration options Disabled Auto Block Multi sector Transfer Auto Enables or disables data multi sectors transfers When set to Auto the data transfer from and to the device occurs multiple sector...

Page 79: ...Configuration Enhanced Configuration options Disabled Compatible Enhanced Configure SATA As IDE Sets the configuration for the Serial ATA connectors supported by the Southbridge chip If you want to use the Serial ATA hard disk drives as Parallel ATA physical storage devices keep the defaul setting IDE IDE Configuration SATA Configuraton Enhanced Configure SATA as IDE Hard Disk Write Protect Disabl...

Page 80: ...F1 General Help F10 Save and Exit ESC Exit v02 58 C Copyright 1985 2006 American Megatrends Inc BIOS SETUP UTILITY Main AMIBIOS Version 0201 Build Date 06 11 07 Processor Type Genuine Intel R CPU 2 40GHz Speed 1200 MHz Count 1 System Memory Available 503 MB Hard Disk Write Protect Disabled Disables or enables device write protection This will be effective only if device is accessed throuh BIOS Con...

Page 81: ... CPU related information that the BIOS automatically detects Select Screen Select Item Change Option F1 General Help F10 Save and Exit ESC Exit v02 58 C Copyright 1985 2007 American Megatrends Inc Configure advanced CPU settings Manufacturer Intel Brand String Genuine Intel R CPU 2 40 GHz Frequency 2 40GHz FSB Speed 800 MHz Cache L1 32 KB Cache L2 512 KB CPUID 660 Ratio Status Unlocked Max 12 Min ...

Page 82: ...options Disabled Enabled 5 4 2 Chipset The Chipset menu allows you to change the advanced chipset settings Select an item then press Enter to display the sub menu Advanced Chipset Settings WARMING Setting wrong values in below sections may cause system to malfunction North Bridge Configuration BIOS SETUP UTILITY Advanced Configure North Bridge features North Bridge Configuration Select Screen Sele...

Page 83: ...tions Disabled Enabled 1MB Enabled 8MB Set this item to Disabled if you intend to install a PCIE x16 graphics card to the PCIE x16 slot PEG Port Control Auto Configuration options Auto Disabled PEG Force x1 Disabled This item appears when the PEG Port Control item is set to Auto Configuration options Enabled Disabled The following item appears when the Internal Graphics Mode Select item is set to ...

Page 84: ...nabled Disabled Front Panel Type HD Audio Allows you to set the front panel audio connector AAFP mode to legacy AC 97 or high definition audio depending on the audio standard that the front panel audio module supports Configuration options AC97 HD Audio Marvell GigaBit LAN Enabled Configuration options Enabled Disabled LAN Boot ROM Disabled This item appears only when you enable the previous item ...

Page 85: ... changing the settings of the PCI PnP menu items Incorrect field values can cause the system to malfunction Select Screen Select Item Change Option F1 General Help F10 Save and Exit ESC Exit v02 58 C Copyright 1985 2007 American Megatrends Inc Advanced PCI PnP Settings WARNING Setting wrong values in below sections may cause system to malfunction Plug And Play O S No NO lets the BIOS configure all...

Page 86: ...ou to enable or disable support for legacy USB devices Setting to Auto allows the system to detect the presence of USB devices at startup If detected the USB controller legacy mode is enabled If no USB device is detected the legacy USB support is disabled Configuration options Disabled Enabled Auto 5 4 5 USB Configuration The items in this menu allows you to change the USB related features Select ...

Page 87: ...ced Configuration and Power Interface ACPI version supported Configuration options Disabled Enabled 5 5 4 ACPI APIC Support Enabled Allows you to enable or disable the Advanced Configuration and Power Interface ACPI support in the Advanced Programmable Interrupt Controller APIC When set to Enabled the ACPI APIC table pointer is included in the RSDT pointer list Configuration options Disabled Enabl...

Page 88: ...hen the external modem receives a call while the computer is in Soft off mode Configuration options Disabled Enabled The computer cannot receive or transmit data until the computer and applications are fully running Thus connection cannot be made on the first try Turning an external modem off and then back on while the computer is off causes an initialization string that turns the system power on ...

Page 89: ...ds Inc Select Screen Select Item Change Field F1 General Help F10 Save and Exit ESC Exit CPU Temperature v02 58 C Copyright 1985 2007 American Megatrends Inc Power On By PCIE Devices Disabled Allows you to enable or disable the PCIE devices to generate a wake event Configuration options Disabled Enabled Power On By PS 2 Keyboard Disabled Allows you to disable the Power On by PS 2 keyboard function...

Page 90: ...operation or Performance Mode to achieve maximum CPU fan speed Configuration options Optimal Silent Mode Performance Mode Chassis Fan Speed xxxxRPM or Ignored N A The onboard hardware monitor automatically detects and displays the chassis fan speed in rotations per minute RPM If the fan is not connected to the motherboard the field shows N A Vcore Voltage 3 3V Voltage 5V Voltage 12V Voltage The on...

Page 91: ...rity 1st xxth Boot Device xxx Drive These items specify the boot device priority sequence from the available devices The number of device items that appears on the screen depends on the number of devices installed in the system Configuration options xxx Drive Disabled Select Screen Select Item Change Option F1 General Help F10 Save and Exit ESC Exit v02 58 C Copyright 1985 2007 American Megatrends...

Page 92: ...for F1 If Error Enabled When set to Enabled the system waits for the F1 key to be pressed when error occurs Configuration options Disabled Enabled Hit DEL Message Display Enabled When set to Enabled the system displays the message Press DEL to run Setup during POST Configuration options Disabled Enabled Interrupt 19 Capture Disabled When set to Enabled this function allows the option ROMs to trap ...

Page 93: ...select the Change Supervisor Password then press Enter The message Password Uninstalled appears If you forget your BIOS password you can clear it by erasing the CMOS Real Time Clock RTC RAM See section 4 3 Jumper for information on how to erase the RTC RAM After you have set a supervisor password the other items appear to allow you to change other security settings 5 6 3 Security The Security menu...

Page 94: ...ssword composed of at least six letters and or numbers then press Enter 3 Confirm the password when prompted The message Password Installed appears after you set your password successfully To change the user password follow the same steps as in setting a user password Clear User Password Select this item to clear the user password Password Check Setup When set to Setup BIOS checks for user passwor...

Page 95: ...IOS This utility doesn t support 1 NTFS format 5 7 1 ASUS EZ Flash 2 Allows you to run ASUS EZ Flash 2 When you press Enter a confirmation message appears Use the left right arrow key to select between Yes or No then press Enter to confirm your choice Please see section 5 1 3 for details ASUSTek EZ Flash 2 BIOS ROM Utility V3 05 Current ROM Update ROM A C Note Enter Select or Load B Backup ESC Exi...

Page 96: ...lf Test POST Configuration options Disabled Enabled v02 58 C Copyright 1985 2007 American Megatrends Inc Pair Status Length 1 2 N A 3 6 N A 4 5 N A 7 8 N A POST Check LAN cable Disabled Check LAN cable during POST Select Screen Select Item Change Field Tab Select Field F1 General Help F10 Save and Exit ESC Exit BIOS SETUP UTILITY Advanced ...

Page 97: ...on window appears Select YES to save changes and exit If you attempt to exit the Setup program without saving your changes the program prompts you with a message asking if you want to save your changes before exiting Press Enter to save the changes while exiting Exit Discard Changes Select this option only if you do not want to save the changes that you made to the Setup program If you made change...

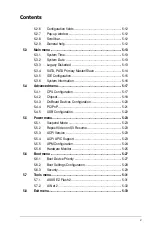
Page 98: ...5 34 Chapter 5 BIOS setup ...

Reviews: