background image

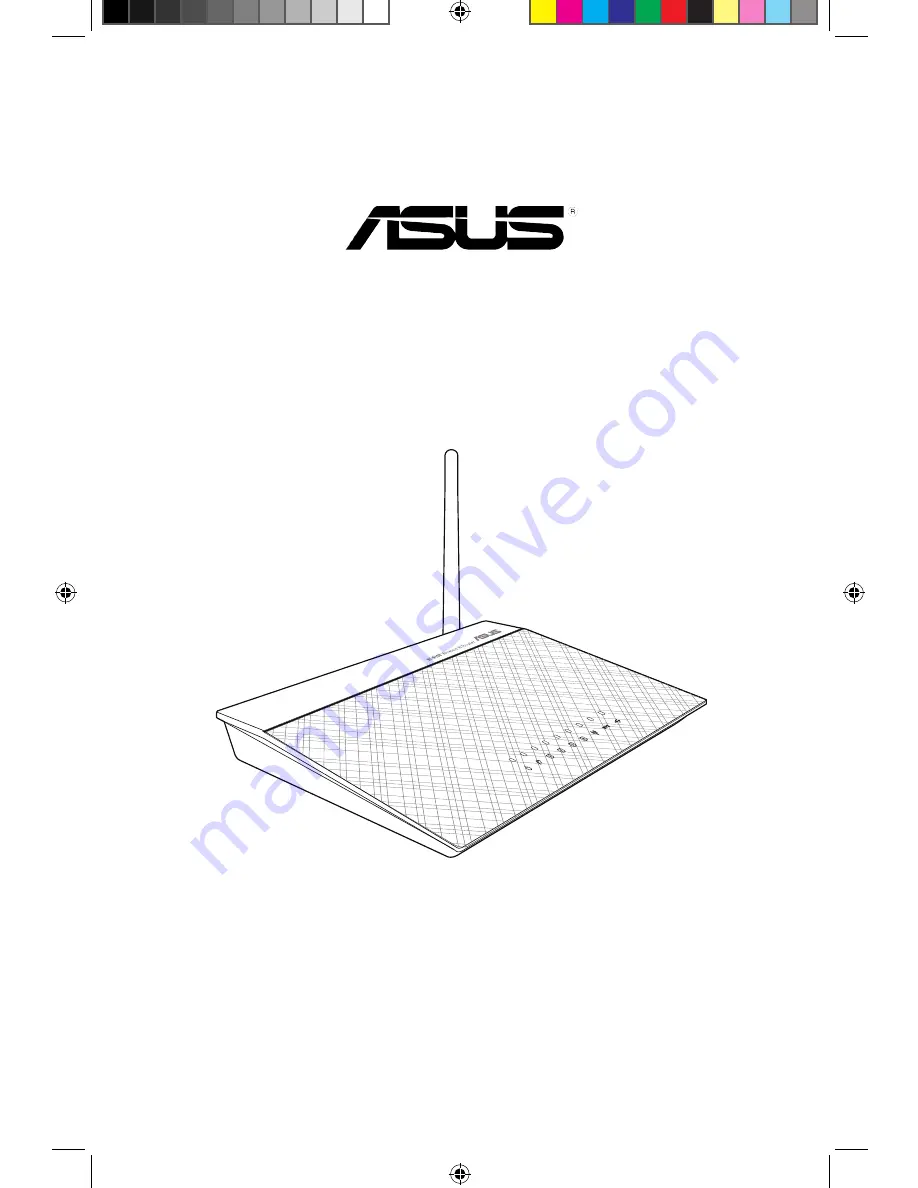
User Manual

RT-N10U

Wireless - N150 Router

7656_rtn10u.indd   1

8//1   10:05:9 AM

Summary of Contents for RT-N10U

Page 1: ...User Manual RT N10U Wireless N150 Router 7656_rtn10u indd 1 8 1 10 05 9 AM ...

Page 2: ...ITY OR LIABILITY FOR ANY ERRORS OR INACCURACIES THAT MAY APPEAR IN THIS MANUAL INCLUDING THE PRODUCTS AND SOFTWARE DESCRIBED IN IT Products and corporate names appearing in this manual may or may not be registered trademarks or copyrights of their respective companies and are used only for identification or explanation and to the owners benefit without intent to infringe Offer to Provide Source Co...

Page 3: ... Setup QIS 13 Using QIS with auto detection 13 Configuring the network clients Accessing the wireless router 17 Setting an IP address for wired or wireless clients 17 Configuration via the web GUI 23 Network configuration using the web GUI Using the Network Map 24 Creating your Guest Network 26 Using the Traffic Manager 28 Managing QoS Quality of Service Bandwidth 28 Monitoring Traffic 30 Administ...

Page 4: ...g the Network Place Samba Share service 42 Using the FTP Share service 44 Using the Miscellaneous setting 47 Using the utilities Installing the utilities 49 Device Discovery 51 Firmware Restoration 52 Setting up your network printer 53 Troubleshooting Troubleshooting 57 ASUS DDNS Service 60 Frequently Asked Questions FAQs 60 Appendices Notices 63 ASUS Contact Information 71 7656_rtn10u indd 8 1 10...

Page 5: ...Chapter 3 Configuring the network clients This chapter provides instructions on setting up the clients in your network to work with your ASUS Wireless Router Chapter 4 Network configuration using the web GUI This chapter provides instructions on configuring the ASUS Wireless Router using its web graphics user interface web GUI Chapter 5 Using the utilities This chapter provides information on the ...

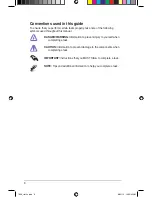
Page 6: ...t this manual DANGER WARNING Information to prevent injury to yourself when completing a task CAUTION Information to prevent damage to the components when completing a task IMPORTANT Instructions that you MUST follow to complete a task NOTE Tips and additional information to help you complete a task 7656_rtn10u indd 6 8 1 10 05 AM ...

Page 7: ...ckage RT N10U Wireless Router x1 Power adapter x1 Support CD x1 RJ 45 cable x1 USB cable x1 Quick Start Guide x1 Warranty card x1 System requirements Before installing the ASUS Wireless Router ensure that your system network meets the following requirements An Ethernet RJ 45 port 10Base T 100Base TX At least one IEEE 802 11b g n device with wireless capability An installed TCP IP and Internet brow...

Page 8: ...m the ground as possible Keep the device clear from metal obstructions and away from direct sunlight Keep the device away from transformers heavy duty motors fluorescent lights microwave ovens refrigerators and other industrial equipment to prevent signal loss Place the device at the center of the network to provide ideal coverage for all wireless mobile devices Install the device at least 20cm aw...

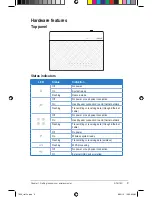
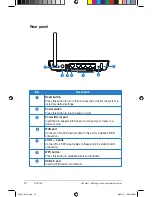
Page 9: ...ansmitting or receiving data through Ethernet cable Off No power or no physical connection On Has physical connection to an Ethernet network Flashing Transmitting or receiving data through Ethernet cable Off No power On Wireless system ready Flashing Transmitting or receiving data wireless Flashing WPS processing Off No power or no physical connection On External USB device installed Hardware feat...

Page 10: ...power on off 3 Power DC In port Insert the AC adapter into this port to connect your router to a power source 4 WAN port Connect an RJ 45 Ethernet cable to this port to establish WAN connection 5 LAN 1 4 ports Connect RJ 45 Ethernet cables to these ports to establish LAN connection 6 WPS button Press this button to establish wireless connection 7 USB 2 0 port Insert a USB device into this port 1 2...

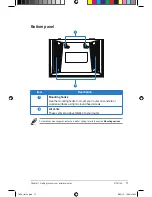
Page 11: ...ing hooks Use the mounting hooks to mount your router on concrete or wooden surfaces using two round head screws 2 Air vents These vents provide ventilation to your router For details on mounting your router on a wall or ceiling refer to the section Mounting options 7656_rtn10u indd 11 8 1 10 05 7 AM ...

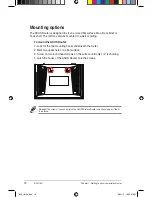
Page 12: ...esigned to sit on a raised flat surface like a file cabinet or book shelf The unit may also be mounted to a wall or ceiling To mount the ASUS Router 1 Look for the two mounting hooks underneath the router 2 Mark two upper holes on a flat surface 3 Screw on two round head screws on the surface until only 1 4 is showing 4 Latch the hooks of the ASUS Router onto the screws 7656_rtn10u indd 1 8 1 10 0...

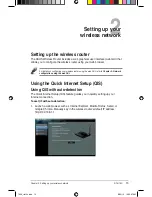
Page 13: ...ing your wireless router using the web GUI refer to Chapter 4 Network configuration using the web GUI Using the Quick Internet Setup QIS Using QIS with auto detection The Quick Internet Setup QIS feature guides you in quickly setting up your Internet connection To use QIS with auto detection 1 Launch a web browser such as Internet Explorer Mozilla Firefox Safari or Google Chrome Manually key in th...

Page 14: ...sername admin and password admin to log into the user interface 3 The wireless router automatically detects if your ISP connection type is Dynamic IP PPPoE PPTP L2TP and Static IP Key in the necessary information for your ISP connection type 7656_rtn10u indd 1 8 1 10 05 8 AM ...

Page 15: ...reless network 4 Assign the network name SSID and network key for a secure wireless network Click Apply when done 5 A summary of your Internet and wireless settings will be displayed Click Next to continue 7656_rtn10u indd 15 8 1 10 05 8 AM ...

Page 16: ...16 RT N10U Chapter 2 Setting up your wireless networkr 6 Read the wireless network connection tutorial Click Finish 7656_rtn10u indd 16 8 1 10 05 8 AM ...

Page 17: ...clients or computers in your network rather than automatically getting IP addresses from your wireless router Follow the instructions below that correspond to the operating system installed on your client or computer 3 Configuring the network clients In the Router mode if you want to manually assign an IP address to your client we recommend that you use the following settings IP address 192 168 1 ...

Page 18: ...n an IP address automatically if you want the IP settings to be assigned automatically Otherwise select Use the following IP address Key in an IP address Subnet mask and Default gateway 4 Select Obtain DNS server address automatically if you want the DNS server settings to be assigned automatically Otherwise select Use the following DNS server addresses and key in the Preferred and Alternate DNS s...

Page 19: ... address automatically if you want the IP settings to be assigned automatically Otherwise select Use the following IP address Key in an IP address Subnet mask and Default gateway 4 Select Obtain DNS server address automatically if you want the DNS server settings to be assigned automatically Otherwise select Use the following DNS server addresses and key in the Preferred and Alternate DNS server 5...

Page 20: ...and Sharing Center Change adapter settings 2 On the Network Connections window click on Local Area Connection 3 On the Local Area Connection Network Status window click Properties 4 Select Internet Protocol Version 4 TCP IPv4 or Internet Protocol Version 6 TCP IPv6 then click Properties 7656_rtn10u indd 0 8 1 10 05 5 AM ...

Page 21: ...Otherwise select Use the following IP address Key in an IP address Subnet mask and Default gateway 6 Select Obtain DNS server address automatically if you want the DNS server settings to be assigned automatically Otherwise select Use the following DNS server addresses and key in the Preferred and Alternate DNS server 7 Click OK 7656_rtn10u indd 1 8 1 10 05 5 AM ...

Page 22: ...22 RT N10U Chapter 4 Network configuration using the web GUI 7656_rtn10u indd 8 1 10 05 5 AM ...

Page 23: ...iguration via the web GUI The router s web graphics user interface web GUI allows you to access additional features inluded with the wireless router To access the web GUI 1 Launch a web browser then key in the router s IP address 2 On the login page key in the default user name admin and password admin 3 From the main page click the navigation menu and links to configure the various features of th...

Page 24: ...eb GUI Using the Network Map Network Map allows you to view the status of the Internet system and clients in your network It enables you to quickly set up your Wide Area Network WAN using the Quick Internet Setup QIS feature 7656_rtn10u indd 8 1 10 05 5 AM ...

Page 25: ...e Internet status screen use the Quick Internet Setup QIS feature to quickly set up your WAN Security level Click this icon to display information on the SSID authentication and encryption methods LAN IP and MAC address Click Wireless on the left navigation panel to enable the WPS mode Client status Click this icon to display information about the clients or computers in the network and allows you...

Page 26: ... Guest Network provides wireless Internet connectivity for temporary visitors while restricting access to your private network To create your guest network 1 Click Guest Network on the left navigation panel 2 Click Enable 3 To configure additional options click Modify 7656_rtn10u indd 6 8 1 10 05 5 AM ...

Page 27: ...item 5 Assign a wireless name for your temporary network on the Network Name SSID field 6 Select an Authentication Method 7 Select a WEP Encryption method 8 Specify the Access time or click Limitless 9 Select Disable or Enable on the Access Intranet item 10 Click Apply 7656_rtn10u indd 7 8 1 10 05 5 AM ...

Page 28: ...feature allows you to set the bandwidth priority and manage network traffic To set up bandwidth priority 1 Click Traffic Manager on the left navigation panel and click the QoS tab 2 Click ON to enable QoS Fill in the upload and download bandwidth fields 3 Click Save Your bandwidth information is available from your ISP 7656_rtn10u indd 8 8 1 10 05 5 AM ...

Page 29: ...t to prioritize specific network applications and network services click User define QoS rules on the upper right hand corner 5 Online service types source IP addresses ports and protocols can be added and configured in the QoS rules screen 7656_rtn10u indd 9 8 1 10 05 55 AM ...

Page 30: ...etwork configuration using the web GUI MonitoringTraffic Click the Traffic Monitor tab to view real time or historical bandwidth information of your Internet Wired and Wireless connections 7656_rtn10u indd 0 8 1 10 05 55 AM ...

Page 31: ...s Point mode Router Mode To set up the wireless router in Router mode 1 Click Administration on the navigation panel and click the Operation Mode tab Select Wireless router mode Click Save 2 Select your connection from these types of ISP services Dynamic IP PPPoE PPTP L2TP and Static IP 3 Key in the required information of your selected connection type 4 Click Apply to save settings 7656_rtn10u in...

Page 32: ... Mode To set up the wireless router in Repeater mode 1 Click Administration on the navigation panel and click the Operation Mode tab Select Repeater mode Click Save 2 Select a wireless network from the list Click Connect 3 Setup complete 7656_rtn10u indd 8 1 10 05 56 AM ...

Page 33: ...int Mode To set up the wireless router in Access Point mode 1 Click Administration on the navigation panel and click the Operation Mode tab Select Access Point AP mode Click Save 2 Key in network name and password Click Apply 3 Setup complete 7656_rtn10u indd 8 1 10 05 56 AM ...

Page 34: ... 4G icon The ASUSWRT user interface does not support PIN code input If the SIM card was previously set with a PIN code use your mobile phone or a compatible wireless USB dongle to disable the PIN code 2 On the USB Modem configuration page click Yes for Enable USB Modem 3 On the USB Adapter item select your USB adapter s model name If the model name is not listed select AUTO 7656_rtn10u indd 8 1 10...

Page 35: ...er to your Internet service provider or telecommunications service for the necessary values for the 3G 4G items 4 Select the Location and ISP for your service Key in the APN Dial Number Username and Password if necessary 5 Setup complete 7656_rtn10u indd 5 8 1 10 05 57 AM ...

Page 36: ...ing Address field key in the starting IP address 5 In the IP Pool Ending Address field key in the ending IP address ASUS recommeds that you use an IP address format of 192 168 1 xxx where xxx can be any number between 2 and 254 when specifying an IP address range An IP Pool Starting Address should not be greater than the IP Pool Ending Address 6 In the Lease Time field specify in seconds when an a...

Page 37: ...y To recover or restore the system use the Firmware Restoration utility To upgrade the firmware 1 Click Administration from the left navigation panel 2 Click the Firmware Upgrade tab 3 In the New Firmware File item click Browse Navigate to the downloaded firmware file 4 Click Upload Download the latest firmware from the ASUS website at http www asus com Upgrading the firmware 7656_rtn10u indd 7 8 ...

Page 38: ...estore Save Upload Setting tab 3 Select the tasks that you want to do To restore to the default factory settings click Restore and click OK once prompted To save the current system settings click Save navigate to the folder where you intend to save the file and click Save To restore from a saved system settings file click Browse to locate your file then click Upload 7656_rtn10u indd 8 8 1 10 05 58...

Page 39: ...10U Chapter 4 Network configuration using the web GUI Using the USB Extension The USB Extension menu provides AiDisk Servers Center Network Printer Server and 3G 4G submenus 7656_rtn10u indd 9 8 1 10 05 59 AM ...

Page 40: ...t To use AiDisk 1 Click USB application on the left navigation panel and click the AiDisk icon 2 From the Welcome to AiDisk wizard screen click Go 3 Assign access rights to the USB storage device Select limitless access rights limited access rights and admin access to define read right privileges to files stored in the USB storage device Click Next 7656_rtn10u indd 0 8 1 10 05 59 AM ...

Page 41: ...r domain name will follow the format xxx asuscomm com where xxx is your host name For example myfiles asuscomm com 5 Click Next 6 Click Finish 7 To access the USB storage device via FTP from a client on the network launch a web browser or a third party FTP client utility and key in the ftp link ftp hostname asuscomm com you previously created For example ftp myfiles asuscomm com 7656_rtn10u indd 1...

Page 42: ... Samba Share tab 3 Click Share with account Click OK at the pop up window 8 Click Apply Using the Network Place Samba Share service 4 Click the Add button to create user accounts for users who will be accessing the USB storage device via Samba Network Place Samba Share allows you to configure accounts and permissions to access files on the USB storage device 7656_rtn10u indd 8 1 10 06 00 AM ...

Page 43: ...gn read write access for a specific file folder R Select this option to assign read only access for a specific file folder No Select this option if you do not want to share a specific file folder 5 Assign a name for the user account and key in a password Click Add 6 Use the Modify and Delete buttons to modify the password or remove the user account 8 Click Apply 7656_rtn10u indd 8 1 10 06 00 AM ...

Page 44: ... To set up the FTP Share service 1 Configure file sharing using the steps in Using AiDisk for File Sharing 2 Enable the DDNS service for FTP server access a Click WAN on the left navigation panel then click the DDNS tab b In the Enable the DDNS Client field tick Yes c Select your DDNS Server from the list d Key in your Host Name e Click Apply 7656_rtn10u indd 8 1 10 06 01 AM ...

Page 45: ... FTP Share tab 5 Click the Enable FTP and Share with account 6 Click the Add button to create accounts for users who will be accessing the USB storage device via FTP Server Assign a name for the user account and key in a password Click Add 7 Use the Modify and Delete buttons to modify the password or remove the user account 7656_rtn10u indd 5 8 1 10 06 01 AM ...

Page 46: ...in the account username and password 8 Select the type of access rights for the storage device R W Select this option to assign read write access for a specific file folder W Select this option to assign write only access for a specific file folder R Select this option to assign read only access for a specific file folder No Select this option if you do not want to share a specific file folder 765...

Page 47: ...aximum number of users who can access the USB storage device assign a device name and work group or specify the language settings for the FTP server To configure additional USB device settings 1 Click USB application on the left navigation panel and click Servers Center 2 Click the Miscellaneous setting tab 3 Specify or change configuration settings as needed 3 Click Apply 7656_rtn10u indd 7 8 1 1...

Page 48: ...48 RT N10U Chapter 4 Network configuration using the web GUI 7656_rtn10u indd 8 8 1 10 06 0 AM ...

Page 49: ...r configuring the ASUS Wireless Router To install the ASUS WLAN Utilities in Microsoft Windows insert the support CD in the CD drive If Autorun is disabled run setup exe from the root directory of the support CD To install the utilities 1 Click Install ASUS Wireless Router Utilities 2 Click Next 7656_rtn10u indd 9 8 1 10 06 0 AM ...

Page 50: ...the Utilities 3 Click Next to accept the default destination folder or click Browse to specify another path 4 Click Next to accept the default program folder or enter another name 5 Click Finish 7656_rtn10u indd 50 8 1 10 06 0 AM ...

Page 51: ...device and enables you to configure the device To launch the Device Discovery utility From your computer s desktop click Start All Programs ASUS Utility RT N13U Wireless Router Device Discovery When you set the router to Access Point mode you need to use Device Discovery to get the router s IP address 7656_rtn10u indd 51 8 1 10 06 0 AM ...

Page 52: ...hen the Power LED at the front panel begins to flash slowly which indicates that the wireless router is in rescue mode 3 Use the following to set up your TCP IP settings IP address 192 168 1 x Subnet mask 255 255 255 0 4 From your computer s desktop click Start All Programs ASUS Utility RT N10U Wireless Router Firmware Restoration Launch rescue mode before using the Firmware Restoration utility Th...

Page 53: ...uter refer to the Plug n Share Disk Support List at http event asus com networks printersupport The wireless router s printer server function is not supported on Windows 2000 To set up your USB Printer 1 Click USB application from the left navigation panel then click Network Printer Server 2 Click Download Now to download the network printer utility 3 Unzip the downloaded file and click the Printe...

Page 54: ... Utilities 4 Follow the onscreen instructions to set up your hardware then click Next 5 Wait for a few minutes for the initial setup to finish Click Next 6 Click Finish to complete the installation 7656_rtn10u indd 5 8 1 10 06 05 AM ...

Page 55: ...the Utilities 7 Follow the Windows OS instructions to install the printer driver 8 After printer driver installation is complete computers on the network will now be able to access the printer 7656_rtn10u indd 55 8 1 10 06 05 AM ...

Page 56: ...56 RT N10U Chapter 5 Using the Utilities 7656_rtn10u indd 56 8 1 10 06 05 AM ...

Page 57: ... click Tools Internet Options 2 Under Temporary Internet files click Delete Cookies and Delete Files 3 Disable the proxy settings of the web browser The client cannot establish a wireless connection with the router Out of Range Put the router closer to the wireless client Try to change the channel settings Authentication Use a wired connection to connect to the router Check the wireless security s...

Page 58: ...he wireless router and re configure the settings Check if the WAN LED on the wireless router is ON Check the wireless encryption settings Check if the computer can get the IP address via both wired network and wireless network Ensure that your web browser is configured to use the local LAN and is not configured to use a proxy server If the ADSL LINK light blinks continuously or stays off Internet ...

Page 59: ...l The following are the factory default settings User Name admin Password admin Enable DHCP Yes if WAN cable is plugged in IP address 192 168 1 1 Domain Name Blank Subnet Mask 255 255 255 0 DNS Server 1 192 168 1 1 DNS Server 2 Blank SSID ASUS I cannot use 192 168 1 1 to enter the web GUI Check the router s operation mode In the Router mode the default IP address is 192 168 1 1 In the AP mode use ...

Page 60: ...on and the domain name may be registered by others 2 I did not register the ASUS DDNS for the router I bought six months ago Can I still register it Yes you can still register the ASUS DDNS service for your router The DDNS service is embedded in your router so you can register the ASUS DDNS service anytime Before registering click Query to check if the hostname has been registered or not If not th...

Page 61: ... ISP DNS server and ASUS DDNS results in different WAN IPs in MS DOS and in the router configuration page Different ISPs may have different interval time for IP updating 6 Is the ASUS DDNS service free or is it just a trial version The ASUS DDNS service is a free and embedded service in some ASUS routers Check if your ASUS router supports the ASUS DDNS service 7656_rtn10u indd 61 8 1 10 06 06 AM ...

Page 62: ...62 RT N10U Chapter 6 Troubleshooting 7656_rtn10u indd 6 8 1 10 06 07 AM ...

Page 63: ...nd to comply with the limits for a class B digital device pursuant to part 15 of the FCC Rules These limits are designed to provide reasonable protection against harmful interference in a residential installation This equipment generates uses and can radiate radio frequency energy and if not installed and used in accordance with the instructions may cause harmful interference to radio communicatio...

Page 64: ...ient Effective use of the radio spectrum Article 3 2 Testing for radio test suites according to EN 300 328 2 has been conducted These are considered relevant and sufficient CE Mark Warning This is a Class B product in a domestic environment this product may cause radio interference in which case the user may be required to take adequate measures Operation Channels Ch1 11 for N America Ch1 14 Japan...

Page 65: ... distribute copies of free software and charge for this service if you wish that you receive source code or can get it if you want it that you can change the software or use pieces of it in new free programs and that you know you can do these things To protect your rights we need to make restrictions that forbid anyone to deny you these rights or to ask you to surrender the rights These restrictio...

Page 66: ... does 1 You may copy and distribute verbatim copies of the Program s source code as you receive it in any medium provided that you conspicuously and appropriately publish on each copy an appropriate copyright notice and disclaimer of warranty keep intact all the notices that refer to this License and to the absence of any warranty and give any other recipients of the Program a copy of this License...

Page 67: ...ponding machine readable source code which must be distributed under the terms of Sections 1 and 2 above on a medium customarily used for software interchange or b Accompany it with a written offer valid for at least three years to give any third party for a charge no more than your cost of physically performing source distribution a complete machine readable copy of the corresponding source code ...

Page 68: ...equence of a court judgment or allegation of patent infringement or for any other reason not limited to patent issues conditions are imposed on you whether by court order agreement or otherwise that contradict the conditions of this License they do not excuse you from the conditions of this License If you cannot distribute so as to satisfy simultaneously your obligations under this License and any...

Page 69: ...r published by the Free Software Foundation 10 If you wish to incorporate parts of the Program into other free programs whose distribution conditions are different write to the author to ask for permission For software which is copyrighted by the Free Software Foundation write to the Free Software Foundation we sometimes make exceptions for this Our decision will be guided by the two goals of pres...

Page 70: ...E WITH ANY OTHER PROGRAMS EVEN IF SUCH HOLDER OR OTHER PARTY HAS BEEN ADVISED OF THE POSSIBILITY OF SUCH DAMAGES END OF TERMS AND CONDITIONS NCC Warning Safety Warning SAFE TEMP This wireless router should be only used in environments with ambient temperatures between 5ºC 41ºF and 40ºC 104ºF DO NOT expose to or use near liquids rain or moisture DO NOT use the modem during electrical storms 7656_rt...

Page 71: ...39 USA Telephone 15029550883 Fax 15029338713 Website usa asus com Online support support asus com ASUS COMPUTER GmbH Germany and Austria Address Harkort Str 21 23 D 40880 Ratingen Germany Fax 492102959911 Website www asus de Online contact www asus de sales Technical Support Telephone Component 491805010923 Telephone System Notebook Eee LCD 491805010920 Fax 492102959911 Online support support asus...

Page 72: ...RT STR 21 23 40880 RATINGEN GERMANY Authorised distributors in Turkey BOGAZICI BIL GISAYAR SAN VE TIC A S Tel 90 212 3311000 Address AYAZAGA MAH KEMERBURGAZ CAD NO 10 AYAZAGA ISTANBUL CIZGI Elektronik San Tic Ltd Sti Tel 0090 2123567070 Address CEMAL SURURI CD HALIM MERIC IS MERKEZI No 15 C D 5 6 34394 MECIDIYEKOY ISTANBUL EEE Yönetmeliğine Uygundur 7656_rtn10u indd 7 8 1 10 06 09 AM ...

Reviews: