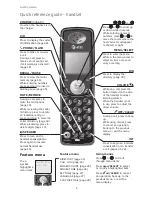
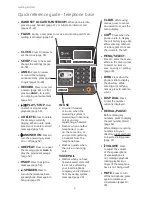
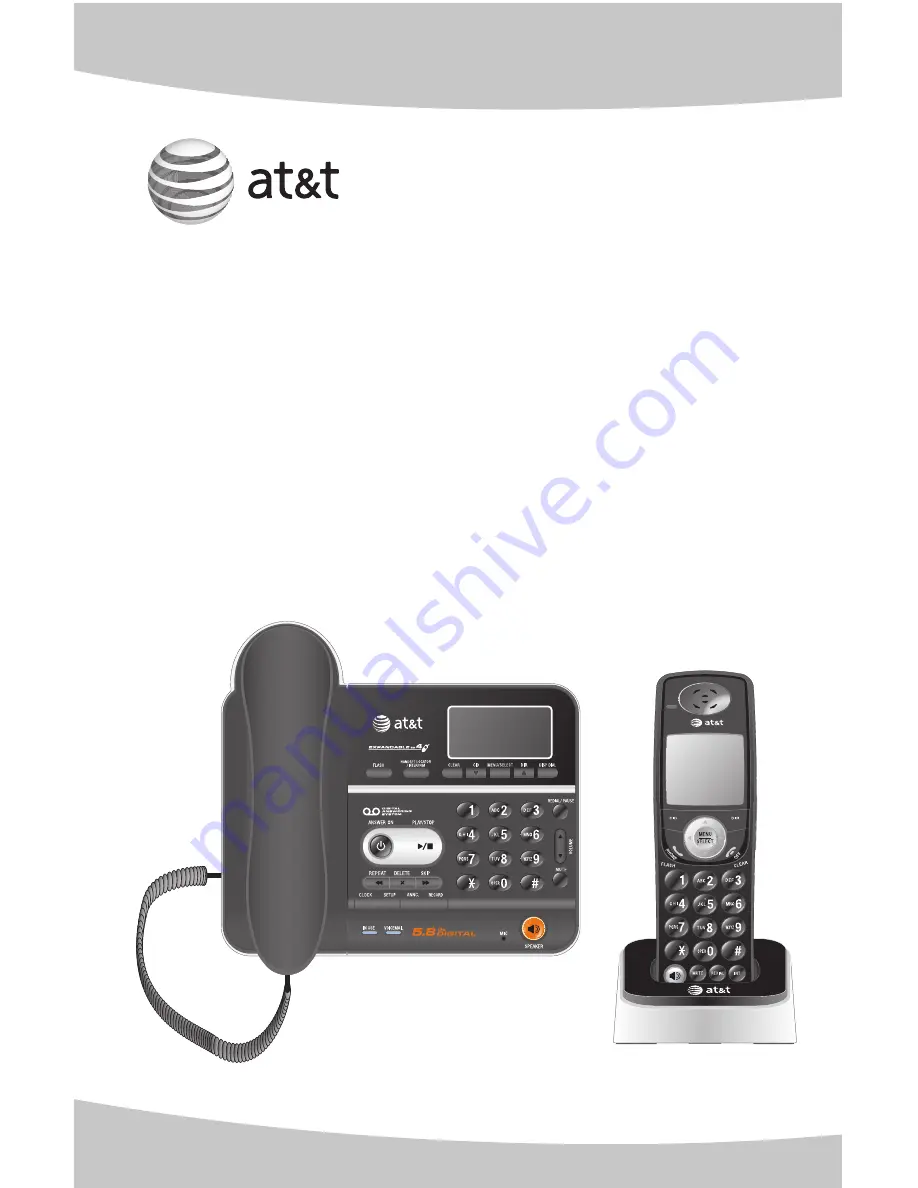
background image

User's manual

TL74108/TL74208/TL74308/
TL74408/TL74258/TL74358/
TL74458
5.8 GHz corded/cordless
telephone/answering system with 
caller ID/call waiting

Summary of Contents for TL 74208

Page 1: ...User s manual TL74108 TL74208 TL74308 TL74408 TL74258 TL74358 TL74458 5 8 GHz corded cordless telephone answering system with caller ID call waiting ...

Page 2: ...s manual for all the feature operations and troubleshooting information necessary to install and operate your new AT T product You can also visit our website at www telephones att com or call 1 800 222 3111 In Canada dial 1 866 288 4268 2008 Advanced American Telephones All rights reserved AT T and the AT T logo are trademarks of AT T Intellectual Property II L P d b a AT T Intellectual Property l...

Page 3: ...ales receipt and original packaging in case it is necessary to ship your telephone for warranty service The model number of your telephone can be found on the label located on the bottom of the telephone base Check to make sure the telephone package includes the following items Battery for cordless handset User s manual TL74108 TL74208 TL74308 TL74408 TL74258 TL74358 TL74458 5 8 GHz corded cordles...

Page 4: ... search 40 To dial delete or edit entries 41 Caller ID operation Caller ID operation 43 Caller ID history 46 Answering system operation About the answering system 49 Day time announcement 51 Answering system mode 52 Outgoing announcements 53 Answering system setup 55 Message playback 59 Recording and playing memos 60 Message counter displays 61 Remote access 62 Appendix A Screen icons and alert to...

Page 5: ...G Important safety information 71 Appendix H FCC part 68 ACTA 74 Appendix I FCC part 15 76 Appendix J Limited warranty 77 Appendix K Technical specifications 80 Appendix L Troubleshooting 81 Appendix M Index 89 ...

Page 6: ...menu or exit the menu display REDIAL PAUSE Press to view the redial memory page 16 While entering numbers press and hold to insert a dialing pause page 35 INT Press to begin an intercom conversation or to transfer a call pages 21 24 Feature menu Feature menu DIRECTORY page 34 CALL LOG page 43 RINGER VOLUME page 26 RINGER TONE page 26 KEY TONE page 27 LANGUAGE page 27 CLR VOICE MAIL page 28 Using m...

Page 7: ... While entering or modifying names press to advance cursor DISP DIAL Press to dial the number currently displayed CLOCK Press to review or set the clock page 51 SETUP Press to hear and change the settings pages 55 58 ANNC Press to review or record the outgoing announcement press again to quit pages 53 54 RECORD Press to record a memo page 60 or after pressing ANNC to record an outgoing announcemen...

Page 8: ...ch as on top of the washing machine or work bench If you subscribe to high speed Internet service Digital Subscriber Line DSL through your telephone lines you must install a DSL filter between the telephone base and the telephone wall jack see page 6 The filter will prevent noise and caller ID problems caused by DSL interference Please contact your DSL service provider for more information about D...

Page 9: ... handset 3 and handset 4 The TL74208 TL74258 has two handsets automatically registered as handset 1 and handset 2 You can register two additional handsets which will be assigned as handset 3 and handset 4 The TL74308 TL74358 has three handsets automatically registered as handset 1 handset 2 and handset 3 You can register one additional handset which will be assigned as handset 4 The TL74408 TL7445...

Page 10: ...the batteries every nine months Getting started Backup battery installation and use not included In the event of a power failure your telephone can still operate with limited functions if there are backup batteries purchased separately installed in the telephone base If a power failure happens during a call on the corded handset the call will continue at the lowest volume until you hang up while a...

Page 11: ...ectrical outlet not controlled by a wall switch 3 Route cords through slots 2 Plug one end of the telephone line cord into the telephone jack at the bot tom of the telephone base 1 Plug the small end of the telephone base power adapter into the power jack at the bottom of the telephone base 6 Plug the coiled handset cord into the jack at the left of the telephone base Getting started Telephone bas...

Page 12: ...harger installation IMPORTANT INFORMATION 1 Use only the power adapters supplied with this product or equivalent To order a replacement power adapter visit our website at www telephones att com or call 1 800 222 3111 In Canada dial 1 866 288 4268 2 The power adapters are intended to be correctly oriented in a vertical or floor mount position The prongs are not designed to hold the plug in place if...

Page 13: ...CTURE BATTERIES MADE IN CHINA Battery Pack BT5633 BT6823 3 6V 550mAh Ni MH THIS SIDE UP WARNING DO NOT BURN OR PUNCTURE BATTERIES MADE IN CHINA Battery Pack BT5633 BT6823 3 6V 550mAh Ni MH THIS SIDE UP WARNING DO NOT BURN OR PUNCTURE BATTERIES MADE IN CHINA Battery Pack BT5633 BT6823 3 6V 550mAh Ni MH Plug the battery securely into the plug inside the handset battery compartment matching the color...

Page 14: ...studs is available for purchase from many handware or consumer electronics retailers and may require professional installation Desktop to wall mount installation To install the telephone base in the wall mount position make sure that you first unplug all cords connected to the telephone base 1 Press in as the arrows indicated The bracket will detach from the base and you can swing it down into wal...

Page 15: ...ower adapter to the jacks on the bottom of the telephone base Bundle the telephone cord and power adapter cord and secure them with a twist tie Plug the power adapter and telephone line cord into the wall outlets 3 Place the bundled telephone line cord and power adapter cord into the cavity under the telephone base as shown below Align the mounting studs on the telephone outlet plate with the moun...

Page 16: ...ition 1 Untie the bundled telephone cord and power adapter cord and make sure that you unplug the power adapter and telephone line cord from the wall outlets before you begin 2 Push as indicated by arrows in the illustration until the bracket is released and swing it upward until it clicks into the desktop position Side view Wall mount Desk mount ...

Page 17: ...etting started Installation options 4 Remove the telephone handset tab rotate and replace for desktop use 3 Connect the telephone line cord and power adapter to the jacks on the bottom of the telephone base ...

Page 18: ... shown in the figure outwards to remove the belt clip from the handset Plug a 2 5 mm headset into the jack on the side of the handset Lift the rubber flap here Left side of handset For handsfree headset conversations use any industry standard 2 5 mm headset purchased separately For best results use an AT T 2 5 mm headset To purchase a headset visit our website at www telephones att com or call 1 8...

Page 19: ... base or press SPEAKER to hang up The screen displays the elapsed time as you talk in hours minutes and seconds On hook dialing predialing Using a cordless handset 1 Enter the telephone number Press MUTE REMOVE or OFF CLEAR to make corrections as you enter the phone number 2 Press PHONE FLASH or SPEAKER to dial Using the telephone base 1 Using the dial key pad on the telephone base to enter the te...

Page 20: ...s any dial pad key 0 9 or To end a call Press OFF CLEAR or return the handset to the charger Using the telephone base Lift the corded handset or press SPEAKER OR Press any dial pad key 0 9 or To end a call Return the corded handset to the telephone base or press SPEAKER if you are using speakerphone Auto off A call will be ended automatically when you put the cordless handset in the charger If the...

Page 21: ...SE to call the most recently called number up to 30 digits Press MUTE REMOVE to delete the displayed number from the redial memory Using the telephone base Press REDIAL PAUSE to display the most recently called number up to 30 digits Press CID DIR or REDIAL PAUSE repeatedly to view up to five recently called numbers The telephone base will beep twice at the beginning and end of the list Press CLEA...

Page 22: ...OFF CLEAR or MUTE REMOVE on a handset the ringer of the handset will be silent but the handset locator feature will not be cancelled To stop the paging tone Press PHONE FLASH SPEAKER or any dial pad key 0 9 or on the handset s OR Press HANDSET LOCATOR INTERCOM on the telephone base NOTE The handset ringer volume also determines the level of the paging tone If the handset ringer volume level is set...

Page 23: ...phone base to put your current call on hold and answer the new call You can press PHONE FLASH on the cordless handset or FLASH on the telephone base at any time to switch back and forth between the calls Conference call using the telephone base or multiple handset If you would like to join an ongoing call Using a cordless handset Press PHONE FLASH or SPEAKER on another cordless handset Press OFF C...

Page 24: ...rned off To un mute the call on a cordless handset Press MUTE REMOVE again and resume speaking When mute is turned off MICROPHONE ON will display temporarily on the handset screen To mute the call on the telephone base Press MUTE to silence the microphone When mute is on the screen on the telephone base will show MUTED for a few seconds and the MUTE button will turn red until mute is turned off To...

Page 25: ...lephone base While on a call you can press CID to review the caller ID history To dial the displayed number press MENU SELECT or DISP DIAL Last number redial Using a cordless handset If you are on a call press REDIAL PAUSE to display and dial the most recently dialed number If you press REDIAL PAUSE again within two seconds the number will not be dialed Using the telephone base If you are on a cal...

Page 26: ... key 0 9 or to answer the intercom call OR Press SPEAKER or any dial pad key 0 9 or on the telephone base or lift the corded handset to answer the intercom call NOTES 1 Before the intercom call is answered you can cancel the intercom call by pressing OFF CLEAR or INT on the calling handset 2 If the called handset is not answered within 100 seconds or if it is in the directory or call log mode or o...

Page 27: ...m call is answered you can cancel the intercom call by pressing CLEAR or HANDSET LOCATOR INTERCOM on the telephone base 2 If the called handset is not answered within 100 seconds or if it is in the directory or call log mode or on a call or out of range the calling handset will show the message UNABLE TO CALL TRY AGAIN 3 Pressing OFF CLEAR or MUTE REMOVE on the cordless handset will temporarily si...

Page 28: ...w talk without the outside caller hearing the conversation 4 Press OFF CLEAR on the calling handset or place the corded handset back to the telephone base to complete the transfer The calling handset s screen will show CALL TRANSFERED and the called handset will automatically be connected to the outside call NOTES 1 Before the intercom call is answered you can cancel the transfer and return to the...

Page 29: ...complete the transfer The calling handset s screen will show CALL TRANSFERED and the called handset will automatically be connected to the outside call NOTES 1 Before the intercom call is answered you can cancel the transfer and return to the outside call by pressing HANDSET LOCATOR INTERCOM or SPEAKER 2 If the called handset does not answer the intercom call within 100 seconds or if the other han...

Page 30: ...e is not in use to enter the feature menu 2 Use or to scroll to the feature to be changed When scrolling through the menu the top menu item is always highlighted with a symbol 3 Press MENU SELECT to select the highlighted item NOTE To cancel an operation back up to the previous menu or exit the menu display press OFF CLEAR Press and hold OFF CLEAR to return to idle mode ...

Page 31: ...ndset is in idle mode press the VOLUME buttons on the right side of the handset to change ringer volume NOTE The ringer volume level also determines the ringer levels of intercom calls pages 21 22 and the handset locator paging tone page 17 If the handset ringer volume level is set to off that handset ringer is silenced for all incoming calls and paging Ringer tone This feature allows you to choos...

Page 32: ... to select ON or OFF 4 Press MENU SELECT to save your preference and return to the feature menu Language In this menu you can select the language used for all screen displays To select a language 1 Press MENU SELECT in idle mode to enter the feature menu 2 Use or to scroll to the LANGUAGE menu then press MENU SELECT 3 Press or to select ENGLISH FRANCAIS or ESPANOL 4 Press MENU SELECT to save your ...

Page 33: ...ur voicemail from a different telephone line while away from home This feature only turns off the displayed NEW VOICE MAIL message icon and VOICEMAIL light it does not delete your voicemail message s If there actually are new voicemail messages your local telephone company will continue to send the signal to turn on the visual message waiting indication To manually turn off the new voicemail indic...

Page 34: ...ly This will silence the ringer without disconnecting the call The next incoming call will ring normally at the preset volume NOTE If more than one handset is installed each handset will ring when there is an incoming call unless the volume is turned off Pressing OFF CLEAR or MUTE REMOVE on one handset will only silence the ringer of that particular handset ...

Page 35: ...e phone is not in use to enter the feature menu 2 Use CID or DIR to scroll to the feature to be changed When scrolling through the menu the top menu item is always highlighted with a symbol 3 Press MENU SELECT to select the highlighted item NOTE To cancel an operation back up to the previous menu or exit the menu display press CLEAR Press and hold CLEAR to return to idle mode ...

Page 36: ... to enter the feature menu 2 Use CID or DIR to scroll to the RINGER VOLUME menu then press MENU SELECT 3 Press CID or DIR to sample each volume level 4 Press MENU SELECT to save your preference and return to the feature menu OR When the handset is in idle mode press the VOLUME buttons on the telephone base to change ringer volume NOTE The ringer volume level also determines the ringer levels of in...

Page 37: ...r preference and return to the feature menu Key tone The handset is factory programmed to beep with each key press If you turn off the KEY TONE there will be no beeps when keys are pressed To turn the KEY TONE on or off 1 Press MENU SELECT in idle mode to enter the feature menu 2 Use CID or DIR to scroll to the KEY TONE menu then press MENU SELECT 3 Press CID or DIR to select ON or OFF 4 Press MEN...

Page 38: ... actually are new voicemail messages your local telephone company will continue to send the signal to turn on the visual message waiting indication To manually turn off the new voicemail indication 1 Press MENU SELECT in idle mode to enter the feature menu 2 Use CID or DIR to scroll to the CLR VOICE MAIL menu then press MENU SELECT 3 Press MENU SELECT again to turn the voicemail indication off or ...

Page 39: ...0 If all memory locations are in use the screen will display LIST FULL You will not be able to store a new number until an existing one is deleted Exiting the directory On a cordless handset press OFF CLEAR to cancel an operation back up to the previous menu or exit the menu display Press and hold OFF CLEAR to return to the idle mode OR On the telephone base press CLEAR to cancel an operation back...

Page 40: ...o 30 digits Press or to move the cursor to the left or right Press MUTE REMOVE to erase numbers Press and hold MUTE REMOVE to erase all numbers Press and hold REDIAL PAUSE to enter a three second dialing pause OR Copy a number from redial by pressing REDIAL PAUSE then press or to locate the number to copy Press MENU SELECT to copy the number 6 Press MENU SELECT to save the number in the display Th...

Page 41: ... all letters Dial Key Characters by number of key presses 1 2 3 4 5 6 7 8 9 0 0 1 1 A B C 2 a b c 3 d e f 4 g h i 5 j k l 6 m n o S 7 p q 8 t u v Z 9 w x r y s z D E F G H I J K L M N O P Q R T U V W space X Y 2 3 4 5 6 7 8 9 8 Press MENU SELECT to store your new directory entry The name and the telephone number will then be shown on the screen To change it later see pages 41 42 Directory 36 ENTER...

Page 42: ... to the left or right Press X DELETE to erase numbers Press and hold X DELETE to erase all numbers Press and hold REDIAL PAUSE to enter a three second dialing pause OR Copy a number from redial by pressing REDIAL PAUSE then press CID or DIR or pressing REDIAL PAUSE repeatedly to locate the number to copy Press MENU SELECT to copy the number 6 Press MENU SELECT to save the number in the display The...

Page 43: ...ll letters Dial Key Characters by number of key presses 1 2 3 4 5 6 7 8 9 0 0 1 1 A B C 2 a b c 3 d e f 4 g h i 5 j k l 6 m n o S 7 p q 8 t u v Z 9 w x r y s z D E F G H I J K L M N O P Q R T U V W space X Y 2 3 4 5 6 7 8 9 8 Press MENU SELECT to store your new directory entry The name and the telephone number will then be shown on the screen To change it later see page 42 Directory MSG ENTER NAME...

Page 44: ...W 2 Press or to browse through the directory Entries will be displayed alphabetically by the first letter in the name Using the telephone base 1 Press DIR in idle mode to display the first listing in the directory DIRECTORY EMPTY will be displayed if there are no directory entries OR You can also display the first listing in the directory by first pressing MENU SELECT twice then press MENU SELECT ...

Page 45: ...s that start with the letters on the dial pad key keep pressing the key The names will be shown in alphabetical order For example if you have name entries Jennifer Jessie Kevin and Linda in your directory If you press 5 JKL once you will see Jennifer If you press 5 JKL twice you will see Jessie If you press 5 JKL three times you will see Kevin If you press 5 JKL four times you will see Linda If yo...

Page 46: ... press MUTE REMOVE on a cordless handset or press X DELETE on the telephone base to delete the displayed entry from the directory Once deleted an entry cannot be retrieved To edit an entry Using a cordless handset When a directory entry is displayed 1 Press MENU SELECT to modify the entry You will be prompted to EDIT NUMBER Press the dial pad keys to add digits Press MUTE REMOVE to erase digits Pr...

Page 47: ...ETE to erase digits Press CID or DIR to move the cursor Press and hold REDIAL PAUSE to add a three second pause if desired Copy a number from redial by pressing REDIAL PAUSE then press CID or DIR or pressing REDIAL PAUSE repeatedly to locate the number to copy Press MENU SELECT to copy the number 2 Press MENU SELECT You will be prompted to EDIT NAME Press the dial pad keys to add characters page 3...

Page 48: ...be available in all areas Depending on your service caller ID with call waiting lets you see the name and telephone number of the caller before answering the telephone even while on another call It may be necessary to change your telephone service to use this feature Contact your telephone company if You have both caller ID and call waiting but as separate services you may need combined service Yo...

Page 49: ... will not be saved in the caller ID history The caller ID history is stored in the telephone base and is shared by all handsets Changes made at any one handset will be reflected in all Caller s name Caller s number Appears when the call is missed and un reviewed Time of call Date of call CHRISTINE SMITH 908 555 0100 NEW 10 01 AM 11 23 CHRISTINE SMITH 908 555 0100 NEW 10 01 11 23 AM MSG CHRISTINE S...

Page 50: ... phone company Missed calls indicator When a handset is in idle mode and has calls that have not been reviewed its screen will show XX MISSED CALLS All entries which have not been reviewed will be counted as missed calls when the phone is idle Each time an entry from the caller ID history marked NEW is reviewed the number of missed calls decreases by one If you do not want to review all the missed...

Page 51: ...ase 1 Press CID to review the caller ID history The caller ID history displays the caller ID entries in reverse chronological order starting with the most recent call OR You can also review the caller ID history by pressing MENU SELECT then use CID or DIR to scroll to the CALL LOG then press MENU SELECT 2 Press CID or DIR to scroll through the list as shown on the left Caller ID operation Pat Will...

Page 52: ...DISP DIAL or SPEAKER or lift the corded handset to call the number as it is displayed in the caller ID history OR Press repeatedly to see the various dialing options you can choose to dial with or without an area code or with or without the 1 then press DISP DIAL or SPEAKER or lift the corded handset to place the call NOTE You may need to change how a caller ID number will be dialed if the entry i...

Page 53: ... ID history OR Press and hold X DELETE on the telephone base to delete all entries from the caller ID history When asked to confirm press MENU SELECT to clear the caller ID history of all entries or press OFF CLEAR on a cordless handset or press CLEAR on the telephone base to exit and leave all entries in the caller ID history intact With an entry from the caller ID history displayed Press MENU SE...

Page 54: ...r digital answering system press PLAY STOP button on the telephone base If you subscribe to caller ID call waiting service through your telephone service provider you can use your telephone answering system and voicemail together Set your answering system to answer calls at least two rings earlier than your voicemail is set to answer For example set your voicemail to answer calls after six rings a...

Page 55: ...e for replay until you delete them If F is flashing in the message counter memory is full You will have to delete some messages before new ones can be recorded When there are new messages including memos on the answering system the number of message stored will flash in the message counter To play answering system messages press PLAY STOP Press VOLUME to adjust the playback volume when playing mes...

Page 56: ...ou hear the correct setting press CLOCK to move to the next setting 1 Press CLOCK the system will announce the current clock setting and then announce To set the clock press CLOCK 2 Press CLOCK The system will announce the current year setting and then announce To change the year press SKIP or REPEAT to change the hour press CLOCK 3 Press CLOCK The system will announce the current hour setting and...

Page 57: ...m is on The ANSWER ON light will be on NOTE If the answering system is off and there is an incoming call the system will answer after 10 rings and announce to the caller Please enter your remote access code For more information about remote access see pages 62 63 Call screening at the telephone base Call screening allows you to hear the announcement and the incoming message when a call comes in Yo...

Page 58: ... the announcement menu To record a new outgoing announcement 1 Press ANNC You will hear Announcement Press PLAY or press RECORD 2 Press RECORD and begin speaking after you hear Record after the tone Press STOP when you are done 3 Speak facing the telephone base from approximately nine inches away 4 Press PLAY STOP when you are done Your recorded announcement will be played back To listen to the re...

Page 59: ... RECORD 2 Press PLAY STOP to begin playback 3 Press DELETE during playback to delete your announcement Announcement deleted will be announced Press ANNC to exit the announcement menu When your announcement is deleted calls will be answered with the pre set announcement described on page 53 Answering system operation 54 ...

Page 60: ... change the setting Number of rings set the number of rings before the answering system answers an incoming call Call screening turn the call screening at the base feature on or off Remote access code change the code required to access your answering system from another telephone Message alert tone set the message alert tone to On so that it will beep when you have a new answering system message 3...

Page 61: ...r rings when there are no new messages This allows you to check for new messages without paying for a toll call 3 Press SETUP to save your selection and move to the next menu option OR Press PLAY STOP to save your selection and exit the menu NOTE If you subscribe to caller ID call waiting and voicemail service through your telephone service provider you can use your telephone answering system and ...

Page 62: ...nu Remote access code To access your answering system remotely from any touch tone phone you need to enter a two digit number 10 99 Unless you change it the remote access code is 19 To change the remote access code 1 Press SETUP three times The system will announce Remote access code followed by the current setting and then To change the setting press SKIP or REPEAT to continue setup press SETUP 2...

Page 63: ...e your selection and move to the next menu option OR Press PLAY STOP to save your selection and exit the menu Temporarily turning off the message alert tone Pressing any telephone base key except HANDSET LOCATOR will temporarily silence the message alert tone If you press DELETE in idle mode there will be a voice prompt to direct you to press DELETE again to delete all old messages and the message...

Page 64: ...uring playback When a message is playing you can adjust the playback volume skip repeat or delete the message When playing messages Press VOLUME button to adjust the message playback volume Press SKIP to skip to the next message Press REPEAT to repeat the message Press twice to hear the previous message Press DELETE to delete the message Press PLAY STOP to stop playback To delete all old messages ...

Page 65: ...s STOP when you are done The message counter will show the elapsed time in seconds as you record You can record a memo up to four minutes long Memos less than one second long will not be saved 2 Speak facing the MIC microphone at the bottom front of the telephone base from approximately nine inches away 3 Press PLAY STOP to stop recording The system will announce Recorded and a confirmation tone T...

Page 66: ...lash to indicate the clock needs to be set 10 99 Current remote access code while setting page 57 1 99 counting Elapsed time while recording a memo page 60 or announcement up to 90 seconds page 53 99 flashing A memo recording is more than 99 seconds F flashing Memory is full Messages must be deleted before new messages can be recorded System is answering a call being accessed remotely or the clock...

Page 67: ...all old messages 4 Press to repeat the current message during playback 4 4 Press twice to hear the previous message 5 Press to stop any operation including recording 5 Press to hear a list of remote commands 6 Press to skip to the next message during playback NOTES 1 If a valid remote access code is not entered the call will be ended automatically 2 If you pause for more than four seconds during r...

Page 68: ... the answering system on or off 8 Press to end remote access the call will be terminated 4 Hang up to end the call and save all undeleted messages Cut out the remote access wallet card at the back of this user s manual for quick reference 63 Answering system operation ...

Page 69: ... Screen icons Handset alert tones Four short beeps Low battery warning Two beeps Out of range while the handset is on a call Confirmation tone Command completed successfully Telephone base tones New voicemail messages have been received Speakerphone is in use HANDSET 1 10 21 AM 11 23 25 MISSED CALLS NEW MUTE Ringer off Missed and un reviewed calls Screen icons Two short beeps VOLUME keys are press...

Page 70: ...ages IN USE On when handset is in use when the answering system is answering an incoming call or you are registering a handset Flashes when another telephone is in use on the same line or you are deregistering a handset from the telephone base Flashes quickly when there is an incoming call Lighted keypad Lighted display CHARGE On when the handset is charging in the charger SPEAKER On when speakerp...

Page 71: ...the caller ID log CONNECTING The handset has lost communication with the telephone base PAGING The telephone base is paging handset s Another handset is calling LINE IN USE An extension phone or one of the handsets is in use NO LINE No telephone line is connected ALREADY SAVED The telephone number you have entered is already stored in the directory SAVED The entry in the caller ID history is saved...

Page 72: ... ON You have started the intercom process and need to enter the handset number you want to call INTERCOM TO The intercom call has just been ended by you or the receiver of the call INTERCOM ENDED The handset is attempting to intercom with another handset CALLING HANDSET X You have started the call transfer using intercom process and need to enter the handset number to which you want to transfer th...

Page 73: ...onal handsets to it Handsets purchased separately need to be registered to the telephone base before use When first purchased all optional accessory handsets will show NOT REGISTERED on the screen The new handset may need to be charged for five minutes before registering to the telephone base To register a handset to your telephone base 1 Place the unregistered handset into a charger If PRESS HNDS...

Page 74: ...OM while the IN USE light is still flashing The light flashes about seven seconds If the light stops flashing start again with step number one 3 The handset s will show CONNECTING and it will take about 10 seconds to complete de registration ALL handsets will show NOT REGISTERED if de registration was successful 4 To re register the handset s to the telephone base follow the registration instructi...

Page 75: ...torms Electrical storms can sometimes cause power surges harmful to electronic equipment For your own safety take caution when using electric appliances during storms Cleaning your telephone Your telephone has a durable plastic casing that should retain its luster for many years Clean it only with a soft cloth slightly dampened with water or a mild soap Do not use excess water or cleaning solvents...

Page 76: ... comes in contact with any liquids unplug any line or power cord immediately Do not plug the product back in until it has dried thoroughly Install this product in a protected location where no one can trip over any line or power cords Protect cords from damage or abrasion If this product does not operate normally see the Troubleshooting section on pages 81 88 of this user s manual If you cannot so...

Page 77: ...lephone base of the cordless telephone near or on top of a TV or VCR If interference is experienced moving the cordless telephone farther away from the TV or VCR will often reduce or eliminate the interference Rechargeable batteries This product contains either nickel cadmium or nickel metal hydride rechargeable batteries Exercise care in handling batteries in order not to create a short circuit w...

Page 78: ...pacemaker Should NOT place wireless telephones directly over the pacemaker such as in a breast pocket when it is turned ON Should use the wireless telephone at the ear opposite the pacemaker WTR s evaluation did not identify any risk to bystanders with pacemakers from other persons using wireless telephones Especially about telephones answering systems Two way recording This unit does not sound wa...

Page 79: ...s For more information please contact your local telephone company This equipment may not be used with Party Lines If you have specially wired alarm dialing equipment connected to your telephone line ensure the connection of this equipment does not disable your alarm equipment If you have questions about what will disable alarm equipment consult your telephone company or a qualified installer If t...

Page 80: ...harmful interference and 2 this device must accept any interference including interference that may cause undesired operation The term IC before the certification registration number only signifies that the Industry Canada technical specifications were met The Ringer Equivalence Number REN for this terminal equipment is 0 1 The REN is an indication of the maximum number of devices allowed to be co...

Page 81: ...s connected Consult the dealer or an experienced radio TV technician for help Changes or modifications to this equipment not expressly approved by the party responsible for compliance could void the user s authority to operate the equipment This device complies with Part 15 of the FCC Rules Operation is subject to the following two conditions 1 this device may not cause harmful interference and 2 ...

Page 82: ... the manufacturer s authorized service representative will repair or replace at the manufacturer s option without charge a materially defective PRODUCT If the manufacturer repairs the PRODUCT they may use new or refurbished replacement parts If the manufacturer chooses to replace the PRODUCT they may replace it with a new or refurbished PRODUCT of the same or similar design The manufacturer will r...

Page 83: ...item 6 below or Charges for installation or setup adjustment of customer controls and installation or repair of systems outside the unit How do you get warranty service To obtain warranty service in the United States of America visit www telephones att com or call 1 800 222 3111 In Canada call 1 866 288 4268 NOTE Before calling for service please review the user s manual a check of the PRODUCT con...

Page 84: ...imited warranty and you should not rely on any such modification State Provincial Law rights This warranty gives you specific legal rights and you may also have other rights which vary from state to state or province to province Limitations Implied warranties including those of fitness for a particular purpose and merchantability an unwritten warranty that the PRODUCT is fit for ordinary use are l...

Page 85: ...ons 5 8 GHz digital spread spectrum frequency hopping technology This technology digitally transmits your voice across multiple channels in both the 5 8GHz and 2 4GHz frequencies to provide enhanced range ultimate sound clarity and advanced privacy against eavesdropping on your calls while not interfering with wireless routers Telephone operating range This cordless telephone operates within the m...

Page 86: ...elephone base Unplug the unit s electrical power Wait for approximately 15 seconds then plug it back in Allow up to one minute for the cordless handset and telephone base to reset You may need to purchase a new handset battery please refer to page 8 of this user s manual I cannot get a dial tone First try all the suggestions above Move the cordless handset closer to the telephone base You might ha...

Page 87: ...noise Noise from a television radio or other appliances may cause the phone to not dial out properly If you cannot eliminate the background noise first try muting the cordless handset before dialing or dialing from another room in your home with less background noise If the other phones in your home are having the same problem the problem is in your wiring or local service Contact your local telep...

Page 88: ...ne base for one minute to allow the cordless handset and base to resynchronize channels Move the cordless handset closer to the telephone base You might have moved out of range Reset the telephone base Unplug the unit s electrical power Wait for 15 seconds then plug it back in Allow up to one minute for the cordless handset and telephone base to reset Other electronic products can cause interferen...

Page 89: ...hone or modem farther apart from one another or use a different surge protector Relocate your phone to a higher location The phone will likely have better reception when not installed in a low area If the other phones in your home are having the same problem the problem is in your wiring or local service Contact your local telephone company charges may apply I hear other calls while using my phone...

Page 90: ...al telephone company charges may apply Other electronic products can cause interference with your cordless phone Try installing your phone as far away as possible from electronic devices like television sets VCRs or other cordless telephones Re install the handset battery and place cordless handset in the telephone base Wait for the cordless handset to re establish its connection with the telephon...

Page 91: ...st install a DSL filter between the telephone base and the telephone wall jack see page 6 The filter will prevent noise and caller ID problems caused by DSL interference Please contact your DSL service provider for more information about DSL filters Your caller must be calling from an area that supports caller ID Both you and your caller s telephone companies must use caller ID compatible equipmen...

Page 92: ...than seven seconds the system stops recording and disconnects the call If the system s memory becomes full during a message the system stops recording and disconnects the call If the caller s voice is very soft the system may stop recording and disconnects the call Difficulty hearing messages Press VOLUME to increase speaker volume System does not answer after correct number of rings Make sure tha...

Page 93: ...wering system is not full Outgoing announcement is not clear When you record your announcement make sure you speak in a normal tone of voice about nine inches from the telephone base Make sure there is no background noise TV music etc while you are recording Common cure for electronic equipment If the unit does not seem to be responding normally try putting the cordless handset in its base If it d...

Page 94: ...it entries 41 name search 40 new entries 35 38 Display dial 41 DSL 3 6 E Elapsed time 14 Ending calls 14 15 F Flash switchhook flash 18 H Handset speakerphone 15 Handset locator 17 Handset settings 25 29 Headset 13 I Intercom 21 22 Incoming caller ID history 44 Incoming calls answering 15 Indicator lights 65 L Language 27 33 Last number redial 16 M Making calls 14 Memory match 45 Missed calls indi...

Page 95: ...cations 80 Telephone base installation 6 Telephone base settings 30 33 Telephone operating range 80 Troubleshooting 81 88 V Voicemail 65 Voicemail waiting indicator 28 Voice prompts 50 Volume controls 18 26 31 Index M Index ...

Page 96: ...ss call 8 or hang up Model name TL74108 TL74208 TL74308 TL74408 TL74258 TL74358 TL74458 Type 5 8 GHz corded cordless telephone answering system with caller ID call waiting 2008 Advanced American Telephones All rights reserved AT T and the AT T logo are trademarks of AT T Intellectual Property II L P d b a AT T Intellectual Property licensed to Advanced American Telephones Printed in China Remote a...

Page 97: ...vanced American Telephones All rights reserved AT T and the AT T logo are trademarks of AT T Intellectual Property II L P d b a AT T Intellectual Property licensed to Advanced American Telephones Printed in China Issue 5 AT T 05 08 ...

Reviews: