background image

  sueno pro S
  sueno pro R
  sueno pro ITE

User Manual

TINNITUS INSTRUMENTS

Summary of Contents for sueno pro ITE

Page 1: ...sueno pro S sueno pro R sueno pro ITE User Manual TINNITUS INSTRUMENTS ...

Page 2: ...ams 17 4 OPERATION SUENO PRO R 19 4 1 Construction 19 4 2 Inserting battery 20 4 3 Removing battery 21 4 4 Switching tinnitus instruments on and off 21 4 5 Inserting and removing tinnitus instruments 18 4 6 Volume control and program selection 24 4 6 1 Multifunctional rocker switch 24 4 6 2 Volume selection 25 4 6 3 Selecting hearing programs 26 Intended purpose Tinnitus instruments from audifon a...

Page 3: ...nnitus instrument please contact your doctor or your hearing care professional 5 OPERATION SUENO PRO ITE 27 5 1 Construction 27 5 2 Inserting battery 28 5 3 Removing battery 29 5 4 Switching tinnitus instruments on and off 30 5 5 Inserting and removing tinnitus instruments 30 5 6 Volume control and program selection 32 5 6 1 Volume selection 32 5 6 2 Selecting the hearing programs 33 6 ACCESSORIES...

Page 4: ...n cell and a chemical reaction is initiated During production the air holes are sealed with a protective strip This ensures the battery remains fresh until use and lasts longer when it is sealed Removing the protective strip allows oxygen to enter and the chemical reaction is initiated 2 3 Batteries To start your tinnitus instruments first insert a battery in the battery compartment Make sure you ...

Page 5: ...tals that can pollute the environment and harm health Batteries are recycled as they contain valuable raw materials such as iron zinc manganese or nickel Old batteries should not be discarded with household waste Consumers are obliged to dispose of batteries at a collection point provided by the local authority or a sales outlet After use you can also return the batteries in the appropriate contai...

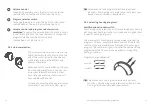
Page 6: ...few minutes before inserting the battery First push the battery compartment up until it clicks into the first catch position OFF position You should now be able to open it fully Then insert the battery in the battery compartment Ensure that the symbol marked on the battery is visible when you have inserted it Please do not open the battery compartment any wider than shown here This might damage th...

Page 7: ...rument Switching on Close the battery compartment securely by moving it past the catch of the OFF position into the casing You will feel the battery compartment clicking into place as you close it The tinnitus instruments are now switched on After a preset delay and a start up jingle the first program will activate and the instruments are now ready for use Your tinnitus instruments are switched on...

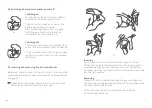
Page 8: ...tivated by pressing the top and bottom end The rocker switch can be programmed with one of three functions Your hearing care professional has marked here which of the functions has been set for your hearing aids 3 6 Volume control and program selection 3 6 1 Multifunctional rocker switch To position the concha support bend slightly and place it carefully in the outer part of your ear Caution Risk ...

Page 9: ...ing programs The rocker switch allows you to swap between the hearing programs To do so simply hold down one end of the rocker switch until you hear audible confirmation of the change in program The number of signals indicates the number of the program selected You can move up or down through the hearing situations switch 1 2 3 switch 3 2 1 Program change sequence Example with three hearing progra...

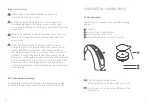
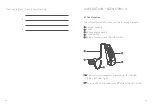
Page 10: ...s The tinnitus instruments have markings for the sides blue left red right Your tinnitus instruments may differ from the illustrations Receiver module Dome Concha clip optional Rocker switch Battery compartment ON OFF switch 4 1 Construction 1 2 3 5 4 Hearing program 1 2 3 4 Description of setting ...

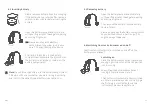
Page 11: ...are now ready for use 4 4 Switching tinnitus instruments on and off Your tinnitus instruments are switched on and off via the battery compartment 4 2 Inserting battery Please remove a battery from its packaging If the battery has a protective film remove and wait a few minutes before inserting the battery Open the battery compartment carefully with your fingernail at the edge for opening and swing...

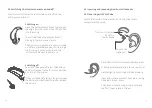
Page 12: ...and place the support carefully in the outer part of your ear Switch the tinnitus instrument on by closing the battery compartment securely Caution Risk of injury Always wear the receiver module with its dome or PowerSleeve and check that they are positioned securely on the tube Switching off To switch the device off press the battery compartment out to the first catch position This is the OFF pos...

Page 13: ...uments feature a multifunctional rocker switch for controlling volume and selecting different programs The rocker switch can be activated by pressing the top and bottom end 4 6 Volume control and program selection 4 6 1 Multifunctional rocker switch The rocker switch can be programmed with one of three functions Your hearing care professional has marked here which of the functions has been set for...

Page 14: ...1 2 3 4 6 3 Selecting the hearing programs Rocker switch Your hearing care professional will have adjusted the various hearing programs with you switch 1 2 3 switch 3 2 1 Program change sequence Example with three hearing programs The rocker switch allows you to swap between the hearing programs To do so simply hold down one end of the rocker switch until you hear audible confirmation of the chang...

Page 15: ...minutes before inserting the battery Open the battery compartment carefully with your fingernail at the edge for opening and swing it right out Then insert the battery in the battery com partment Make sure the symbol on the battery matches the symbol on the bat tery compartment Note Do not force the battery into the battery compartment If it does not fit check whether you are inserting it cor rect...

Page 16: ... tinnitus instruments Depending on the model your tinnitus instruments have markings for the sides blue left red right Before use check that your tinnitus instruments are clean After use earwax and other residues may be present Remove before using again Switching off The tinnitus instruments are switched off as soon as the battery compartment is opened If they will be out of use for a long time op...

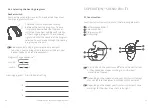
Page 17: ... Description of setting 5 6 2 Selecting hearing programs tinnitus instruments with a program switch When you switch your hearing aids on they will be at the volume set for you Increase volume Slowly turn the controller forwards Reduce volume Slowly turn the controller backwards Once you have reached the upper or lower volume limit you will hear a clear signal 5 6 1 Volume selection right ear left ...

Page 18: ...egular cleaning Do not use a damp cloth to clean your tinnitus instruments Always use a soft dry cloth 7 1 General 6 ACCESSORIES The tinnitus instruments from the sueno pro family feature the following accessories which are available from your hearing care professional For further information contact your hearing care professional Accessories Side marking UniTip Soundshell UniTip receiver module S...

Page 19: ...hen simply pull out the replacement tool and dispose of it Should your tinnitus instrument still not function correctly despite regular care call on your hearing care professional Do not try under any circumstances to repair your tinnitus instrument yourself 7 2 Cleaning and care of behind the ear tinnitus instruments with external receiver Tinnitus instruments with an external receiver involve sp...

Page 20: ...udifon dry star UV 2is not only automatic but also consumes very little power switching itself off at the end of the drying program The drying station is simple to operate using a single sensor button 7 4 Drying tinnitus instruments Your tinnitus instruments should be dried after use at the end of the day and above all after cleaning If you take care of your tinnitus instruments by drying them car...

Page 21: ...ep such parts out of the reach of children under the age of 36 months the mentally disabled and pets Should a battery tinnitus instrument or other small parts be accidentally swallowed please consult a doctor immediately Warning Risk of injury In some very rare cases the dome may remain in the ear canal on removal Should this happen please contact your doctor or hearing care professional at once P...

Page 22: ...Always wear your receiver module with its dome or PowerSleeve 9 2 Information about product safety Note Damage to tinnitus instrument Tinnitus instruments are susceptible to impact so avoid any hard knocks e g by dropping them Note Modifications to the device No modifications should be made to the tinnitus instruments unless performed directly by the manufacturer Note Damage to tinnitus instrument...

Page 23: ... instrument ear mould or tubing yourself Otherwise your tinnitus instruments may be damaged Note Malfunctions Your devices may be subject to interference from other electrical equipment despite their EMC compatible design In this case move away from the source of interference Note Interference with electronic devices If you are in an environment where use of electronic or wireless devices is restr...

Page 24: ...etween 0 C and 40 C Air pressure between 500 and 1100 hPa 12 TRANSPORT AND STORAGE CONDITIONS Relative humidity between 10 and 60 Storage temperature between 20 C and 60 C Remove battery for prolonged storage periods Store away from magnetic fields 13 ENVIRONMENTALLY COMPATIBLE DISPOSAL Old tinnitus instruments and batteries must not be discarded with your household waste Please return used tinnit...

Page 25: ...ifon GmbH Co KG hereby declares that the tinnitus instruments sueno pro S sueno pro R and sueno pro ITE comply with the following directives 93 42 EEC for medical devices 2011 65 EU RoHs for the reduction of hazardous substances RED directive 2014 53 EU on radio and telecommunications terminal equipment The declaration of conformity is available for inspection at audifon GmbH Co KG Werner von Siem...

Page 26: ...51 50 Date Hearing care professional Date Hearing care professional Date Hearing care professional Date Hearing care professional Date Hearing care professional Date Hearing care professional ...

Page 27: ...ates possible damage to property Additional information for better understanding Manufacturer of the device Do not dispose of hearing aids with your household waste Please read and observe the directions in the user manual It contains important warnings and information about safety precautions Restrict humidity Restrict temperatures This is a medical device Item number Serial number Batch number ...

Page 28: ...proper repair Therefore please always follow the safety and care instructions Proof of purchase must be provided as proof of warranty The date of purchase and the serial number must be clearly visible Warranty obligations will not result in any extension of the warranty period nor will they give rise to a new warranty period for the tinnitus instrument The warranty period for built in spare parts ...

Page 29: ...41 3040 Revision date 12 2020 High tech made in Germany audifon GmbH Co KG Werner von Siemens Straße 2 99625 Kölleda Germany www audifon com Telephone 49 3635 4056 590 Fax 49 3635 4056 589 Manufacturer contact audifon com ...

Reviews: