background image

VE720E/VE920E

7”/9” UNTERBAU TFT LCD FERNSEHER

INKLUSIVE DVD-PLAYER

7”/9” UNDER THE COUNTER TV

INCLUDING DVD-PLAYER

BEDIENUNGSANLEITUNG/GARANTIEURKUNDE

OWNER’S MANUAL/WARRANTY CARD

Summary of Contents for VE720E

Page 1: ...VE720E VE920E 7 9 UNTERBAU TFT LCD FERNSEHER INKLUSIVE DVD PLAYER 7 9 UNDER THE COUNTER TV INCLUDING DVD PLAYER BEDIENUNGSANLEITUNG GARANTIEURKUNDE OWNER S MANUAL WARRANTY CARD...

Page 2: ...attery installation p 55 Remote Control Functions p 56 Operation Initial Setup p 59 Channel Tuning Setup p 59 Positioning the screen p 59 Setting time alarm p 59 Modes of operation p 61 Using the DVD...

Page 3: ...agnitude to constitute a risk of electric shock to persons This symbol is intended to alert the user to the presence of important operating and maintenance servicing instructions in the literature acc...

Page 4: ...injury to a child or adult and may result in dama ge to the product Use only with a cart stand tripod bracket or table recommended by the manufactures or sold with the product Mounting of this produc...

Page 5: ...that it be unpluged from the wall outlet and disconnected from the antenna or cable system This will pre vent damage to the product due to lightning and power line surges 16 Power Lines An outside ant...

Page 6: ...ment Parts When replacement parts are required be sure the ser vice technician has used replacement parts specified by the manufacturer or that have the same characteristics as the original part Unaut...

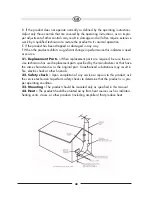
Page 7: ...provides guidelines for proper grounding and in particular specifies that the cable ground shall be connected to the grounding system of the building as close to the point of cable entry as possi ble...

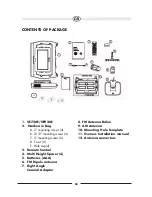
Page 8: ...mounting screws 4 C 3 mounting screws 4 D Foot 4 E Hole cap 4 3 Remote Control 4 Multi Height Spacer 4 5 Batteries AAA 6 FM Dipole antenna 7 Right Angle Coaxial Adaptor 8 FM Antenna Balun 9 AM Antenn...

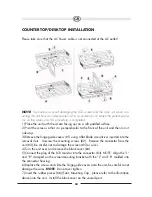
Page 9: ...emove the hinge guide covers 1 using a flat blade screwdriver inserted into the removal slots Unscrew the mounting screws 2 Remove the connector from the unit 3 be careful not to damage the screen 5 o...

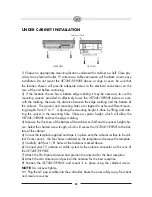
Page 10: ...hole Choose a spacer height which will allow the VE720E VE920E to clear the edge molding 3 Measure the thickness of the bottom of the cabinet or shelf and the spacer height cho sen Select the shortest...

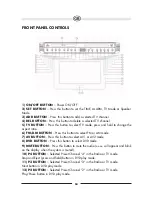
Page 11: ...ct FM or AM mode 7 AV BUTTON Press this button to select AV1 or AV2 mode 8 DVD BUTTON Press this button to select DVD mode 9 MUTE BUTTON Press this button to mute the audio will appear and blink on th...

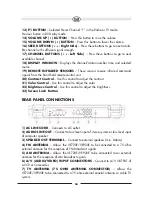
Page 12: ...adjust the contrast 21 Color Control Use this control to adjust the color 22 Brightness Control Use this control to adjust the brightness 23 Screen Lock Button REAR PANEL CONNECTIONS 1 AC LINE CORD C...

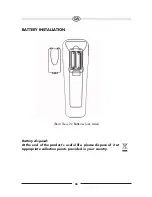
Page 13: ...55 BATTERY INSTALLATION Rear View 2x Batteries Size AAA Battery disposal At the end of the product s useful life please dispose of it at appropriate collection points provided in your country...

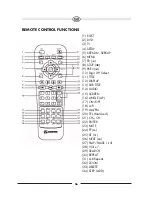
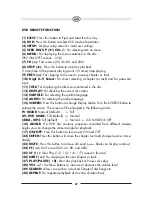
Page 14: ...FR 8 STOP 9 PREV 10 Digit 0 9 Select 11 TITLE 12 DISPLAY 13 SUB TITLE 14 AUDIO 15 SCREEN 16 ANGLE AP 17 ON OFF 18 A V 19 AM FM 20 TEL Not Used 21 CH CH 22 ENTER 23 MUTE 24 FF 25 SF I 26 NEXT 27 PLAY...

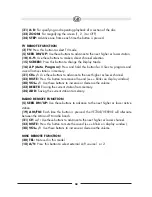
Page 15: ...audio language 15 SCREEN Press this button to change Display Mode Push the SCREEN Button to enlarge the screen The screen will be enlarged in the following order TV MODE Normal default Full AV DVD MOD...

Page 16: ...ext higher or lower channel 23 MUTE Press this button to remove all sound blinks on display window 28 VOL Use these buttons to increase or decrease the volume 33 DELETE Erasing the current station fro...

Page 17: ...arch HRC IRC STD and channel search mode automatically During this time the unit will not respond to any commands The unit will respond normally once the cable mode and channel search mode is conclude...

Page 18: ...2 Press the P3 button once The set time will disappear from the Display Window and a series of dashes will appear Alarm DEACTIVATED mode 3 Press the ON OFF button The alarm is now deactivated NOTE Th...

Page 19: ...tion mode 2 Press the SEEK button to select the AIR mode 3 Press the ON OFF button to confirm SETTING THE SPEAKER MODE 1 With power off press the SET button four times to enter the speaker configurati...

Page 20: ...again press the PLAY II button For some VCDs stop mode is possible by pressing the NEXT button Searching for a Specific Scene song by Selecting the Chapter Number 1 Pressing the SEARCH button once wi...

Page 21: ...e end of the section SET B 3 Press the button until OFF is displayed on the screen this will turn off the repeat function A TO B OFF Changing the Subtitle Language 1 If the disc contains caption data...

Page 22: ...s only allow you to select disc playback options using the DVD root menu 1 The root menu of a disc appears when pressing the MENU button 2 Use the navigation buttons to select the desired item on the...

Page 23: ...lapsed time of title 6 The number of total chapters 7 The remaining time of title 8 The number of the current angle 9 The number of total angles 10 The number of the current audio language 11 The numb...

Page 24: ...the disc that is playing Off As you toggle through the options the repeat option changes The selected repeat opti on loops repeatedly until its turned off PLAYING MP3 DISCS MP3 is a digital audio for...

Page 25: ...he top of the screen make sure that the disc is paused and press ENTER Use the NEXT button to move to the next song Press the PREVIOUS button to move to the previous song USING THE REPEAT FEATURE The...

Page 26: ...y pressing the Up button or you can reverse the photos vertically by pressing the Down button 6 You can return the root Menu by pressing MENU key SETUP MENU The setup menu allows the user to select th...

Page 27: ...ppear 2 Press ENTER the following screen will appear 3 Use the or buttons to highlight the desired menu item 4 Press ENTER button to display the sub menu 5 Each sub menu item provides a number of opti...

Page 28: ...item for setup and repeat steps 3 and 6 8 Press the SETUP button to exit the SETUP mode VIDEO Menu 1 Press the SETUP button to display the main menu see sample screen under LANGUAGE Menu 2 Press the...

Page 29: ...display the main menu see sample screen under LANGUA GE Menu Use to select parental Rating 1 Kid Safe 2 G 3 PG 4 PG 13 5 PG R 6 R 7 NC 17 8 Adult CHANGE PASSWORD RATING 1 Select Rating by or buttons a...

Page 30: ...arental level and change the password you can record this default password in another area and delete it from this manual Some discs can be limited depending on the age of users while some discs canno...

Page 31: ...ube Backlighting Life Expectancy 30 000 Hrs Resolution 1440 W X 234 H Screen TFT LCD 16 9 Pixel 1010880 DISC AVAILABLE DVD Linear Velocity 3 49m sec Maximum Playback Time 135 minutes CD Linear Velocit...

Page 32: ...ing Life Expectancy 30 000 Hrs Resolution 1920 W X 220 H Screen 9 TFT LCD 16 9 Pixel 126720 DISC AVAILABLE DVD Linear Velocity 3 49m sec Maximum Playback Time 135 minutes CD Linear Velocity 1 2 1 4m s...

Page 33: ...be changed The disc being played does not support subtitle functions The disc is prohibited from changing subtitle languages Vocal languages AUDIO cannot be changed The disc being played does not supp...

Reviews: