background image

Micro-HiFi-System

10008845   10022749

Summary of Contents for 10008845

Page 1: ...Micro HiFi System 10008845 10022749 ...

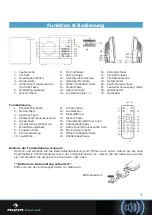
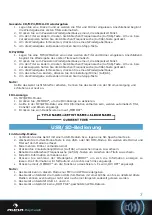
Page 2: ...eise sorgfältig durch und befolgen Sie diese um möglichen technischen Schäden vorzubeugen Aufbau und Anschluss 1 Wandmontage Befestigungsmaterial nicht im Lieferumfang enthalten Bringen Sie zwei Nägel auf gleicher Höhe an Die Entfernung zwischen diesen sollte 73 146mm betragen Notiz Die Größe der Nägel 3 5x25 2 Lautsprecheranschluss tes 2 tes ...

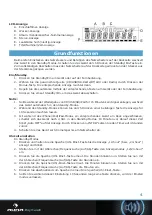
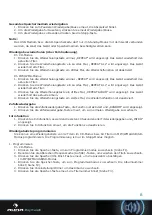
Page 3: ... Polmarkierungen ein Setzen Sie die Abdeckung wieder ein und schieben Sie diese bis zum Einrasten nach oben Batterie im Lieferumfang enthalten Entfernen Sie den Sicherungsstreifen vor Gebrauch Batterietausch 8 IR Empfänger 9 LCD Anzeige 10 Standby LED Anzeige 11 Standby Ein Taste 12 Öffnen Schließen Taste 13 Modus Taste 14 Speicher Taste 15 Lautstärkeregler 11 Introfunktion 12 Lautstärke 13 Einsch...

Page 4: ...n Standby Modus 2 Während des Standby Modus können Sie durch Drücken einer beliebigen Taste die Anzeige für 10 Sekunden leuchten lassen 3 Ist während des iPhone iPod iPad Modus ein entsprechendes Gerät am Dock angeschlossen schaltet sich das Gerät nach 4 Std in den Standby Modus 10 Minuten vor Ablauf dieser Zeit blinkt Auto OFF auf der Anzeige Durch Drücken von INTRO setzen Sie den Timer auf 4 Stu...

Page 5: ... es wird VOL angezeigt und Sie können mit der Abbrechen Frequenzsuche Auf Ab Taste die Lautstärke einstellen 9 Sollten Sie während dieser Einstellung 10 Sekunden lang keine Taste drücken wird der Einstell modus verlassen 10 Nach dem Einstellen der Einschalt und Abschaltzeit drücken Sie die Wecker Taste und es wird angezeigt 11 Das Gerät schaltet sich zur eingestellten Uhrzeit selbstständig ein und...

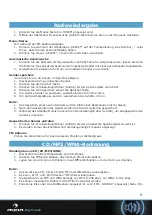
Page 6: ...4 6 Um die Speicherplätze zu ändern wiederholen Sie Schritte 2 bis 4 Notiz 1 Das Speichern eines neuen Senders auf den Platz eines Bestehenden löscht diesen 2 Nach dem Ausschalten des Geräts werden die Sender weiterhin gespeichert 3 Während des Standby Modus drücken Sie Voreinstellung Ordner Auf Ab um alle gespeicherten Sender zu löschen Gespeicherten Sender aufrufen 1 Drücken Sie Voreinstellung O...

Page 7: ...en trennen Sie das Gerät von der Stromversorgung und schließen es erneut an ID3 Anzeige Im MP3 WMA Modus 1 Drücken Sie MEMORY um die ID3 Anzeige zu aktivieren 2 Sollte in der MP3 WMA Datei eine ID3 Information enthalten sein werden automatisch Titel Künstler und Album angezeigt 3 Drücken Sie zum Deaktivieren erneut MEMORY USB SD Bedienung Im Standby Modus 1 Verbinden Sie das Gerät mit einem USB Me...

Page 8: ...BUM wird angezeigt Das Gerät wiederholt das aktuelle Album 4 Drücken Sie die Wiederholungstaste ein viertes Mal die Wiederholfunktion ist deaktiviert Zufallswiedergabe 1 Drücken Sie die Zufallswiedergabe Taste die Funktion ist aktiviert und RANDOM wird angezeigt 2 Drücken Sie die Zufallswiedergabe Taste erneut um zur normalen Wiedergabe zu wechseln Introfunktion 1 Drücken Sie Introfunktion es werd...

Page 9: ...ktion ist deaktiviert AUX Wiedergabe Der AUX Anschluss befindet sich auf der linken Seite des Gerätes Verwenden Sie einen 3 5mm Klinkekabel um weitere Wiedergabegeräte anzuschließen 1 Drücken Sie die Modus Taste um zum AUX Modus zu wechseln 2 Über den Lautstärkeregler kann die Lautstärke reguliert werden Notiz 1 Das 3 5mm Klinkekabel sind nicht im Lieferumfang enthalten 2 Während des AUX Modus sch...

Page 10: ...enmächtig und führen Sie Reparaturen nie selber aus Behandeln Sie das Produkt sorgfältig Es kann durch Stöße Schläge oder den Fall aus bereits geringer Höhe beschädigt werden Halten Sie das Produkt fern von Feuchtigkeit und extremer Hitze ACHTUNG Es wird keine Haftung für Folgeschäden übernommen Technische Änderungen und Irrtümer vorbehalten Wichtige Hinweise zur Entsorgung Dieses Elektrogerät geh...

Page 11: ...malen Hausmüll entsorgt werden Informieren Sie sich über die örtlichen Regelungen zur getrennten Sammlung elektrischer und elektronischer Gerätschaf ten Richten Sie sich nach den örtlichen Regelungen und entsorgen Sie Altgeräte nicht über den Hausmüll Durch die regelkonforme Entsorgung der Altgeräte werden Umwelt und die Gesundheit ihrer Mitmenschen vor möglichen negativen Konsequen zen geschützt ...

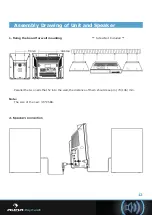
Page 12: ... 1 fixing the board for wall mounting Screw Not Included Parallel the two nails that fix into the wall the distance of them should keep in 73 146 mm Note The size of the nail 3 5 25BA 2 Speakers connection tes 12 2 Speakers connection tes ...

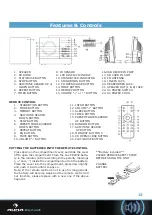
Page 13: ...ON 16 RANDOM BUTTON 17 SKIP TUNE SEARCH UP BUTTON 18 MONO ST BUTTON 5 19 CD OPEN CLOSE BUTTON 20 PLAY PAUSE BUTTON Press down on the compartment cover and slide the cover off to open the compartment Place the one CR2032 batte ry in the remote control according to the polarity markings and inside the compartment and on the battery Place the cover into the compartment press down lightly and push it ...

Page 14: ...it will be switched off within 15 minutes automatically 2 During in standby mode press any button key can make the display light for 10 seconds 3 During in iPhone iPod iPad mode the iPhone iPod iPad player inserted on the iPod docking bracket the main unit will be switched to Standby mode automatically after 4 hours which convert to iPod mode start the timer In the 10 minutes before the unit switc...

Page 15: ...imer volume high or low by pressing the SKIP TUNE SEARCH UP or DOWN button 9 Each enable state as shown above will be cleared if the button is not pushed in 10 seconds 10 10 After adjusting TIMER ON and TIMER OFF press the TIMER button appears on the display 11 The unit will be switched on automatically at TIMER ON order and start playing the unit will be switched off automatically at TIMER OFF or...

Page 16: ...steps 2 to 4 6 To change the stored preset stations repeat the above steps 2 to 4 Notes 1 Storing a new station into a preset location will erase the previously stored station in that location 2 Power off will not erase the memory of preset stations Perform the stations presetting procedures again to store the stations 3 During the unit in STANDBY mode press and hold the PLAY PAUSE button to erase...

Page 17: ...he STOP button once on the unit or remote control Note If the main unit is not working properly disconnect the power source and then reconnect it again ID3 OPERATION During in the MP3 WMA mode 1 Press the MEMORY button once to open the ID3 function 2 If the MP3 WMA file is written ID3 it will automatically search the information of TITLE NAME ARTIST NAME and ALBUM NAME indicated on the display 3 P...

Page 18: ...play the current track repeatedly 2 Press the REPEAT button twice REPEAT ALL is displayed It will play all tracks repeatedly 3 Press the REPEAT button thrice then REPEAT ALBUM is displayed It will play repeatedly the current album 4 Press the REPEAT button four times then REPEAT function will be off RANDOM PLAY on the remote control 1 Press the RANDOM button once and then RANDOM is displayed 2 Pre...

Page 19: ... input is located on the left hand side of the unit Use a 3 5mm stereo jack cable to connect audio equipment through the LINE IN jack 1 To select the AUX input function repeatedly press the MODE button on the unit or remote control until the AUX is indicated on the display 2 Press the VOLUME or button to adjust the sound output level Note 1 LINE in cable not included 2 During in Aux mode whether t...

Page 20: ...ed information about recycling of this product please contact your local council or your household waste disposal service Your product contains batteries covered by the European Directive 2006 66 EC which cannot be dis posed of with normal household waste Please check local rules on separate collection of batteries The correct disposal of batteries helps prevent potentially negative consequences o...

Page 21: ...et d utilisation afin d éviter de causer tout dommage technique à l appareil Montage et branchement 1 Fixation sur le mur Le matériel de montage n est pas inclus dans la livraison Planter deux clous à même hauteur dans le mur distants de 73 à 146 mm Note la taille de clou conseillée est de 3 5 x 2 5 mm 2 Branchement des enceintes tes 21 ...

Page 22: ...t la polarité Remettre le couvercle en le poussant vers le haut Une pile est incluse dans la livraison Retirer la bande de protection avant la première utilisation Changer les piles 8 Récepteur IR 9 Affichage LCD 10 LED témoin Stand by 11 Touche de Stand by 12 Touche pour ouvrir fermer 13 Touche Mode 14 Touche Mémoire 15 Régleur de volume 11 Fonction Intro 12 Augmenter le volume 13 Programmer l ar...

Page 23: ...pouvez allumer l écran pendant 10 secondes en appuyant sur une des touches 3 SiunappareilestconnectédansledockenmodeiPod iPhone iPad l appareilsemetautomatiquement en mode Stand by au bout de 4 heures 10 minutes avant cette durée l écran affiche Auto OFF en clignotant En appuyant sur la touche INTRO l arrêt est à nouveau programmé pour 4 heures de plus 4 Pour économiser de l énergie éteindre l app...

Page 24: ...volume de réveil 9 Si aucune touche n est actionnée pendant plus de 10 secondes lors des réglages l appareil quitte automatiquement le mode Réglage de la fonction réveil 10 Une fois les heures de Réveil et d Arrêt programmées appuyer sur la touche Réveil et s affiche 11 L appareil se mettra en marche à l heure programmée et commencera la lecture de la source voulue Note Si la mention ERROR s affic...

Page 25: ...egarder d autres stations de radio répéter les étapes 2 à 4 Note 1 La sauvegarde d une station sur une plage déjà utilisée efface la station qui y était sauvegardée auparavant 2 L appareil éteint conserve les stations sauvegardées en mémoire 3 Pour effacer toutes les stations sauvegardées appuyer sur la touche Réglage Dossier haut bas en mode Stand by Écouter une station de radio sauvegardée 1 App...

Page 26: ...mes le débrancher du secteur et le rebrancher à nouveau Affichage des ID 3 En mode MP3 WMA 1 Appuyer sur la touche Mémoire pour activer l affichage des ID 3 2 Si les fichiers MP3 WMA possèdent des informations ID 3 le nom du titre de l artiste et de l album s affichent automatiquement 3 Pour désactiver l affichage ID 3 appuyer à nouveau sur la touche Mémoire Utilisation du mode USB SD En mode Stan...

Page 27: ... fois sur la touche Répétition REPEAT ALBUM s affiche Tous les titres de l album seront répétés 4 Appuyer une quatrième fois sur la touche Répétition pour désactiver le mode Répétition Lecture aléatoire 1 Appuyer sur la touche Lecture Aléatoire pour activer la fonction et RANDOM s affiche à l écran 2 Appuyer à nouveau sur cette touche pour désactiver la fonction Fonction Intro 1 Appuyer sur la tou...

Page 28: ...de la liste 3 Appuyer une troisième fois sur la touche Répétition pour désactiver le mode Répétition Lecture en mode AUX L entrée AUX est située sur la gauche de l appareil Utiliser un câble jack 3 5 mm pour connecter une source audio externe 1 Appuyer sur la touche Mode pour passer en mode AUX 2 Le volume peut être réglé avec le régleur de volume Note 1 La livraison ne comporte pas de câble jack ...

Page 29: ... son environnement Toute réparation doit obligatoirement être effectuée dans un atelier qualifié Tout changement ou modification apporté sur l appareil en réduit la sécurité Danger de blessure Ne pas ouvrir l appareil et ne pas effectuer de réparations par soi même Un mauvais montage peut éventuellement causer des dysfonctionnements voire une panne totale N ouvrir en aucun cas l appareil Attention...

Page 30: ...et de préserver l environnement et la santé Le recyclage des ma tériaux contribue à la préservation des ressources naturelles Ce produit contient des piles qui sont soumises à la directive européenne 2006 66 CE selon laquelle elles ne doivent pas être éliminées avec les ordures ménagères Renseignez vous sur les dispositions en vigueur concernant la mise en rebut séparée des piles La mise en rebut ...

Reviews: