background image

www

.auna-multimedi

a.com

Fullmatic


Platt

enspiel

er

Turntabl

e

Tocadisc

os

Platine

Gir

adischi

10032888 

   10032889

Summary of Contents for Fullmatic 10032888

Page 1: ...w w w a u n a m u l t i m e d i a c o m Fullm atic Plattenspieler Turntable Tocadiscos Platine G iradischi 10032888 10032889 ...

Page 2: ......

Page 3: ...e Bedienungsanleitung und weitere Informationen rund um das Produkt zu erhalten INHALTSVERZEICHNIS Sicherheitshinweise 4 Geräteübersicht 4 Zusammemnbau 6 Verstärker Anschluss 7 Abspielen von Platten 8 Ersetzen der Nadel 9 Reinigung und Pflege 9 Hinweise zur Entsorgung 10 Technische Daten 10 KONFORMITÄTSERKLÄRUNG Hersteller Chal Tec GmbH Wallstraße 16 10179 Berlin Deutschland Dieses Produkt entspri...

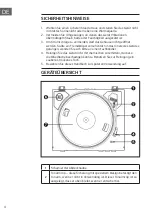
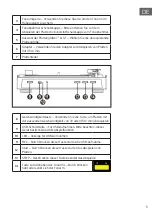
Page 4: ...n Fremdkörper versehentlich in das Innere des Gerätes gelangen wenden Sie sich bitte an einen Fachhändler 4 Reinigen Sie das Gerät nicht mit chemischen Lösemitteln da diese die Oberfläche beschädigen könnte Benutzen Sie zur Reinigung ein sauberes trockenes Tuch 5 Bewahren Sie dieses Handbuch zur späteren Verwendung auf GERÄTEÜBERSICHT 1 Scharnier der Abdeckhaube 2 Tonarmclip diese Sicherung mit sp...

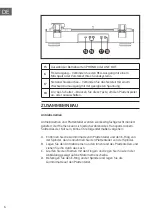
Page 5: ...45 U min 7 Plattenteller 8 Geschwindigkeitstaste Verwenden Sie die Taste um Platten mit der passenden Geschwindigkeit von 33 oder 45 U min abzuspielen 9 USB Schnittstelle Für USB Aufnahmen Bitte beachten dieses Gerät besitzt keine USB Abspielfunktion 10 LED Anzeige für USB Aufnahmen 11 REC Durch Drücken dieser Taste startet die USB Aufnahme 12 Start Durch Drücken dieser Taste startet das Abspielen...

Page 6: ...werden werkseitig fachgerecht moniert geliefert der Riemen kann sich jedoch während des Transports lockern Sollte dies der Fall sein können Sie folgendermaßen vorgehen A Entfernen Sie die Gummimatte vom Plattenteller und den E Ring von der Spindel dann entnehmen Sie den Plattenteller von der Spindel B Legen Sie den Antriebsriemen an den Innenrand des Plattentellers und ziehen Sie ihn durch das Loc...

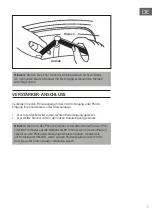
Page 7: ...ers oder Stereoanlage Der rote Stecker wird in den rechten Kanaleingang gesteckt Der weiße Stecker wird in den linken Kanaleingang gesteckt Hinweis Wenn sie den Phonoanschluss verwenden stellen Sie den PH LINE OUT Schalter auf die Betriebsart PH Phono wenn sie den Platten spieler an den Phonoanschluss angeschlossen haben schalten sie auf Betriebsart LINE OUT wenn sie den Plattenspieler mit dem AUX...

Page 8: ... Wenn Sie andere Lieder auf der Platte abspielen möchten drücken Sie die Taste zum Anheben des Tonarms 14 und der Tonarm hebt sich wobei das Abspielen unterbrochen wird Bewegen Sie den Tonarm mit der Hand an die gewünschte Stelle der Platte und drücken Sie erneut die Taste zum Anheben des Tonarms 14 erneut wodurch sich der Tonarm langsam absenkt und das Abspielen der Musik fortsetzt 6 Der Tonarm k...

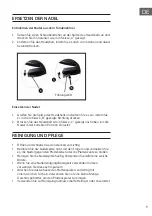
Page 9: ... bis die Nadel in der korrekten Position einrastet REINIGUNG UND PFLEGE Öffnen und schließen sie den Deckels vorsichtig Berühren Sie die Nadelspitze nicht mit den Fingern und vermeiden Sie es die Nadel gegen den Plattenteller oder die Plattenkante zu stoßen Reinigen Sie die Nadelspitze häufig Verwenden Sie dafür eine weiche Bürste Wenn Sie eine Nadelreinigungsflüssigkeit verwenden müssen verwenden...

Page 10: ...gelungen zur getrennten Sammlung elektrischer und elektronischer Gerätschaften Richten Sie sich nach den örtlichen Regelungen und entsorgen Sie Altgeräte nicht über den Hausmüll Durch die regelkonforme Entsorgung der Altgeräte werden Umwelt und die Gesundheit ihrer Mitmenschen vor möglichen negativen Konsequenzen geschützt Materialrecycling hilft den Verbrauch von Rohstoffen zu verringern TECHNISC...

Page 11: ...ser mannual and other information about the product CONTENT Safety Instructions 12 Product Overview 12 Assembly 14 Amplifier Connection 15 Playing Records 16 How to Replace the Needle 17 Cleaning and Care 17 Hints on Disposal 18 DECLARATION OF CONFORMITY Producer Chal Tec GmbH Wallstraße 16 10179 Berlin Germany This product is conform to the following European Directives 2014 35 EU LVD 2011 65 EU ...

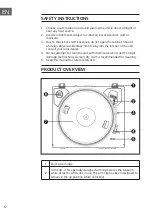
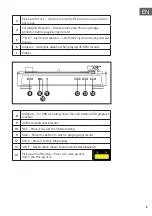
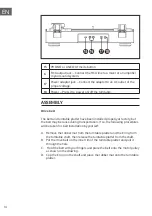
Page 12: ...object accidentally find its way into the interior of the unit contact your local dealer 4 Do not attempt to clean the unit with chemical solvents as this might damage the finishing A clean dry cloth is recommended for cleaning 5 Keep this manual for future reference PRODUCT OVERVIEW 1 Dust cover hinge 2 Arm Clip This specially designed arm clip secures the tonearm while at rest or when not in use...

Page 13: ... to play 6 Adaptor Using this adaptor when playing 45 RPM records 7 Platter 8 USB port for USB recording Note this unit without USB playback function 9 USB recording LED indicator 10 REC Press it to start the USB recording 11 Start Press this button to start to playing vinyl record 12 STOP Press it to stop the playing 13 STOP Das Drücken dieser Taste beendet das Abspielen 14 Pick up arm lift butto...

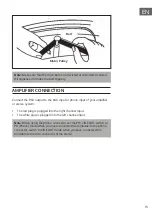
Page 14: ...ry but the belt may be loose during transportation If so the following procedures will be taken for belt installation by yourself A Remove the rubber mat from the turntable platter and the E ring from the turntable shaft then release the turntable platter from the shaft B Put the drive belt on the inner rim of the turntable platter and pull it through the hole C Hold the belt with your fingers and...

Page 15: ...of your amplifier or stereo system The red plug is plugged into the right channel input The white plug is plugged into the left channel input Note When using the phono connector set the PH LINE OUT switch to PH Phono mode when you have connected the turntable to the phono connector switch to LINE OUT mode when you have connected the turntable to the AUX connector of the stereo Belt Motor Pulley ...

Page 16: ...art playing the record from the first songs If you want to play the other songs of the record then press the Pick up arm lift button 14 the tone arm will raised up and stop playing move the tonearm to your desired positon of the record by hand then press the Pick up arm lift button 14 again the tone arm will down slowly and start to playing music again 6 The tone arm will return to the arm rest au...

Page 17: ...direction illustrated by C until the needle locks into the tip position CLEANING AND CARE When opening or closing the turntable cover handle it gently Do not touch the needle tip with your fingers avoid bumping the needle against the turntable platter or record edge Frequently clean the needle tip use a soft brush in a back to front motion only If you must use a needle cleaning fluid use very spar...

Page 18: ...of electrical and electronic equipment By ensuring this product is disposed of correctly you will help prevent potential negative consequences for the environment and human health which could otherwise be caused by inappropriate waste handling of this product For more detailled information about recycling of this product please contact your local council or your household waste disposal service TE...

Page 19: ...d emploi et à d autres informations concernant le produit SOMMAIRE Consignes de sécurité 22 Aperçu de l appareil 22 Assemblage 24 Branchement sur l amplificateur 25 Lecture d un disque vinyle 26 Remplacement de l aiguille 27 Nettoyage et entretien 27 Informations sur le recyclage 28 Fiche technique 28 DÉCLARATION DE CONFORMITÉ Fabricant Chal Tec GmbH Wallstraße 16 10179 Berlin Allemagne Ce produit...

Page 20: ...n objet étranger pénètre accidentellement dans l appareil veuillez contacter un revendeur spécialisé 4 Ne nettoyez pas l appareil avec des solvants chimiques car cela pourrait endommager la surface Utilisez un chiffon propre et sec pour le nettoyage 5 Conservez ce manuel pour référence ultérieure APERÇU DE L APPAREIL 1 Charnière du couvercle 2 Clip de bras de lecture Cette sécurité au design origi...

Page 21: ... lire des disques en 45 t min 7 Platine 8 Bouton de vitesse Utilisez ce bouton pour lire des disques à la vitesse appropriée en 33 ou 45 t min 9 Interface USB Pour les enregistrements USB Veuillez noter cet appareil n a pas de fonction de lecture USB 10 LED témoin d enregistrement USB 11 REC Appuyez sur ce bouton pour lancer l enregistrement USB 12 Start Appuyez sur ce bouton pour lancer la lectur...

Page 22: ...roies d entraînement et les platines sont montées en usine correctement mais la courroie peut se desserrer pendant le transport Si tel est le cas vous pouvez procéder comme suit A Retirez le tapis en caoutchouc du plateau tournant et le joint torique de l axe puis retirez le plateau tournant de l axe B Placez la courroie d entraînement contre le bord intérieur du plateau tournant et tirez le à tra...

Page 23: ... à l entrée phono de votre amplificateur ou stéréo La fiche rouge se branche sur l entrée du canal droit La fiche blanche se branche sur l entrée du canal gauche Remarque Lorsque vous utilisez la prise phono réglez le commutateur PH LINE OUT sur le mode PH Phono si vous avez raccordé la platine vinyle à la prise phono ou passez en mode LINE OUT si vous avez connecté la platine à la prise AUX stéré...

Page 24: ...commencera la lecture au début Si vous souhaitez lire d autres morceaux du disque appuyez sur le bouton de levage du bras de lecture 14 le bras de lecture se soulève pour arrêter la lecture Déplacez le bras de lecture à la position souhaitée sur le disque et appuyez à nouveau sur le bouton de levage du bras de lecture 14 ce qui fait doucement abaisser le bras de lecture et reprendre la lecture de ...

Page 25: ...s enclenche dans la bonne position NETTOYAGE ET ENTRETIEN Ouvrez et fermez le couvercle avec précaution Ne touchez pas la pointe de l aiguille avec vos doigts et évitez de pousser l aiguille contre le plateau tournant ou le bord du disque Nettoyez fréquemment la pointe de l aiguille Utilisez pour cela une brosse douce Si vous devez utiliser un liquide de nettoyage pour aiguilles utilisez le avec p...

Page 26: ...itions en vigueur dans votre région concernant la collecte séparée des appareils électriques et électroniques Respectez les et ne jetez pas les appareils usagés avec les ordures ménagères La mise en rebut correcte du produit usagé permet de préserver l environnement et la santé Le recyclage des matériaux contribue à la préservation des ressources naturelles FICHE TECHNIQUE Numéro d article 1003288...

Page 27: ...tualizado y a información adicional sobre el producto ÍNDICE Indicaciones de seguridad 30 Visión general del aparato 30 Montaje 32 Conexión al amplificador 33 Reproducción de discos 34 Sustituir la aguja 35 Limpieza y cuidado 35 Indicaciones para la retirada del aparato 36 Datos técnicos 36 DECLARACIÓN DE CONFORMIDAD Fabricante Chal Tec GmbH Wallstraße 16 10179 Berlín Alemania Este producto cumple...

Page 28: ...n cuerpo extraño termina por accidente en el interior del aparato contacte con un técnico especializado 4 No limpie el aparato con productos químicos pues podrían dañar la superficie Para limpiar el aparato utilice un paño limpio y seco 5 Conserve este manual para usos posteriores VISIÓN GENERAL DEL APARATO 1 Bisagra de la tapa 2 Sujeción del brazo este seguro con diseño especial fija el brazo del...

Page 29: ... el adaptador para reproducir discos a 45 r min 7 Tocadiscos 8 Botón de velocidad Utilice este botón para reproducir discos con una velocidad de 33 o 45 r min 9 Toma para USB Para grabaciones USB Recuerde este aparato no cuenta con reproducción desde USB 10 LED Indicador para grabaciones USB 11 REC Pulsando este botón comienza la grabación USB 12 Inicio Pulsando este botón comienza la reproducción...

Page 30: ...rea de transmisión La correa de transmisión y el tocadiscos se entregan montados de fábrica pero la correa puede bloquearse durante el transporte En ese caso haga lo siguiente A Retire la base de goma del tocadiscos y la anilla en forma de E del eje y a continuación retire el tocadiscos del eje B Coloque la correa de transmisión en el marco interior del tocadiscos y páselo por el orificio C Agarre...

Page 31: ...su amplificador o equipo estéreo El conector rojo se conecta a la entrada del canal derecho El conector blanco se conecta a la entrada del canal izquierdo Nota Si utiliza la conexión Phono ajuste el interruptor PH LINE OUT al modo de funcionamiento PH Phono cuando conecte el tocadiscos a la conexión Phono y active el modo de funcionamiento LINE OUT cuando haya conectado el tocadiscos a la salida A...

Page 32: ...y comenzará a reproducirlo Si desea reproducir otras canciones en el disco pulse el botón para levantar el brazo 14 y este se levanta donde se había interrumpido la reproducción Mueva el brazo con la mano hasta el lugar deseado del disco y pulse de nuevo el botón para levantar el brazo 14 de nuevo así el brazo bajará lentamente para continuar con la reproducción de música 6 El brazo regresa a su s...

Page 33: ...arriba como se indica en el esquema C hasta que la aguja encaje en la posición correcta LIMPIEZA Y CUIDADO Abra y cierre la tapa con cuidado No toque la punta de la aguja con los dedos y evite golpear la aguja contra el todadiscos o el borde Limpie la punta de la aguja con regularidad Utilice un cepillo para ello Si debe utiliar un limpiador de agujas hágalo con cuidado Frote con cuidado la carcas...

Page 34: ...leyes territoriales que regulan la recogida separada de aparatos eléctricos y electrónicos Guíese por las regulaciones locales y no deseche el aparato como un residuo doméstico Una retirada de aparatos conforme a las leyes contribuye a proteger el medio ambiente y a las personas a su alrededor frente a posibles consecuencias perjudiciales para la salud El reciclaje ayuda a reducir el consumo de ma...

Page 35: ...cedere al manuale d uso più attuale e per ricevere informazioni sul prodotto INDICE Avvertenze di sicurezza 38 Descrizione del dispositivo 38 Montaggio 40 Connettere un amplificatore 41 Riprodurre dischi 42 Cambiare la puntina 43 Pulizia e manutenzione 43 Smaltimento 44 Dati tecnici 44 DICHIARAZIONE DI CONFORMITÀ Produttore Chal Tec GmbH Wallstraße 16 10179 Berlino Germania Questo prodotto è confo...

Page 36: ...ente dei corpi estranei finiscono all interno del dispositivo rivolgersi a un tecnico specializzato 4 Non pulire il dispositivo con solventi chimici in quanto potrebbero rovinare la superficie Utilizzare un panno pulito e asciutto 5 Conservare il presente manuale per future consultazioni DESCRIZIONE DEL DISPOSITIVO 1 Cerniera della copertura 2 Clip del braccio del pick up questa sicura dal design ...

Page 37: ... dischi a 45 giri 7 Piatto del giradischi 8 Tasto della velocità utilizzare questo tasto per riprodurre i dischi alla velocità giusta di 33 o 45 giri 9 Interfaccia USB per registrazioni USB Attenzione questo dispositivo non è dotato di funzione di riproduzione da USB 10 LED spia per registrazioni USB 11 REC premendo questo tasto inizia la registrazione USB 12 Start premendo questo tasto inizia la ...

Page 38: ...ia di trazione Cinghia di trazione e piatto del giradischi vengono consegnati già montati correttamente dalla fabbrica ma la cinghia può allentarsi durante il trasporto Se fosse così procedere come segue A Rimuovere il tappetino in gomma dal piatto e l E Ring dal mandrino poi togliere il piatto del giradischi B Mettere la cinghia di trazione sul bordo interno del piatto e tirarla attraverso il for...

Page 39: ... l ingresso AUX o PHONO dell amplificatore o dell impianto stereo Lo spinotto rosso viene inserito nel canale destro Lo spinotto bianco viene inserito nel canale sinistro Nota se si utilizza una connessione Phono posizionare l interruttore LINE OUT PH sulla modalità di funzionamento PH Phono se si utilizza la connessione AUX dell impianto stereo posizionarlo su LINE OUT Cinghia Trazione ...

Page 40: ...are altri brani sul disco premere il tasto per sollevare il braccio del pick up 14 in modo da interrompere la riproduzione Muovere il braccio del pick up con la mano sulla posizione desiderata e premere nuovamente il tasto per sollevare il braccio del pick up 14 Il braccio si abbassa lentamente e la riproduzione riprende 6 Il braccio del pick up torna automaticamente sul suo supporto quando è fini...

Page 41: ...eadshell verso l alto come in immagine C fino a quando la puntina si incastra in posizione corretta PULIZIA E MANUTENZIONE Aprire e chiudere il coperchio facendo attenzione Non toccare la punta della puntina con le dita ed evitare che sbatta sul piatto o sul bordo del disco Pulire di frequente la punta della puntina utilizzando una spazzola morbida Pulire l alloggiamento del giradischi con un pann...

Page 42: ...igenti per la raccolta di dispositivi elettrici ed elettronici Attenersi alle disposizioni vigenti e non smaltire i vecchi dispositivi con i rifiuti domestici Grazie al corretto smaltimento dei vecchi dispositivi si tutela il pianeta e la salute delle persone da possibili conseguenze negative Il riciclo di materiali aiuta a diminuire il consumo di materie prime DATI TECNICI Numero articolo 1003288...

Page 43: ......

Page 44: ......

Reviews: