background image

Avaya B169 Conference Phone 

User Guide
ENGLISH

Issue 1 June 2014

Summary of Contents for B169

Page 1: ...Avaya B169 Conference Phone User Guide ENGLISH Issue 1 June 2014 ...

Page 2: ... United States and Canada the warranty is provided to you by said Avaya reseller and not by Avaya Licenses THE SOFTWARE LICENSE TERMS AVAILABLE ON THE AVAYA WEBSITE HTTP SUPPORT AVAYA COM LICENSEINFO ARE APPLICABLE TO ANYONE WHO DOWNLOADS USES AND OR INSTALLS AVAYA SOFTWARE PURCHASED FROM AVAYA INC ANY AVAYA AFFILIATE OR AN AUTHORIZED AVAYA RESELLER AS APPLICABLE UNDER A COMMERCIAL AGREEMENT WITH ...

Page 3: ...ing distributed Linux OS source code for those Products that have distributed the Linux OS source code and identifying the copyright holders of the Third Party Components and the Third Party Terms that apply to them is available on the Avaya Support Web site http www avaya com support Copyright Preventing toll fraud Toll fraud is the unauthorized use of your telecommunications system by an unautho...

Page 4: ...n minimizes distracting background noise wideband voice transmission provides a 7 kHz frequency range during VoIP calls and an equalizer allows you to adjust the sound to suit the room s acoustics Warning Do not expose the Avaya B169 charging stand or batteries to water or moisture Warning Do not open the casing of the Avaya B169 Warning Only use the power adapter provided to connect the unit to t...

Page 5: ...9 Making conference group calls 19 Making a temporary conference group call multi party call using the Instant Guide 20 Displaying conference group participants 20 Editing conference groups 21 Deleting conference groups 21 Delete all conference groups 21 Conference guide settings 22 Displaying conference guide status 22 Phonebook 23 Searching for contacts 23 Adding contacts 23 Editing contacts 23 ...

Page 6: ... recharge OmniSound audio technology USB connectivity allows the phone to be used to make VoIP calls The connectivity menu enables you to combine and switch easily between connectivity technologies DECT USB mobile Conference guide for easy set up of multiparty calls Record your meetings with an SD memory card so that you can listen to them later on Expansion microphones can be added to increase th...

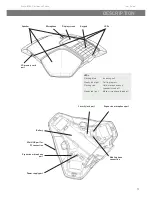
Page 7: ...s LEDs Flashing blue Incoming call Steady blue light Call in progress Flashing red Hold microphone and speaker turned off Steady red light Mute microphone turned off Battery Expansion microphone port Mobile phone connection Security lock port Power supply port Expansion microphone port Mini USB port for PC connection ...

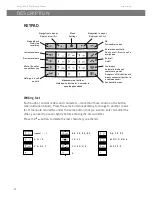
Page 8: ...ered space 1 G H I 4 P Q R S 7 D E F É È 3 M N O Ö Ø Ñ 6 W X Y Z 9 A B C Å Ä Á À 2 J K L 5 T U V Ü Ú 8 0 Menu Settings Navigation in menus Display of call list No end back Start stop recording Increase volume Decrease volume Mute the caller cannot hear you Hold puts a call on hold Alphanumerical buttons Hold down a button for 2 seconds to open the phonebook OK Yes confirm choice Answer connect cal...

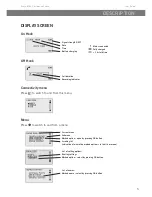
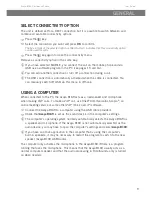
Page 9: ...u Submenu Marked option open by pressing OK button Scrolling list indication of where the marked option is in the list or menu List of setting options Existing settings Marked option select by pressing OK button List of names Marked name select by pressing OK button Call duration Recording indicator Signal strength DECT Date Time Battery charging Mains connected Fully charged 1 hr talk time ...

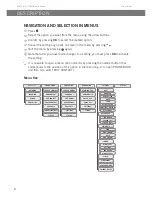
Page 10: ...sition of the option in the menu e g 2 to open PHONE BOOK and then 3 to select EDIT CONTACT Menu tree DESCRIPTION SEARCH CONTACT PHONE BOOK CONF GUIDE RECORDING STATUS ADD CONTACT EDIT CONTACT ERASE CONTACT ERASE ALL IMPORT CONTACTS STATUS SEARCH GROUP ADD GROUP EDIT GROUP ERASE GROUP ERASE ALL SETTINGS STATUS PLAYBACK FILE RENAME FILE ERASE FILE ERASE ALL SETTINGS STATUS OUTGOING CALL LIST INCOMI...

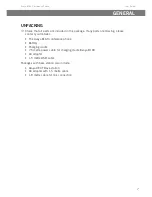
Page 11: ...arts are missing please contact your retailer The Avaya B169 conference phone Battery Charging cradle 7 5 metre power cable for charging cradle Avaya B169 AC adapter 1 5 metre USB cable Packages with base station also include Avaya DECT Base station AC adapter with 1 5 metre cable 1 8 metre cable for line connection ...

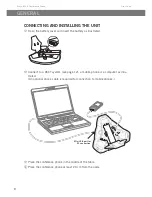
Page 12: ...the battery as illustrated Connect to a DECT system see page 12 a mobile phone or a computer as illus trated An optional phone cable is required for connection to mobile phones Place the conference phone in the middle of the table Place the conference phone at least 20 cm from the users Mini USB port for PC connection ...

Page 13: ...n connected to the PC the Avaya B169 acts as a loudspeaker and microphone when making VoIP calls To make a VoIP call use OneX Communicator Scopia an online meeting service or some other VoIP Voice over IP software Connect the Avaya B169 to a computer using the USB cable provided Check that Avaya B169 is set as the sound device in the computer s settings The computer s operating system normally aut...

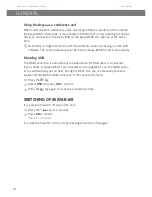
Page 14: ...y Avaya B169 for best audio quality Disabling USB The USB connection is automatically activated when the USB cable is connected If you choose to make a DECT call or answer an incoming DECT call the USB connec tion is automatically put on hold During the DECT call you can manually choose to enable and disable the USB connection in the connectivity menu Press the key Select USB and press OK to confi...

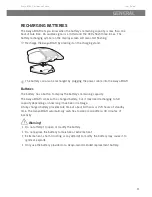
Page 15: ...attery has a button to display the battery s remaining capacity The Avaya B169 comes with a charged battery but it may need recharging to full capacity depending on how long it has been in storage A fully charged battery provides talk time of about 60 hours or 270 hours of standby time The Avaya B169 automatically switches to sleep mode after a 40 minutes of inactivity Warning Do not attempt to op...

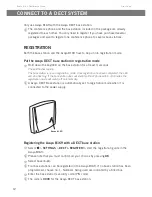
Page 16: ...n mode Once registration has been completed the LED will stop flashing If the base station does not identify a DECT phone within 10 minutes the registration mode will switch off automatically A Avaya DECT Base station is automatically set to registration mode when it is connected to the power supply Registering the Avaya B169 with a DECT base station Select SETTINGS DECT REGISTER to start the regi...

Page 17: ...switchboard administrator A PARK code might be needed check with your company s switchboard adminis trator Activate PARK SETTINGS DECT PARK and try to register again using your PARK code No base station within range or not activated in registration mode CONFIGURING ANALOG EXTENSIONS Documentation application notes and guides for IP office CS1000 and CM is found on support avaya com IP Office For s...

Page 18: ...e call is shown on the display screen Redialling Press an arrow button The last number that you dialled appears on the display screen Use the arrow buttons to look through previously dialled numbers Press The number you select is dialled Calling from the phonebook Please turn to page 23 for instructions on adding and updating contacts in the phone book Press and hold down a number button for two s...

Page 19: ...r is running that the Avaya B169 is connected via the USB cable to the computer and that Avaya B169 is selected as the sound device in the computer s settings Making VoIP calls Make the call or answer an incoming call using the computer s VoIP software The microphone is automatically activated and the LEDs show a steady blue light Ending a VoIP call End the call in the computer s VoIP software The...

Page 20: ...ate Avaya B169 Dial the number on the mobile phone as you normally would The Avaya B169 now functions as a speaker and microphone for the mobile phone The LEDs show a steady blue light Ending calls End the call on the mobile phone Press to inactivate the Avaya B169 ANSWERING AND MAKING CALLS ...

Page 21: ... volume indicators which can be used to adjust the different connections Increase or decrease the speaker volume for all connections in the normal way using the and keys Use the arrow keys to mark one of the connections Adjust the speaker volume for the selected connection using the keys and MUTING THE MICROPHONE Press to turn off the microphone The LEDs change from blue to red The other party can...

Page 22: ... number on the Avaya B169 or use the Phonebook Press the key again to close the connectivity menu Putting a connection on hold during a call Press the button during the call Use the arrow buttons to mark the connection you want to put on hold and press the button The indicator in front of the selected connection starts to flash Repeat the above to reconnect the connection Press the key again to cl...

Page 23: ...Enter a group name and press OK to confirm Press OK to enter the first person Write the name of the first person and press OK to confirm Enter the number and press OK to confirm Press OK to add another person and repeat the above steps Conclude by pressing MAKING CONFERENCE GROUP CALLS Press the button Select the conference group you want to call You can use the arrow buttons to press an alphanume...

Page 24: ...G A TEMPORARY CONFERENCE GROUP CALL MULTI PARTY CALL USING THE INSTANT GUIDE Press the button Select INSTANT with the arrow buttons Press OK to confirm The Instant guide asks you to dial the first number Dial the first person s telephone number Press OK to confirm Press OK when the first person has answered Press OK to call another person and repeat the above steps Press when you have called all t...

Page 25: ...change and press OK to confirm Make the change and press OK to confirm Delete a number or a letter in a name by pressing If you want to cancel the change you are making and leave the name or number as they were press until the CONFERENCE GUIDE menu appears DELETING CONFERENCE GROUPS Select CONF GUIDE ERASE GROUP Mark the group you want to delete and press OK Confirm that you really want to delete ...

Page 26: ...SETTINGS Enter the command for a enquiry for a new dialling tone and press OK to confirm F is the default setting Enter the command to connect everyone to a multi party call and press OK to confirm F3 is the default setting Enter the command to return to your original call and press OK to confirm F1 is the default setting If you experience problems making multi party calls Your PBX may not be prog...

Page 27: ...rrow buttons to press an alphanumeric button to jump to the first name that starts with that letter in the list Press OK or to dial the selected contact to return to the PHONEBOOK menu or to exit the menu ADDING CONTACTS Select PHONE BOOK ADD CONTACT Enter the name of the contact and press OK to confirm Write the number and press OK to confirm Press OK to add another contact or to exit the menu ED...

Page 28: ... pressing OK or cancel the deletion of a contact by pressing DELETING ALL CONTACTS Select PHONE BOOK ERASE ALL Confirm that you really want to delete all contacts by pressing OK or cancel the deletion of a contact by pressing DISPLAYING PHONEBOOK STATUS Select PHONE BOOK STATUS The display screen indicates the number of contacts already stored plus how many more contacts can be added PHONEBOOK ...

Page 29: ... after the recording has ended see page 27 It is possible to permanently disable the recording function see page 31 STARTING A RECORDING Remember to notify all parties in the call before you start recording Press the button and press OK to confirm The recording symbol flashes on the display screen MUTE FUNCTION Press the button during a call to turn the microphone off The LEDs change from blue to ...

Page 30: ...th are displayed for each recording Mark the recording you want and start the playback by pressing OK Adjusting the speaker volume Increase the volume using the button and lower it using Pause playback Pause the playback by pressing OK Restart playback by pressing OK again Move forward in the recording during playback Move forward in the recording by pressing arrow down or backward by pressing arr...

Page 31: ... the recording to be deleted and press OK Confirm that you really want to delete the recording by pressing OK again or cancel the deletion of a recording by pressing Deleting all recordings Select RECORDING DELETE ALL Confirm that you really want to delete all recordings by pressing OK again or cancel the deletion of a recording by pressing ADJUSTING THE RECORDING INDICATOR A short beep is heard e...

Page 32: ...and confirm your choice by pressing OK Select a base station Select SETTINGS DECT BASE The AUTO option and the base stations that are registered are displayed as options in the menu AUTO default means that the Avaya B169 automatically selects the registered base station that has the greatest signal strength Enabling PARK code Select SETTINGS DECT PARK Disabled is defalult PARK is a function that m...

Page 33: ...text on the display screen The text on the display screen can be changed when the Avaya B169 is on hook Select SETTINGS APPERANCE SCREEN TEXT Delete existing text using and enter your new text Press OK to confirm Adjusting LCD contrast Select SETTINGS APPERANCE LCD CONTRAST Select your choice and press OK to confirm DATE AND TIME Changing the time Select SETTINGS TIME DATE TIME Change the flashing...

Page 34: ...ect silent mode an LED on the phone flashes when an incoming call is received Deactivating keypad tones You can select whether or not you want a tone to be heard when you press a button Note that this setting does not affect the tone you hear when you dial a number in call mode Select SETTINGS SOUND KEY TONE Select your choice and press OK to confirm Adjusting sound equalizer The sound reproductio...

Page 35: ...irm that you really want to reset the settings to default by pressing OK again or cancel the resetting procedure by pressing CHECKING STATUS If you need to check the software version or serial number Select STATUS PERMANENTLY DISABLE RECORDING This is not a regular setting and shall only be used to permanently disable the recording function Warning There is no way to enable the recording function ...

Page 36: ...Phones Download the Avaya Upgrade Utility Install the software on your computer Follow the instructions given by the installation program UPGRADING SOFTWARE Restart the Avaya B169 in upgrade mode Connect the Avaya B169 to the PC using the USB cable Select SETTINGS UPGRADE MODE Confirm that you want to restart in upgrade mode by pressing OK or cancel the restart procedure by pressing You can also r...

Page 37: ... Avaya Upgrade utility upgrades Avaya B169 software via the USB connection Connectivity Wireless DECT DECT 6 0 PC connection USB 2 0 Mini B Mobile connection 6 pin connector Power supply Battery Emerging Power Li 18S 7 2 V 5200 mAh Lithium ion Avaya B169 charging cradle Avaya charging station AC adapter Model S024EM1400150 100 240 V AC 14 V DC 1 5 A Audio Technology OmniSound Microphone Omni direc...

Page 38: ... Power supply AC adapter ZDA060060m N m US EU BS 100 240 V AC 6 V DC 600 mA Cable length 2 metres Tele connection Analogue PBX or PSTN RJ 11 Compatibility A Avaya DECT base station can be connected to analogue lines or any PBX equipped with an analogue extension Up to 7 DECT units can be connected to a Avaya DECT base station EU version Up to 4 DECT units can be connected to a Avaya DECT base stat...

Reviews: