background image

AV6240

1-pass Color

Image Scanner

User's Manual

Version 1.0

(Doc. No. 250-0048-0)


  AVISION INC. 1998

Summary of Contents for AV6240

Page 1: ...AV6240 1 pass Color Image Scanner User s Manual Version 1 0 Doc No 250 0048 0 AVISION INC 1998 ...

Page 2: ...pyright All rights reserved No part of this publication may be reproduced transmitted transcribed stored in a retrieval system or translated into any language or computer language in any form or by any means electronic mechanical magnetic optical chemical manual or otherwise without the prior written permission of Avision Inc Material scanned by this product may be protected by governmental laws a...

Page 3: ...o warranty of any kind with regard to this material including but not limited to the implied warranties of fitness for a particular purpose Avision shall not be liable for errors contained herein or for incidental or consequential damages in connection with the furnishing performance or use of this material ...

Page 4: ...at interference will not occur in a particular installation If this equipment does cause harmful interference to radio or television reception which can be determined by turning the equipment off and on the user is encouraged to try to correct the interference by one or more of the following measures Reorient or relocate the receiving antenna Increase the separation between the equipment and recei...

Page 5: ...2 8 3 SCANNER DRIVER INSTALLATION 3 1 3 1 AUTO INSTALLATION PROGRAM 3 1 4 SCANNER OPERATION DOCUMENT PRINTING 4 1 4 1 SCANNING SOURCE 4 3 4 2 IMAGE TYPE 4 4 4 3 RESOLUTION CONTROL 4 6 4 4 IMAGE CONTROL 4 7 4 5 SCANNING 4 11 5 MAINTENANCE 5 1 5 1 CLEANING THE COPYBOARD GLASS 5 1 6 TROUBLESHOOTING 6 1 6 1 QUESTIONS AND ANSWERS 6 2 6 2 TECHNICAL SERVICE 6 4 7 SPECIFICATIONS 7 1 7 1 MODEL AV6240 7 1 A...

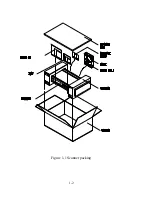
Page 6: ...scanners Before you install and operate the new scanner please take a few minutes to read through the manual It provides you with the proper instructions on how to unpack install operate and maintain the scanner Figure 1 1 shows how the scanner is packed you can check all the items against your checklist If you did not receive all the items please contact your authorized local dealer immediately ...

Page 7: ...1 2 Figure 1 1 Scanner packing ...

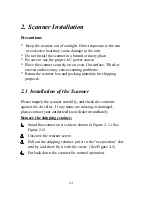
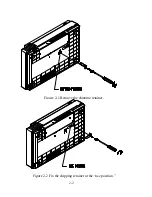
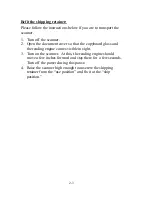
Page 8: ... the scanner box and packing materials for shipping purposes 2 1 Installation of the Scanner Please unpack the scanner carefully and check the contents against the checklist If any items are missing or damaged please contact your authorized local dealer immediately Remove the shipping retainer Stand the scanner on its side as shown in Figure 2 1 See Figure 2 1 Unscrew the retainer screw Pull out t...

Page 9: ...2 2 Figure 2 1 Remove the shipping retainer Figure 2 2 Fix the shipping retainer at the use position ...

Page 10: ...cover so that the copyboard glass and the reading engine comes visible in sight 3 Turn on the scanner At this the reading engine should move a few inches forward and stay there for a few seconds Turn off the power during this pause 4 Raise the scanner high enough to unscrew the shipping retainer from the use position and fix it at the ship position ...

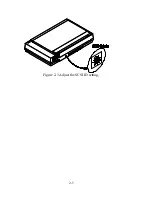
Page 11: ...s designed to operate with its default setting in most ISA class PCs SCSI ID When you have several devices on a SCSI chain you may need to adjust the SCSI ID selector setting located on the back of the scanner This setting assigns a specific device ID to the scanner If the assignment conflicts with an existing SCSI device please select a new ID See Figure 2 4 Note The factory setting for Avision A...

Page 12: ...2 5 Figure 2 3 Adjust the SCSI ID setting ...

Page 13: ...ardware icon Select SCSI Adapter 2 Select Have disk and type d DTCSCSI d means the letter for your current CD ROM drive 3 Press Finish button and restart Windows 95 In Windows NT 1 Press Start Setting Control Panel And then double click Add New Hardware button Select SCSI Adapter 2 Select Driver tag and Add new SCSI Adapter 3 Select Have disk and type d DTCSCSI d means the letter for your current ...

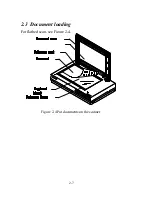
Page 14: ...2 7 2 3 Document loading For flatbed scan see Figure 2 4 Figure 2 4 Put documents on the scanner ...

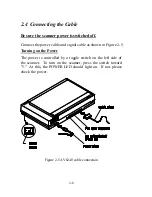
Page 15: ...able and signal cable as shown in Figure 2 5 Turning on the Power The power is controlled by a toggle switch on the left side of the scanner To turn on the scanner press the switch toward 1 At this the POWER LED should light on If not please check the power Figure 2 5 AV6240 cable connection ...

Page 16: ... Terminator into the unused SCSI connector on the scanner See Figure 2 6 The scanner will not function properly unless every SCSI connector is either connected or terminated If the scanner is linked in a SCSI chain between the host computer and other devices plug the SCSI cable from other devices into the unused SCSI connector of the scanner See Figure 2 7 ...

Page 17: ...vice configuration the SCSI connection terminates at the scanner SCSI Chain Configuration Figure 2 7 In the SCSI chain configuration the scanner is connected to the host computer a second SCSI cable then connects the scanner with other devices such as a printer ...

Page 18: ...ated each time the scanner is turned on During the test the READY LED and ERROR LED will light on At the end of the test if no error occurs the READY LED should stay solid while the ERROR LED should extinguish If the ERROR LED goes on blinking after the diagnostic test please consult your local dealer to resolve the problem ...

Page 19: ...megabytes or higher recommended A video graphics array VGA monitor A Microsoft Windows compatible pointing device e g mouse A CD ROM drive 3 1 Auto Installation Program The installation procedures of Avision scanner driver with Avision Auto Installation Program are as follows 1 Start Windows 3 1 or Windows 95 or Windows NT 2 Insert Avision PaperCom Supreme CD into your CD ROM drive In Windows 3 1 ...

Page 20: ... 1 3 2 3 Press the Start button choose RUN type type d driver AV6240 exe d the drive in use and then click OK 4 Follow the instructions on the screen to complete the installation usually just clicking OK will complete the installation Fig 3 1 Fig 3 2 ...

Page 21: ...rs containing the different TWAIN sources that you can choose for bringing an image into your application Select MrScan 32 Expert Vx xx as the source You need to select Mrscan 32 Expert Vx xx for just once except when you have used the dialog box to select a different source In that case you will need to select Mrscan 32 Expert Vx xx as the source again before you can resume your use of AV6240 sca...

Page 22: ...4 2 Avision TWAIN user interface ...

Page 23: ... document as well as the transparency Select either one from the Source drop down list box as shown in the following Figure Note To make transparency scanning work you have to purchase the transparency unit separately You can consult the details from your nearest dealer ...

Page 24: ... use with your document or image Line art Line art includes only black and white areas There are no intermediate shades of gray in between Halftone In addition to the black and white display Halftone can create the illusion of shades of gray by using different size of dots ...

Page 25: ...int in the image as a shade of gray continuous tone 8 bit gray gives more detailed information about the image 256 Color 256 Color presents 256 colors in a color image True Color 16 7 million colors Color image have continuous tones along with its color hues ...

Page 26: ...ion is measured by dots per inch dpi Normally the greater the dpi number the higher the resolution and the image file size Yet the greater resolution takes more time memory and disk space therefore up to a certain degree of dpi the resolution will not visually be improved on the contrary it makes your files more unmanageable ...

Page 27: ...rkest and the lightest shades in the image The higher the contrast the bigger the different gray scales Gamma Adjusts the midtone of the image without losing details of the lightest and the darkest areas Highlight Adjusts the highlight area of the image Shadow Adjusts the darkest area of the image Brightness Contrast Gamma Highlight Shadow Hue Intensity Saturation ...

Page 28: ... the saturation level for the color by clicking the up or down arrow button The level of saturation decides if the color is pale or rich Auto Level Automatically adjusts the highlight and shadow areas of the scanned image to give it an optimal effect Invert The invert command reverses the brightness and the color in the image For color images each pixel will be changed into its complementary color...

Page 29: ...4 9 comes close to that of the original This function uses default parameters to adjust the image Sharpen Sharpens the scanned image Look for more selections under this item ...

Page 30: ...4 10 Descreen Eliminates the moire patterns commonly found in printed matter Before Descreen After Descreen ...

Page 31: ...area with the parameters you have set Exit Cancel the current job As shown in the figure below in the Preview window you can define the area to be scanned by dragging the cursor auxiliary lines with the mouse Click here to shift between different measure systems The cursor auxiliary lines The Preview Window ...

Page 32: ... with ink toner particles or paper coatings As a result the scanner needs to be cleaned occasionally particularly if the scanned image looks smeared The cleaning procedures See Figure 5 1 1 Open the document cover 2 Soak a cotton swab with some isopropyl alcohol 95 3 Wipe the copyboard glass by moving the swab from side to side Repeat this step until the whole copyboard glass is cleaned 4 Close th...

Page 33: ...5 2 Fig 5 1 Cleaning the document glass The Document Glass ...

Page 34: ...t the READY LED and ERROR LED will light on and the scanner reading head will move a bit forward Once the test is finished and if no error occurred the READY LED will stay solid and the ERROR LED will extinguish and the scanner reading head will back to its leftmost position If you have problem with the operation of your scanner please check the following troubleshooting hints ...

Page 35: ... possibilities 1 You forgot to remove the shipping retainer from the scanner If this is the case please remove the shipping retainer first 2 The scanner is not placed on an even flat desktop surface This may cause the scanner to function improperly Question The scanner is powered on but the lamp does not light on Answer The possible causes are as follows 1 The lamp is out of order In this case con...

Page 36: ... see Section 2 2 for more details Question Scanning the scanner will often make noises or it scans back and forth Answer Please select a lower speed from the TWAIN user interface for low speed PC Question Why is it the scanned images always come out to be too dark Answer 1 Modify the Gamma setting to1 8 for your monitor and when printing set the Gamma setting to 2 2 for your printer 2 Adjust the B...

Page 37: ...pace display card interface card The name and version of your scanning software application The version of your scanner driver Please call us at US and Canada Area Avision Labs Inc Address 6049 Stewart Ave Fremont CA 94538 Telephone number 510 440 8785 Fax number 510 440 8337 Web Site http www avision com E mail avision avision labs com Other Area Avision Inc Address No 20 Creation Road Science Ba...

Page 38: ...6 5 Note You can find the latest driver and documents in our homepage located in World Wide Web WWW with our web site http www avision com ...

Page 39: ...solotion 19200 dpi 19200 dpi Scanning modes Black White mode Halftone mode 64 step 8 bit Gray scale 256 levels 24 bit color 16 7 Millions of color 30 bit internal auto mapping to optimal 24 bit Document size 216 x 356 mm 8 5 x 14 inches Interface SCSI 2 Power Source 100 240 VAC 50 60 Hz Power Consumption 35 watts Dimensions 570 mm x 350 mm x 117 mm WxHxD Weight Approx 20 lbs 9 kg ...

Page 40: ...chu Taiwan R O C declare that the product Model Number AV6240 conforms to the following Product Specifications Emission EN 50081 1 1992 EN 55022 class B Conducted Radiated 1994 EN 60555 2 Harmonics 1987 EN 60555 3 Flicker 1987 Immunity EN50082 1 1992 IEC 1000 4 2 ESD 1995 IEC 1000 4 3 RS 1995 IEC 1000 4 4 EFT Burst 1995 IEC 1000 4 5 SURGE 1995 Date December 1995 ...

Page 41: ...your path Type d DTCSCSI d is the letter indicating your current CD ROM drive Press OK 6 The unknown device statement will be displayed Press OK 7 The d SCSI and filename will be displayed Press OK Your are now completing the installation of SCSI card on your computer If you choose Do not install a driver please follow the following procedure 5 Click Windows Start icon from the bottom Choose Setti...

Page 42: ... please 4 If your SCSI card is bundled with Avision AV260CS then install the scanner driver will simultaneously install the SCSI card driver 5 If your SCSI card is not bundled with Avision AV260CS then please follow the installation sheet contained in your SCSI card In Windows NT please 5 Click Windows Start icon from the bottom Choose Setting Choose Control Panel from Setting 6 Choose SCSI Adapte...

Reviews: