

6. Settings
5. Cables
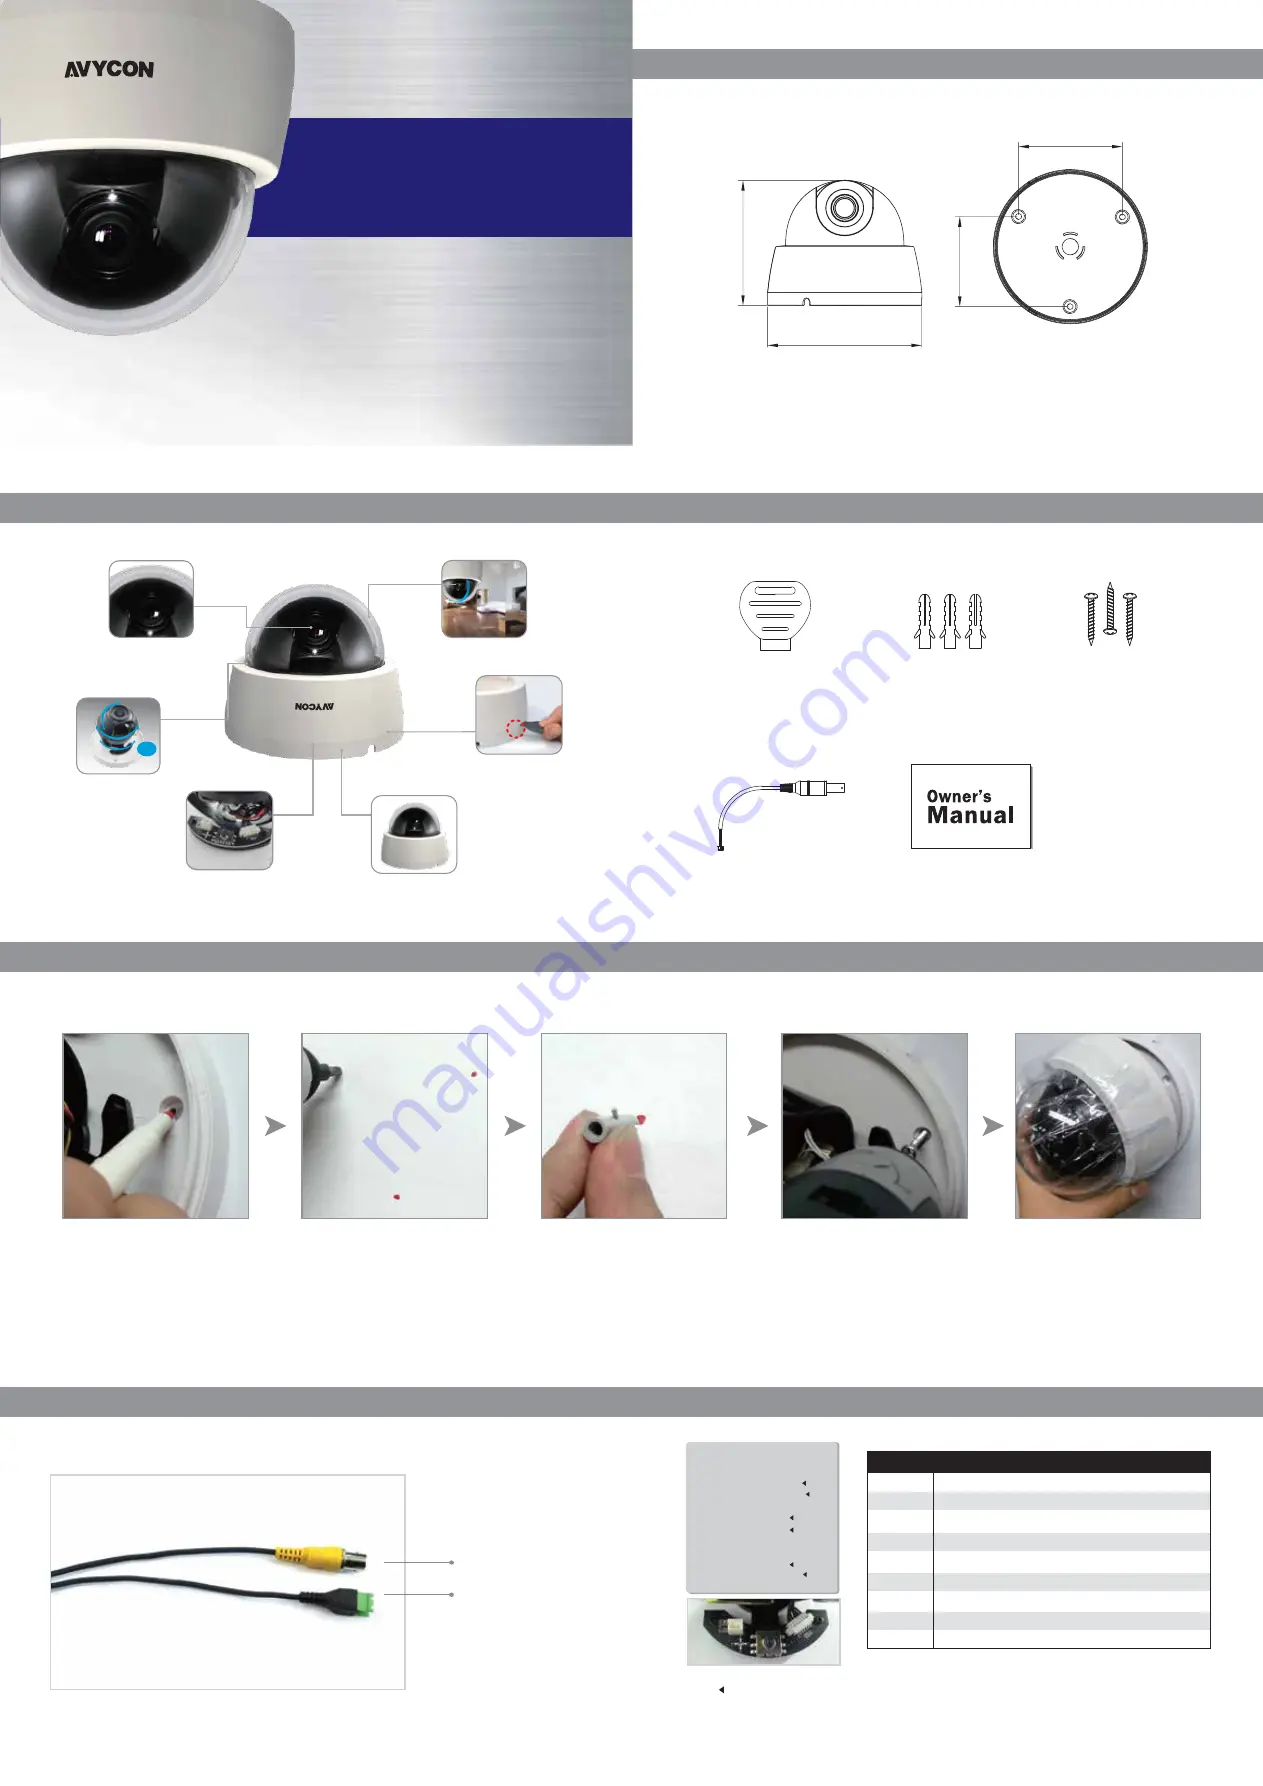
4. Installation Guide
MAIN SETUP
1. EXPOSURE ALC
2. DAY/NIGHT AUTO
3. WHITE BAL ATW
4. MONITOR
5. IMAGE
6. DNR MIDDLE
7. MOTION OFF
8. SYSTEM
9. EXIT SAVE
1. Up and Down : Move Cusor
2. Left and Right : Value
3. Left and Right > Push > Menu > Value
4. END : Push > Return
* Push the SET button > menu open
* Icon has sub menus. Press the set button to
enter sub menus.
※
See back for more details.
Menu Configuration
EXIT
MOTION
SYSTEM
IMAGE
DNR
MONITOR
WHITE BAL
EXPOSURE
DAY/NIGHT
MAIN SETUP
ㆍ
ELC
ㆍ
ALC
ㆍ
AUTO/DAY
ㆍ
EXTERN
ㆍ
CDS
ㆍ
ATW/PUSH
ㆍ
MANUAL
ㆍ
GAMMA
ㆍ
CHROMA
ㆍ
SHARPNESS
ㆍ
SHADING
ㆍ
PED. LV
ㆍ
BACKLIGHT
ㆍ
CONTRAST
ㆍ
POSI/NEGA
ㆍ
MIRROR
ㆍ
PROVACY
ㆍ
RETURN
ㆍ
LOW / MIDDLE / HIGH
ㆍ
ON / OFF
ㆍ
SYSTEM
ㆍ
CAM TITLE
ㆍ
CAM ID
ㆍ
ID DISP
ㆍ
SYNC
ㆍ
BUDRATE
ㆍ
LANGUAGE
ㆍ
SPECIAL
ㆍ
SAVE / RESTORE / INITIAL / MANUAL
Owner’s
Manual
DIGITAL COLOR CCTV CAMERA
3. Contents
2. Features
1. Dimensions
Unit : mm (Inch)
130
(5.1”)
106
(4.1”)
76
(2.9”)
88
(3.46”)
5
Easy opening
Thick Base mount
2
3-Axis structure
4
Simple Elegant design/ Compact Housing
6
Wide View Angle (Up to 90 Degrees)
3
OSD Structure
Up to 90 Degrees
Dual VoltageTerminal
(12V DC/ 24V AC)
Video output
Rotation
X-Axis
Z-Axis
Y-Axis
1
2.8~12mm Lens
1. Mark screw holes to drill
2. Drill 3/16" holes where marked
3. Firmly insert included drywall
anchors
5. Close the cover to complete
installation
4. Align the camera to the holes
and tighten all 3 screws
ULTRA HIGH RESOLUTION
●
1/3” 960H IT CCD
●
2.8~12mm MegaPixel Lens
(ICR)
●
Ultra High Resolution
●
3-Axis Structure
●
ICR Filter Change Function
1. OPENER
1
4. Test Video Cable
4
2. Drywall Anchor x 3
2
3
3. Mounting Screw x3
5
5. Owner’
s Manual


