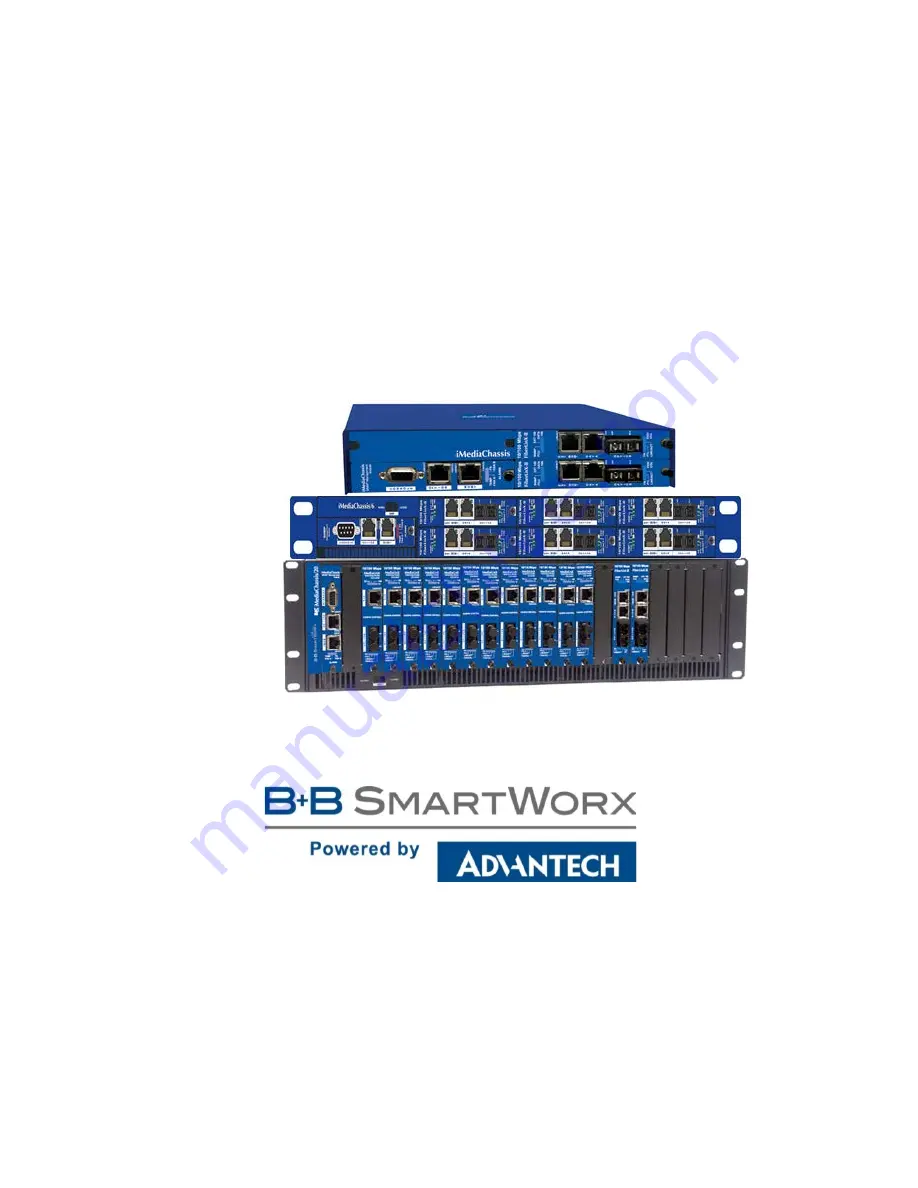
background image

iMediaChassis Series 

iMediaChassis 3, 6 and 20 slot 

USER MANUAL


Summary of Contents for iMediaChassis/20

Page 1: ...iMediaChassis Series iMediaChassis 3 6 and 20 slot USER MANUAL ...

Page 2: ...uarters Westlink Commercial Park Oranmore Co Galway Ireland Phone 353 91 792444 Fax 353 91 792445 www advantech bb com B B SMARTWORX TECHNICAL SUPPORT USA Canada 1 800 346 3119 Ottawa IL USA location Monday Friday 7 00 a m to 7 00 p m CST Europe 353 91 792444 Ireland location Monday Friday 8 a m to 5 00 p m GMT Email support advantech bb com Web www advantech bb com ...

Page 3: ...Management Module LEDs 4 Installing the iMediaChassis 20 4 DC Power Supply Module Wiring Instructions 5 Installing SNMP Management and Application iMcV Modules 6 Replacing Power Supply Modules 7 User Replaceable Power Supplies 7 Dual AC Part Number 850 10960 2AC 7 Dual DC Part Number 850 10960 2DC 8 Dual AC Part Number 605 10144 2AC 9 Dual DC Part Number 605 10145 2DC 9 iMediaChassis 20 Specificat...

Page 4: ...ations 17 About the iMediaChassis 3 18 Hardware Features 18 Alarm Reset Last Gasp and Temperature Gauge 18 Alarm Reset Button 18 Last Gasp Alarm 19 Temperature Gauge 19 Installing the iMediaChassis 3 19 DC Power Wiring Replacing Power Supply Modules and Fans 20 DC Power Supply Module Wiring Instructions 20 Power Supply Modules 21 Fans 21 Installing Management and Application Modules 21 Installing ...

Page 5: ... Figure 4 850 10960 2AC PS 7 Figure 5 850 10960 2DC PS 8 Figure 6 605 10144 2AC PS 9 Figure 7 605 10144 2DC PS 9 Figure 8 iMediaChassis 6 PS 11 Figure 9 DC Wiring Scheme for iMediaChassis 6 15 Figure 10 SNMP Module location for iMediaChassis 6 16 Figure 11 DC Wiring Scheme iMediaChassis 3 21 Figure 12 SNMP Module Slot on iMediaChassis 3 22 ...

Page 6: ... limits This digital apparatus does not exceed the Class B limits for radio noise emission from digital apparatus set out in the Radio Interference Regulation of the Canadian Department of Communications Le présent appareil numérique n émet pas de bruits radioélectriques dépassant les limites applicables aux appareils numériques de classe B prescrites dans le Règlement sur le brouillage radioélect...

Page 7: ...scrites dans le Règlement sur le brouillage radioélectrique publié par le ministère des Communications du Canada Class B This equipment has been tested and found to comply with the limits for a Class B computing device pursuant to Part 15 of the FCC Rules These limits are designed to provide reasonable protection against harmful interference when the equipment is operated in a commercial environme...

Page 8: ...IMediaChassis Series vii Product Description Version FCC Class A FCC Class B iMediaChassis 20 Dual AC Dual DC iMediaChassis 6 AC Dual AC DC Dual DC iMediaChassis 3 AC 2AC DC 2DC ACDC ...

Page 9: ...hich have been adjusted modified or repaired by any party other than B B SmartWorx or iii any descriptions illustrations figures as to performance drawings and particulars of weights and dimensions contained in the B B SmartWorx catalogs price lists marketing materials or elsewhere since they are merely intended to represent a general idea of the products and do not form part of this price quote a...

Page 10: ...an additional slot for installing an SNMP Management Module Power supply modules are user replaceable and hot swappable The iMediaChassis 20 line offers models available in dual AC dual DC and ACDC versions It offers features such as end user replaceable power supply modules temperature monitoring Last Gasp and an Alarm Reset Button HARDWARE FEATURES ALARM RESET LAST GASP AND TEMPERATURE GAUGE The...

Page 11: ...located next to the power connector on the power supply module If this occurs remove and replace the power supply module immediately LEDs on the Management Module and the power supply module itself also indicate power supply module failures LAST GASP ALARM The iMediaChassis series includes the Last Gasp trap feature Remote Chassis Down which sends a Trap when the following occurs Both power supply...

Page 12: ... The SNMP Write Lock switch prevents a new management board from re configuring the application module settings e g the status of features such as LinkLoss FiberAlert Force mode etc made via SNMP on any previous Management Modules Figure 2 SNMP Write Lock Switch NOTE Leave this switch in the NORMAL position during day to day operation the LOCKED position should only be used when changing the SNMP ...

Page 13: ...talling the chassis be sure to observe the following precautions to prevent electrical or mechanical damage 1 Protect the chassis from exposure to sunlight and electrical or magnetic fields 2 Ensure that the equipment rack remains stable even with the addition of the chassis and its associated cabling To install 20 slot Rackmount chassis 1 Have four 10 screws and four clip nuts available hardware ...

Page 14: ...n of the equipment to the supply circuit and the effect that overloading of the circuits might have on over current protection and supply wiring 8 Reliable Grounding Reliable grounding of rack mounted equipment should be maintained Particular attention should be given to supply connections other than direct connections to the branch circuit e g use of power strips 9 All AC and DC versions are inte...

Page 15: ...the captive screw Refer to the documentation shipped with the module for configuration information 4 When installing modules observe ESD precautions refer to the Electrostatic Discharge Precautions section In order to manage an iMediaChassis series the SNMP Management Module needs to be installed in the appropriate slot of the chassis Install the iMediaChassis 20 SNMP Management Module into the fi...

Page 16: ...ower supply module 2 Remove the screws of the retainer plate on some AC modules 3 Move the Power Supply Release switch toward the right or unscrew captive release screw 4 Before grasping the power supply module by the silver handle press the release screw and then slide out of the chassis Power supply modules are hot swappable 5 Install new power supply module If module is equipped with an ON OFF ...

Page 17: ... NUMBER 850 10960 2DC Figure 5 850 10960 2DC PS Both the 850 10960 2AC and 850 10960 2DC were put on End of Life EOL in June 2015 support is still available for existing chassis deployed Power supplies are limited to a six year warranty ...

Page 18: ...IMediaChassis Series 9 DUAL AC PART NUMBER 605 10144 2AC Figure 6 605 10144 2AC PS DUAL DC PART NUMBER 605 10145 2DC Figure 7 605 10144 2DC PS ...

Page 19: ...48V DC 5A ACDC 100 to 240V AC 50 60HZ 2A 48V DC 4 4A Operating Temperature 0 C to 50 C 32 F to 122 F Storage Temperature Dual AC ACDC 20 C to 80 C 4 F to 176 F Dual DC 20 C to 60 C 4 F to 140 F Humidity 20 to 90 non condensing at 40 C Shipping Weight 11 3 kg 25 lbs Dimensions 13 21 x 48 26 x 35 0 5cm 5 2 x 19 0 x 13 8 inches ...

Page 20: ...e iMediaChassis 6 is 1U high can be installed on a rack mount shelf and supports optional redundant power supply modules as well as an SNMP Management Module The iMediaChassis 6 series offers a line of models including single AC single DC dual AC and dual DC It offers features such as end user replaceable power supply modules temperature monitoring Last Gasp and an Alarm Reset Button Figure 8 iMed...

Page 21: ...y module immediately LEDs on the Management Module and the power supply itself also indicate power supply failures After stopping the alarm remove the power supply and replace the power supply module LAST GASP ALARM The iMediaChassis series includes the Last Gasp trap feature Remote Chassis Down which sends a Trap when the following occurs Both power supply modules malfunction Both power supply mo...

Page 22: ...er to the LED panel below for indicators of Link Temperature Power Supply modules and other functions Please refer to page 4 for SNMP LEDs Installing the iMediaChassis 6 Install the chassis first before installing any modules into an iMediaChassis When installing the chassis be sure to observe the following precautions to prevent electrical or mechanical damage 1 Protect the chassis from exposure ...

Page 23: ... the equipment is not compromised 6 Mechanical Loading Mounting of the equipment in the rack should be such that a hazardous condition is not achieved due to uneven mechanical loading 7 Circuit Overloading Consideration should be given to the connection of the equipment to the supply circuit and the effect that overloading of the circuits might have on over current protection and supply wiring 8 R...

Page 24: ...odules installed depending on the model Chassis ordered with one power supply come with a filler tray installed in the second slot To install a second power supply 1 Remove the filler tray 2 Slide the power supply module into the chassis and click into place 3 Attach power cord To remove a power supply module 1 Disconnect the power source from the power supply 2 Move the Power Supply Release switc...

Page 25: ... the slot where the module will be installed B B SmartWorx recommends installing blank brackets in unused module slots 2 Slide the module into the chassis using the card guides 3 Secure the module to the chassis by tightening the captive screw Refer to the documentation shipped with the module for configuration information 4 When installing modules observe ESD precautions refer to the Electrostati...

Page 26: ...C 48V DC 2A Operating Temperature AC 25 C to 50 C 130 F 122 F DC 40 C to 100 C 40 F 212 F Storage Temperature AC 40 C to 85 C 40 F 185 F DC 55 C to 125 C 67 F 257 F Humidity 5 95 non condensing 0 10 000 ft altitude Shipping Weight 13 lbs 5 90 kg Dimensions 4 45 x 44 07 x 27 05cm 1 75 x 17 35 x 10 65 inches ...

Page 27: ...n internal fixed power supply modules that are not end user replaceable It offers features such as redundant power supply modules temperature monitoring Last Gasp and an Alarm Reset Button HARDWARE FEATURES ALARM RESET LAST GASP AND TEMPERATURE GAUGE The iMediaChassis 3 ships with one or two AC or DC power supply modules depending on the model Fans are included in all models ALARM RESET BUTTON Whe...

Page 28: ...dules into an iMediaChassis When installing the chassis be sure to observe the following precautions to prevent electrical or mechanical damage 1 Stay within the chassis power rating to prevent overload of supply circuits or damage to any overcurrent protection and supply wiring 2 Maintain reliable ground especially when connecting to a power strip instead of directly to a branch circuit 3 Protect...

Page 29: ... incorporated in the building installation wiring 8 A suitable listed circuit breaker shall be provided in the building installation as the unit s disconnect device The branch circuit rating i e minimum 15A listed circuit breaker etc DC POWER WIRING REPLACING POWER SUPPLY MODULES AND FANS DC POWER SUPPLY MODULE WIRING INSTRUCTIONS The following image shows the wiring configuration for a 48 VDC pow...

Page 30: ...at the power sourcing equipment POWER SUPPLY MODULES Power supply modules in all models of the iMediaChassis 3 are fixed and not end user replaceable FANS The iMediaChassis 3 includes temperature triggered fans When the temperature inside the chassis reaches 45 C the two fans activate to cool the chassis Fans are not end user replaceable Installing Management and Application Modules SNMP Managemen...

Page 31: ...ies the SNMP Management Module needs to be installed in the appropriate slot of the chassis Install the iMediaChassis 3 slot SNMP Management Module into the bottom left slot NOTE This slot is ONLY for the Management Module do not install Application Modules such as media conversion and mode conversion modules in this slot Figure 12 SNMP Module Slot on iMediaChassis 3 SNMP WRITE LOCK The SNMP Write...

Page 32: ...nstructions about how to configure and operate If an SNMP Management Module is installed refer to the LED panel below for indicators of Link Temperature Power Supply modules and other functions Please refer to page 4 for SNMP LEDs IMEDIACHASSIS 3 SPECIFICATIONS Input Specifications AC 100 to 240V AC 50 60Hz 0 75A DC 35V DC to 75V DC Max 1 6A Operating Temperature AC 0 C to 50 C 32 F to 122 F DC 40...

Page 33: ... 4 4 x 19 0 x 22 0 cm 1 73H 7 50W 8 74D inches Hardware Feature Matrix Power Supply iMediaChassis 3 Versions AC 2AC DC 2DC ACDC Type Fixed End user replaceable No LEDs Yes Redundant upgrade on single slot chassis No Trap can be set for exceeding a temperature value WARNING Disconnect all power supplies before servicing ...

Page 34: ...e the boards on a grounded static free surface ESD pad or in a proper ESD bag Do not slide the modules or stand alone units over any surface WARNING Integrated circuits and fiber optic components are extremely susceptible to electrostatic discharge damage Do not handle these components directly unless you are a qualified service technician and use tools and techniques that conform to accepted indu...

Page 35: ... local authorities Following these steps through proper disposal and recycling will help prevent potential negative consequences to the environment and human health For more detailed information about proper disposal please contact local authorities waste disposal services or the point of purchase for this equipment as 2017 B B SmartWorx All rights reserved The information in this document is subj...

Reviews: