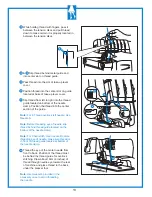
background image

Model BL480A

Getting to Know:

A-LINE SERIES

Diana

Baby Lock Consumer Helpline: 800-313-4110

www.babylock.com

Summary of Contents for Diana BL480A

Page 1: ...Model BL480A Getting to Know A LINE SERIES Diana Baby Lock Consumer Helpline 800 313 4110 www babylock com...

Page 2: ...on how to thread your serger and set tension dials for balanced stitches Once you re familiar with your machine refer to the instruction and reference guide packaged with your machine for additional...

Page 3: ...hen using synthetic threads that easily spill off the cone slip the thread net furnished with the machine over the thread from bottom of the cone leaving the thread end hanging free at the top as show...

Page 4: ...verlock and Chain stitching as shown Tension Color Code 5 Thread Chain Stitch 3 Thread overlock 1 Upper looper thread Green 2 Lower looper thread Blue 3 Chain stitch looper thread Purple 4 Right needl...

Page 5: ...he front cover for quick reference Thread the machine in the order 1 to 4 as shown at right Note Threads go through the take up lever cover for cover stitch as shown Tension Color Code Triple Cover St...

Page 6: ...it slips under guide Then pull thread along the right side of pretension disc as illustrated 3 While holding thread with fingers pass it between the tension discs and pull thread down to make certain...

Page 7: ...ded thread guides 9 Thread the hole in the upper looper from front to back Make sure thread passes behind lower looper Pull about 10cm 4 inches of thread through the looper and place to the back of th...

Page 8: ...f pretension disc as illustrated Manual Threading Threading the Lower Looper Blue 6 Open the front cover and thread the lower looper as indicated in steps 1 through 10 Raise Presser foot to release te...

Page 9: ...t into the thread guide 6 7 8 Thread the balance of the lower looper area of the machine following the blue color coded thread guides placing thread in guides 9 10 Thread the lower looper eye A from f...

Page 10: ...through 11 Raise Presser foot to release tension discs Turn the handwheel toward you until the chain stitch looper eye extends out 5 10mm from the needle plate edge Thread the chain looper area of th...

Page 11: ...ad the looper eye A from front to back Pull about 10cm 4 inches of thread and position into V cutout B on threader Firmly hold thread tail with left hand and pull threader lever C up to place thread i...

Page 12: ...e front through the thread guide Thread the center needle as indicated in steps 1 through 9 Raise Presser foot to release tension discs 2 Thread the top cover thread guide by pulling the thread toward...

Page 13: ...e up lever cover 8 Slip thread from left to right into the thread guide located on bottom of the needle clamp Position the thread into the right section of the guide Note Before threading eye of needl...

Page 14: ...to the front through the thread guide 2 Thread the top cover thread guide by pulling the thread towards the left until it slips under guide Then pull thread along the right side of pretension disc as...

Page 15: ...the center section of the guide Note For 4 Thread overlock left needle Use Needle A Note Before threading eye of needle slip thread behind thread guide located on the bottom of the needle clamp Note F...

Page 16: ...ugh the thread guide 2 Thread the top cover thread guide by pulling the thread towards the left until it slips under guide Then pull thread along the right side of pretension disc as illustrated Threa...

Page 17: ...hreading eye of needle make sure thread is in front of thread guide located on the bottom of the needle clamp for cover stitch and for chain stitch 9 Thread the eye of the left needle Draw about 10cm...

Page 18: ...om back to the front through the thread guide 2 Thread the top cover thread guide by pulling the thread towards the left until it slips under guide Then pull thread along the right side of pretension...

Page 19: ...threading eye of needle make sure thread is in front of thread guide located on the bottom of the needle clamp for cover stitch and for chain stitch 9 Thread the eye of the middle needle Draw about 1...

Page 20: ...ont through the thread guide 2 Thread the top cover thread guide by pulling the thread towards the left until it slips under guide Then pull thread along the right side of pretension disc as illustrat...

Page 21: ...e Before threading eye of needle make sure thread is in front of thread guide located on the bottom of the needle clamp for cover stitch 9 Thread the eye of the right needle Draw about 10cm 4 inches o...

Page 22: ...d too short threads may come untied Firmly pull both thread to test knot security Raise Presser foot to release Tension discs Pull the threads through the machine one at a time If threads do not pull...

Page 23: ...wing conditions Adjust the stitch length to N 4 when sewing heavy weight fabrics Adjust the stitch length to 2 N when sewing lightweight fabrics to obtain excellent seams without puckering Width adjus...

Page 24: ...the presser foot and sew a test sample Note Do not pull on the fabric while sewing as this may deflect the needle causing it to break At the end of the sample continue to run the machine with the pres...

Page 25: ...rting point of sewing At end of sewing Stop sewing when the fabric is not under the needles 5 Raise presser foot 6 Turn the handwheel toward you one circle Counter clockwise then turn handwheel one ci...

Page 26: ...by changing the needle position overedging and seaming on common fabrics A mm and 6 mm overlock seam width can be obtained by changing the needle position 1 needle 3 thread stitch is used for butted o...

Page 27: ...retch fabrics 2 needle 3 thread cover stitch is suitable for stretchy fabrics such as knits etc A narrow seam is formed by using left and middle needles 2 needle 3 thread cover stitch is suitable for...

Page 28: ...read Rolled Hem 1 2 3 4 5 6 7 8 9 10 11 12 4 0mm 6 0mm 4 0mm 6 0mm 4 0mm 6 0mm 4 0mm 6 0mm 2 8mm 5 6mm 5 6mm 4 0mm Page Blue 39 40 40 41 41 42 42 43 43 44 45 46 47 47 50 50 51 54 Green Red Purple D G...

Page 29: ...Diana serger Wrap skirt pattern or template below Paper to trace pattern 4 Cones of Maxi Lock serger thread 1 Spool decorative or contrasting color thread Measuring tape 2 yards linen Interfacing Han...

Page 30: ...t end Press 9 Repeat for the remaining tie strand 10 Serge the front to the back at the side seam Place one of the ties in the left side seam 11 Serge the facing front to the facing back at the side s...

Page 31: ...For other exciting projects like this one visit our Web site at www babylock com 28...

Page 32: ...LBIN BL480A Visit our Web site at www babylock com...

Reviews: