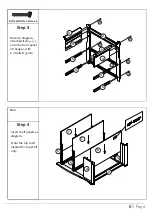
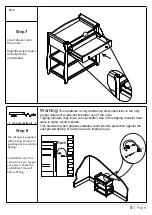
Babymore Sleigh Changer, Instructions Manual
Discover the convenience of the Babymore Sleigh Changer, designed for ease and functionality in your nursery. Access a comprehensive Instructions Manual to maximize the use of your Sleigh Changer. Download the manual for free directly from 88.208.23.73:8080, ensuring you have all the guidance you need for assembly and use.
Share
Download


Reviews:
No comments
Related manuals for Sleigh Changer

Camo
Brand: EasyGO Pages: 60

CAT
Brand: Jenx Pages: 30

OLYMPIA 0302C00
Brand: Jardine Pages: 11

UTS00203E-PK
Brand: HAMPTON BAY Pages: 8

PORTABLE COT WITH TOY MOBILE
Brand: Britax Pages: 6

Osborn D71 M20186
Brand: GRAND RESORT Pages: 7

Osborn 5pc Dining Set D71 M20180
Brand: GRAND RESORT Pages: 7

1713
Brand: Nofred Pages: 2

MIA
Brand: Kinderkraft Pages: 44

Southern Dunes 04564-32 FT Series
Brand: Thomasville Pages: 9

Good Night
Brand: Chicco Pages: 24

EasyLunch
Brand: Chicco Pages: 24

FLIPPA
Brand: APRAMO Pages: 6

Close to You Bedside Bassinet
Brand: Chicco Pages: 16

tasman eco Urban Elyse
Brand: SJC brands Pages: 9

ISOFIX BASE2
Brand: KIDDY Pages: 52

City
Brand: PALI Pages: 2

SKFS735A-5
Brand: Garden Oasis Pages: 2


