background image

1

Assembly Instructions

The Claws Cabin!

Summary of Contents for Claws Cabin

Page 1: ...1 Assembly Instructions The Claws Cabin ...

Page 2: ...t paint both sides of every panel We recommend you do this PRIOR TO ASSEMBLY for the best finish We recommend Dulux Weathershield Exterior Paint 1 UNPACK ALL THE BOXES COMPLETELY and line up all the bags of hardware so you can easily grab bolts and screws during assembly 2 Put a Phillips head bit Size PH2 on a power drill Ensure your bit fits nicely into the screws We have provided one if you don ...

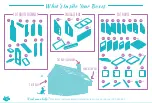
Page 3: ...s What s Inside Your Boxes 2 x2 Disclaimer This product is designed solely for the purpose of giving your cat an outdoor living option It is not intended to keep all predators out and may not be enough to stop a dog or other animal from harming your cat To ensure security and safety additional measures such as a secure foundation and flooring backyard fencing electric fences night lights and addit...

Page 4: ...catenclosures com au or phone 1300 440 453 1 2 3 4 5 6 7 8 9 10 11 12 cathousechimney snugglebox 39 x2 40 x2 42 x2 43 x2 44 x2 46 x2 cathouse 13 14 15 16 17 18 19 20 21 22 23 24 25 26 27 30 31 32 33 34 35 36 37 38 x2 x2 x2 x2 CatHouse CatHousechimney Snuggleboxes 29 47 x2 ...

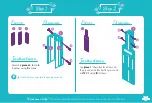
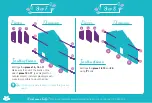
Page 5: ...uctions Pieces Diagram Lay piece 1 down flat face down on the ground and attach what you made in STEP 1 using B screws Instructions A A A A 1 B B B B 1 5 4 3 Make sure you orientate the panels correctly Tip Need some help Email us at sales backyardcatenclosures com au or phone 1300 440 453 4 ...

Page 6: ... chimney using F bolts Ensure the top left cutout is as per the diagram Then attach piece 10 to the other side of piece 1 using F bolts Finally attach piece 7 together with G bolts and place piece 8 chimney floor in place Instructions 6 7 F 6 B B B B 8 9 10 F F F F F G G G G G G 7 10 9 8 G 5 Need some help Email us at sales backyardcatenclosures com au or phone 1300 440 453 Step 3 Step 4 ...

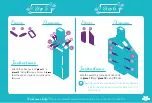
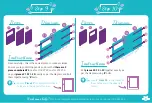
Page 7: ...am With the assembly standing upright bolt on piece 13 and piece 14 using F bolts Instructions 2 13 14 11 12 2 12 11 A A B B B B This is where a second pair of hands can help Be careful the wind doesn t blow this panel over if it s standing up Tip F F F F F F 14 13 6 Need some help Email us at sales backyardcatenclosures com au or phone 1300 440 453 Step 5 Step 6 ...

Page 8: ... it impossible to close the door Pieces Diagram Instructions Pieces Diagram Bolt together piece 18 19 and 20 using F bolts Instructions 18 15 16 17 15 16 17 Try laying the panels down to make this process easier Tip F F F F F F 19 20 18 19 20 F F F F 7 Need some help Email us at sales backyardcatenclosures com au or phone 1300 440 453 Step 7 Step 8 ...

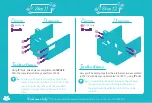
Page 9: ...EP one for STEP 10 Lay out pieces 21 22 23 exactly as per the diagram and bolt them together using E bolts Instructions 21 22 23 Front view of panel 21 22 23 E E E Ensure Piece 22 is orientated so these holes are in the upper left corner Tip Back view of panel E E E E E E E E E 24 25 23 24 25 Ensure Piece 25 is orientated so these holes are in the upper left corner Tip 8 Need some help Email us at...

Page 10: ... hands here One person will need to be holding the pieces together while the other person bolts each side together Tip F Bolts only Now is a good time to move these assembled pieces to the position where you re going to have your enclosure Once these pieces are bolted together it will get heavy and become hard to move Tip F F F F F F F F Pieces Diagram Pieces Diagram 9 Need some help Email us at s...

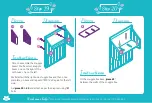
Page 11: ... Slide in tray piece 29 in the middle and tray pieces 30 on either side as they are shorter Now bolt in the front side panel you assembled in STEP 7 using E bolts Secure pieces 47 between the front panel and each side panel with B screws This will help to square up the cat house and can be used to hang toys from Instructions 26 27 D 27 26 26 x2 47 x2 30 x2 29 29 30 30 47 E E E B E E E 10 Need some...

Page 12: ...mall gaps along the top ridge line of the roof are OK as there is a roof cap coming in STEP 17 Instructions 31 32 31 32 A A A A A A A A Roof pieces 33 34 now get put on and bolted together using E bolts Then fasten with A screws as per diagram Instructions 33 34 E E E E A A A A 34 33 11 Need some help Email us at sales backyardcatenclosures com au or phone 1300 440 453 Note the wooden lugs sit out...

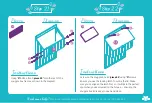
Page 13: ...uctions 35 37 Using B screws attach piece 38 the chimney door handle as shown in the diagram With the other piece 38 attach to the front door of the hutch with B screws Make sure your screws go in from the inside of the door Instructions 38 C 36 x2 C C C C C C C 37 36 35 x2 38 B B 12 Need some help Email us at sales backyardcatenclosures com au or phone 1300 440 453 Step 17 Step 18 ...

Page 14: ...ox base piece 42 between the walls of the snuggle box Instructions 42 40 36 We ll start with the right side snuggle box and then once complete go back and repeat STEPS 19 23 again for the left side Get piece 39 40 and attach as per the diagram using G bolts 39 40 G G G G 42 13 Need some help Email us at sales backyardcatenclosures com au or phone 1300 440 453 Step 19 Step 20 ...

Page 15: ...the latch first so it will be in the perfect spot when you ve screwed on the hinges ensuring the snuggle box lid is easy to open and close Instructions 44 36 Using G bolts attach piece 43 onto the rest of the snuggle box frame as shown in the diagram G G 43 G G 44 D x3 D x3 14 Need some help Email us at sales backyardcatenclosures com au or phone 1300 440 453 Step 21 Step 22 ...

Page 16: ...uchups or features you may want to add Instructions Using C screws attach the rain guard piece 46 You ve now completed the right side snuggle box Follow STEPS 19 23 again for the left side snuggle box 46 C C C C 15 Need some help Email us at sales backyardcatenclosures com au or phone 1300 440 453 Step 23 Step 24 ...

Page 17: ...ny other offers Item must be in stock on our website Photos must be high resolution and able to be shared online as per our customer photo guide available on our website Send us a picture of for use on any of our cat accessories Claws Cabin your cat in the andgeta10 discountcode TM Need some help Email us at sales backyardcatenclosures com au or phone 1300 440 453 16 ...

Page 18: ...accessories online checkoutourcat Click to see our range ...

Page 19: ... for your enclosure Great for naps and adventure Cat Hammocks Blocks 80 of harsh UV rays Reduces the inside temp by 11 C Helps keep out colder weather Shade Cloth Impact resistant Extremely lightweight High thermal insulation Insulated Roofing accessories range online ...

Page 20: ...issues setting up your enclosure or perhaps you have some kitty questions We re happy to help Get in touch with us call live chat or email us anytime Need a helping hand Backyardcatenclosures com au sales backyardcatenclosures com au 1300 440 453 ...

Reviews: