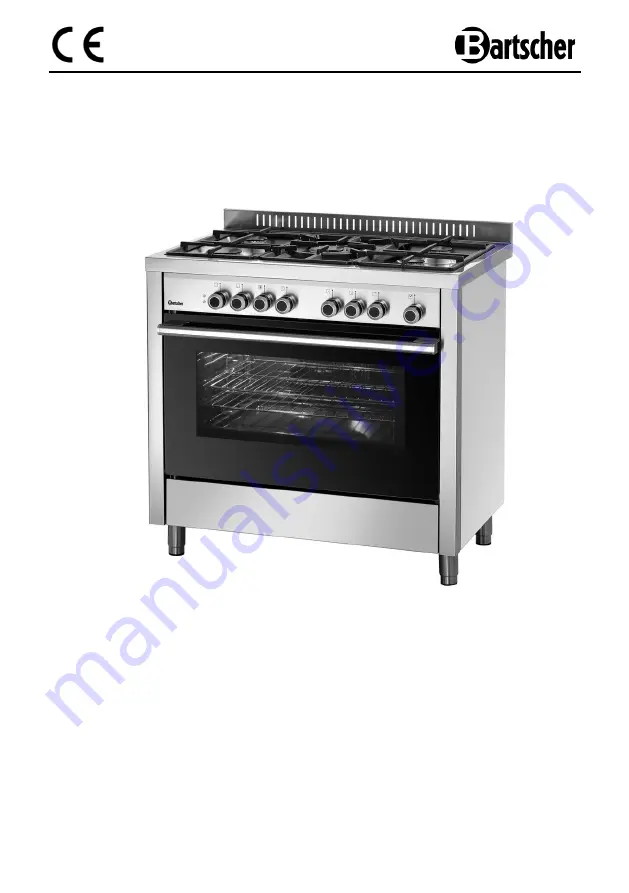
background image

0539CT02


BGH 600-520 


1519811


Original-Gebrauchsanleitung 

V1-1/1218 

Summary of Contents for BGH 600-520

Page 1: ...0539CT02 BGH 600 520 1519811 Original Gebrauchsanleitung V1 1 1218...

Page 2: ...4 Technical data 45 4 1 Overview of parts 45 4 2 Technical specification 46 5 Installation and operation 50 5 1 Installation instructions 50 5 1 1 Moving of the device 51 5 1 2 Location 51 5 1 3 Stabi...

Page 3: ...essible for anyone carrying out the installation servicing maintenance or cleaning Please keep these instructions and give them to future owners of the device 1 Safety This device is designed in accor...

Page 4: ...ldren with physical or mental disabilities insufficient experience and or insufficient knowledge unless such persons are under the care of a person responsible for their safety or have received instru...

Page 5: ...revent hazards and to ensure optimum efficiency no modifications or alterations to the device that are not explicitly approved by the manufacturer may be undertaken DANGER Electric shock hazard To avo...

Page 6: ...cations the electric shock hazard will occur Do not use any acid agents and make sure no water ingresses the device Never operate the device with moist hands or standing on wet floor Disconnect the de...

Page 7: ...m the outside of a given building Regularly control the tightness of the device Never use open flame for this purpose but only soapsuds leak detection agent During the operation of the device children...

Page 8: ...s e g curtains or wall cabinets Overheated fat and oil ignites very fast Therefore never leave the device unattended during the preparation of meals with fats or oils e g fries Never clean the applian...

Page 9: ...is used for its intended purpose and according to the instructions included in this manual Gas stove with multifunction oven is designed only for preparing appropriate dishes 1 4 Use against the inten...

Page 10: ...by violation of advice concerning operation and cleaning use other than designed alterations made by user use of inadequate spare parts We reserve the right to make technical changes for purposes of...

Page 11: ...er The outer and inner packing material should be removed completely from the device before installation If you liked to dispose the packing consider the regulations applicable in your country Supply...

Page 12: ...1 Hob 8 Height adjustable feet 4x 2 Control panel 9 Baking tray 1x 3 Oven light 10 Grilles 2x 4 Shelf guides 4x 11 Fan 5 Oven glazed doors 12 Body 6 Glass door handle 13 Gas burner 5x 7 Storage compa...

Page 13: ...Natural gas H high calorific 20 mbar Propane nozzles 50 mbar and natural gas nozzles L low calorific 20 mbar are enclosed Gas burners Single ring burner triple ring burner Type of ignition electronic...

Page 14: ...ight adjustable feet yes Height adjustable 850 x 900 mm Cast iron grilles Storage compartment under the oven W 660 x D 450 x H 120 mm Gas connected load 11 3 kW Oven connected load 2 495 kW 230 V 50 6...

Page 15: ...0 G31 20 28 30 37 DE Germany II2ELL3B P I2E G20 G20 20 20 DK Denmark II2H3B P G20 G30 G31 20 30 30 EE Estonia II2H3B P G20 G30 G31 20 30 30 ES Spain II2H3 G20 G30 G31 20 28 30 37 FI Finland II2H3B P G...

Page 16: ...1 20 30 30 20 30 30 SE Sweden II2H3B P G20 G30 G31 20 30 30 SI Slovenia II2H3 II2H3B P G20 G30 G31 G20 G30 G31 20 28 30 37 20 30 30 SK Slovakia II2H3 II2H3B P G20 G30 G31 G20 G30 G31 20 28 30 37 20 30...

Page 17: ...iple ring burner 130 Liquefied gas G30 G31 50 77 277 g h 3 80 1 80 28 30 37 98 Natural gas G20 20 137 363 dm h G25 152 421 dm h 5 Installation and operation 5 1 Installation instructions CAUTION Any i...

Page 18: ...es The installation place must be easily accessible and sufficiently spacious to allow easy operation of the appliance and good air circulation Never place the device directly next to walls furniture...

Page 19: ...the device forward install the rear stabilizer The required angles dowels and screws are supplied The oven protection wall is located at the rear of the device Carefully measure the H distance to the...

Page 20: ...th permanent ventilation which prevents the accumulation of exhaust products harmful to health The space where the device is to be installed must be of sufficient air capacity for the proper combustio...

Page 21: ...not use extension cords or power strips to avoid the risk of overheating and fire Locate the device so that the plug is easily accessible for the device to be quickly disconnected if the need arises...

Page 22: ...the pressure reduction connection must be directed to the outside the hose must not come into contact with hot surfaces of the device the rear or top of the device oven etc the gas bottle must not to...

Page 23: ...the burner remove the jet using a 7 mm wrench replace the removed jet with one appropriate for the type of gas Fig 11 see information for the type of gas and jets in the Jet and burner properties tabl...

Page 24: ...eck the flame Make sure that it still allows for correct heating of the thermocouple If not correct again the minimum flame setting After replacement of nozzles or other adjustments always make sure t...

Page 25: ...n accordance with the instructions given in 6 Cleaning and maintenance Before first use inspect the installation and stability of the device as well as the installations and connections to the gas and...

Page 26: ...ust the flame by turning the control knob only between the large and small flame and never between the large flame and OFF position o Fig 15 In case of an accidental flame loss e g draught spilled liq...

Page 27: ...he device The device should be inspected by a specialist every 6 months 5 2 3 Electric multifunction oven Before turning the oven on ensure only the required equipment for a particular cooking baking...

Page 28: ...the desired position The red oven operation indicator comes on immediately after setting one of the functions Fig 18 Oven light comes on after activating the oven control knob Oven light is on during...

Page 29: ...epends on the type and amount of food preferences and experience Cooking time can be set within a range of 5 55 minutes by turning the time dial clockwise to the desired condition After the time has e...

Page 30: ...ooking baking results 6 Cleaning and maintenance WARNING Before cleaning set the gas control knobs in 0 position and close the main gas valve Set all oven control knobs in o position and disconnect th...

Page 31: ...ying attention not to leave any cleaning agent residues Then dry the oven changer and shelf guides o Do not use any abrasive clothes or other products which may damage the oven surface Oven glazed doo...

Page 32: ...of the oven glazed doors pull out the inner pane by pulling it towards you Fig 22 o Clean the inner pane of the oven glazed doors with a soft most cloth and a mild cleaning agent Do not use any abrasi...

Page 33: ...at the lowest flame level o Inspect the tightness of the gas installation s seals o Regularly check whether the gas burner caps are lying flat and correctly on burner crowns Holes in gas burner crowns...

Page 34: ...rom the rating plate on the back wall of the appliance o If the lighting inside the oven does not work replace the oven light bulb in the following way Make sure the device is disconnected from the po...

Page 35: ...the device at the dedicated local collection point separately from household waste NOTE Electric devices should be used and disposed of properly to prevent the impact on the environment Disconnect the...

Reviews: