background image


1,  1.5,    2.2, and 3 kVA 

Intelligent True On-Line UPS 

  For Corporate and IT Users 


User Manual 


Summary of Contents for BBP-AR-1000RM-PSW-ONL

Page 1: ...1 1 5 2 2 and 3 kVA Intelligent True On Line UPS For Corporate and IT Users User Manual...

Page 2: ...planation 14 4 Installation and Operation 15 4 1 Unpacking 15 4 2 Selecting Installation Position 18 4 3 Operation 19 5 UPS System Block Diagram 33 6 Maintenance Guide 34 6 1 Troubleshooting 34 6 2 Er...

Page 3: ...e check that the ground wire of the UPS is properly grounded before connecting the UPS to the AC mains 6 This UPS is designed to be installed and commissioned in a sheltered controlled environment as...

Page 4: ...s 16 Make sure that the AC utility outlet is correctly grounded 17 Install the UPS away from objects that give off excessive heat and areas that are excessively wet 18 The battery will discharge natur...

Page 5: ...cal shock and high short circuit current The following precautions should be observed when working on batteries 1 Remove watches rings or other metal objects 2 Use tools with insulated handles 3 Wear...

Page 6: ...stored in a moderate climate The batteries should be charged for 12 hours every three months by connecting the UPS to the utility supply and switching on the input breaker located on the UPS rear pane...

Page 7: ...friendly plug and play design allows hassle free installation 5 Built in maintenance free sealed batteries minimize the need for after sales service 6 To protect the unit from overloading the UPS will...

Page 8: ...ven during power outages 5 Our smart battery management system extends the batteries life span 6 Our Active Power Factor Correction control function constantly maintains the UPS input power factor at...

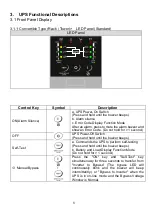
Page 9: ...Code Do not hold for 1 second OFF UPS Power Off Switch Press and hold until the buzzer beeps Self Test a Commands the UPS to perform self testing Press and hold until the buzzer beeps b Battery and L...

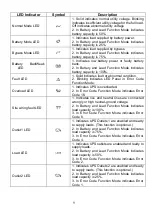
Page 10: ...on Mode Overload LED 1 Indicates UPS is overloaded 2 In Error Code Function Mode indicates Error Code 16 Site wiring fault LED 1 Indicates live and neutral lines are connected wrongly or high neutral...

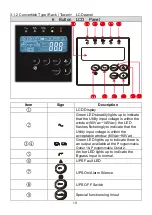
Page 11: ...window 90Vac 145Vac the LED flashes flickeringly to indicate that the Utility input voltage is within the acceptable window 60Vac 90Vac Green LED lights up to indicate there is an output available at...

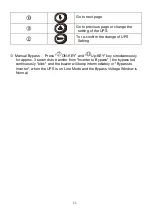
Page 12: ...e of UPS Setting Manual Bypass Press ON KEY and Up KEY key simultaneously for approx 3 seconds to transfer from Inverter to Bypass the bypass led continuously blink and the buzzer will beep intermedia...

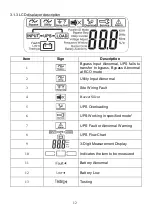
Page 13: ...ypass Bypass Abnormal at ECO mode 2 Utility Input Abnormal 3 Site Wiring Fault 4 Buzzer Silent 5 UPS Overloading 6 UPS Working in specified mode 7 UPS Fault or Abnormal Warning 8 UPS Flow Chart 9 3 Di...

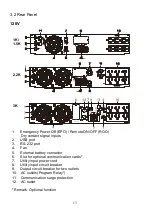
Page 14: ...3 RS 232 port 4 Fan 5 External battery connector 6 Slot for optional communication cards 7 Utility input power cord 8 Utility input circuit breaker 9 Output circuit breaker for two outlets 10 AC outle...

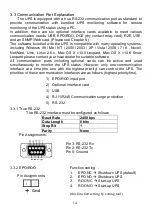
Page 15: ...ontact your local dealer for suitable software All communication ports including optional cards can be active and used simultaneously to monitor the UPS status However only one communication interface...

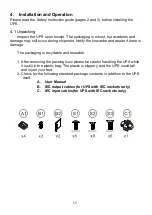
Page 16: ...orwarder and dealer if there is damage The packaging is recyclable and reusable 1 After removing the packing foam please be careful handling the UPS while it is still in the plastic bag The plastic is...

Page 17: ...16 4 1 1 Installation Instructions Tower installation Rack Mount installation Step 1 Step 2...

Page 18: ...17 Step 3...

Page 19: ...ents 1 Keep at least 20 cm 8 inches of clearance beyond the rear panel of the UPS 2 Do not block the air flow to the ventilation louvers of the unit 3 Ensure that the installation site is free from ex...

Page 20: ...loads to the UPS to ensure that the batteries are working properly To do this switch off the AC power source when the UPS is on The LED on the front panel display will turn off the LED will shine and...

Page 21: ...to the outlets The LEDs will turn off and the ventilating fans will stop after ten seconds and the BUS discharge is below 42 V The UPS is now completely shut down 4 3 1 4 Self Testing in AC Mode After...

Page 22: ...pinning Full LCD display looks as below figure 5 Press UPS button and hold untill twice beep heard UPS begins starting procedures for 5 seconds LCD display will show as below figure A and then figure...

Page 23: ...ilable or external battery set well connected to UPS Press and hold key for 3 seconds until twice beeps heard release button and press for 3 seconds until twice beeps heard again to confirm cold start...

Page 24: ...ing select key The display sequence are as below figure F AC input voltage figure G AC input frequency figure H UPS output voltage figure I UPS output frequency figure J UPS loading percentage figure...

Page 25: ...24 J K L M...

Page 26: ...zzer Code The procedures to release UPS from locked up status are as below a Check and record the error code b Check user s manual to understand possible cause solve the problem or call service provid...

Page 27: ...ey to scroll through the UPS settings The LCD will display in sequence figure Q1 buzzer figure R1 Self test figure S1 Bypass Voltage Windows figure T Output Frequency Synchronization Window figure U I...

Page 28: ...27 S1 Bypass Voltage is adjusted to wide range S2 Bypass Voltage is adjusted to narrow range T Frequency Window is 3 Hz U inverter output voltage...

Page 29: ...28 V1 The UPS is operating in normal mode...

Page 30: ...Output Voltage Adjustment 3 2 1 0 1 2 3 4 3 2 6 Press the scroll up key to execute special functions The functions include buzzer ON as in figure Q1 buzzer OFF as in figure Q2 Alarm silence for UPS W...

Page 31: ...put acceptable window It follows the inverter output voltage Please refer specification for the detail 4 3 3 5 Figure T indicates the bypass frequency window of the Inverter Output The acceptable sett...

Page 32: ...e after output is off otherwise it will be shutdown completely 2 Backup mode AC input not available Press Off key and hold until twice beeps heard UPS output will shut off 10 seconds later fan stop sp...

Page 33: ...n UPS statuses with their beep codes UPS Status Beep Code UPS faulty Inverter shut down All functions inhibited Long Continuous Beep Control keypad error Long Continuous Beep UPS faulty loads continue...

Page 34: ...ons Utility Condition UPS Operating Mode LEDs Normal Working power starts after approximately 5 seconds LEDs on the panel will blink and fans will start Press the ON button for 1 5 seconds The UPS sta...

Page 35: ...to provide DC backup Otherwise consult your local dealer right away 2 Overload 2 Disconnect some non critical loads from the UPS output until the overload ceases Check if there is any short circuit be...

Page 36: ...vice is turned on or the UPS switches back and forth between battery and utility modes 1 A power strip is connected to the UPS See if there is any damage to the utility wall receptacle or if the cord...

Page 37: ...8 and 16 are represented by the four bar LEDs 25 50 75 and 100 and the Overload LED Each LED represents a number as shown in the figure below For example the figure below shows the 25 50 and 100 bar...

Page 38: ...EPO mode Er11 UPS over temperature Er12 Inverter overload Er14 Fan errors Er39 When UPS start process Utility Voltage less than 90V and Battery no connection Er28 Bypass overload 6 3 Maintenance 1 Cle...

Page 39: ...connector or a USB cable to the UPS communication port Connect the female RS 232 connector or the other end of the USB cable to the computer Note RS 232 and USB cables are optional 7 1 1 USB The USB c...

Page 40: ...39 Please refer to the software user s manual...

Page 41: ...DB9 8 1 2 For interface settings and pin assignments please refer to section 3 3 1 8 1 3 Installation Position Optional Slot 8 2 USE USB card 8 2 1 CN1 is for USB 8 2 2 For the communicaiton protocol...

Page 42: ...tivated after 6 25 VDC is applied between pin 9 and pin 10 for 5 seconds 8 3 3 The capacity of each relay contact is 40 VDC 25 mA 8 3 4 Installation Position Optional Slot 8 3 5 Flexible signal output...

Page 43: ...42 8 4 SNMP Cards 8 4 1 Megatec SNMP card 8 4 1 1 For installation please refer to the user s manual that came with the card 8 4 1 2 Installation Position Optional slot on rear panel...

Page 44: ...V adjustable to 100 110 115 120 Voltage Regulation Static within 1 until low battery warning Frequency Synchronized Range 3 Hz or 1 Hz selectable Frequency Battery Mode 50 60 Hz 0 2 unless synchronize...

Page 45: ...min 3 min 3 min 3 min 3min Charger Charge Current Max Standard 1 8 A 1 8 A 1 6A 1 6A 1 4 A Supplementary Charger Max Optional 3 1A 3 1A 3 1A 3 1A 3 1A Recharge time to 90 4hr 4hr 4hr 4hr 4hr Floating...

Page 46: ...dB Relative Humidity 0 90 without condensation Interface Standard RS 232 USB Port EPO ROO RJ11 RJ45 Surge Protection UPS Bundled UPSilon2000 Software Option 2ndRS 232 RS485 Dry Contact Closure Mega SN...

Reviews: