background image


BC201 User manual 

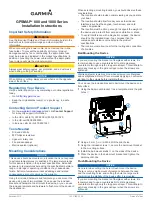
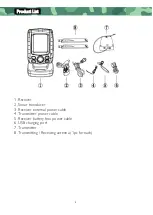
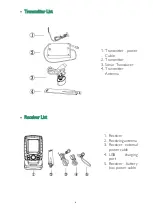
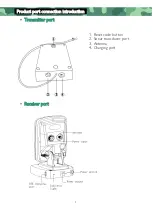
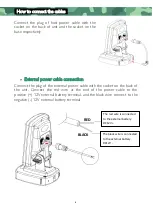
Summary of Contents for BC201

Page 1: ...BC201 User manual ...

Page 2: ...NG PORT INTRODUCTION 9 KEY FUNCTIONS 10 POWER ON OFF 10 DISPLAY VIEW 11 SONAR ZOOM VIEW 11 STOP CHART 12 SONAR VIEW 12 ACCESSING MENU FEATURES 13 SONAR 13 o Sensitivity 13 o Depth Range 14 o Upper and Lower Limit 14 o Fish Symbols Depth 15 o Depth Cursor 15 o Simulator 16 SETUP 16 o Backlight 16 o Volume 16 o Units 16 o Chart Speed 17 o Fish Alarm 17 o Depth Alarm 17 o Battery Alarm 18 o Transpare...

Page 3: ...this fish finder is the ideal tool to bring the fish to you How Does Sonar Work Sonar technology is based on sound waves The system uses sonar to locate and define the structure bottom contour and composition as well as depth directly below the transducer The transducer sends a sound wave signal and determines distance by measuring the time between the transmission of the sound wave and when the s...

Page 4: ...een Back Lighting White LED Power Input Receiver DC 12V Power Input Launcher DC 12V Detect Angle 20 60 Sonar Frequency 83KHz 200KHz Radio Frequency 433 92MHz Radio Range Max 800m 2600ft Depth Range Min 0 6m 2ft Depth Range Max 80m 240ft Operational Temperature 20 70 C ...

Page 5: ... Fish situation and depth alarm Kell offset Zoom in on display of bottom tracking Kell offset setting Automatic depth range Noise Rejection 100 level sensitivity setting Automatic and manual selection of depth range Auto zoom and quick manual zoom Measurement unit can be set to meters or feet User selectable sonar chart mode ...

Page 6: ...t List 1 Receiver 2 Sonar transducer 3 Receiver external power cable 4 Transmitter power cable 5 Receiver battery box power cable 6 USB charging port 7 Transmitter 8 Transmitting Receiving antenna 1pc for each ...

Page 7: ...ist 1 Transmitter power Cable 2 Transmitter 3 Sonar Transducer 4 Transmitter Antenna Receiver List 1 Receiver 2 Receiving antenna 3 Receiver external power cable 4 USB charging port 5 Receiver battery box power cable ...

Page 8: ...7 Product port connection introduction Transmitter port 1 Reset code button 2 Sonar transducer port 3 Antenna 4 Charging port Receiver port ...

Page 9: ...the plug of the external power cable with the socket on the back of the unit Connect the red wire at the end of the power cable to the positive 12V external battery terminal and the black wire connect to the negative 12V external battery terminal Key Function RED BLACK The red wire is connected to the external battery DC12V The black wire is connected to the external battery DC12V ...

Page 10: ...9 Connect the antenna Install the antenna plug into the antenna pedestal on the back of the unit and tighten it Charging port introduction ...

Page 11: ...s displayed first After a few seconds the unit starts to work Loading Press and hold Power Key until the Shutdown Page is displayed release the Power Key to power Off Shutdown Automatic power off feature The display will shut off automatically when the depth display reads continuously for 5 minutes ...

Page 12: ...s working you can press the Zoom Key to manually enlarge the bottom signal in the main screen 2x Press it again and screen will return to the normal operation In the Sonar Zoom View the display is split to show the full range view on the right and the zoomed view on the left The full range view on the right also contains the Zoom Preview Box that shows what part of the full range view is shown in ...

Page 13: ...Power Key to stop the screen chart in the main screen then press the Power Key again and the screen chart will be recovered Sonar View When the unit starts working you can press the View Esc key to switch between different frequencies 200KHz 83KHz Stop Chart Icon ...

Page 14: ... press the Esc Key to return to the top to close menu system Sonar o Sensitivity Settings Auto 1 to 100 Sensitivity controls the unit s ability to pick up echoes If you want to see more details try increasing the sensitivity a little at a time There are situations when too much clutter appears on the screen Decreasing the sensitivity can reduce the clutter and show the strongest fish echoes if fis...

Page 15: ... a specific setting Please Note In manual operation if the depth is greater than the depth range setting the bottom will not be visible on the screen You can select Auto to return to automatic operation o Upper and Lower Limit Settings 0ft to 231ft 0m to 70m Settings 9ft to 240ft 3m to 80m Changing the upper and lower limits gives you far greater control over the depth range This feature lets you ...

Page 16: ...es There are several fish symbol sizes These are used to designate the relative size between targets Please Note The sonar s microcomputer is sophisticated but it can be fooled It can t distinguish between fish and other suspended objects such as trotlines submerged floats air bubbles etc o Depth Cursor Settings On Off The depth cursor consists of a horizontal line with a digital depth box on the ...

Page 17: ...e on screen when Simulator is set to On Setup o Backlight Settings Off 30 60 100 User can switch the Front light or adjust the brightness as needed Please Note Continuous Front light operation significantly decreases battery life of the unit o Volume Settings High Medium Low Volume setting allows you to adjust the Alarm Volume so that you can select the tone that you can hear best o Units Settings...

Page 18: ...ff for no fish alarm Or select one of the following symbols to set the alarm 1 Large Fish Only 2 Large Medium Fish Only 3 All Fish o Depth Alarm Settings Off 1ft to 99ft 1m to 30m The Depth Alarms make a sound and the Depth Alarm Indicator will blink when the bottom signal goes shallower than the Depth Alarm s setting ...

Page 19: ...tery Voltage Readout will blink when the input battery voltage is equal to or less than the menu setting o Transparency Settings 0 to 70 Transparency setting allows you to change the transparency of the dialog boxes so you can see through the dialog box Transparency 70 Transparency 0 ...

Page 20: ...he waterline Enter a negative vertical measurement from the transducer to keel to read the depth from the keel o Sonar Chart Mode Settings White Background Blue Background Gray Scale You can change the Sonar Chart Mode to suit your viewing preferences o Surface Clarity Settings Off High Medium Low Surface Clarity adjusts the filter that removes surface clutter noise caused by algae and aeration Th...

Page 21: ...ost conditions If you have high noise levels try using the High setting However if you are having trouble with noise we suggest that you take steps to find the interference source and fix it rather than continually using the unit on the high setting o Language Language selects the display language for menus There are the following languages available English Russian French Japanese Finnish Polish ...

Page 22: ...eps 2 Transmitter then check the transmitter you will see a green button on the transmitter see the picture keep pressing the green button then connect the power supply to the transmitter After this the receiver will be powered off automatically In this condition you can release your hand from the green button and disconnect power supply from the transmitter The product can be used normally when y...

Reviews: