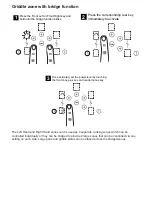
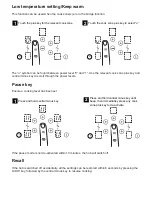
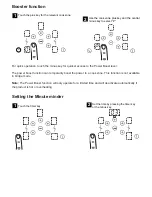
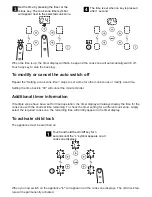
background image

USER

GUIDE

A commitment to: 

Belling 100/110 Ei Range

Part Number:  083596201       Date: 11/08/16

Summary of Contents for 100 EI

Page 1: ...USER GUIDE A commitment to Belling 100 110 Ei Range Part Number 083596201 Date 11 08 16 ...

Page 2: ...ss supplied To register your appliance online www belling co uk Your new appliance comes with our 12 month guarantee protecting you against electrical and mechanical breakdown To register please complete the registration form included register online or by phone For full terms conditions of the manufacturer s guarantee please refer to the web site above In addition you may wish to purchase an exte...

Page 3: ...t wheeled bin symbol This indicates for disposal purposes at end of life that these products must be taken to a recognized collection points such as local authority sites local recycling centres This appliance Complies with European Community Directives CE for household and similar electrical appliances and Gas appliances where applicable This appliance conforms to European Directive regarding Eco...

Page 4: ...y with the appliance Cleaning and user maintenance shall not be made by children without supervision Do not use harsh abrasive cleaners or sharp metal scrapers to clean the oven door glass since they can scratch the surface which may result in shattering of the glass Do not use a steam cleaner on any cooking range hob or oven appliance Metallic objects such a knives forks spoons and lids should no...

Page 5: ... fire in the kitchen don t take any risks get everyone out of your home and call the Fire Brigade If you have an electrical fire in the kitchen Pull the plug out or switch off the power at the fuse box this may be enough to stop the fire imme diately Smother the fire with a fire blanket or use a dry powder or carbon dioxide extinguisher Remember never use water on an electrical or cooking oil fire...

Page 6: ...ct Note Your appliance layout may differ depending on the model Hob Left hand rear Left hand front Right hand rear Right hand front Centre Minus key On Off key Cook zones Bridge symbol Bridge symbol Cook zones Cook zones Cook zones Timer Cook zones ...

Page 7: ...lling Do not try to slow cook using any of the other oven functions Defrost Fanned Oven Base Heat Lights only Conventional Grill Conventional Oven Oven Selector Control Base Heat with fan Intense Baking Low Grill Single Grill Top Heat Dual Grill Fanned Grill S Slow Cook Clock Programmer Thermostat indicator Thermostat indicator Top oven only Oven Grill controls Top oven Grill or Grill Oven Oven ...

Page 8: ...he selected temperature is reached When the Top oven grill or grill is switched on the cooling fans comes on to keep the fascia and control knobs cool during cooking grilling The cooling fans may operate when the main ovens are in use depending on the temperature setting The fans may continue to operate for a period after the oven grill has been switched off During use the fan may cycle on and off...

Page 9: ...N WHEN THE GRILL IS USED FOR CONVENTIONAL GRILLING Grill pan trivet and detachable grill pan handle The grill trivet inside the grill pan can be inverted to give a high or low position or it may be removed The speed of grilling can be controlled by selecting a higher or lower shelf position or adjusting the grill setting Inverted ...

Page 10: ...pper stainless steel aluminium glass ceramic terra cotta Booster function The booster function temporarily increases the power to a cook zone allowing for a faster heat up time It will deactivate automatically after 10 minutes or if a lower power level is selected Bridge function Individual cook zones can be bridged or joined together to create a larger single controlled cook zone By bridging the ...

Page 11: ... by vibration due to the passage of energy from the hob to the pan Switching the appliance On Off 1 Press and hold the On Off key to activate the appliance 2 Press and hold the On Off key to deactivate the appliance If within 20 seconds no action zone or timer selection takes place the hob will automatically switch off Switching a cook zone On Off 1 Touch the plus key for the relevant cook zone 2 ...

Page 12: ...e 3 Once activated set the power level by touching the front zone plus key and central minus key The Left Hand and Right Hand zones can be used as 4 separate cooking zones which can be controlled individually or they can be bridged to provide 2 large zones that can be controlled via one setting on each side Large pans and griddle plates can be placed across the bridged zones ...

Page 13: ...entral minus key to scroll through the power levels Pause key Ensure a cooking level has been set 1 Press and hold central minus key 2 Press and hold central minus key until beep then immediatley press any cook zone plus key to de activate If the pause mode is not de activated within 10 minutes the hob will switch off Recall If the hob is switched off accidentally all the settings can be restored ...

Page 14: ...ss to the Power Boost level The power boost function can temporarily boost the power to a cook zone This function is not available in bridge mode Note The Power Boost function will only operate for a limited time and will deactivate automatically if the product is hot or overheating Setting the Minute minder 1 Touch the timer key 2 Set the time by pressing the timer key or the minus key ...

Page 15: ...is up Touch any key to stop the beeping The maximum time that can be set is 99 minutes To modify or cancel the Minute minder Repeat Setting the Minute minder steps to modify the timer Setting the time back to 00 will cancel the minute minder Timer auto switch off Ensure power level is already set before selecting a cook zone to be timed 1 Touch the cook zone plus key 2 Touch the timer key ...

Page 16: ...e time back to 00 will cancel the minute minder Additional timer information If multiple zones have been set for timed operation the timer display will always display the time for the cook zone with the shortest time remaining To check the timer setting for a different cook zone simply select the required cook zone the remaining time will briefly appear in the timer display To activate child lock ...

Page 17: ...Once the child lock is deactivated the appliance can continued to be used Auto stand by The hob will automatically switch off if left with pan on for an extended period of time see maximum running times below Power Level Maximum Operation Time hours 1 8 2 6 3 5 4 5 5 4 6 1 5 7 1 5 8 1 5 9 1 5 P Power Boost 5 minutes ...

Page 18: ...ce Check installation allows for free air flow clean cooling fan inlets on the underside of the hob E3 Water or pans on the glass above the user controls Clean any water on the surface above user controls display E6 Mains power disturbance Supply to appliance must be checked Contact electrician E H Temperature sensor issue Allow system to cool ...

Page 19: ... Max adjustable minute minder Max adjustable cooking time Display hours minutes Display minutes seconds Using the touch controls Menu Scroll through to select a function Plus Increase time or volume Minus Decrease time or volume When a function is selected and the time or volume is set the chosen function will automatically start seven seconds after setting Manual Mode If the programmer is not in ...

Page 20: ...s or minus buttons to set a time Once set the minute minder will start to countdown in steps of seconds The display will show the minute minder symbol and the remaining time The countdown will continue in the background if other functions are being set When the set time for the minute minder has completed an alarm is heard and the minute minder symbol will flash on the display Press any button to ...

Page 21: ...e plus or minus buttons to set a time Once set the automatic mode auto cooking symbol and the time of day is displayed When cooking is completed an alarm is heard and the manual mode symbol flashes on the display Press the Menu button to stop the alarm and then the time of day will then be displayed Pressing the Menu button again will return to manual mode To modify or cancel the cooking time Retu...

Page 22: ...and temperature have been set The appliance will not be switched on until the set cooking start time that is the difference between the cooking end time and the cooking duration When cooking is completed an alarm is heard and manual mode symbol flashes on the display Press the menu button to stop the alarm Pressing the Menu button again will return to manual mode To modify or cancel the end of coo...

Page 23: ...ce the Key lock is active the buttons will be inactive A two beep signal will be heard if the buttons are pressed To deactivate the Key lock Press and hold the plus button for 3 5 seconds The Key lock symbol will disappear and the appliance can continue to be used Note In case of main power loss for a short time about 1 5 minutes timer maintains its status Key lock status and buzzer tone are memor...

Page 24: ...opic positions if fitted Standard shelves Front of appliance 2 Ensure the shelf is fully pushed back towards the back of the oven until the shelf stopper is reached Slightly raise the shelf and insert in the chosen shelf position 1 ...

Page 25: ...ranty Additional features Plate rack if supplied 1 Pull the shelf out of the cavity 2 Tilt the plate warmer towards you and make sure that it hooks underneath the shelf bars at the front 3 Drop the plate warmer carefully into position The plate warmer is now secure and you can place your plates into it Always make sure that you use oven gloves if you are putting the plate warmer into a hot or rece...

Page 26: ...ANT TO CLEAN YOUR APPLIANCE REGULARLY AS A BUILD UP OF FAT CAN AFFECT IT S PERFORMANCE OR DAMAGE IT AND MAY INVALIDATE YOUR GUARANTEE IN ADDITION TO THE ABOVE DO NOT USE METAL SCRAPERS TO CLEAN THE OVEN DOOR GLASS Undiluted bleaches Chloride products Warm soapy water Wipe with damp cloth Dry with a soft cloth Clean wrung out cloth Wire Wool Abrasive cleaners Nylon pads Steam cleaners Do not place ...

Page 27: ...Please keep this handbook for future reference or for anyone else who may use the appliance ...

Page 28: ...2 3 3 0 Maximum load 7 5kW Hob top Ovens Electrical supply load Electrical supply Oven Load kW 240v Conventional 2 07 Fanned 2 00 Single variable grill if fitted 1 85 Dual grill if fitted 2 70 Conventional top if fitted 1 39 Oven Lamps Fans Lamps 25W each Cooling fans 10W each Oven stir fan 30W each Electrical supply load Appliance type Electrical supply Max load kW Single grill models 240v 50 Hz ...

Reviews: