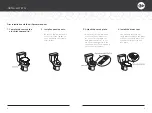
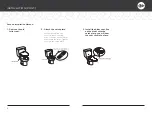
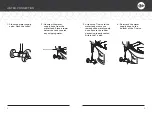
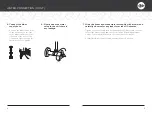
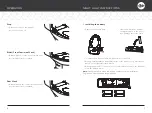
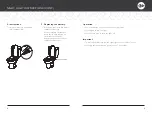
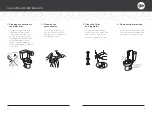
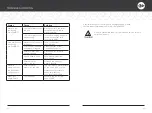
background image

OWNER’S MANUAL

Manual del Propietario

HD-5000

BIDET SEAT

Summary of Contents for bioBidet HD-5000

Page 1: ...OWNER S MANUAL Manual del Propietario HD 5000 BIDET SEAT ...

Page 2: ...ct Diagram 5 PRODUCT INSTALLATION Pre Installation 6 Installation 8 Water Connection 12 Operation 16 Night Light Instructions 17 PRODUCT MAINTENANCE Cleaning Maintenance 20 Troubleshooting 22 Specifications 24 WARRANTY Warranty 25 TABLE OF CONTENTS ...

Page 3: ...E There are two methods for installation The recommended way is using the rubber expansion nuts The second option is using the butterfly nuts Please select the option best suited for your specific installation needs T valve and rubber gasket Bidet Supply Hose ...

Page 4: ...instructed 2 The water shutoff valve should be near where the product is installed Pre Installation 1 Insert the mounting bolts into the rectangular steel mounting brackets 2 Insert the mounting bolts with the brackets into the catch plate 3 Example of how the bolts fit through the mounting brackets and how they are placed onto the catch plate and secured to the toilet ...

Page 5: ...ng bolts and adjust the pieces to line up the mounting bolts to the expansion nuts Then tighten to secure the catch plate Line up the bidet with the catch plate then push the bidet seat onto the catch plate You will hear the bidet seat click into place Be sure to firmly press down so the top of the expansion nut is flush with the ceramic toilet surface First Installation Method Recommended INSTALL...

Page 6: ...the catch plate 3 Install the bidet seat line up the bidet with the catch plate you will hear the seat click into place Put the catch plate over the toilet seat mounting holes Screw on the nuts from underneath the toilet Tighten to secure the catch plate INSTALLATION CONT ...

Page 7: ...supply hose from the water tank Place a towel below the tank to catch any dripping water 3 Attach the T valve to the water tank where you removed the water supply hose Ensure the rubber gasket is properly seated within the T valve 4 Re attach the water supply hose to the bottom of the T valve ...

Page 8: ... 6 Slowly open the water valve to check if there is any leakage Tighten any connectors gently until leakage stops If any leaks continue turn off the water supply and check older hoses for damaged rubber o rings Teflon tape may be used on connections to help seal Contact Bio Bidet support if additional assistance is needed 7 Wipe the hoses and connectors thoroughly with a towel and carefully observ...

Page 9: ...the battery Remove the battery pack Insert 4AA batteries and put the battery pack in the control box Replace the cover firmly To ensure the proper polarity AA batteries must be used During initial installation and replacement of the batteries you must install based on the figure provided above During long periods of non use it is recommended to remove the batteries from the battery pack Note Pleas...

Page 10: ...eplacing the battery press the release button on the bidet then remove Repeat the previous steps to replace the batteries Press the button once to activate the night light Press again to dim the light Press a third time to turn the light off To prolong the battery life the night light turns off after 7 hours Pressing the power button will reset the 7 hour timer Operation Important ...

Page 11: ... polishing agent bleach or chlorine Pull out the nozzle softly and use a smooth cloth sponge or soft toothbrush to clean the nozzle Turn off the water supply remove the white water hose and clean the filter screen Clean the regulator o ring Close the cover Push and hold the release button and pull the bidet seat forward as shown 2 Cleaning the spray nozzles 3 Clean the filter and regulator 4 Remov...

Page 12: ...Filter of water inlet hose is clogged Clean the filter of water inlet hose Nozzle head is stuck Take off and clean the nozzle head External water pressure is low Increase the external water pressure Water is dropping from the bowl when using the unit External water pressure is too high The maximum water pressure of the unit is 110 PSI If the water supply pressure is above this contact your local w...

Page 13: ...ered in normal use of our product and does not apply in the following cases 1 Loss of or damage to your product due to abuse misuse tampering mishandling improper packaging by you alteration and failure to following operating instructions 2 Use of parts supplies other than those by Bio Bidet Innovation LLC s dealers that cause damage to your product 3 Replacement of discolored or stained parts cau...

Page 14: ...l damages caused by the use or misuse of or in ability to use Bio Bidet Innovation LLC regardless of the possibility and foresee ability of such damages In no event shall recovery of any kind against Bio Bidet Innovation LLC be greater in amount than the purchase price of the product and causing the alleged damage Without limiting the foregoing you assume all risk and liability for loss damage or ...

Page 15: ...Español ...

Page 16: ...ducto 33 INSTALACION DEL PRODUCTO Preinstalación 34 Instalación 36 Conexión de agua 42 Operación 44 Instrucciones para la luz nocturna 45 MANTENIMIENTO DEL PRODUCTO Limpieza y mantenimiento 48 Solución de problemas 50 Especificaciones 52 GARANTÍA Garantía 53 TABLA DE CONTENIDO ...

Page 17: ...Paquete de baterías Entrada de agua metálica a la izquierda Pestaña de liberación del asiento Control de luz nocturna y compartimento para batería Tapa Palanca de control Conector de válvula en T suministrado Manguera de suministro de bidet incluida Manguera de suministro de agua Válvula de cierre Asiento Boquilla rociadora de lavado frontal bidet Boquilla de rociado de lavado trasero 2 pernos de ...

Page 18: ... La válvula de cierre de agua debe estar cerca de donde está instalado el producto Preinstalación 1 Inserte los pernos de montaje en los soportes de montaje de acero rectangulares 2 Inserte los pernos de montaje con los soportes en la placa de retención 3 Ejemplo de cómo encajan los pernos a través de los soportes de montaje y cómo se colocan en la placa de retención y se aseguran al sanitario ...

Page 19: ... de expansión Luego apriete para asegurar la placa de retención Alinee el bidet con la placa de retención y luego empuje el asiento del bidet hacia la placa de retención Escuchará que el asiento del bidet encaja en su lugar Asegúrese de presionar firmemente hacia abajo para que la parte superior de la tuerca de expansión quede al ras con la superficie de cerámica del inodoro Primer método de insta...

Page 20: ...tención escuchará que el asiento encaja en su lugar Ponga la placa de retención en los orificios de montaje del asiento sanitario Atornille las tuercas de debajo del sanitario Apriete para asegurar la placa de retención INSTALACIîN CONTINUACIîN Asiento sanitario viejo Mantenga este lado con el FRENTE hacia arriba placa de retención Ranuras debajo del asiento del bidet ...

Page 21: ...e una toalla debajo del tanque para recoger el agua que gotea 3 Conecte la válvula en T al tanque de agua donde quitó la manguera de suministro de agua Asegúrese de que la junta de goma esté asentada correctamente dentro de la válvula en T 4 Vuelva a conectar la manguera de suministro de agua a la parte inferior de la válvula en T Desatornille para quitar ...

Page 22: ...ente la válvula de agua para comprobar si hay alguna fuga Apriete los conectores suavemente hasta que se detenga la fuga Si continúan las fugas cierre el suministro de agua y compruebe que las mangueras antiguas no tengan juntas de goma dañadas Se puede usar cinta de teflón en las conexiones para ayudar a sellar Comuníquese con el soporte de Bio Bidet si necesita ayuda adicional 7 Limpie las mangu...

Page 23: ...n de la batería Retire la batería Inserte 4 baterías AA y coloque el paquete de baterías en la caja de control Vuelva a colocar la tapa firmemente Para garantizar la polaridad adecuada se deben utilizar pilas AA Durante la instalación inicial y el reemplazo de las baterías debe instalarlas según la figura proporcionada anteriormente Durante largos períodos de inactividad se recomienda retirar las ...

Page 24: ...beración en el bidet luego retírelo Repita los pasos anteriores para reemplazar las baterías Presione el botón una vez para activar la luz nocturna Presione nuevamente para atenuar la luz Presione una tercera vez para apagar la luz Para prolongar la vida útil de la batería la luz nocturna se apaga después de 7 horas Al presionar el botón de encendido se reiniciará el temporizador de 7 horas Operac...

Page 25: ...de dientes suave para limpiar la boquilla Cierre el suministro de agua retire la manguera de agua blanca y limpie la rejilla del filtro Limpiar la junta del regulador Cierre la tapa Mantenga presionado el botón de liberación y jale el asiento del bidet hacia adelante como se muestra 2 Limpieza de las boquillas de pulverización 3 Limpie el filtro y regulador 4 Retire el cuerpo principal LIMPIEZA Y ...

Page 26: ...agua está obstruido Limpiar el filtro de agua manguera de entrada El cabezal de la boquilla está atascado Quite y limpie la cabeza de la boquilla Agua externa la presión es baja Aumentar la presión externa de agua El agua cae del recipiente cuando se utiliza la unidad La presión del agua externa es demasiado alta La presión máxima de agua de la unidad es 110 PSI Si la presión del suministro de agu...

Page 27: ...idet Innovation LLC que causen daños a su producto 3 Reemplazo de piezas descoloridas o manchadas causadas por cloro lejía amoníaco u otros productos químicos suministros de limpieza oxidación desgaste normal 4 Daño o mal funcionamiento de la unidad como resultado de instalación negligente 5 Todos y cada uno de los daños a la plomería paredes pisos cielo raso y propiedades personales que resulten ...

Page 28: ... ingresos o espaciamientos inconvenientes gastos por equipos o servicios sustitutos o cualquier otro daño especial incidental o consecuente causado por el uso o mal uso de Bio Bidet Innovation LLC o la capacidad de usarlo independientemente de la posibilidad y capacidad de previsión de tales daños En ningún caso la recuperación de ningún tipo contra Bio Bidet Innovation LLC será mayor en monto al ...

Page 29: ...Gracias Soporte técnico Servicio al cliente 7900 S Route 31 Crystal Lake IL 60014 T 847 458 2334 U S TOLL FREE 877 339 5214 support biobidet com www biobidet com ...

Reviews: