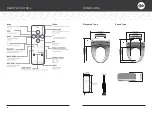
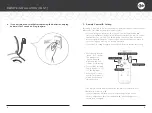
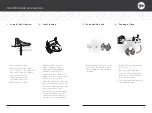
background image

OWNER’S MANUAL

ULTIMATE 770


Summary of Contents for bioBidet ULTIMATE 770

Page 1: ...OWNER S MANUAL ULTIMATE 770 ...

Page 2: ...ards Cautions 5 Cautions Before Installation 7 Main Unit Parts 9 RemoteControl 10 Dimensions 11 PRODUCT INSTALLATION Installation 12 RemoteInstallation 16 PRODUCT OPERATION Operation 20 Maintenance Cleaning 28 Settings 30 Specifications 33 WARRANTY Warranty 34 ...

Page 3: ...nk Do not place in or drop into water or other liquid Do not reach for a product that has fallen into water Unplug immediately WARNING To reduce the risk of burns electrocution fire or injury to persons Close supervision is necessary when this product is used by on or near children Use this product only for its intended use as described in this manual Only use attachments recommended by the manufa...

Page 4: ...an if the grounding instructions are not completely understood or if in doubt as to whether the product is properly grounded This product is for use on a nominal 120V circuit and has a grounding plug that looks like the plug illustrated in sketch A in Figure 1 A temporary adapter which looks like the adapter illustrated in sketches B and C may be used to connect this plug to a 2 pole receptacle as...

Page 5: ...8 9 MAIN UNIT PARTS Top Mount Metal Bolt x2 T Valve 7 8 AAA size Batteries x2 Top Mount Rubber Nut x2 Catch Plate Bidet Water Supply Hose Washer x2 Bracket Holder Remote Control and Holder ...

Page 6: ...10 11 REMOTE CONTROL DIMENSIONS Rinses nozzle 3 times and extends for manual cleaning Elongated Type Round Type ...

Page 7: ...djust as needed before tightening bolts Do not over tighten bolts 3 Fix the catch plate onto the toilet 4 Push the main body towards the catch plate completely INSTALLATION 1 Remove the seat from the existing toilet body Release the nuts and then remove the seat and cover from it Store the seat in a proper place for future use Turn off the water Disconnect the existing water hose Attach the T valv...

Page 8: ...electric shock 5 After installing the T valve connect the supplied bidet hose from the center of the T valve to the bidet 6 Turn on the water and check for leaks 7 Plug in and be sure that the nozzle comes out and retracts when powered on INSTALLATION CONT ...

Page 9: ...he batteries with new AAA size x 2 pcs REMOTE INSTALLATION 1 Remove the adhesive protection to attach the remote control bracket to the wall or other surface 2 Insert two AAA type batteries included as indicated inside the battery compartment Clean and dry the area thoroughly before attaching the bracket Identify a location in the bathroom for the remote control that is visible and reachable from ...

Page 10: ...l interruption of more than 2 units are used at one place In case of using one unit only no setting is needed If you want to change the ID please refer to Remote Control ID Setting The remote should be located near by the main unit when ID is set Default ID of remote is 0 In case of battery replacement power resetting of main unit or factory initialization ID will be initialized 0 and setting proc...

Page 11: ...ss the button once again to stop oscillate function The specialized water spray in Turbo function helps relieve constipation 3 Dry Temperature Control 4 Massage Dryer operates for 3 minutes Dryer temperature is adjustable by pressing or buttons 5 Levels Dryer effect will be improved if you wipe the moisture lightly before operating the drying function When pressing the Massage button during the op...

Page 12: ...le 5 positions Water pressure is adjustable 5 positions If the water or screen filters become blocked it may cause low water pressure 7 Stop 8 Seat Water Temperature Control All operations will stop When pressing the stop button for 3 seconds unit will turn off Press Stop Wash Bidet or Turbo to turn on Seat Water temperature is adjustable 4 levels Off Low Middle High To reduce the chance of low te...

Page 13: ...aning while not seated the nozzle cleans itself 3 times The nozzle extends and stops for manual cleaning process Clean the nozzle with a brush and press STOP button after completion of manual cleaning Then nozzle cleans itself for 3 times and retracts NOZZLE CLEANING will not operate if the seat sensor is activated 11 Night Light 12 Automatic Tank Draining Blue LED night light provides enough brig...

Page 14: ... cannot be controlled Features Night Light Silent mode Nozzle cleaning 15 Reset 16 User Preset Press and hold the Stop button on the auxiliary panel for 5 seconds After 3 seconds the seat will power off Keep holding another 2 seconds and the seat will power back on This completes the factory reset process Nozzle position water pressure dry water seat temperature can be preset and stored for 2 diff...

Page 15: ... not spray water directly onto the surface Clean the body after removing the power plug from the outlet Be sure no water splashes onto the power plug or outlet Be careful of not dropping any chemical detergents or toilet cleaner on the main body or supply hose to avoid damage 3 Extended Non Use 4 Draining of Tank When the bidet seat is not being used for an extended period of time unplug the unit ...

Page 16: ...nsor off Seat sensor on Regardless of on off The unit will work without sitting on the seat if the occupied seat sensor is deactivated Turn off If the seat sensor is deactivated some features cannot be controlled Night light on off silent mode on off and nozzle cleaning User settings with the side control auxiliary panel No Function Seat Status Switch Operation Description Initial Status 1 Factory...

Page 17: ...ot the responsibility of BBC Innovation LLC As such any use of non Bio Bidet water filters is prohibited and will void the warranty for those Bio Bidet products Bio Bidet will not be responsible for any resulting damages or claims related to the misuse or distribution of non Bio Bidet filters SPECIFICATIONS Item U770 U770R Rated Voltage AC 120V 60Hz Max Power Consumption 870W Power cord length 1 2...

Page 18: ...cumstances in accordance with the user guide during the warranty period Although it is within the warranty period we will charge the repair service fee etc repair parts travel expense if it falls under the following cases Voiding Warranty Defects occurred from the user s careless handling Defects occurred from usage with incorrect power voltage E g 220V was used to the 110V product Defects occurre...

Page 19: ...Thank You Technical Support Customer Service 7900 S Route 31 Crystal Lake IL 60014 T 847 458 2334 U S TOLL FREE 877 339 5214 support biobidet com www biobidet com ...

Reviews: