background image

Owner’s Manual

P U R E   P A S S I O N   S I N C E   1 9 1 1

Summary of Contents for ZAFFERANO 250EFI

Page 1: ...Owner s Manual P U R E P A S S I O N S I N C E 1 9 1 1 ...

Page 2: ...arting your Scooter 15 Riding your Scooter 16 PeriodicalCheck 19 1 Replacement and Refuel for Motor Gear 19 2 Parts Lubricating 19 3 Oil Pipe 20 4 Spark Plug 20 5 Fuel Injector and Fuel System 21 6 Tires 22 7 Tire Pressure 22 8 Lamp Specifications 22 9 Headlight Beam Adjustment 23 10 Headlight Bulb Replacement 23 11 Front Lamp Replacement 23 12 Fuse Replacement 23 Battery 24 Air Filter Maintenance...

Page 3: ...ersonnel are available at any authorized Benelli SSR Dealer to provide you with service parts and acces sories With the persistent pursuit of quality tenet making consumers more satisfied the company has been continuously improving both the quality and performance of the product However due to such changes some color appearance differences and structural differences may be possible to cause incons...

Page 4: ...ly of original fittings which will impact the warranty 10 Any accessory equipped shall not affect the safety and per formance of the scooter Overloading of the electrical system is especially dangerous Wear a Safety Helmet The helmet is the most important piece of motorcycle scooter safety equipment Be sure to purchase a helmet that meets at least the minimum DOT regulations and wear it at all tim...

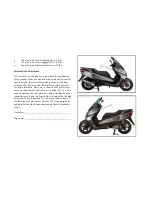
Page 5: ...er service Please record those numbers for future reference Frame No is shown on the main frame beam on the middle of the frame as in position it can be seen by opening the front glove box and removing the right inspection cover and the Engine No is shown at the left side of the gearbox as in position The brand label is shown at the left side of frame front as position it can be seen by opening th...

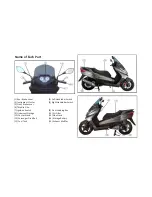
Page 6: ...ch 3 Instrument Cluster 4 Right Handlebar Switch 5 Front Brake Lever 6 Throttle Grip 7 Ignition Switch 8 Front Loading Box 9 Underseat Storage 10 Air Filter 11 Center Stand 12 Side Stand 13 Passenger Grab Rail 14 Storage Battery 15 Fuel Tank 16 Exhaust Muffler ...

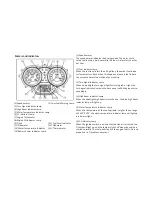
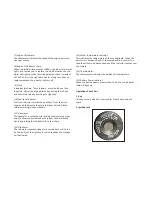
Page 7: ...en this happens please refuel in time to ensure the normal operation of your vehicle 3 Turn Signal Indicator Lamp When operating the turn signal light for turning left or right the turn signal indicator lamp on the dash panel will blink green corre spondingly 4 High Beam Indicator Lamp When the headlight high beam is switched on the blue high beam indicator lamp will light up 5 Water Temperature I...

Page 8: ...fuel quantity left Please refuel according to your schedule 11 Odometer The odometer records the total driving kilometers and miles and the kilometer system and mile system can be switched freely by pressing the left button for a short time 12 Trip Meter The trip meter records mileage for a certain time which can be zeroed Press the right key for three seconds the mileage will be cleared 13 Water ...

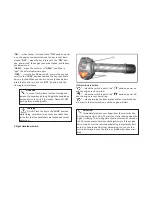
Page 9: ...tention In case of theft please lock the steering and remove the key when parking Wiggle the handlebars back and forth to verify if it is locked Please DO NOT park in places blocking traffic 1 Electric start Switch when the switch is put to the position power on and the engine can be started when the switch is put to the position power off and the engine cannot be started when grasping the front b...

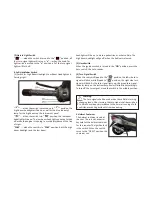
Page 10: ...igh beam headlight will go off when the button is released 2 Horn Switch When the ignition switch is turned to the ON position press the horn switch the horn sounds 3 Turn Signal Switch When the switch is flipped to the position the left side turn signal will blink while flipped to position the right side turn signal will blink As the turn signal lights up the green turn signal indicator lamp on t...

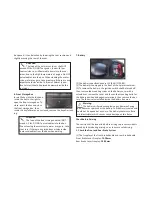
Page 11: ...ed at any time The battery contains sulfuric acid electrolyte which can cause eye damage or skin burns be opened It can be locked by lowering the seat cushion and slightly pressing the rear of the seat 6 Front Storage Box Insert the key into the lock and rotate the key to the right to open the front storage box To close insert the key and close the front storage box then rotate the key leftwards o...

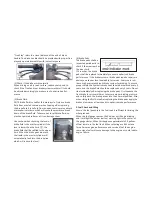
Page 12: ... cluster When this happens approximately 0 5 gallons of fuel remain in the fuel tank When refueling use 91 octane for optimum engine performance and service life of the engine Low octane fuels will cause damage to the engine or could lead to engine failure Free Play refers to a travel distance of the end of brake handle The brake handle should be provided with proper free play and operated smoothl...

Page 13: ...ew it in Remove the dipstick and check the oil level on the dipstick refill the engine if the level is below the upper level mark During the break in period the engine oil should be changed at 200mi 400mi 600mi and 1000mi after this period you should change it every 2000mi The oil volume is 1 4 L and 1 3L when replacing The oil volume shall not fall below the lower limit on the dip stick Driving o...

Page 14: ...bars from left to right and right to left Check if the steering is too tight or too loose check for clunk ing by lifting the front wheel slowly If an abnormality is detected contact your local dealership for repair 5 Brake Lamp Inspection Turn the ignition switch to position Apply the front and rear brakes respectively to make sure the brake lamp will light up Check if the brake lamp cover is dirt...

Page 15: ...rom a standing posi tion to compress the rear suspension to check if the front and rear suspension is in good condition 10 Speedometer Function Check Check if each function of speedometer works properly 11 Horn Check Turn the ignition switch to position press the horn but ton to confirm the horn sounds 12 Rearview Mirror Check Sit on the seat cushion in your normal driving position to view the rea...

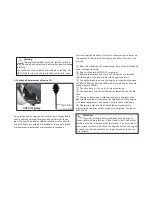
Page 16: ...OT remove the radiator cap the coolant temperature is still very high and it will spray out under pressure and can cause burns if done so Wait until the engine has cooled to check add coolant to the cooling system 1 The fuel engine oil and coolant levels should be checked prior to the engine being started and the fuel quantity should be suf ficient to satisfy the driven mileage planned The engine ...

Page 17: ...he side stand with your left foot and lean the scooter to the left onto the stand Keep your foot on the side stand until it touches the ground before getting off of the scooter Caution After the scooter starts and before riding the brakes should be kept applied Warning Before riding your scooter check the position of the side stand carefully If the side stand is not returned to the original positi...

Page 18: ...eled You must estimate the distance between vehicles in front of you and keep a safe distance to allow enough room for braking Inex perienced riders often use the rear brake only Using only the rear brake can cause the scooter to become unstable when braking and will accelerate brake wear 8 Emergency braking and sharp turns NOT recommended Emergency braking and or sharp turns are the main reasons ...

Page 19: ...ffler will be come hot Avoid being burned Once the scooter is parked DO NOT touch the muffler and related parts of the engine and pay attention that the muffler side of the scooter can not easily burn passers by c If the fuel injector works normally the ignition system should be checked d Remove the spark plug and touch it to the metal body of the engine then turn over the engine to check if any s...

Page 20: ... oil every year or 3 000 miles whichever comes first GL 5 85W 90 gear oil is recommended Full capacity of gear oil is 0 15L 0 13L for replacement When done check if the gear drive box has any oil leakage 2 Parts Lubrication Proper lubrication is very important to keep every part of motor cycle in normal operation prolong the service life and maintain safe driving After the scooter has been used fo...

Page 21: ... slide it up then remove the drain line plug Allow the oil to drain into a rag before replacing the drain plug and hose clamp 4 Spark Plug When the initial mileage reaches 600 miles and again at 2 500 miles remove the spark plug and use a small wire brush or spark plug cleaner to remove the carbon build up from the spark plug Y Motorcycle lubrication oil Z Grease 1 Rear brake lever pivot bolt Z At...

Page 22: ...ution when installing the spark plug not to cross thread it which will damage the cylinder head Install the spark plug by hand then tighten using a wrench DO NOT over tighten the spark plug as this can also damage the cylinder head Use caution when the spark plug is re moved not to allow impurities into the engine through the spark plug hole Please use the diagram below when reconnecting the fuel ...

Page 23: ...sur face which can lead to loss of grip which can lead to accidents The tire pressures must be maintained within the prescribed limits The tire pressures should be checked when cold not immediately after riding Caution The engine idle speed should only be adjusted once the engine has been properly warmed up 8 Lamp Specifications The rated power for all of the light bulbs are listed below When repl...

Page 24: ... Remove the screws from the headlight access panel b Remove the headlight access panel c Remove the rubber cover from the backside of the head light d Disconnect the wiring plug e Release the headlight bulb retainer clip and remove the bulb f Install the new bulb without touching the glass surface of the bulb Reinstall the loose parts in reverse order of above 11 Parking Lamp Replacement The parki...

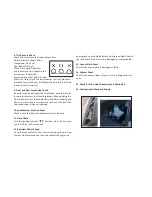
Page 25: ...FUSES OF THE CORRECT AM PERAGE AND TYPE WHEN REPLACING The battery is located in the battery box in the foot well of the scooter To remove the battery follow the procedures below a Turn off the ignition switch b Open the seat c Remove the battery cover screws and then remove the cover d Remove the negative terminal bolt and then remove the positive terminal bolt e Gently remove the battery from th...

Page 26: ...yte liquid has drained into the battery and then slowly remove the container of electrolyte from the top of the battery be sure not to drip any electrolyte on your skin or clothing f Once the battery is completely filled use the black plastic cap we removed earlier from the electrolyte container and affix it to the top of the battery to seal the open electrolyte filling holes After confirmation th...

Page 27: ...follows a Remove the left side cover 1 then remove the 10 screws securing the airbox lid to the airbox 2 b Remove the foam air filter from the airbox c Clean the filter using a high quality foam filter cleaner and let it fully dry d Oil the air filter using a high quality foam filter oil and wring out any excess oil before installation Reinstall the air filter element in reverse order of above Cau...

Page 28: ...chnical Parameters Engine BJ169MM 5A single cylinder 4 stroke liquid cooled Displacement 249 8cc Nominal Displacement 250cc Cylinder Bore x Stroke 69mm X 66 8mm Compression Ratio 10 5 1 Maximum Power 20 1 hp 7000r min Maximum Torque 17 3 ft lb 6000r min Transmission Type V belt drive infinite variable speed Clutch Dry centrifugal Ignition Method TLI Starting Method Electric Start Fuel Tank Capacit...

Page 29: ...mark3 If always driving on uneven roads maintenance should be done more frequently Inspection Item Odometer Reading 600mi 4 000mi 6 000mi 8 000mi Fuel Lines I I I Throttle Operation I I I Air Filter Remark 2 C C R C Spark Plug I R I Engine Oil R 2 000mi per R Gear Oil Every 3 000mi Engine Idle Speed I I I I Brake Pad Wear I I I Brake System I I I I Drive Belt 5 000 mi per I 15 000mi per R Brake Li...

Page 30: ...Electric Motor BB W SPARK PLUG G Dg N Y LR B R N B FUSE 30A R W O R P R WP P N Y R W On Off Switch N R W G Y O G B G W R B R R W P G Y P R W G W G B PUMP RELAY Fuel Pump B R LR B DG B R P R R W Brake Switch IAT TPS IAC B Y LICENSE PLATE LIGHT 5W B P B G W Y RIGHT TURN LIGHT 16W G B B TAIL BREAK LIGHT 21 5W LEFT TURN LIGHT 16W N Y N Y W B N W R P G R G BL N Y R G B O B BL N BL INJ B BL W O CLT W N ...

Reviews: