background image

BERNINA 770 QE PLUS

KAFFE EDITION

Summary of Contents for Kaffe 770 QE PLUS

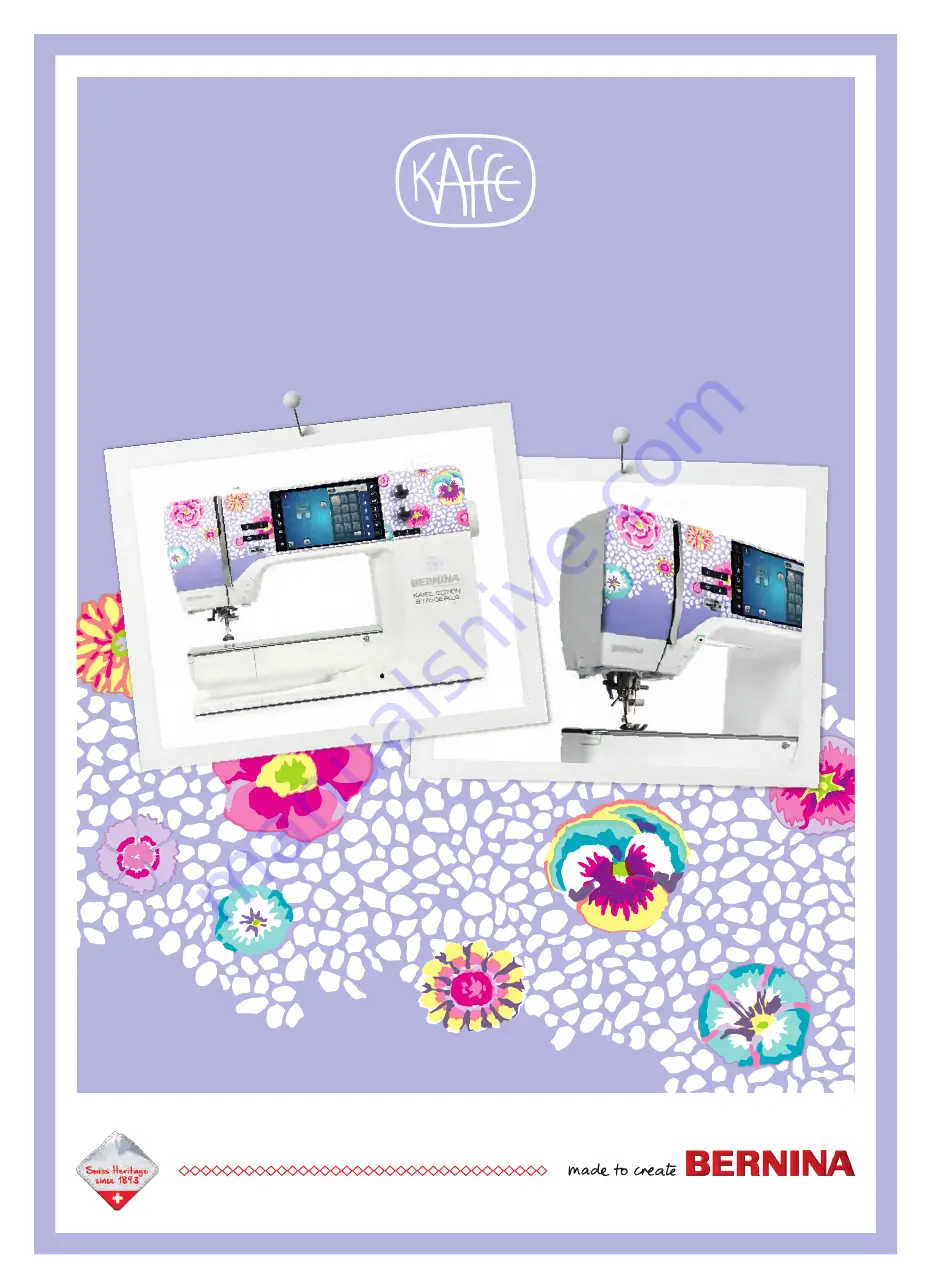
Page 1: ...BERNINA 770 QE PLUS KAFFE EDITION ...

Page 2: ......

Page 3: ...sed the highest demands on technique and the ease of use but also considered the design of the product After all we sell our products to creative people like you who do not only appreciate high quality but also form and design Enjoy the creative sewing embroidering and quilting on your new BERNINA 770 QE PLUS and keep informed about the various accessories at www bernina com On our homepage you wi...

Page 4: ...Horizontal spool pin 34 2 6 Free arm 35 2 7 Feed dog 35 Adjusting the feed dog 35 2 8 Slide on table 36 Using the slide on table 36 2 9 Presser foot 36 Adjusting the presser foot position via the knee lifter of the Free Hand System 36 Adjusting the presser foot position via the button Presser foot up down 36 Changing the presser foot 36 Selecting the presser foot in the User Interface 37 Adjusting...

Page 5: ... stitch width 69 Changing the stitch length 69 Correcting the balance 70 Programming pattern repeat 70 Programming long stitch 70 Mirror image of stitch patterns 71 Editing stitch pattern length 71 Programming the stitch counter function 71 Sewing stitch patterns using the triple stitch 71 Quick reverse 72 Permanent Quick reverse 72 Backstepping 72 5 6 Combining stitch patterns 72 Overview Combi m...

Page 6: ...he Buttonhole Foot with Slide 3A 112 Using cord with the Buttonhole Foot 3 113 9 6 Sewing a test sample 114 9 7 Determining the buttonhole slit width 114 9 8 Determining the buttonhole length with the Buttonhole Foot with Slide 3A 115 9 9 Determining the buttonhole length with Buttonhole Foot 3C 115 9 10 Sewing a buttonhole automatically 116 9 11 Programming the Heirloom buttonhole 117 9 12 Sewing...

Page 7: ...tabilizer 142 Preparing the embroidery hoop 142 Attaching the hoop 143 Overview Embroidery functions 144 Center the needle to the embroidery hoop 144 Moving the hoop to the back 144 Moving the module for the sewing mode 144 Grid on off 145 Locating the center of the embroidery motif 145 Virtual positioning of the embroidery hoop 145 14 Setup Program 146 14 1 Adjusting the embroidery settings in th...

Page 8: ...otif from the personal memory 167 Deleting an embroidery motif from the BERNINA USB stick 168 16 Embroidery 169 16 1 Embroidering via the button Start Stop 169 16 2 Increasing the embroidery speed 169 16 3 Adjusting the upper thread tension 169 16 4 Embroidering via the foot control 170 17 Care and maintenance 171 17 1 Firmware 171 Checking the firmware version 171 Updating firmware 171 Recovering...

Page 9: ...g magnifying glass If the LED lamp is damaged or defective have the LED lamp checked or repaired at your local authorized BERNINA dealer Switch off the machine before working in the needle area Before starting the machine close all covers WARNING To reduce the risk of burns fire electric shock or injury to persons the following instructions must be observed General facts This machine may only be u...

Page 10: ...r servicing of double insulated products To lubricate the machine only use oil recommended by BERNINA Safety instructions While operating the machine all protective inserts must be in place and all covers must be closed Appropriate use The machine may be used cleaned and maintained by children older than eight or by people with reduced physical sensory or mental capabilities or if there is a lack ...

Page 11: ...le area such as threading the needle changing the needle threading the looper or changing the presser foot switch off the machine To switch off set the power switch to 0 When protective covers are removed when the machine is oiled or when other cleaning and maintenance operations mentioned in this instruction manual are carried out switch off the machine and disconnect the power plug from the outl...

Page 12: ... notice Maintenance of double insulated products In a double insulated product two systems of insulation are provided instead of grounding No grounding means is provided on a double insulated product nor should a means for grounding be added to the product Servicing a double insulated product requires extreme care and knowledge of the system and should only be done by qualified service personnel O...

Page 13: ...ess it is avoided WARNING Designates a medium risk hazard which can lead to serious injuries if not avoided CAUTION Designates a low risk hazard which can lead to minor or moderate injuries if not avoided NOTICE Designates a hazard which can lead to material damage if not avoided Tips from BERNINA quilt experts can be found next to this symbol ...

Page 14: ...achines are assembled with utmost care and are subjected to an extensive functionality test The integrated stitch counter therefore indicates that the machine has already sewn stitches which were performed exclusively for test purposes and quality control The subsequent thorough cleaning does not exclude the possibility that thread remnants may still be found in the machine 1 3 Welcome to the worl...

Page 15: ...ideas All this you can find in the weekly blog of BERNINA Our experts give useful tips and explain step by step how you can achieve the desired result In the community you can upload your own projects and exchange experiences and ideas with other sewing and embroidering enthusiasts https www bernina com blog Available in English German Dutch and French BERNINA Social Media Follow on social network...

Page 16: ...ontrols 1 2 3 4 5 6 7 8 9 10 11 1 Quick Reverse 7 Pattern Begin 2 Thread Cutter 8 Needle position Up Down 3 Presser Foot Up Down 9 Upper Multi function knob 4 Start Stop 10 Lower Multi function knob 5 Pattern End 11 Needle Position Right Left 6 Securing ...

Page 17: ...idery module 7 Slide speed control 2 Bobbin cover 8 Thread take up lever cover 3 Connection for accessory optional accessory 9 Thread take up lever 4 Presser foot 10 Fixing screw 5 Needle threader 11 Connection for slide on table 6 Sewing light 12 Connection for Free Hand System ...

Page 18: ... Connection for foot control 7 Power switch 2 PC connection 8 Connection for power cable 3 Spool holder 9 Magnet holder for touchscreen pen 4 Bobbin winding unit with thread cutter 10 Air vents 5 Swiveling spool holder 11 USB port 6 Handwheel 12 Feed dog up down ...

Page 19: ...ction for Slide on Table 8 Carry Handle 2 Connection for Darning Hoop 9 Bobbin Winder Pretension 3 BSR connection 10 Thread Guide 4 Connection for accessory 11 BDF BERNINA Dual Feed 5 Air Vents 12 Thread Cutter 6 Thread Guide 13 Feed Dog 7 Bobbin Winding Unit 14 Stitch Plate ...

Page 20: ...tional accessories Free Hand System FHS To raise and lower the presser foot Slide On Table To increase the sewing surface Straight and CutWork Stitch Plate To sew straight stitches and for CutWork Spool Disc To support the regular unwinding of the thread from the spool Bobbin for B9 hook Set of 5 To wind the bobbin thread Foam Pad 2 pieces The foam pad prevents the thread from slipping tangling or...

Page 21: ...ion of the presser foot sole when sliding over thick seams Needle Assortment For any common applications Seam Guide right To align regular seam distances Screwdriver Torx gray To change the needle Screwdriver red slot To loosen and tighten slotted screws Angular Torx Wrench Torx To open the headframe Brush Needle Inserter To clean the feed dog and the looper area Sewing Machine Oil To oil the mach...

Page 22: ...stration Number Name Purpose Example 1C Reverse Pattern Foot To sew various practical and decorative stitches To sew forward and in reverse 1D Reverse Pattern Foot To sew various practical and decorative stitches with Dual Feed To sew forward and in reverse 3A Buttonhole Foot with Slide To sew buttonholes automatically 4D Zipper Foot To sew in zippers with Dual Feed 20C Open Embroidery Foot To sew...

Page 23: ... 21 Illustration Number Name Purpose Example 42 BERNINA Stitch Regulator BSR Free motion quilting with regular stitch length 97D Patchwork Foot For patchwork and other exact work if working with BERNINA Dual Feed ...

Page 24: ...x accessories can be neatly stored in compartments and matching holders 1 2 3 4 5 6 7 7 7 7 1 Big drawer 5 Spool Pin 2 Small drawer 6 Presser Feet 3 Buttonhole foot with slide 7 Presser Foot Holders for 5 5 mm and 9 0 mm feet 4 Selection of needles ...

Page 25: ...er Thread Tension 5 Stitch Plate Selection 2 Needle Selection 6 Feed Dog Indicator 3 Presser foot indicator presser foot selection 7 Bobbin Thread 4 Presser Foot Pressure Overview System settings 1 2 3 4 5 6 7 1 Home 5 Help 2 Setup Program 6 eco Mode 3 Tutorial 7 Clear Settings 4 Creative Consultant ...

Page 26: ... the finger or stylus Tap Short tap of an element Swipe Tap an element and swipe quickly on the screen Draw Tap the screen and slowly move in one direction eg for scrolling up and down Navigation Illustration Name Purpose Home Switch between Home screen and Sewing screen Navigation path Show a previous menu level Close Close the window More Show more features or information Continue Scroll to next...

Page 27: ...lider control Reset the value to the default value by tapping the small bullet Field Plus Minus Plus increase Minus reduce the value Yellow frame Indication that the set value differs from the default value Reset the value to the default value by tapping Enter text and numbers To enter numerical values or text a corresponding keyboard is shown Illustration Name Purpose Entry field Display of the e...

Page 28: ...t In general it can be said the thinner the thread the finer the needle The illustrated needles are either standard or optional accessory depending on the machine Needle sizes 70 75 for thin fabrics Needle sizes 80 90 for medium fabrics Needle sizes 100 110 and 120 for heavy fabrics Overview Needles Illustration Needle name Needle description Purpose Universal needle 130 705 H 60 120 Slightly roun...

Page 29: ...70 90 Small ball point For fine knitware and knitted materials For embroidery on fine delicate fabrics Metafil needle 130 705 H METAFIL 80 Long needle eye 2 mm in all needle sizes For sewing or embroidering with metallic threads Cordonnet needle to patch embroidery 130 705 H N 70 100 Long needle eye 2 mm in all needle sizes Topstitching with thick thread Felt needle PUNCH Needle with barbed hook F...

Page 30: ...t here medium ball point 4 70 Needle size 0 7 mm 5 Thread selection For a perfect sewing result thread and fabric quality play an important role We recommend purchasing quality threads to achieve good sewing results Cotton threads have the advantage of being a natural fiber and therefore are especially suitable for sewing cotton fabrics Mercerized cotton threads have a slight sheen that is not los...

Page 31: ...and goes easily through the needle eye The thread can be optimally secured The thread can break and skipped stitches can occur when there is too much clearance in the long groove and the needle eye The thread can break and get stuck when the thread scrapes against the edge of the long groove not fit well into the needle eye optimally ...

Page 32: ...ea can be avoided 2 2 Accessory box Accessory box free standing On the back of the box pull both extensions out until they click into place Storing accessory 2 3 4 6 7 5 1 1 1 1 1 Insert the holders 1 for bobbins presser feet and needles into the accessory box Store the presser feet in the holders 7 5 5 mm or 9 0 mm Store the small parts e g thread discs etc in the drawers 2 and 3 Buttonhole Foot ...

Page 33: ...to the foot control socket of the machine Place the foot control under the table If the cable is too long roll up the excess length and fix it in the cable holders of the foot control Connecting the machine To ensure safe operation of the machine only the supplied mains cable may be used The supplied power cable is designed for the voltage range applicable in the country of use If the machine is t...

Page 34: ...taching the knee lifter of the Free Hand System The lateral position of the knee lifter can be adjusted by your local BERNINA Dealer if required Insert the knee lifter into the opening at the front side of the machine Adjust the sitting height so that the knee lifter can be operated with the knee Fixing the touchscreen pen Store the touchscreen pen at the magnet holder ...

Page 35: ...ne To sew faster press the foot control harder Release the foot control to stop the machine Activate deactivate additional function The Foot Control can be programmed with a second function that can be activated and deactivated by a Back kick On delivery the Back kick is programmed with the function Needle Up Down To raise or lower the needle press the Foot Control downward with your heel The Back...

Page 36: ...p as far as it will go Inserting foam pad and thread spool The foam pad prevents the thread from getting hooked at the swiveling spool holder Place the foam pad on the swiveling spool holder Place the thread spool on the spool holder Horizontal spool pin Placing the foam pad the thread spool and the spool disc The spool disc provides an even unwinding of the thread from the thread spool The spool ...

Page 37: ...events the thread from knotting and breaking The spool net is only used with the horizontal spool holder Pull the spool net over the thread spool 2 6 Free arm The BERNINA 770 QE PLUS provides a solidly designed free arm which offers a lot of space for large project on the right of the needle 2 7 Feed dog Adjusting the feed dog To lower the feed dog push the button Feed Dog Indicator To raise the f...

Page 38: ...ser foot Adjusting the presser foot position via the knee lifter of the Free Hand System Adjust the sitting height so that the knee lifter can be operated with the knee Push the knee lifter with the knee to the right to raise the presser foot Simultaneously the feed dog is lowered and the thread tension is released Release the knee lifter slowly to lower the presser foot Adjusting the presser foot...

Page 39: ...anging the presser foot a check can be performed to determine whether it is suitable for the selected stitch pattern Additionally alternative presser feet are displayed which are available for the selected stitch pattern Switch the machine on Select a stitch pattern Tap Presser foot indicator presser foot selection To display all suitable presser feet for the selected stitch pattern tap Optional P...

Page 40: ...r foot pressure This provides the advantage that the presser foot is slightly lifted so that the fabric can be moved more easily When working with thin fabrics it is recommended to increase the presser foot pressure This provides the advantage that the fabric cannot be moved too easily under the presser foot 50 Tap Presser Foot Pressure Adjust the Presser Foot Pressure 2 10 Needle and stitch plate...

Page 41: ...g the machine and the machine will not sew Selecting needle type and needle size Convenient memory function To prevent a loss of information the needle type and the needle size can be saved additionally on the machine The saved needle type and the saved needle size can be checked at any time Tap Needle Selection Tap Needle Information Select the needle type 1 of the fitted needle Select the needle...

Page 42: ...eedle Stop Up Down The machine stops with needle position down as soon as the foot control is released or the button Start Stop has been pushed Tap Needle Stop Up Down again The machine stops with needle position up as soon as the foot control is released or the button Start Stop has been pushed Changing the stitch plate The stitch plate is marked with vertical horizontal and diagonal lines in mil...

Page 43: ...be used in combination with the needle sewing can begin If the selected stitch plate is not suitable to be used in combination with the needle an error message is displayed and starting the machine is automatically prevented 2 11 Threading Threading the upper thread Prerequisite The needle and the presser foot are raised The machine is switched off and disconnected from the power supply system Pla...

Page 44: ...d tension 2 1 2 Guide the thread downwards 3 around the thread take up lever cover 4 Guide the thread upwards and insert into the thread take up lever 5 Guide the thread downwards again 6 3 4 5 6 Guide the thread through the guides 7 8 above the presser foot 7 8 Switch the machine on ...

Page 45: ...0 Guide the thread around the gray threader hook from the left to the right 12 Press the threader lever down as far as it will go 11 and then pull the thread from the left to the right 12 through the threader slot 13 until it hooks into the small wire hook 12 11 13 Release the lever and the thread simultaneously to thread Pull the thread loop 14 to the back 14 ...

Page 46: ...e is inserted Guide the first thread in direction of the arrow on the right side of the tension disc 1 Guide the second thread in direction of the arrow on the left side of the tension disc 1 1 Guide the first and the second thread to the thread guide above the needle Thread the first thread manually into the right needle Thread the second thread manually into the left needle ...

Page 47: ...ht and to the thread guide above the needle Thread the first thread into the left needle manually Thread the second thread into the center needle manually Thread the third thread into the right needle manually Winding the bobbin thread The bobbin thread can be wound while embroidering if the swiveling spool holder is used for winding Prerequisite The foam pad the thread spool and the appropriate s...

Page 48: ...o the right Push the engaging lever towards the bobbin again to continue the winding process As soon as the bobbin is full the machine stops the winding process automatically Remove the bobbin and cut the thread using the thread cutter at the engaging lever Threading the bobbin thread Prerequisite The needle is raised The machine is switched off and the bobbin cover is opened Press the bobbin case...

Page 49: ...bbin so that the silvery sensor surface is facing the back of the bobbin case Pull the thread into the slot 2 from the left 2 Pull the thread to the right under the spring 3 then pass it below the two thread guides 4 and pull it upwards 3 4 ...

Page 50: ...e bobbin case until it engages Pull the thread through the thread cutter 6 and cut 6 Close the Looper Cover Indicating fill level of bobbin thread When the fill level of the bobbin thread is low an animation appears in the icon Bobbin Thread to indicate that the bobbin thread is about to run out To thread the bobbin thread according to the animation tap Bobbin Thread ...

Page 51: ...n use this function to reduce the maximum speed Tap Setup Program Tap Sewing settings RPM Tap Maximum Sewing Speed Set the maximum sewing speed Programming the securing stitches If the function is switched on at the start of the pattern 4 securing stitches are automatically sewn after the thread cut Tap Setup Program Tap Sewing settings Tap the switch again to deactivate the securing stitches Tap ...

Page 52: ...ce tap Securing Stitches To program subsequent securing stitches tap Securing stitches in close succession To program the number of subsequent securing stitches tap Plus or Minus To program 4 securing stitches in place tap Securing stitches in place To deactivate the automatic thread cut after securing tap Automatic Thread Cutter To activate the automatic thread cut after securing tap Automatic Th...

Page 53: ...tap Minus or Plus To program 4 securing stitches in place tap Securing stitches in place To deactivate the automatic securing tap Securing Stitches To activate the automatic securing tap Securing Stitches again Adjusting the presser foot position with needle stop down With lowered needle 3 different presser foot position can be selected the presser foot lowered the presser foot is raised to hoveri...

Page 54: ...The number and type of securing stitches can be programmed Tap Setup Program Tap Sewing settings Tap Programming buttons and icons Tap Programming the button Securing To program subsequent securing stitches tap Securing stitches in close succession To program the number of securing stitches tap Minus or Plus To program 4 securing stitches in place tap Securing stitches in place Programming the foo...

Page 55: ...ecuring via the Back kick tap Securing Stitches To activate the automatic securing via the Back kick tap Securing Stitches again To deactivate the automatic thread cut via the Back kick tap Automatic Thread Cutter To activate the automatic thread cut via the Back kick tap Automatic Thread Cutter again To keep the lowered position of the presser foot via the Back kick tap Lift the presser foot To k...

Page 56: ...idery Software the function Centering the embroidery motif must be activated Tap Setup Program Tap Embroidery settings Tap Centering the embroidery motif Tap the Switch A previously moved embroidery motif which has been saved in the new position is opened in the saved position after selecting Tap the Switch again The embroidery motif is centered to the Embroidery Hoop Calibrating the embroidery ho...

Page 57: ...machine is switched off the alterations are reset to the basic setting 4 mm Tap Setup Program Tap Embroidery settings Tap Entering the fabric thickness Select fabric thickness Activating Deactivating the function thread away To bring up the thread end after cutting and to pull it out of the fabric the function must be activated For embroidery motifs with long stitches it is recommended to deactiva...

Page 58: ...ny programmed securing stitches none are embroidered Turn on the switch in the upper section to deactivate the securing stitches at the start If the embroidery motif doesn t have any programmed securing stitches the securing stitches are added and will be embroidered Turn off the switch in the lower section to deactivate the securing stitches at the end If the embroidery motif doesn t have any pro...

Page 59: ...ged from mm to inch The standard setting is in mm Tap Setup Program Tap Embroidery settings Tap Measuring unit To display the measurements in the Embroidery Mode in inch tap inch To display the measurements in the Embroidery Mode in mm tap mm 3 3 Selecting personal settings Tap Setup Program Tap Personal Settings Select the required display color and background Tap the text box above the color set...

Page 60: ...ivating the bobbin thread indicator Tap Setup Program Tap Monitoring Functions Tap the switch in the lower section of the display to deactivate the bobbin thread indicator Tap the switch again to activate the bobbin thread indicator 3 5 Activating the audio signals 1 2 3 4 Tap Setup Program Tap Set Sound To switch all audio signals on or off tap 1 To switch off the sound when selecting a stitch pa...

Page 61: ...rmware updates additional languages for the User Interface can be provided Tap Setup Program Tap Machine Settings Tap Language Selection Select a language Adjusting the brightness of the display The brightness of the display can be set to meet your individual needs Tap Setup Program Tap Machine Settings Tap Screen Settings Adjust the brightness of the display in the upper section of the screen Adj...

Page 62: ...ng this function will delete all individually made settings Tap Setup Program Tap Machine Settings Tap Factory Setting To restore all default settings for sewing tap Default setting sewing and confirm To restore all default settings for embroidering tap Default setting embroidering and confirm To restore all default settings tap Default setting machine confirm and restart the machine Deleting user...

Page 63: ...cted to the machine and the data can be deleted Insert the BERNINA USB stick into the USB Port of the machine Tap Setup Program Tap Machine Settings Tap Factory Setting Tap Deleting USB Stick and confirm Calibrating the Buttonhole Foot 3A The Buttonhole Foot with Slide 3A is calibrated to the machine and they should only be used both together Prerequisite The Buttonhole Foot with Slide 3A is fitte...

Page 64: ...ngs Tap Maintenance Updates Tap Packing position Follow the instructions on the display Reviewing the total number of stitches The total number of stitches by the machine and the number of stitches since the last maintenance carried out by a specialist BERNINA dealer are displayed Tap Setup Program Tap Machine Settings Tap Information Tap Machine Data Registering details of the dealer The contact ...

Page 65: ...e saved on a USB stick and consequently provided to the specialized BERNINA dealer Insert a USB stick which provides enough free capacity into the USB port of the machine Tap Setup Program Tap Machine Settings Tap Information Tap Service Data Tap Export the service data The icon Export the service data is outlined in white If the white frame is no longer displayed remove the USB stick Display mach...

Page 66: ...Setup Program 64 Tap Information ID Tap Machine ID The machine ID is displayed If the Machine ID is not displayed the most up to date version of the firmware must first be installed on the machine ...

Page 67: ...m The settings are adjusted 4 3 Calling up the Help Touch the window in the display where help is needed To start the Help Mode tap Help twice Tap the icon in the display where help is needed 4 4 Using eco mode During a longer interruption of work the machine can be set into a power save mode The power save mode also serves as a child safety feature Nothing can be selected in the display and the m...

Page 68: ...ap Stitch Pattern Selection via Number 5 2 BERNINA Dual Feed It is recommended to match the presser foot pressure with the fabric The thicker the fabric the lower the presser foot pressure The BERNINA Dual Feed feeds the fabric from above and from beneath simultaneously This provides an even and careful feed forward even for smooth and thin materials Striped and checkered patterns can be matched p...

Page 69: ... Curtain fabrics with pattern repeats Sticky fabrics are Imitation leather coated fabrics optimally with optional accessory Zigzag Foot with Non Stick Sole 52D Application of the BERNINA Dual Feed Only use presser feet with a cut out at the center back and the labeling D Additional presser feet with the labeling D are listed in the enclosed accessory catalog Activate Dual Feed Raise the presser fo...

Page 70: ...sed for upper and bobbin thread When of using other types of sewing or embroidery threads the optimal tension may vary Therefore it may be necessary to adjust the upper thread tension according to the sewing or embroidering project as well as the desired stitch pattern or the embroidery motif individually The higher the upper thread tension the tighter the upper thread which means that the bobbin ...

Page 71: ...terns Changing the stitch width Turn the Upper Multi function knob to the left to narrow the stitch width Turn the Upper Multi function knob to the right to widen the stitch width To call up further setting options tap the icon Stitch width 1 1 Changing the stitch length Turn the Lower Multi function knob to the left to shorten the stitch length Turn the Lower Multi function knob to the right to e...

Page 72: ...itch pattern turn the Lower Multi function knob until the preview of the stitch pattern matches the stitch pattern sewn on the fabric Altered Balance settings can be saved for each stitch in the Personal Memory Altered Balance settings only remain valid until the Clear Settings is pushed or the machine is switched off Programming pattern repeat Stitch patterns can be repeated up to 99 times Select...

Page 73: ... counter function The Stitch Counter function cannot be applied with all stitch patterns If for example the Honeycomb stitch No 8 has been selected the Stitch Counter function cannot be used Select a stitch pattern Tap i Dialog Lower the needle REC 123 Tap Programming the length via the Stitch Counter Sew the desired length Push the button Quick Reverse The display changes to Auto and the selected...

Page 74: ... the button Quick Reverse Permanent Quick reverse Select a stitch pattern or alphabet Tap i Dialog To sew permanently in reverse tap Permanent Quick Reverse The machine sews permanently in reverse until Permanent Quick Reverse is tapped again Backstepping Select a stitch pattern or alphabet Tap i Dialog To backstep the last 200 stitches tap Backstepping 5 6 Combining stitch patterns Overview Combi...

Page 75: ...tch pattern combinations again they can be saved in the folder Personal Memory Create a stitch pattern combination Tap Personal Memory Tap Save stitch pattern To save the stitch pattern combination tap Confirm Loading a stitch pattern combination Tap Combination Mode Single Mode Tap Personal Memory Tap Loading a stitch pattern combination Select a stitch pattern combination Overwriting a stitch pa...

Page 76: ...ingle stitch pattern Create a stitch pattern combination To select a single stitch pattern tap the desired position 1 within the stitch pattern combination 1 To edit the single stitch pattern tap i Dialog Deleting a single stitch pattern Prerequisite A stitch pattern combination has been created Tap the desired stitch pattern 1 within the stitch pattern combination 1 ...

Page 77: ...new stitch pattern Adapting the stitch pattern length and stitch pattern width The length and width of the individual stitch patterns in a stitch pattern combination can be adapted to the longest and widest stitch patterns in the combination Create a stitch pattern combination Tap i Dialog Tap Edit Entire Combination Tap Total Pattern Length 1 1 2 Tap Adjust Length within Combination 2 The lengths...

Page 78: ...e To increase the length of the stitch pattern combination proportionally turn the Lower Multi function knob clockwise Mirroring a stitch pattern combination Create a stitch pattern combination Tap i Dialog Tap Edit Entire Combination To mirror the whole stitch pattern combination from left to right tap Mirror Image Left Right To reset the changes and revert to the default settings tap Mirror Imag...

Page 79: ...Tap i Dialog Tap Edit Combination at Cursor Position Tap Combination Subdivider 2 Sew the first section and then reposition the fabric Securing a stitch pattern combination Create a stitch pattern combination Select the desired position within the stitch pattern combination where the stitch pattern combination is to be secured Tap i Dialog Tap Edit Combination at Cursor Position Tap Securing Stitc...

Page 80: ...aved automatically and can be called up at any time To display the previously sewn stitch patterns tap History Select a stitch pattern Saving stitch patterns in personal memory In the folder Personal Memory any stitch patterns also those which have been individually edited can be saved Select a stitch pattern alphabet or buttonhole Edit the stitch pattern Tap Personal Memory Tap Save stitch patter...

Page 81: ... Personal Memory Tap Delete Select the file where the stitch pattern has been saved Select a stitch pattern To delete the stitch pattern tap Confirm Saving stitch patterns on the BERNINA USB stick On the BERNINA USB stick stitch patterns also those which have been individually edited can be saved Select a stitch pattern or alphabet Editing stitch patterns Tap Personal Memory Tap Save stitch patter...

Page 82: ...tern End before sewing is started or while sewing While sewing a stop icon indicates that the function is activated and the stitch pattern or the current combination of a stitch pattern will be secured at the end with the programmed number of stitches Securing via the icon Securing Every single pattern of the stitch pattern combination can be secured at the start or at the end Tap i Dialog Tap Edi...

Page 83: ...g plates as required from the back of the presser foot close to the needle to level the fabric layer The presser foot is leveled with the sewing project Place 1 3 compensating plates as required from the front of the presser foot close to the needle to level the fabric layer The presser foot is leveled with the sewing project Sew until the complete presser foot has passed the thick seam Remove the...

Page 84: ...compensation tool the fabric can be fed evenly When the fabric edge is reached stop the sewing process with needle position down Raise the presser foot Turn the fabric and place in desired position Place 1 3 compensating plates as required on the right of the presser foot close to the sewing project Lower the presser foot Resume sewing until the sewing project is on the feed dog again ...

Page 85: ...reinforcing fabric edges or attaching lace or rubber tape 5 Securing program For automatic securing at the start of the seam with forward and reverse stitches 6 Triple straight stitch For reinforced seams on heavy fabrics and decorative effects 7 Triple zigzag For durable seams on strong fabrics visible hems and decorative seams 8 Honeycomb stitch For stretch fabrics and hems including with rubber...

Page 86: ...einforcing fabric edges for sewing on rubber tape and for decorative seams 17 Lycra stitch For flat joining seams visible hems on Lycra fabric and for stitching over seams in foundation garments 18 Stretch stitch For stretchable seams and hems in woven and knitted fabrics 19 Reinforced overlock For overlock seams or flat joining seams on medium weight knit fabrics and toweling 20 Knit overlock For...

Page 87: ...in a combination for one straight stitch 33 Three single straight stitches As connecting stitches in a combination for three individual straight stitches 34 Darning stitch For darning together with the function Permanent reverse sewing 35 Open overlock stitch For simultaneously sewing together and finishing elastic fabrics with a reinforced edge 36 Overlock For medium weight knitted goods 37 Reinf...

Page 88: ...hing with Cordonnet use long stitches ca 3 5 mm Prerequisite The Reverse Pattern Foot 1C 1D is fitted Tap Practical Stitches Select Straight stitch No 1 6 3 Securing with the automatic Securing Program Due to a determined number of 6 stitches sewn forward and 6 stitches sewn backward the securing is regular Prerequisite The Reverse Pattern Foot 1C is fitted Tap Practical Stitches Select Securing p...

Page 89: ... seam allowances Iron the seam Open the zipper length Baste the zipper under the fabric so that the fabric folded edges meet over the center of the zipper Open the zipper a few centimeters Fit the Zipper Foot 4D Move the needle position to the right Use the Free Hand System to raise the presser foot and to position the sewing project Start sewing from top left Guide the foot so that the needle sti...

Page 90: ...tches Finish the seam allowances Iron the seam Open the zipper length Baste the zipper under the fabric so that the fabric folded edges meet over the center of the zipper Fit the Zipper Foot 4D Move the needle position to the right Use the Free Hand System to raise the presser foot and to position the sewing project Start sewing in the center of the seam at the end of the zipper Sew diagonally alo...

Page 91: ...ded to fit the Jeans Foot 8 This will help to sew denim or canvas For decorative topstitching the stitch length can be elongated Fit the Reverse Pattern Foot 1C 1D Tap Practical Stitches Select Triple straight stitch No 6 6 7 Sewing Triple Zigzag For firm materials such as denim deckchair covers awnings or frequently washed items Finish raw edges first Fit the Reverse Pattern Foot 1C 1D Tap Practi...

Page 92: ...g Foot 9 Tap Practical Stitches Select Straight stitch No 1 Lower the feed dog Attach the Slide on Freearm Extension Table Hoop the sewing project in the round embroidery hoop optional accessory The darning area stays evenly taut and cannot be distorted Sew from the left to the right guide the fabric evenly by hand without using pressure Move in curves when changing the direction to avoid holes an...

Page 93: ...Practical stitches 91 Sew the rows in irregular lengths Turn the sewing project by 90 Sew the first rows not too close Turn the sewing project by 180 Sew another loose row ...

Page 94: ...brics If the darning area becomes distorted correct with the Balance Fit the Reverse Pattern Foot 1C or Buttonhole Foot with Slide 3A Tap Practical Stitches Select Simple darning program No 22 Hoop light weight materials in the round Embroidery Hoop optional accessory The darning area stays evenly taut and cannot be distorted Start sewing top left Sew the first row Stop the machine Push the button...

Page 95: ...irst row Stop the machine Push the button Quick Reverse The darning length is programmed Finish sewing the Darning Program The machine stops automatically 6 11 Finishing edges Zigzag No 2 is suitable for all materials It can also be used for elastic seams as well as for decorative sewing Use darning thread for fine materials When sewing satin stitch beads it is recommended to select a dense short ...

Page 96: ...Select Double overlock No 10 6 13 Narrow edgestitching Fit the Blindstitch Foot 5 or Edgestitch Foot 10 10C 10D Tap Practical Stitches Select Straight stitch No 1 Place the left hand edge against the guide of the Blindstitch foot Select the left hand needle position at the desired distance to the edge 5 8 5 8 5 8 1 25 15 15 15 75 75 6 14 Wide edgestitching Fit the Reverse Pattern Foot 1C Tap Pract...

Page 97: ...uide into the hole in the presser foot Adjust the width as required Tighten the screw Guide the folded edge along the seam guide 5 8 5 8 5 8 1 25 15 15 15 75 75 6 16 Sewing hem edges When using the Blindstitch Foot 5 it is recommended to set the needle position far left or far right With the Reverse Pattern Foot 1C and the Edgestitch Foot 10 10C 10D all needle positions are possible Fit the Blinds...

Page 98: ...fabric edges are finished Fit the Blindstitch Foot 5 Tap Practical Stitches Select Blind stitch No 9 Fold the fabric back over the right side of the fabric to expose the overcast edge Place the fabric under the presser foot and move the folded edge against the metal guide on the presser foot Guide the folded edge evenly along the metal guide of the presser foot to sew the stitches evenly deep Make...

Page 99: ... visible hem is particularly suitable for elastic seams in tricot made of cotton wool synthetic and mixed fibers Fit the Reverse Pattern Foot 1C 1D Tap Practical Stitches Select Tricot stitch No 14 Iron the hem and baste if necessary Reduce the Presser Foot Pressure if necessary Sew the hem in the desired depth on the right side Trim off the remaining fabric on the reverse side ...

Page 100: ...g stitches When sewing basting stitches it is recommended to use a fine darning thread This is easier to remove With the Basting Stitch No 21 every fourth stitch is sewn The longest stitch comes up to 24 mm when a stitch length of 6 mm is selected The recommended stitch length is 3 5 5 mm The Basting Stitch is suitable for sewing projects where a very long stitch length is required Fit the Reverse...

Page 101: ...ive stitches which are programmed with satin stitches are particularly appropriate for heavyweight materials e g Decorative stitch No 401 For a perfect stitch formation it is of advantage to use the same thread color for upper and bobbin thread and a stabilizer With pile or longfiber materials it is recommended to use an additional water soluble stabilizer which can be easily removed after sewing ...

Page 102: ...an be used for bobbin thread sewing It is recommended to guide your project at consistent speed evenly under the needle following the lines of the design The stabilizer must be removed after sewing Sew a sample first to check what the result looks like on the wrong side of the fabric Not all decorative stitches are suitable for this technique Simple decorative stitches provide best results Avoid c...

Page 103: ...nique and extends the range of decorative stitches If the cross stitches are sewn on fabric with a linen texture they look like hand stitched cross stitching When cross stitches are sewn with cotton embroidery thread the stitch pattern appears fuller Cross stitches are particularly used for home furnishing trimmings on garments and embellishing in general As every following line refers to the firs...

Page 104: ...oom embroidery techniques The use of Pintuck Feet can simplify this technique considerably This technique reduces the size of the fabric This means that always enough fabric should be calculated Overview Pintuck Feet Pintuck foot Number Description 30 optional accessory 3 grooves For heavy weight fabrics In combination with the 4 mm double needle 31 optional accessory 5 grooves For heavy to medium...

Page 105: ...ght fabrics Working with cord A more distinctive and relief like effect can be achieved when the pintucks are corded which means that they are sewn with an additional pintuck cord Chose a pintuck cord that fits well into the grooves of the selected pintuck foot The cord must be colorfast and shrinkproof Switch off the machine and disconnect it from the power supply Remove the needle Remove the pre...

Page 106: ...ve the hook cover open If the hook cover is opened deactivate the lower thread indicator in the Setup Program The cord lies on the wrong side of the material and is hold sewn over by the bobbin thread Sewing Pintucks Insert the corresponding twin needle Threading the double needle Thread up command Sewing the first pintuck Place the first pintuck in one of the side grooves in the presser foot Sew ...

Page 107: ...erfect stitch formation it is recommended to use the same thread color for upper and bobbin threads The fabric can be reinforced with embroidery stabilizer on the wrong side When working with pile or napped fabrics e g toweling use an additional water soluble stabilizer on the right side of the fabric Stitch pattern Name ABCabc Block alphabet Double Block Script Italics Quilting text ABCabc Comic ...

Page 108: ...tion tap Combination Mode Single Mode To open the extended Enter Mode tap Increasing Decreasing the display size 1 1 Select the letter ABC To use upper case letters tap Upper Case Characters standard setting abc To use lower case letters tap Lower Case Characters 123 To use figures and mathematical symbols tap Numbers and Mathematical Characters To use special characters tap Special Characters To ...

Page 109: ...ouble block Script and Comic alphabets as well as Cyrillic can also be downsized Tap Alphabets Select the font Select the letter Tap i Dialog To reduce the font size tap Alter Font Size To scale up the font size to 9 mm tap Alter Font Size again ...

Page 110: ...m weight fabrics e g blouses dresses children s and baby clothes crafts 53 Stretch buttonhole For all elastic fabrics 54 Round buttonhole with normal bartack For medium weight to heavy fabrics e g dresses jackets coats and rainwear 55 Round buttonhole with horizontal bartack For medium weight to heavy fabrics with a reinforced bar e g dresses jackets coats and rainwear 56 Keyhole buttonhole For he...

Page 111: ...d handicrafts on light to medium weight fabrics 64 Double rounded buttonhole For medium weight to heavy fabrics made from different fabrics 65 Double rounded heirloom buttonhole For light to medium weight woven fabrics e g blouses dresses and bedlinen 67 Round buttonhole with bartack For medium weight woven fabrics e g blouses dresses and jackets 68 Decorative keyhole buttonhole with horizontal ba...

Page 112: ...the back between the sewing project and the bottom of the slide to the thick part of the sewing project Lower the presser foot 9 3 Using the compensation plate For sewing a buttonhole in problematic fabrics it is recommended to use the Height Compensation Tool optional accessory The Height Compensation Tool can be used in combination with the Buttonhole Foot with Slide 3A Insert the compensation p...

Page 113: ... to be sewn automatically mark the complete length of 1 buttonhole on the fabric using chalk or a water soluble pen For any subsequent buttonholes mark the starting point For keyhole and round buttonholes mark the lenght of the bead with chalk or a water soluble pen on the fabric For any subsequent buttonholes mark the starting point The length of the keyhole is sewn additionally ...

Page 114: ...ewing Prerequisite The Buttonhole Foot with Slide 3A is fitted and raised Insert the needle at the beginning of the buttonhole Guide the cord on the right side under the Buttonhole Foot with Slide Hook the cord over the pin at the back of the Buttonhole Foot with Slide Pull the cord on the left side under the Buttonhole Foot with Slide to the front Pull the cord ends into the slits Lower the Butto...

Page 115: ...site The Buttonhole Foot 3C is fitted and raised Insert the needle at the beginning of the buttonhole Hook the cord over the pin at the back of the buttonhole foot Pull both cords ends under the buttonhole foot to the back and place each a cord into a groove of the sole Lower the buttonhole foot Sew the buttonhole in the usual manner Pull the cord loop until the loop disappears in the bartack ...

Page 116: ...ole and the Round Buttonhole affect both beads in the same way With the manual keyhole or round buttonhole the alterations affect both sides in the opposite way If the Stitch Counter function is used and alterations are made concerning the Balance the alterations affect both buttonhole beads differently Tap Buttonholes Select the buttonhole Select and fit the desired presser foot Place the fabric ...

Page 117: ...ttonhole Foot 3C When the Buttonhole Foot 3C is used the buttonhole length must be determined via the function Stitch Counter The Stitch Counter function is suitable for all types of buttonholes The left buttonhole bead is sewn forward the right buttonhole bead is sewn in reverse If alterations are made to the Balance the Stitch Counter function has to be saved for every buttonhole separately Prer...

Page 118: ...31 mm depending on the buttonhole type The Buttonhole Foot with Slide 3A must lie perfectly flat on the fabric so that the length can be measured accurately Programmed buttonholes are the same length and of the same nice look Prerequisite The Buttonhole Foot with Slide 3A is fitted Tap Buttonholes Select the buttonhole No 51 59 No 63 65 or No 67 70 Sew the required length of the buttonhole To prog...

Page 119: ...g via the arrow icons or by pushing the button Quick Reverse Prerequisite The Buttonhole Foot 3C is fitted Tap Buttonholes Select Standard buttonhole No 51 Tap i Dialog man Tap Manual Length Adjustment Step 1 is activated in the display for the start of the buttonhole Sew the required length of the buttonhole Step 2 is activated Stop when the required length of the buttonhole or length marking is ...

Page 120: ...he Buttonhole Foot 3C is fitted Tap Buttonholes Select Round buttonhole with normal bartack No 54 Tap i Dialog man Tap Manual Length Adjustment Step 1 is activated in the display for the start of the buttonhole Sew the required length of the buttonhole Step 2 is activated Stop when the required length of the bead or length marking is reached Step 3 appears by tapping Scroll down The machine sews t...

Page 121: ...ry Place the fabric on an appropriate piece of wood Position the cutter in the center of the buttonhole Press down on the cutter with your hand 9 16 Sewing on buttons The Button Sew on Program can be used to sew on buttons with two or four holes press studs or snap fasteners Recommended Sewing Program Button sew on program No 60 Recommended Presser Foot Button Sew On Foot 18 Alternative Presser Fe...

Page 122: ...e left hole For buttons with 4 holes sew on the two front holes first then the two back holes Lower the presser foot Perform the first stitches in the left hole via the handwheel Keep turning the handwheel until the needle changes the position to the right hole Make sure that the needle hits the right hole If required adjust the stitch width via the Upper Multi function knob Hold the threads and p...

Page 123: ...ch straight stitch For sewing patchwork parts together using a straight stitch with a 2 mm stitch length No 1304 No 1308 Hand look quilt stitch For attaching an imitation of hand look stitch with monofilament No 1309 No 1314 Blanket stitch For applications and sewing on ribbons No 1317 No 1327 No 1329 No 1330 No 1339 No 1346 No 1363 No 1371 No 1373 No 1394 Decorative quilt stitch For quilting craz...

Page 124: ...utomatically at the end of the Securing Program 10 3 Sewing handlook quilt stitches Handlook quilt stitches are suitable for all fabrics and sewing projects which should look hand sewn It is recommended to use a monofilament thread as upper thread and an embroidery thread as bobbin thread The sewing speed should be moderate to prevent the monofilament from breaking If required the upper thread ten...

Page 125: ...th round movements to form the design of your choice Prerequisite The top layer the batting and the backing are pinned together or basted The feed dog is lowered The Darning Foot 9 is fitted Tap Practical Stitches Select Straight stitch No 1 If required adjust the upper thread tension To prevent the fabric from shifting select the needle position down To start the machine press the foot control or...

Page 126: ... on By moving the fabric the machine accelerates If the fabric isn t moved securing in place is possible without pressing an additional button When working via the foot control or when using the button Start Stop the BSR mode doesn t stop automatically 11 2 BSR mode 2 The BSR function can be controlled via the foot control or the button Start Stop The machine starts only when the foot control or t...

Page 127: ... the presser foot sole NOTICE The lens of the BSR presser foot is dirty The machine doesn t recognize the BSR presser foot Clean the lens with a soft slightly damp cloth Raise the needle Raise the BSR foot Switch the machine off and disconnect it from the power supply system Remove the BSR foot from the machine Press both push buttons at the BSR foot against each other Pull the presser foot sole o...

Page 128: ...o start the BSR Mode push the button Start Stop again or press and hold the foot control again A red light is lit on the BSR Presser Foot Move the fabric to control the speed of the machine in the BSR Mode To stop the BSR Mode push the button Start Stop again or release the foot control The BSR Mode stops and the red light at the presser foot goes off BSR To deactivate the BSR Mode and to quilt wi...

Page 129: ...with the selected settings as soon as the fabric is moved To stop the machine press the foot control briefly with your heel again The machine will stop but the KickStart function will remain active To end the KickStart function tap the screen or press the foot control at the front The BSR display appears The KickStart function will be deactivated The function programmed for the Back kick will be a...

Page 130: ...tion to the machine 12 2 Supplied accessories Embroidery module Overview accessory Embroidery module Illustration Name Purpose Drop Shaped Embroidery Foot 26 For embroidering darning and free motion quilting Large Oval Embroidery Hoop To embroider large embroidery motifs or motif combinations up to 145 x 255 mm 5 70 x 10 04 in Including the template for precise fabric positioning ...

Page 131: ...7 in For free arm embroidering with closed sewing projects such as sleeves trouser legs or socks Including the template for precise fabric positioning USB Connecting Cable To transfer data from the computer to the machine or vice versa Embroidery Needle Assortment For embroidering Template Holder To place and remove the template in or out of the embroidery hoop Spool Net For even thread unwinding ...

Page 132: ... Upper Thread Tension 5 Stitch Plate Selection 2 Needle Selection 6 Feed Dog Indicator 3 Presser foot indicator presser foot selection 7 Bobbin Thread 4 Hoop Indicator Select Hoop Overview System settings 1 2 3 4 5 6 7 1 Home 5 Help 2 Setup Program 6 eco Mode 3 Tutorial 7 Clear Settings 4 Creative Consultant ...

Page 133: ...beautiful embroidery Glossy polyester with a brilliant sheen is a hard wearing colorfast thread and has a high tensile strength which is suitable for all types of embroidery Rayon is a soft viscose fiber with a brilliant sheen and suitable for fine delicate embroidery or items that will not receive excessive wear and tear Metallic thread is a light to medium weight thread suitable for special effe...

Page 134: ...F file provides the information on the thread colors Please note If the INF file is missing the embroidery motif cannot be displayed in the real color but only in standard colors In this case the colors can be entered manually in the color overview of the motif on the machine Additionally following embroidery formats can be read by the machine PES PEC XXX PCS JEF and DST BERNINA International AG p...

Page 135: ... The result is a very dense covering zigzag stitching to fill the shape Satin stitching fills are ideal for narrow and small shapes Satin stitching is however not suitable for larger areas since wide stitches are too loose and do not cover the fabric properly In addition there is the risk that with too long stitches the threads could catch on something which would damage the embroidery Step stitch...

Page 136: ...NA Embroidery 134 Connecting stitches Long stitches which are used to get from one part of the motif to the next Before and after the connecting stitch securing stitches are sewn Connecting stitches are trimmed ...

Page 137: ...e slide on table must not be attached Make sure that the module and the machine are placed on a stable even surface Make sure that there is enough space around to allow the unimpeded movement of the embroidery arm Lift the embroidery module on the left Carefully push the embroidery module from left to right into the embroidery module connection of the machine 1 1 1 To remove the embroidery module ...

Page 138: ...ind all embroidery motifs at the end of the instruction manual Furthermore embroidery motifs from the Personal Memory or from the BERNINA USB stick can be loaded Tap Home Tap Embroidery Mode Select an alphabet an embroidery motif a stitch pattern or a personal embroidery motif from one of the files 13 3 Embroidery foot Attaching the embroidery foot Raise the needle Raise the presser foot Switch th...

Page 139: ...are available for the currently selected embroidery motif Switch the machine on Select an embroidery motif Tap Presser foot indicator presser foot selection Select the fitted embroidery foot 13 4 Needle and stitch plate Inserting the embroidery needle Embroidery needles of the type 130 705 H SUK provide a larger eye and are slightly rounded This avoids thread abrasion when using Rayon and cotton e...

Page 140: ...his can be used with the selected stitch plate Tap Needle Selection Select the fitted needle If the selected needle is suitable in combination with the stitch plate embroidering can be started If the selected needle is not suitable in combination with the stitch plate starting the machine is automatically blocked Selecting needle type and needle size Convenient memory function To prevent a loss of...

Page 141: ...d in and knotted optimally which results in an optimized stitching result To lower the feed dog push the button Feed dog up down Switch off the machine and disconnect it from the power supply Remove the needle Remove the presser foot At the marking on the rear of the stitch plate push the stitch plate downwards until it tips Remove the stitch plate Place the opening of the stitch plate Straight an...

Page 142: ...chine is automatically prevented Thread up command The machine must be ready for embroidery to bring up the bobbin thread The bobbin thread can be brought up in one step for a manual knotting If no securing stitches are wanted it is recommended to deactivate the securing stitches in the Setup Hold the upper thread Push the button Presser Foot Up Down The bobbin thread is brought up automatically 1...

Page 143: ...h temporary adhesive spray Carefully cut away excess stabilizer after embroidering Using adhesive spray The application of spray adhesive is recommended for stretch and smooth materials and knitware It prevents the fabric from losing shape and slipping Appliqués can be exactly positioned with spray adhesive The spray adhesive shouldn t be used near the machine to avoid contamination Use the adhesi...

Page 144: ...embroidery The stabilizer dissolves in water Water soluble stabilizers are an ideal protection for looped pile fabrics preventing the loops from being damaged It prevents threads from sinking into the material and keeps the fabric pile from poking though the embroidery Place the stabilizer on the underside of the material Use adhesive spray to adhere stabilizer if necessary For material with a pil...

Page 145: ...free arm press the inner hoop into the outer hoop so that the inner hoop including the fabric protrudes downwards by up to 1 mm Attaching the hoop Raise the needle Raise the embroidery foot Hold the hoop with the right side of the fabric up with the attaching mechanism to the left Position the hoop below the embroidery foot Press both attaching mechanisms 1 of the hoop towards each other Position ...

Page 146: ... To move the hoop back to its previous position push the button Start Stop Moving the hoop to the back To facilitate changing the bobbin it is recommended to move the hoop to the back before threading This makes it easier to open the bobbin cover Tap Hoop Indicator Select Hoop P Tap Move Hoop to the Back Thread the bobbin thread see page 46 To move the hoop back to its previous position push the b...

Page 147: ...so that the needle is placed exactly over the center of the embroidery motif tap Center Motif To position the hoop so that the needle is placed exactly over the motif start tap Center Motif again Virtual positioning of the embroidery hoop The embroidery hoop is automatically moved to the new position as soon as the embroidery motif is repositioned Therefore the icon Virtual Positioning is activate...

Page 148: ...Setup Program 146 14 Setup Program 14 1 Adjusting the embroidery settings in the Setup Program Further information about this topic see page 53 ...

Page 149: ...tif Tap Selection Tap Load Embroidery Motif Select a new embroidery motif 15 3 Checking the embroidery time and the embroidery motif size In the selection menu Edit the estimated embroidery time in minutes as well as the width and height of the embroidery motif is indicated at lower left 1 1 15 4 Regulating the speed The sewing speed can be adjusted infinitely variable with the slide Move the slid...

Page 150: ...ling 9 Mirror Image Left Right Scaling up the embroidery motif view The view of the embroidery motif can be scaled up In addition to that the view can be adjusted with or without changing the embroidery position Select an embroidery motif To edit the view of the embroidery motif tap Zoom In To scale up the view of the embroidery motif tap Zoom In 1 up to 4 times To get back to the Edit Mode tap Zo...

Page 151: ...embroidery position Select an embroidery motif To display the icon Relocating a stitch pattern tap Zoom In Tap Move Embroidery Motif The icon turns dark gray Move the view of the embroidery motif The embroidery position is altered To get back to the Edit Mode tap Zoom Out Moving the embroidery motif Select an embroidery motif Tap i Dialog Tap Move Embroidery Motif Turn the Upper Multi function kno...

Page 152: ...he embroidery motif size proportionally Enlargements or reductions of the motif size up to maximum 20 achieve the best results If the motif size is to be altered by more than 20 the motif should be adapted in a separate embroidery software and then reloaded onto the machine Select an embroidery motif Tap i Dialog Tap Change Motif Size If Retain proportions is not outlined in white tap Retain propo...

Page 153: ...mbroidery motif wider turn the Upper Multi function knob clockwise To make the embroidery motif narrower turn the Upper Multi function knob anti clockwise To make the embroidery motif longer turn the Lower Multi function knob clockwise To make the embroidery motif shorter turn the Lower Multi function knob anti clockwise Mirroring embroidery motifs Embroidery motifs can be mirror imaged both verti...

Page 154: ...satin stitches are too long they can be changed to step stitches Select an embroidery motif Tap i Dialog Tap Alter Stitch Type Stitch Density 1 2 Touch the switch in the upper section of the display 1 to change the satin stitch to the step stitch Set the stitch length to 2 Altering the stitch density If the satin stitches are embroidered too densely the stitch density can be adjusted Select an emb...

Page 155: ...ated in the display If the embroidery motif hasn t been positioned correctly yet the position can be altered via the Upper Lower Multi function knobs and the complete embroidery positions can be checked again To position the needle in the center of the embroidery motif tap Center Motif Turn the Upper Multi function knob to move the embroidery motif horizontally Turn the Lower Multi function knob t...

Page 156: ...n canceled i e the embroidery motif has been broken down into different elements colors the colors are no longer combined for new groupings With alphabets the length of the connecting stitches must first be set to 1 in the setup The cancellation of the group then works for all letters Create an embroidery motif combination Select the embroidery motif 1 in the embroidery motif combination 1 Tap i D...

Page 157: ...er soluble pen on the fabric The place or the location where the embroidery motif is to be positioned is clearly visible Select an embroidery motif Tap i Dialog Tap Pinpoint Placement Tap Grid Point Positioning The embroidery motif is given a grid with nine different location positioning points To prevent the size of the embroidery motif from being changed when positioning the points tap Scale the...

Page 158: ...ints can be defined as you like within the embroidery motif Prerequisite Any two points of the embroidery motif are marked with chalk or a water soluble pen on the fabric The place or the location where the embroidery motif is to be positioned is clearly visible Select an embroidery motif Tap i Dialog Tap Pinpoint Placement Tap Free Point Positioning To prevent the size of the embroidery motif fro...

Page 159: ...hanged position tap Save Position The point changes color and is set The embroidery motif is adjusted accordingly To reset the changes and revert to the default settings tap Reset Pinpoint Placement 15 7 Combining embroidery motifs Combining embroidery motifs In the Combi mode several embroidery motifs can be combined Select an embroidery motif Tap Add Embroidery Motif 1 Select another embroidery ...

Page 160: ...drag it outwards A new window opens 1 To delete the selected embroidery motif tap Confirm Duplicating the embroidery motif Select an embroidery motif Tap i Dialog Tap Duplicating The embroidery motif 1 is duplicated 2 1 2 Duplicating a combination When a combination is duplicated the individual embroidery motifs cannot be selected anymore Select an embroidery motif Tap Add Embroidery Motif Select ...

Page 161: ...ttering Overview embroidery alphabets Embroidery motif Name Swiss Block Anniversary Alphabet Guinevere Drifter Childs Play Russian Textbook Curly Rounded Sans Creating words sentences A lettering is always embroidered in one color To embroider individual letters or individual words in a different color the grouping must be canceled ...

Page 162: ...ures and mathematical symbols tap Numbers and Mathematical Characters To use special characters tap Special Characters Tap the text box above the keyboard to delete the entered text completely To delete single letters of the entered text tap Delete To accept the text tap Confirm Tap Hoop Indicator Select Hoop Select the hoop To get back to the Edit Mode tap Hoop Indicator Select Hoop again Editing...

Page 163: ...Enter the text and rotate it if necessary Tap Hoop Indicator Select Hoop To position the text lines more precisely tap Grid On Off 15 9 Changing the colors of the embroidery motif Overview changing the color 1 2 3 4 5 1 Color indication 4 Altering color brand 2 Preview for selected color 5 Color Information 3 Assign Thread Brand ...

Page 164: ...nging the thread brand Select an embroidery motif Tap Color Information Tap Altering color brand To display other thread brands scroll to the left and to the right Tap Assign Thread Brand Any thread colors of the selected embroidery motif will be matched with the selected thread brand 15 10 Embroidering the embroidery motif Overview Embroidery menu 1 2 3 4 5 6 7 1 Basting 5 Reduce Color Changes 2 ...

Page 165: ...embroidery motif using the function Embroidery Sequence Control Select an embroidery motif Tap Embroidery Tap Embroidery Sequence Control In the left section of the display a compact view of the embroidery motif is displayed On the right side the enlarged embroidery motif is displayed Select the desired position in the compact view Turn the Upper Multi function knob to move the hoop stitch by stit...

Page 166: ... The hoop moves to the first stitch of the current color The currently active color can be embroidered individually or in another sequence Select an embroidery motif Tap Embroidery Touch the icon Scroll up to select the previous color of the embroidery motif 15 11 Freearm Embroidery Freearm embroidering is defined as embroidering tubular fabrics or garments which are positioned around the freearm ...

Page 167: ...ropriate stabilizer in the embroidery hoop depending on the stabilizer Pull the fabric tube carefully over the freearm of the machine and attach the embroidery hoop at the clutch of the embroidery module If necessary reposition the embroidery motif check Tap Check Embroidery Motif Size After the successful check of the embroidery motif size start the embroidery process 15 12 Administering embroide...

Page 168: ...e is activated Select the embroidery motif which is to be overwritten Tap Confirm Overwriting the embroidery motif on the BERNINA USB stick Select an embroidery motif Edit the embroidery motif Tap Selection Tap Save Embroidery Motif The embroidery motif to be saved is outlined in yellow Insert the BERNINA USB stick into the USB port of the machine Tap USB Stick Select the embroidery motif which is...

Page 169: ...if from the personal memory Tap Selection Tap Load Embroidery Motif Select Personal Embroidery motif Select an embroidery motif Loading an embroidery motif from the BERNINA USB stick Tap Selection Insert the BERNINA USB stick into the USB port of the machine Tap USB Stick Select a personal embroidery motif Deleting an embroidery motif from the personal memory The embroidery motifs which are saved ...

Page 170: ...ct the embroidery motif which is to be deleted Tap Confirm Deleting an embroidery motif from the BERNINA USB stick Tap Selection Tap Delete Insert the BERNINA USB stick into the USB port of the machine Tap USB Stick Select the embroidery motif which is to be deleted Tap Confirm ...

Page 171: ...ured By switching the machine off and on the optimal embroidery speed is activated Prerequisite The embroidery motif is selected Tap Embroidery speed The maximum speed is activated Tap Embroidery speed again The optimal speed is activated 16 3 Adjusting the upper thread tension The default setting of the upper thread tension is set automatically as soon as a stitch pattern or an embroidery motif i...

Page 172: ...ellow outlined icon on the left side to reset the alteration to default setting in the Setup Program 16 4 Embroidering via the foot control Embroidering via the foot control is recommended when only a short sequence has to be embroidered While embroidering the foot control must be pressed down all the time Press the foot control to start embroidering ...

Page 173: ...ommended to save data and settings on a BERNINA USB stick before the firmware update is started If personal data and settings should get lost during a firmware update they can be transferred to the machine again afterwards Prerequisite Accessories such as the Embroidery module or the BSR Foot which are connected to the machine have been removed Insert the USB stick with the new firmware version in...

Page 174: ...nsferred and the machine cannot be used Remove the BERNINA USB stick optional accessory only after the saved data has been transferred successfully Tap Load Data After the data has been transferred a green tick is temporarily displayed 17 2 Machine Cleaning the display Clean the display in the switched off status with a soft slightly damp microfiber cloth Cleaning the feed dog Remaining threads un...

Page 175: ...t use compressed air spray Clean the feed dog with the brush Cleaning the hook CAUTION Electronically driven components Risk of injury near the needle and the hook Switch the machine off and disconnect it from the power supply system Open the hook cover Remove the bobbin case Press the release lever to the left Fold down the fastening bracket along with the black hook race cover Remove the hook ...

Page 176: ...astened to the correct position Close the hook race cover and the fastening bracket until the release bracket engages As a check turn the handwheel Insert the bobbin case Lubricating the hook Lubricating the hook can prevent the occurrence of unwanted noises in the hook area BERNINA recommends lubricating the hook in the following cases Before using the machine for the first time After a longer do...

Page 177: ...n in the center with two fingers Guide the hook lower edge first at an angle from above behind the hook race cover Position the hook with the two lugs on the hook driver meeting the corresponding openings in the hook the colored mark on the hook driver should be visible through the hole in the hook Insert the hook The hook is magnetic and therefore fastened to the correct position Close the hook r...

Page 178: ... maintenance 176 Cleaning the thread catcher Tap Setup Program Tap Machine Settings Tap Maintenance Updates Tap Cleaning the thread catcher Clean the thread catcher according to the instructions on the display ...

Page 179: ...hes The feed dog is not lowered To lower the feed dog push the button Feed dog up down The selected needle and stitch plate cannot be used in combination Replace the needle Replace the stitch plate The needle is not at its top end Adjust the needle position via the handwheel The upper thread is used up Rethread The upper thread has broken Rethread The bobbin thread is used up Rethread The bobbin t...

Page 180: ... the Setup Program Incorrect presser foot for the BERNINA Dual Feed Fit a presser foot with the designation D The fabric under the presser foot is too thick Reduce the fabric thickness The contact between the machine and the embroidery module is interrupted due to vibrations Make sure that the module and the machine are standing on a stable even surface Connect the embroidery module to the machine...

Page 181: ...nough free capacity on the BERNINA USB stick optional accessory Make sure that the BERNINA USB stick optional accessory is used Delete data from the BERNINA USB stick optional accessory No personal data on the BERNINA USB stick optional accessory No personal data for recovery available on the BERNINA USB stick optional accessory Make sure that the data and settings have been saved on the BERNINA U...

Page 182: ...hread catcher needs cleaning The thread catcher must be cleaned The message appears every time the machine is switched on after 1000 cutting cycles have been reached Tap Confirm The machine calls up the function Clean the thread catcher Clean the thread catcher according to the instructions on the display The counter for the cutting cycles is reset It is time for the regular maintenance Please con...

Page 183: ...sary Clean the feed dog If the error still occurs contact specialized BERNINA dealer 18 2 Troubleshooting Fault Cause Solution Uneven stitch formation Upper thread too tight or too loose Adjust the upper thread tension Check the thread feed from the thread spool Needle blunt or bent Replace the needle make sure that a new BERNINA quality needle is used Poor quality needle Use a new BERNINA quality...

Page 184: ... Upper thread breaks Incorrect needle thread combination Match the needle with the thread size Upper thread is too tight Reduce the upper thread tension Incorrectly threaded Rethread Poor quality thread Use quality thread The stitch plate or the hook tip is damaged Contact the nearest specialized BERNINA dealer to have the damages repaired Replace the stitch plate The thread is caught in the area ...

Page 185: ...election prevents the adjustment of the stitch width Select the fitted presser foot Speed too low Unfavorable room temperature Place the machine in a warm room one hour before use Settings in the Setup Program Adjust the sewing speed in the Setup Program Adjust the slide The machine doesn t start Unfavorable room temperature Place the machine in a warm room one hour before use Connect the machine ...

Page 186: ...update process is blocked and the hourglass on the display is inactive Remove the USB stick Switch off the machine Switch the machine on Follow the instruction on the display Firmware update files are not found Unzip the update data Store data for the firmware update directly on the data medium and not in a folder on the USB stick Beads and or bartacks are repeatedly not sewn properly The Buttonho...

Page 187: ...red in a cold room place it in a warm room one hour before use Switch the machine off and disconnect it from the power supply system Don t store the machine outdoor Protect the machine against climatic influences 19 2 Dispose of the machine Clean the machine Sort the components by their materials and dispose of them according to the local laws and regulations ...

Page 188: ... thickness 12 5 0 49 mm in Sewing light 30 LED Maximum speed 1000 Stitches per minute Measurements without the spool pin W H D 522 358 214 20 55 14 09 8 43 mm in Weight 14 30 86 kg lb Energy consumption 140 W Input voltage 100 240 V Protection class Electrical engineering II ...

Page 189: ...6 37 38 39 40 Buttonholes 51 52 53 54 55 56 57 58 59 60 61 62 63 64 65 67 68 69 70 Decorative stitches Natural stitches 101 102 103 104 105 106 107 108 109 110 111 112 113 114 115 116 117 118 119 122 123 124 125 126 127 128 129 130 131 132 134 136 137 138 139 140 141 142 143 144 145 146 147 148 150 152 153 154 155 156 159 160 161 165 166 167 168 169 170 171 172 173 174 175 176 177 178 179 180 181 ...

Page 190: ...2 373 374 375 376 377 378 Satin stitches 401 402 405 406 407 408 409 410 412 413 414 415 416 417 418 419 421 422 423 424 425 426 427 428 429 430 431 433 434 436 437 440 442 443 444 445 447 448 449 450 451 452 453 454 455 456 457 458 461 464 465 466 468 469 471 472 473 Geometric stitches 601 602 603 604 605 606 607 608 609 610 611 612 613 614 615 616 618 619 620 621 622 623 624 625 626 627 628 629 ...

Page 191: ...703 704 705 706 707 708 709 710 711 712 713 714 715 716 717 721 722 723 724 725 726 727 729 730 731 732 733 734 735 736 737 738 739 740 741 742 743 744 745 746 747 748 749 750 751 752 756 762 764 765 767 768 769 770 771 772 773 774 775 776 777 778 779 780 781 782 783 Novelty stitches 901 902 903 904 905 906 907 908 909 910 911 912 913 914 915 916 917 918 919 920 921 922 924 926 928 929 935 937 938...

Page 192: ... 1735 1736 Seasons 2001 2002 2003 2004 2005 2006 2007 2008 2009 2015 2016 2017 2018 2019 2020 2021 2022 2023 Sport and hobbies 2201 2202 2203 2204 2205 2206 2207 2209 2210 2211 2212 2213 2215 2216 2217 2218 2219 Kaffe Fassett stitches 7101 7102 7103 7104 7105 7106 7107 7108 7109 7110 7111 7112 7113 7114 7115 7116 7117 7118 7119 7120 7121 7122 7123 7124 7125 7126 7127 7129 7130 7131 ...

Page 193: ... 1382 1384 1385 1386 1387 1388 1389 1390 1391 1393 1394 21 2 Overview Embroidery motifs Editing embroidery motifs Let your inspiration run free A vast selection of embroidery motifs is at your disposal If you see one of the following pictograms below a number of the embroidery motif you can find additional information at https www bernina com specialeffects Freestanding lace Punchwork Design motif...

Page 194: ...acord 40 5822 Bd381 62 x 64 mm 2 4 x 2 5 inch 866 1 Isacord 40 5822 Bd382 80 x 69 mm 3 2 x 2 7 inch 756 1 Isacord 40 5822 Bd383 80 x 80 mm 3 1 x 3 1 inch 1 690 1 Isacord 40 5822 Bd384 46 x 46 mm 1 8 x 1 8 inch 430 1 Isacord 40 5822 Bd385 46 x 92 mm 1 8 x 3 6 inch 852 1 Isacord 40 5822 Bd386 93 x 91 mm 3 6 x 3 6 inch 1 572 1 Isacord 40 5822 Bd387 67 x 67 mm 2 6 x 2 6 inch 741 1 Isacord 40 5822 ...

Page 195: ...1 43 x 55 mm 1 7 x 2 2 inch 620 1 Isacord 40 5822 Bd392 52 x 68 mm 2 1 x 2 7 inch 632 1 Isacord 40 5822 Bd395_48 96 x 96 mm 3 8 x 3 8 inch 5 672 1 Isacord 40 3641 Bd396_48 97 x 97 mm 3 8 x 3 8 inch 3 728 1 Isacord 40 3641 Bd403_48 97 x 97 mm 3 8 x 3 8 inch 5 309 1 Isacord 40 1430 Bd407_48 51 x 41 mm 2 x 1 6 inch 974 1 Isacord 40 1335 Bd408_48 80 x 80 mm 3 1 x 3 1 inch 2 468 1 Isacord 40 1335 ...

Page 196: ...5822 Bd415_48 97 x 97 mm 3 8 x 3 8 inch 3 212 1 Isacord 40 5822 Bd416_48 97 x 97 mm 3 8 x 3 8 inch 2 168 1 Isacord 40 5822 Bd364 89 x 89 mm 3 5 x 3 5 inch 1 373 1 Isacord 40 3150 Bd370 46 x 93 mm 1 8 x 3 7 inch 1 028 1 Isacord 40 3150 Bd373 103 x 34 mm 4 x 1 3 inch 770 1 Isacord 40 3150 Bd367 65 x 65 mm 2 6 x 2 6 inch 1 124 1 Isacord 40 3150 Bd566_48 110 x 59 mm 4 3 x 2 3 inch 2 260 1 Isacord 40 5...

Page 197: ... 123 x 123 mm 4 9 x 4 8 inch 7 229 1 Isacord 40 5610 12499 05 123 x 123 mm 4 9 x 4 9 inch 6 317 1 Isacord 40 4103 12499 24 133 x 215 mm 5 2 x 8 4 inch 11 445 1 Isacord 40 4103 12499 23 123 x 123 mm 4 9 x 4 9 inch 11 194 1 Isacord 40 5115 12607 20 122 x 122 mm 4 8 x 4 8 inch 1 055 1 Isacord 40 0020 12607 21 61 x 122 mm 2 4 x 4 8 inch 657 1 Isacord 40 0020 12416 04 89 x 89 mm 3 5 x 3 5 inch 3 482 1 ...

Page 198: ... 5610 Nb346_48 76 x 76 mm 3 x 3 inch 3 366 1 Isacord 40 5513 Nb347_48 76 x 76 mm 3 x 3 inch 2 337 1 Isacord 40 5513 Nb334_48 127 x 127 mm 5 x 5 inch 6 838 1 Isacord 40 5513 Nz498 89 x 89 mm 3 5 x 3 5 inch 2 642 1 Isacord 40 3353 Nz503 99 x 99 mm 3 9 x 3 9 inch 2 103 1 Isacord 40 3353 82013 29 121 x 121 mm 4 8 x 4 8 inch 5 644 1 Isacord 40 2920 82013 30 83 x 166 mm 3 3 x 6 5 inch 2 774 1 Isacord 40...

Page 199: ... 16 123 x 122 mm 4 8 x 4 8 inch 1 222 1 Isacord 40 0020 12616 16 123 x 123 mm 4 8 x 4 8 inch 1 198 1 Isacord 40 5422 12380 22 110 x 61 mm 4 4 x 2 4 inch 2 487 1 Isacord 40 1543 12380 43 123 x 123 mm 4 9 x 4 9 inch 8 248 1 Isacord 40 1543 12380 30 89 x 96 mm 3 5 x 3 8 inch 4 442 1 Isacord 40 1543 12380 04 83 x 90 mm 3 3 x 3 5 inch 2 189 1 Isacord 40 1543 12380 08 89 x 89 mm 3 5 x 3 5 inch 2 725 1 I...

Page 200: ... Isacord 40 0020 5 Isacord 40 0020 6 Isacord 40 0020 7 Isacord 40 0020 8 Isacord 40 0020 9 Isacord 40 0020 10 Isacord 40 0020 11 Isacord 40 0020 12 Isacord 40 0020 12736 05 140 x 136 mm 5 5 x 5 3 inch 1 329 1 Isacord 40 0020 2 Isacord 40 0020 3 Isacord 40 0020 4 Isacord 40 0020 5 Isacord 40 0020 6 Isacord 40 0020 7 Isacord 40 0020 8 Isacord 40 0020 12736 06 140 x 140 mm 5 5 x 5 5 inch 1 563 1 Isac...

Page 201: ... 4 inch 1 240 1 Isacord 40 0020 12736 11 152 x 152 mm 6 x 6 inch 1 181 1 Isacord 40 0020 12736 12 127 x 127 mm 5 x 5 inch 966 1 Isacord 40 0020 12736 13 152 x 152 mm 6 x 6 inch 878 1 Isacord 40 0020 12736 14 126 x 126 mm 4 9 x 4 9 inch 653 1 Isacord 40 0020 12736 15 127 x 126 mm 5 x 4 9 inch 728 1 Isacord 40 0020 12736 16 127 x 127 mm 5 x 5 inch 716 1 Isacord 40 0020 12736 17 127 x 127 mm 5 x 5 in...

Page 202: ...cord 40 0108 32152 03b 179 x 196 mm 7 1 x 7 7 inch 1 847 1 Isacord 40 0108 2 Isacord 40 0108 32152 04 190 x 288 mm 7 5 x 11 4 inch 22 113 1 Isacord 40 0108 32152 05a 190 x 153 mm 7 5 x 6 inch 10 319 1 Isacord 40 0108 2 Isacord 40 0108 32152 05b 184 x 176 mm 7 2 x 6 9 inch 11 845 1 Isacord 40 0108 2 Isacord 40 0108 3 Isacord 40 0108 32152 06 115 x 140 mm 4 5 x 5 5 inch 2 532 1 Isacord 40 0108 32152...

Page 203: ...2 Applique 2 3 Applique 1 4 Applique 2 5 Applique 1 6 Applique 2 7 Applique 1 8 Applique 2 9 Isacord 40 0015 10 Isacord 40 0020 11 Isacord 40 5510 12 Isacord 40 5650 13 Isacord 40 4230 14 Isacord 40 4116 15 Isacord 40 0132 16 Isacord 40 0112 17 Isacord 40 0015 Ck867 122 x 133 mm 4 8 x 5 2 inch 28 880 1 Applique 1 2 Applique 2 3 Applique 3 4 Isacord 40 5730 5 Isacord 40 2761 6 Isacord 40 0630 7 Isa...

Page 204: ...acord 40 0108 5 Isacord 40 0015 6 Isacord 40 3622 7 Isacord 40 4174 8 Isacord 40 0015 Ck522 71 x 53 mm 2 8 x 2 1 inch 9 089 1 Isacord 40 3810 2 Isacord 40 0131 3 Isacord 40 0015 4 Isacord 40 0020 5 Isacord 40 0310 6 Isacord 40 1703 7 Yenmet 7021 8 Isacord 40 3353 Ck863 127 x 125 mm 5 x 4 9 inch 19 354 1 Isacord 40 0630 2 Isacord 40 0506 3 Isacord 40 0630 4 Isacord 40 0015 5 Isacord 40 4103 6 Isaco...

Page 205: ...plique 1 3 Applique 2 4 Isacord 40 1720 Be790309 87 x 150 mm 3 4 x 5 9 inch 13 252 1 Applique 1 2 Applique 3 3 Isacord 40 0015 4 Isacord 40 1900 5 Isacord 40 0020 6 Isacord 40 4116 7 Isacord 40 0176 8 Isacord 40 0015 9 Isacord 40 0310 Be790310 138 x 136 mm 5 4 x 5 4 inch 16 278 1 Applique 1 2 Applique 3 3 Applique 1 4 Applique 3 5 Isacord 40 1161 6 Isacord 40 1141 7 Isacord 40 1161 8 Isacord 40 36...

Page 206: ... Isacord 40 0020 Cm216_48 47 x 67 mm 1 9 x 2 6 inch 5 046 1 Isacord 40 1010 2 Isacord 40 0101 3 Isacord 40 0132 4 Isacord 40 0020 5 Isacord 40 0124 6 Isacord 40 1010 7 YLI variations 8012 Cm213_48 58 x 102 mm 2 3 x 4 inch 7 866 1 Isacord 40 1840 2 Isacord 40 1055 3 Isacord 40 1252 4 Isacord 40 0651 5 Isacord 40 0660 6 Isacord 40 0020 7 Isacord 40 1055 Wp421_48 96 x 137 mm 3 8 x 5 4 inch 14 219 1 I...

Page 207: ...3 1 Isacord 40 0015 2 Isacord 40 0015 3 Isacord 40 0020 4 Isacord 40 2051 5 Isacord 40 0015 6 Isacord 40 4174 7 Isacord 40 2051 8 Isacord 40 0015 12621 05 155 x 104 mm 6 1 x 4 1 inch 5 811 1 Isacord 40 0015 2 Isacord 40 0015 3 Isacord 40 0933 4 Isacord 40 1252 5 Isacord 40 1252 6 Isacord 40 0015 12621 09 155 x 104 mm 6 1 x 4 1 inch 5 520 1 Isacord 40 0015 2 Isacord 40 0015 3 Isacord 40 0504 4 Isac...

Page 208: ...0670 12606 37 46 x 78 mm 1 8 x 3 1 inch 2 692 1 Isacord 40 0670 2 Isacord 40 0670 3 Isacord 40 0670 12611 21 156 x 72 mm 6 1 x 2 8 inch 11 513 1 Applique 1 2 Applique 2 3 Isacord 40 1703 12611 23 156 x 72 mm 6 1 x 2 8 inch 12 817 1 Applique 1 2 Applique 2 3 Isacord 40 1902 12611 22 156 x 72 mm 6 1 x 2 8 inch 12 504 1 Applique 1 2 Applique 2 3 Isacord 40 1703 12611 24 156 x 72 mm 6 1 x 2 8 inch 12 ...

Page 209: ...2611 08 80 x 120 mm 3 1 x 4 7 inch 5 770 1 Applique 1 2 Applique 2 3 Applique 1 4 Applique 2 5 Isacord 40 1154 6 Isacord 40 5440 7 Isacord 40 1902 12611 18 130 x 158 mm 5 1 x 6 2 inch 8 045 1 Applique 1 2 Applique 2 3 Isacord 40 0151 4 Isacord 40 5440 Nx737 72 x 99 mm 2 8 x 3 9 inch 10 793 1 Isacord 40 0015 2 Yenmet 7005 3 Isacord 40 3962 4 Isacord 40 0020 Nx741 80 x 78 mm 3 1 x 3 1 inch 11 206 1 ...

Page 210: ...acord 40 0020 2 Isacord 40 1306 Be790608 80 x 80 mm 3 2 x 3 1 inch 7 937 1 Isacord 40 0020 Be790603 80 x 75 mm 3 2 x 2 9 inch 11 824 1 Isacord 40 0015 2 Isacord 40 3654 Be790602 80 x 75 mm 3 1 x 3 inch 10 169 1 Isacord 40 5643 2 Isacord 40 5912 3 Isacord 40 0015 Embellishment Nb843_48 87 x 121 mm 3 4 x 4 8 inch 8 976 1 Isacord 40 9971 2 Isacord 40 9937 3 Isacord 40 9925 4 Isacord 40 9975 5 Isacord...

Page 211: ...0090 07 128 x 36 mm 5 x 1 4 inch 5 450 1 Applique 1 2 Applique 2 3 Isacord 40 5440 19999 002 125 x 136 mm 4 9 x 5 4 inch 10 184 1 Isacord 40 0015 2 Isacord 40 0015 3 Isacord 40 0015 Nb934_48 132 x 165 mm 5 2 x 6 5 inch 9 168 1 Isacord 40 2241 2 Isacord 40 1154 3 Isacord 40 1346 4 Isacord 40 1161 5 Isacord 40 2222 6 Isacord 40 5833 7 Isacord 40 1154 8 Isacord 40 2241 Nb935_48 104 x 169 mm 4 1 x 6 6...

Page 212: ...4 mm 4 9 x 4 1 inch 6 148 1 Isacord 40 0108 2 Isacord 40 3641 3 Isacord 40 3652 Fp887 135 x 187 mm 5 3 x 7 4 inch 12 658 1 Isacord 40 2504 12528 12 124 x 124 mm 4 9 x 4 9 inch 39 751 1 Isacord 40 0931 2 Isacord 40 0824 3 Isacord 40 0851 12528 03 76 x 130 mm 3 x 5 1 inch 16 171 1 Isacord 40 0851 2 Isacord 40 0824 3 Isacord 40 0931 Oc07207 106 x 138 mm 4 2 x 5 4 inch 17 807 1 Yenmet 7012 2 Isacord 4...

Page 213: ...51_48 72 x 103 mm 2 8 x 4 1 inch 8 612 1 Isacord 40 2155 2 Isacord 40 2504 3 Isacord 40 0020 4 Isacord 40 0020 Be790405 126 x 185 mm 4 9 x 7 3 inch 7 734 1 Isacord 40 3102 Fb126 87 x 102 mm 3 4 x 4 inch 2 668 1 Isacord 40 1220 2 Isacord 40 1805 Be790407 200 x 271 mm 7 9 x 10 7 inch 19 455 1 Isacord 40 2510 Be790502 60 x 58 mm 2 4 x 2 3 inch 1 814 1 Isacord 40 3541 Borders and Lace 12659 01 45 x 58...

Page 214: ...8 17 42 x 152 mm 1 6 x 6 inch 7 962 1 Isacord 40 0352 2 Isacord 40 4752 3 Isacord 40 5552 Oc33411 24 x 177 mm 0 9 x 7 inch 15 868 1 Isacord 40 0015 Oc33416 36 x 128 mm 1 4 x 5 inch 16 090 1 Isacord 40 1902 2 Isacord 40 0015 12485 12 41 x 139 mm 1 6 x 5 5 inch 3 391 1 Isacord 40 1134 2 Isacord 40 0520 3 Isacord 40 4240 4 Isacord 40 4111 5 Isacord 40 0702 6 Isacord 40 1430 12485 31 46 x 225 mm 1 8 x...

Page 215: ...1009 29 32 x 152 mm 1 3 x 6 inch 4 649 1 Isacord 40 5210 82005 40 26 x 240 mm 1 x 9 4 inch 8 256 1 Isacord 40 0851 Be790702 73 x 190 mm 2 9 x 7 5 inch 9 135 1 Isacord 40 0442 Na914_48 19 x 120 mm 0 7 x 4 7 inch 4 691 1 Isacord 40 3151 2 Isacord 40 3251 3 Isacord 40 3150 Cm473_48 32 x 209 mm 1 2 x 8 2 inch 8 963 1 Isacord 40 3920 2 Isacord 40 3962 Fb436_48 29 x 133 mm 1 1 x 5 2 inch 4 735 1 Isacord...

Page 216: ... Isacord 40 5730 2 Isacord 40 5513 3 Isacord 40 4430 4 Isacord 40 1032 5 Isacord 40 1900 6 Isacord 40 4113 12597 16 88 x 85 mm 3 5 x 3 3 inch 15 862 1 Isacord 40 0904 2 Isacord 40 0940 12858 04 159 x 164 mm 6 3 x 6 4 inch 16 385 1 Isacord 40 0015 2 Isacord 40 0015 80009 17 86 x 130 mm 3 4 x 5 1 inch 6 582 1 Isacord 40 5934 2 Isacord 40 5866 3 Isacord 40 5934 He255 133 x 127 mm 5 2 x 5 inch 17 198 ...

Page 217: ...rd 40 4103 10 Isacord 40 3522 11 Isacord 40 0842 Hg747_48 124 x 147 mm 4 9 x 5 8 inch 18 378 1 Isacord 40 0970 2 Isacord 40 3770 3 Isacord 40 5912 4 Isacord 40 0520 5 Isacord 40 0811 6 Isacord 40 3350 7 Isacord 40 3040 8 Applique 1 9 Applique 2 10 Applique 1 11 Applique 2 12 Applique 1 13 Applique 2 14 Isacord 40 4073 15 Isacord 40 0020 16 Isacord 40 1200 17 Isacord 40 0101 Nb754_48 114 x 128 mm 4...

Page 218: ... x 3 8 inch 8 085 1 Isacord 40 1010 2 Isacord 40 0811 3 Isacord 40 1311 4 Isacord 40 1543 Be790303 70 x 70 mm 2 7 x 2 8 inch 5 764 1 Isacord 40 0532 2 Isacord 40 1300 3 Isacord 40 0020 4 Isacord 40 0015 Be790301 127 x 89 mm 5 x 3 5 inch 10 153 1 Isacord 40 1161 2 Isacord 40 1860 3 Isacord 40 1805 4 Isacord 40 4116 5 Isacord 40 1114 6 Isacord 40 0532 7 Isacord 40 0731 8 Isacord 40 1322 9 Isacord 40...

Page 219: ... 40 1912 17 Isacord 40 1543 18 Isacord 40 0020 12505 04 124 x 176 mm 4 9 x 6 9 inch 11 861 1 Isacord 40 3840 2 Isacord 40 3840 3 Isacord 40 3815 4 Isacord 40 0311 5 Isacord 40 5822 6 Isacord 40 5822 7 Isacord 40 6031 8 Isacord 40 5633 9 Isacord 40 0811 10 Isacord 40 0811 11 Isacord 40 2530 12 Isacord 40 2530 13 Isacord 40 2300 14 Isacord 40 2155 15 Isacord 40 0931 16 Isacord 40 0504 17 Isacord 40 ...

Page 220: ...cord 40 0442 3 Isacord 40 0345 4 Isacord 40 1301 5 Isacord 40 0702 6 Isacord 40 1102 7 Isacord 40 0761 8 Isacord 40 0640 Fl135 88 x 87 mm 3 5 x 3 4 inch 12 688 1 Isacord 40 5633 2 Isacord 40 5822 3 Isacord 40 5326 4 Isacord 40 0870 5 Isacord 40 3241 Fl136 85 x 89 mm 3 3 x 3 5 inch 8 501 1 Isacord 40 0311 2 Isacord 40 5326 3 Isacord 40 5374 4 Isacord 40 0101 5 Isacord 40 3951 Fl138 85 x 75 mm 3 3 x...

Page 221: ...6 106 x 172 mm 4 2 x 6 8 inch 12 636 1 Isacord 40 3150 2 Isacord 40 3210 3 Isacord 40 0311 4 Isacord 40 3331 5 Isacord 40 3711 6 Isacord 40 2250 7 Isacord 40 2241 8 Isacord 40 2051 12457 13 113 x 130 mm 4 4 x 5 1 inch 6 676 1 Isacord 40 6051 2 Isacord 40 5730 3 Isacord 40 5722 4 Isacord 40 2905 5 Isacord 40 0311 6 Isacord 40 5115 7 Isacord 40 5220 8 Isacord 40 5100 21009 21 65 x 108 mm 2 6 x 4 2 i...

Page 222: ...8 11_cr 84 x 124 mm 3 3 x 4 9 inch 174 1 Swarovski 0280 2 Swarovski 0280 3 Swarovski 0280 12448 08_pw 119 x 177 mm 4 7 x 7 inch 4 540 1 Edding 7 21022 13_dw 106 x 193 mm 4 2 x 7 6 inch 15 285 1 Edding 34 2 Edding 68 3 Edding 6 4 Applique 1 5 Applique 2 6 Isacord 40 2640 7 Applique 1 8 Applique 2 9 Isacord 40 1352 10 Isacord 40 1600 11 Isacord 40 4111 12 Isacord 40 4103 13 Isacord 40 0017 14 Isacor...

Page 223: ...dding 16 4 Edding 10 5 Edding 1 Be790903 181 x 293 mm 7 1 x 11 5 inch 11 366 1 Edding 19 Be790901 182 x 252 mm 7 1 x 9 9 inch 38 392 1 Edding 34 2 Edding 9 3 Edding 33 4 Edding 68 5 Edding 1 Be790909 167 x 322 mm 6 6 x 12 7 inch 20 162 1 Edding 7 Dw05 105 x 94 mm 4 1 x 3 7 inch 13 334 1 Isacord 40 2022 2 Cut 0001 3 Cut 0002 4 Cut 0003 5 Cut 0004 6 Isacord 40 2022 Dw10 184 x 184 mm 7 3 x 7 3 inch 5...

Page 224: ...0 2810 90025 05 51 x 49 mm 2 x 1 9 inch 3 750 1 Isacord 40 0101 2 Isacord 40 0520 3 Isacord 40 1300 4 Isacord 40 2560 5 Isacord 40 0101 6 Isacord 40 3750 90025 06 51 x 48 mm 2 x 1 9 inch 4 402 1 Isacord 40 0101 2 Isacord 40 5912 3 Isacord 40 2508 4 Isacord 40 2532 5 Isacord 40 0101 6 Isacord 40 2155 90025 07 52 x 51 mm 2 1 x 2 inch 4 648 1 Isacord 40 3150 2 Isacord 40 3251 3 Isacord 40 3150 4 Isac...

Page 225: ...2 x 48 mm 2 x 1 9 inch 4 816 1 Isacord 40 4240 2 Isacord 40 0520 3 Isacord 40 2160 4 Isacord 40 0101 5 Isacord 40 4240 6 Isacord 40 3251 7 Isacord 40 4610 8 Isacord 40 2530 90025 16 102 x 88 mm 4 x 3 5 inch 15 211 1 Isacord 40 0010 2 Isacord 40 1704 3 Isacord 40 2152 4 Isacord 40 3335 5 Isacord 40 5411 6 Isacord 40 5324 90025 17 102 x 88 mm 4 x 3 5 inch 17 447 1 Isacord 40 3962 2 Isacord 40 0232 3...

Page 226: ... 100 x 83 mm 3 9 x 3 3 inch 13 122 1 Isacord 40 0010 2 Isacord 40 6011 3 Isacord 40 0010 4 Isacord 40 5822 5 Isacord 40 4111 6 Isacord 40 3962 90025 26 101 x 84 mm 4 x 3 3 inch 16 975 1 Isacord 40 3962 2 Isacord 40 4111 3 Isacord 40 4101 4 Isacord 40 3335 90025 27 88 x 85 mm 3 5 x 3 4 inch 14 208 1 Isacord 40 6031 2 Isacord 40 5613 3 Isacord 40 5324 4 Isacord 40 2504 5 Isacord 40 3102 90025 28 89 ...

Page 227: ...54 90025 34 63 x 60 mm 2 5 x 2 4 inch 6 714 1 Isacord 40 0101 2 Isacord 40 3150 3 Isacord 40 4610 4 Isacord 40 3654 5 Isacord 40 3820 6 Isacord 40 1600 90025 35 56 x 64 mm 2 2 x 2 5 inch 5 473 1 Isacord 40 0101 2 Isacord 40 1352 3 Isacord 40 2530 4 Isacord 40 4610 5 Isacord 40 3150 6 Isacord 40 3654 7 Isacord 40 1600 8 Isacord 40 3820 90025 36 190 x 190 mm 7 5 x 7 5 inch 9 498 1 Isacord 40 0020 90...

Page 228: ...20 90025 44 101 x 203 mm 4 x 8 inch 946 1 Isacord 40 0020 90025 45 140 x 121 mm 5 5 x 4 8 inch 2 132 1 Isacord 40 0020 90025 46 72 x 80 mm 2 8 x 3 1 inch 397 1 Isacord 40 0020 90025 47 190 x 190 mm 7 5 x 7 5 inch 6 535 1 Isacord 40 0020 90025 48 67 x 203 mm 2 6 x 8 inch 1 073 1 Isacord 40 0020 90025 49 80 x 202 mm 3 1 x 8 inch 792 1 Isacord 40 0020 90025 50 190 x 190 mm 7 5 x 7 5 inch 8 085 1 Isac...

Page 229: ...90025 55 100 x 371 mm 3 9 x 14 6 inch 11 412 1 Isacord 40 0138 2 Isacord 40 0020 90025 56 190 x 190 mm 7 5 x 7 5 inch 3 950 1 Isacord 40 0020 2 Isacord 40 0138 90025 57 140 x 140 mm 5 5 x 5 5 inch 2 354 1 Isacord 40 0020 2 Isacord 40 0138 90025 58 190 x 190 mm 7 5 x 7 5 inch 7 503 1 Isacord 40 0020 2 Isacord 40 0138 90025 59 100 x 100 mm 3 9 x 3 9 inch 2 843 1 Isacord 40 0138 2 Isacord 40 0020 900...

Page 230: ...ord 40 5912 4 Isacord 40 2560 5 Isacord 40 4103 6 Isacord 40 3910 7 Isacord 40 3962 8 Isacord 40 0101 Kaffe Cat In A Ruff_4 101 x 92 mm 4 x 3 6 inch 28 674 1 Isacord 40 1346 2 Isacord 40 5912 3 Isacord 40 2560 4 Isacord 40 4103 5 Isacord 40 3910 6 Isacord 40 3962 7 Isacord 40 0101 Kaffe Peonies_1 192 x 192 mm 7 6 x 7 6 inch 114 987 1 Isacord 40 2520 2 Isacord 40 2530 3 Isacord 40 0442 4 Isacord 40...

Page 231: ...e White Dahlia_2 149 x 192 mm 5 9 x 7 6 inch 89 811 1 Isacord 40 0003 2 Isacord 40 2905 3 Isacord 40 3045 4 Isacord 40 2762 5 Isacord 40 6011 6 Isacord 40 0970 7 Isacord 40 5822 8 Isacord 40 5933 9 Isacord 40 0182 10 Isacord 40 0152 Kaffe White Dahlia_3 192 x 149 mm 7 6 x 5 9 inch 89 406 1 Isacord 40 0003 2 Isacord 40 2905 3 Isacord 40 3045 4 Isacord 40 2762 5 Isacord 40 6011 6 Isacord 40 0970 7 I...

Page 232: ...e firmware version 171 Child safety lock 65 Cleaning the feed dog 172 Cleaning the hook 173 Combination Mode 72 157 Combining Embroidery Motifs 157 Cord 112 D Decorative stitches 99 Display machine ID 63 Dispose of the machine 185 E Embroidery file format 132 Embroidery test 132 Energy saving Mode 65 Entering dealer data 62 Environmental Protection 10 Error messages 177 Explanation of symbols 11 F...

Page 233: ...otif 136 Selecting the language 59 Setting sounds 58 Setting the display brightness 59 Setting the lower thread indicator 58 Setting the securing stitches 49 Setting the sewing light 59 Setting the upper thread indicator 58 Setting values 25 Sewing a test sample 114 Slide on Freearm Extension Table 36 Storing the machine 185 T Technical specifications 186 Threading the bobbin thread 46 Threading t...

Page 234: ......

Page 235: ......

Page 236: ...BERNINA recommends threads from 1068025 00A 04 2022 01 EN ...

Reviews: