background image

1

E12317-00
E12319-00

OPTIMA QT SERIES

OPTIMA QT SERIES

21”, 24", 27" 

Propane Burnishers

Operator and Parts 

Manual

1001 Brown Avenue  •  Toledo, Ohio  43607-0127 

Customer Service: 888-GO-BETCO  •  Fax: 800-445-5056  •  Technical Service: 877-856-5954  •  www.betco.com

E12321-00

Optional 
Emissions 
Kit Available

Summary of Contents for Optima QT E12317-00

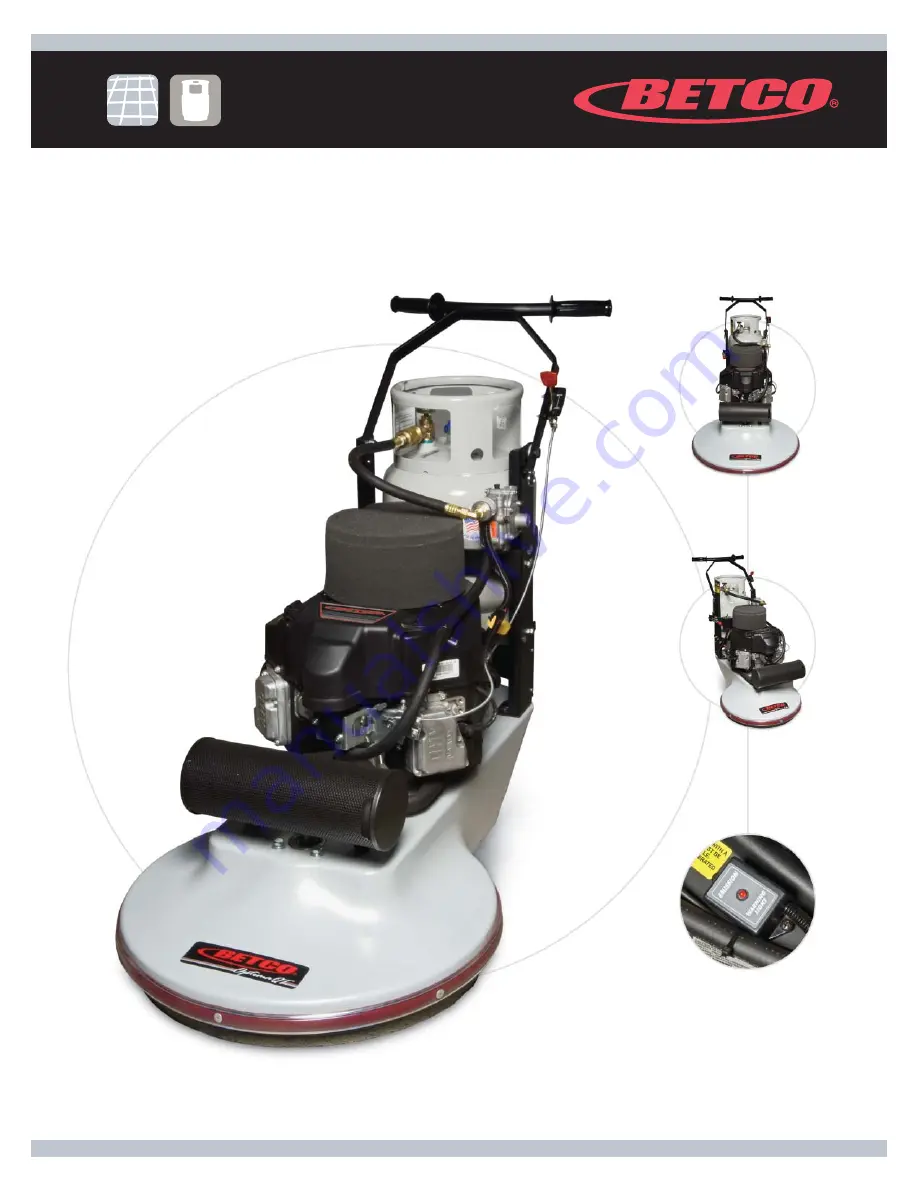
Page 1: ...IMA QT SERIES 21 24 27 Propane Burnishers Operator and Parts Manual 1001 Brown Avenue Toledo Ohio 43607 0127 Customer Service 888 GO BETCO Fax 800 445 5056 Technical Service 877 856 5954 www betco com E12321 00 Optional Emissions Kit Available ...

Page 2: ...river Removal 8 Major Assemblies 9 Handle Bar 10 11 Lower Handle Support 12 13 Regulator Assembly 14 15 12V Key Switch Box 14 15 Kawasaki Engine Assembly 16 17 Deck Assembly 18 19 Belt Drive System 20 21 Pad Drive System 22 23 Centrifugal Clutch Assembly 24 25 Parts List 26 27 Electrical Schematic 28 29 Engine Maintenance 30 Troubleshooting 31 Emissions Warranty 32 33 Warranty 36 ...

Page 3: ...peration of your equipment Various types are available A CO carbon monoxide detector detects carbon monoxide before it reaches dangerous levels Detectors are a must for those who run propane powered equipment The CO Detector is for everyone s protection against Carbon Monoxide Poisoning Carbon Monoxide Detector Passive Effective for 30 days after package has been opened Write the date opened on th...

Page 4: ...s and never run the engine in a closed building or confined area without proper ventilation Do not allow engine to run unattended If you have any indication that the engine is not running properly immediately shut the machine off and have it checked over and repaired by qualified maintenance personnel Workers should be trained to recognize the hazards of carbon monoxide and the early symptoms of c...

Page 5: ...ING AND STOPPING THE KAWASAKI ENGINE Starting The Kawasaki Engine The Kawasaki engine is equipped with a 12 volt starter and a key switch start 1 Place propane tank into handle assembly and close propane tank strap clamp to secure tank 2 Attach propane hose coupling and fully tighten 3 Tilt machine back so that pad is off the floor 4 Open propane tank valve turn counterclockwise and check for any ...

Page 6: ...een the full and add marks on the dipstick Do not loosen oil fill cap or remove dipstick while engine is running Park your burnisher on a level surface Turn the oil fill cap counter clockwise and then lift from the fill tube Wipe the dip stick clean and push it back into the oil fill tube until the cap seats and then withdraw it to check the oil level Do not screw cap on to check oil Add if necess...

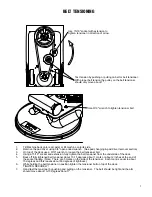
Page 7: ... a 9 16 wrench to loosen the belt tensioner bolt 3 Using a 15 16 socket and extension fully tighten the belt tensioner from the underside of the deck 4 Back off fully tightened belt tensioner about 10 15 degrees about 1 mark or about 2 inches at the end of 5 the socket handle Note There are 5 marks on the side of the tensioner Each mark is equal to about 15 degrees and this leaves about 60 degrees...

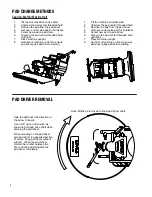
Page 8: ...for burnisher 4 Center new pad on pad driver 5 Screw in the pad center threaded hold 6 until tight Place machine upright 7 Set front of machine on floor to ensure 8 pad driver grips pad before starting Note Muffler is removed to show pad driver shaft Spin the pad driver the direction of the arrow to loosen Use a 3 4 open end wrench as shown to hold pad drive shaft while spinning the pad driver Whe...

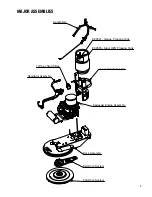
Page 9: ...9 DQGOH DU 6WHHO 23 3URSDQH 7DQN 9 H 6ZLWFK R RZHU DQGOH 6XSSRUW HFN VVHPEO HOW ULYH 6 VWHP 3DG ULYH 6 VWHP DZDVDNL QJLQH VVHPEO 5HJXODWRU VVHPEO DXJH 3URSDQH 7DQN MAJOR ASSEMBLIES ...

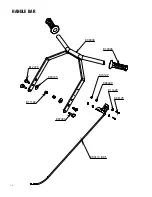
Page 10: ...10 HANDLE BAR ...

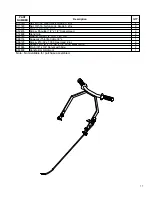
Page 11: ...VVHPEOHG 3 57 180 5 HVFULSWLRQ 47 1XW 1 ORQ RFN UDGH LQF 1XW 1 ORQ RFN UDGH LQF DVKHU 6 LQF 6FUHZ 6KRXOGHU 6RFNHW HDG DQG ULS DVKHU 1 ORQ 2 DZDVDNL 7KURWWOH DEOH 6FUHZ H HDG LQF 6SDFHU 2 RQJ ODFN 1 ORQ 3LQ HWHQW ZLWK 5LQJ DQGOH DU HOGPHQW ...

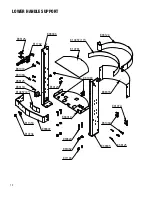
Page 12: ...12 LOWER HANDLE SUPPORT ...

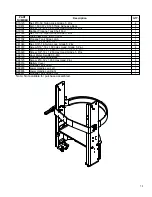
Page 13: ... 5XEEHU 3URSDQH 7DQN 6KHOI 3DG 1XW 1 ORQ RFN UDGH LQF 7XEH ODPS 29 3URSDQH 7DQN 6WUDS DWFK DVKHU 866 LQF 1XW 1 ORQ RFN UDGH LQF 6FUHZ H HDG UDGH LQF 6FUHZ H HDG UDGH LQF 6FUHZ H HDG UDGH LQF RXU 0HWHU 6HQ 9 3URSDQH 7DQN 6WUDS DFN 6FUHZ H HDG LQF DWWHU RYHU 3URSDQH 7DQN 6KHOI RZHU DQGOH HJ HIW RZHU DQGOH HJ 5LJKW 3URSDQH 7DQN 6WUDS URQW ...

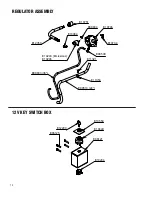
Page 14: ...14 PLVVLRQV REGULATOR ASSEMBLY 12V KEY SWITCH BOX ...

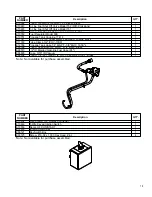
Page 15: ...H XHO 6KXW 2II 9DOYH 0RGHO 6FUHZ H HDG UDGH LQF XHO 5HJXODWRU 0RGHO 3URSDQH 7DQN RXSOLQJ 6FUHZ 6KHHW 0HWDO 3DQ HDG 3KLOOLSV ODFN 7XEH ODPS 29 3URSDQH 7DQN RVH 0137 0 LWWLQJ RVH DUE 0137 DUE UDVV UDLGHG DVROLQH XHO RVH RVH 9DFXXP LWWLQJ 7KUHDG 2 DOO UDVV 3 57 180 5 HVFULSWLRQ 47 LUH ODPS 5RPH RQQHFWRU LUH H HG JQLWLRQ 6ZLWFK HFDO 2 21 67 57 JQLWLRQ 6ZLWFK H H 6ZLWFK R 6FUHZ H HDG LQF ...

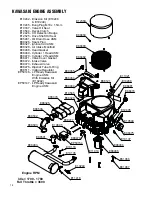
Page 16: ...GJH ULYH 6KDIW 2LO 6HDO 2LO UDLQ RVH 60 6SDUN 3OXJ JQLWLRQ RLO 60 LU QWDNH 0DQLIROG HDG DVNHW OLQGHU HDG 60 OLQGHU HDG 60 9DOYH RYHU DVNHW QWDNH 9DOYH KDXVW 9DOYH LSVWLFN 7XEH 2 5LQJ 9ROWDJH 5HJXODWRU 3 3 5HDG DZDVDNL QJLQH 60 LWK PLVVLRQ LW 3 3 5HDG DZDVDNL QJLQH 60 QJLQH 530 GOH XOO 7KURWWOH ...

Page 17: ...DO PLVVLRQV DUQLQJ LJKW LU QWDNH LOWHU 3DSHU 6SDUN 3OXJ JQLWLRQ RLO 60 LU XHO QWDNH 0DQLIROG 2 5LQJ PP PP 7 LU LOWHU 7KXPE 1XW 9 6WDUWHU HDG DVNHW OLQGHU HDG 60 OLQGHU HDG 60 9DOYH RYHU DVNHW QWDNH 9DOYH KDXVW 9DOYH 2LO LSVWLFN 2LO LOWHU 2 5LQJ 6WXG PP PP LU QWDNH LOWHU RDP 0XIIOHU DVNHW RROLQJ LU QWDNH XDUG HFDO PLVVLRQV HFDO LU LOWHU RYHU 0XIIOHU DWDO WLF 0DQLIROG DZDVDNL 6 9 LU LOWHU RYHU DZDVD...

Page 18: ...ULDO RFDWLRQ 2Q 2SSRVLWH 6LGH LV VXSSOLHG ZLWK WKH PDFKLQH IWHU UHPRYLQJ WKH H H EROW LQVHUW LW LQWR WKH KROH XVH D KDPPHU WR VHDW XVW 6NLUW XVW 6NLUW 6FUHZ HEROW ZLWK 1XW LQF LUH DXJH 5HG ZLWK 5LQJV LUH DXJH ODFN ZLWK 5LQJV XVW 6NLUW DECK ASSEMBLY ...

Page 19: ...LQJ XUDFRDW HFN OXPLQXP DVWLQJ XUDFRDW XVW 6NLUW XVW 6NLUW 6FUHZ HEROW ZLWK 1XW LQF 6ROHQRLG 9 HFN OXPLQXP DVWLQJ XUDFRDW LUH DXJH 5HG ZLWK 5LQJV LUH DXJH ODFN ZLWK 5LQJV XVW 6NLUW 1XW 1 ORQ RFN UDGH LQF 5LYHW ULYH DPPHU Q KHHO ZLWK 6HDOHG DOO HDULQJV 1RQ 0DUNLQJ HFDO 7 2 2SWLPD 47 DVKHU 6SOLW RFN LQF 6FUHZ H HDG UDGH LQF 1XW 1 ORQ RFN UDGH LQF 6ZLYHO DVWHU 6WXG KHHO UDFNHW LULQJ DUQHVV XUQLVKHU 6...

Page 20: ...20 HFN HFN HFN HFN HFN HFN HFN SODFH EHWZHHQ DOXPLQXP GHFN DW WKLV EROW ORFDWLRQ HFN SODFH EHWZHHQ DQG DOXPLQXP GHFN DW WKLV EROW ORFDWLRQ BELT DRIVE SYSTEM ...

Page 21: ...QF HOW 9 HOW HOW 9 HOW 3XOOH 2 HOW 7HQVLRQHU HOW 9 HOW 6FUHZ H HDG UDGH LQF DVKHU 6 LQF H XVKLQJ 47 PP 7DSHU RFN 3XOOH 2 3XOOH 2 DVKHU 6 LQF H PP PP PP QJLQH 3XOOH 6 2 XVKLQJ 6 4 7DSHU RFN 3DG ULYHU OXP HDULQJ VVHPEO ZLWK 6KDIW 6FUHZ H HDG UDGH LQF DVKHU 6SOLW RFN LQF DVKHU 6SOLW RFN LQF DVKHU 7 6SULQJ 6FUHZ H HDG UDGH LQF ...

Page 22: ...22 PAD DRIVE SYSTEM 3DG ULYHU 3DG 3DG ULYHU 3DG ULYHU 3DG 3DG 3 3DG ULYH VVHPEO 3 3DG ULYH VVHPEO 3 3DG ULYH VVHPEO 3LHFH 6HW 3LHFH 6HW ...

Page 23: ... LJKW XUQLVK 3DG DVH 3DG L 6KLQH LJKW XUQLVK 3DG DVH 6FUHZ H HDG UDGH LQF 3DG ULYHU 3DG ULYHU 3DG ULYHU 3DG ULYHU 6KDIW RXSOLQJ 5LYHW 2 ZLWK HDG DVKHU 6 LQF 3DG RFN HQWHU RN 5 6HW ODFN 1XW 1 ORQ RFN UDGH LQF DVKHU 6SOLW RFN LQF 3 3DG ULYH VVHPEO LWKRXW 3DG 3 3DG ULYH VVHPEO LWKRXW 3DG 3 3DG ULYH VVHPEO LWKRXW 3DG ...

Page 24: ...DQG DOLJQLQJ NH ZD V LV LQVWDOOHG WR DOLJQ WKH EHOW GULYH VHFWLRQ RI WKH FOXWFK WR WKH SDG GULYHU SXOOH EHOW GULYH VHFWLRQ 5HPRYH DQG GLVFDUG VHW VFUHZV IURP FOXWFK EHIRUH LQVWDOOLQJ VKRXOG WLJKWHQ RQWR WKH OLS RI WKH FOXWFK VKRXOG EH MXVW LQVLGH WKH OLS RI WKH GULYH VKDIW KROH QJLQH GOH 530 ...

Page 25: ...LODEOH IRU SXUFKDVH DVVHPEOHG 3 57 180 5 HVFULSWLRQ 47 DVKHU 6SOLW RFN LQF 6FUHZ H HDG UDGH LQF H DVKHU 866 LQF OXWFK HQWULIXJDO 530 LD DVKHU 6 LQF 6SDFHU XUQLVKHU DZDVDNL OXWFK 7RS 6SDFHU XUQLVKHU DZDVDNL OXWFK RWWRP ...

Page 26: ...ead Grade 5 Zinc 1 0 19 E10705 Bumper Red Model 21 53 24 63 28 75 1 0 21 E10725 Screw 1 4 20 x 1 500 Hex Head Grade 5 Zinc 3 0 13 15 E10734 Screw 1 4 20 x 0 625 Hex Grade 5 Zinc 3 0 15 E10746 Fuel Regulator Model 60E 1 0 15 E10751 Propane Tank Coupling 7141F 1 0 13 E10761 Rubber Propane Tank Shelf Pad 1 0 23 E10850 Rivet 3 16 OD x 0 938 L with 0 375 Head 3 0 17 E10895 Gasket Carburetor to Air Fuel...

Page 27: ...8121 Decal Emissions Warning Light 1 0 13 E88316 Battery Cover 1 0 13 E88317 Lower Handle Leg Left 1 0 13 E88318 Lower Handle Leg Right 1 0 13 E88319 Propane Tank Shelf 1 0 19 E88324 Battery 12V 12AH 35CCA AGM 1 0 17 E88325 Air Intake Filter Paper 1 0 Page Part Description Qty 17 E88326 Spark Plug 2 0 17 E88327 Ignition Coil ASM 2 0 17 E88328 Air Fuel Intake Manifold 1 0 17 E88464 O Ring 12 5mm ID...

Page 28: ...UWHU DWWHU 9 0 JQLWLRQ 6ZLWFK 9ROWDJH 5HJXODWRU 6ROHQRLG 9 3 3 5HDG 3 DZDVDNL QJLQH VVHPEO ODFN DXJH LUH 5HG DXJH LUH UHHQ DXJH LUH ODFN DXJH LUH 5HG DXJH LUH ODFN DXJH LUH HOORZ DXJH LUH 5HG DXJH LUH ODFN DXJH LUH ODFN DXJH LUH 5HG DXJH LUH ODFN DXJH LUH ELECTRICAL SCHEMATIC ...

Page 29: ...mission Kit E10242 E10248 O2 Sensor Electrical Control Box E10249 O2 Sensor E10243 In Line Fuel Shut Off Valve Model 152 E12381 Black 6 Gauge Wire E12380 Red 6 Gauge Wire Green 14 Gauge Wire Red 14 Gauge Wire Black 14 Gauge Wire Black Wire Yellow 14 Gauge Wire E12380 Red 6 Gauge Wire Blue 14 Gauge Wire E10553 Black 14 Gauge Wire Red 14 Gauge Wire E10553 Black 14 Gauge Wire Red Wire Blue Wire Green...

Page 30: ...take foam filter Clean air intake paper filter Check belt tension Change engine oil Change oil filter Clean dust and dirt from cylinder and cylinder head cooling fins Tighten nuts and screws Clean and regap sparkplugs Replace air intake foam filter Replace air intake paper filter Replace spark plugs Check and adjust valve clearance Clean combustion chamber Clean and lap valve seating surface IMPOR...

Page 31: ...l level Machine vibrates excessively Pad not centered on pad driver Remove pad and center pad properly on pad driver Pad damaged Replace pad Loose bolts Check and tighten bolts Pad center lock is loose Tighten pad center lock securely Machine is hard to push Floor may be uneven in one spot Try another spot on the floor Front end bearing housing not adjusted properly Adjust the front end bearing ho...

Page 32: ...d due to abuse neglect improper maintenance or unapproved modification You are responsible for presenting your utility equipment engine to a Betco Corporation distribution center as soon as the problem exists The warranty repairs should be completed within a reasonable amount of time not to exceed 30 days If you have any questions regarding your warranty rights and responsibilities you should cont...

Page 33: ... of warranted parts sufficient to meet the expected demand for such parts 9 Any replacement part may be used in the performance of any warranty maintenance or repairs and must be provided without charge to the owner Such use will not reduce the warranty obligations of Betco Corporation 10 Add on or modified parts that are not exempted by the Air Resources Board may not be used The use of any non e...

Page 34: ...34 ...

Page 35: ...35 ...

Page 36: ...ranty consideration include but may not be limited to power cords transport wheels vacuum bags belts squeegee blades pad drivers clutch plates handle grips filters screens throttle cables brushes and carbon brushes Subject to the conditions and exceptions stated in this warranty Betco warrants the Betco products to be free from defects in material and workmanship under normal use and service for t...

Reviews: