background image

Installation and User Guide

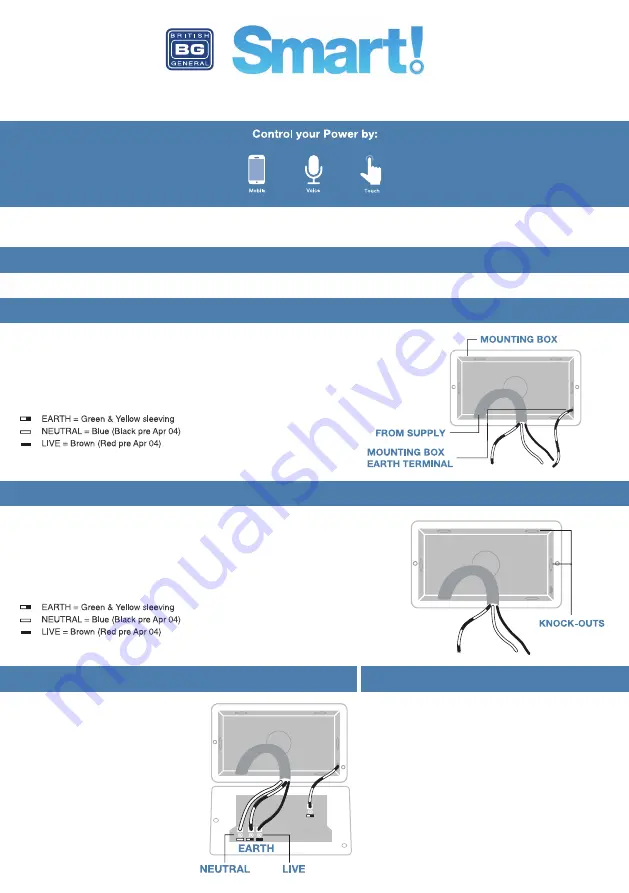
Before commencing work always isolate the power at the consumer unit / fuse box. 

1. Unscrew the socket from the wall/mounting box. 
2. Note the cable connections: There will generally be three different wiring configurations, this 
illustration shows a single wire of each colour connected to each terminal (there could be two or 
three wires of each colour connected to each terminal) + an additional connection between the 
mounting box earth terminal and the socket earth terminal. 
3. Unscrew each terminal to release the wires. 

1. Carefully position the accessory into the mounting box, 
ensuring that no wires are trapped between the plate and 
the wall and secure with screws  (do not over tighten) then 
set screw covers in place (optional).
2. Once the installation has been completed correctly, 
replace the fuse for the circuit, switch the power back on at 
the consumer unit and test.

1. Install mounting box (metal or pattress) for either flush or surface mounting, ensuring
appropriate size of product. (Mounting box to be purchased separately)
2. Select the most suitable entry point of the mounting box (knock-out) and route the supply
cable through.
3. Cables should be prepared so a sufficient conductor length reaches the terminals. Strip
the ends of the individual conductors leaving an adequate length bare to enter terminals.

1. Line up the new socket to mounting box and 
take note of where each terminal is located.
2. Connect each wire to the matching terminal. 
(Refer to key in step 2).
An earth connection should always be made 
between the mounting box earth terminal and
the socket earth terminal.
Make sure no copper wire is exposed & that 
only the bare end enters the terminal.
3. Tighten terminal screws securely. 
(Do not over tighten).

Wiring Instructions

1. Power Off

2a. Replacing an Existing Socket (Removal)

2b. New Installation

3. Wire Up Your Socket

4. Complete The Installation

Summary of Contents for Smart!

Page 1: ...witch the power back on at the consumer unit and test 1 Install mounting box metal or pattress for either flush or surface mounting ensuring appropriate size of product Mounting box to be purchased separately 2 Select the most suitable entry point of the mounting box knock out and route the supply cable through 3 Cables should be prepared so a sufficient conductor length reaches the terminals Stri...

Page 2: ...le device will indicate a successful connection and the red indicator on the socket will turn off To connect additional BG Smart devices please follow the steps below 1 Connect and power up the device 2 Press and hold the power button until the RED LED flashes quickly 3 Go to the BG Home app and Add Device 4 Once found and connected name the device accordingly Repeat for all additional BG Smart de...

Page 3: ...elay time for your sockets to turn on or off after a set length of time Ideal for sockets where you plug in devices like hair straighteners or heaters for added safety and for charging your mobile phone so this turns off once it has reached a full charge Select Timer Select the device you want to set a timer for Choose how often you want the timer to operate Choose the time you want the timer to f...

Page 4: ... also set a scene to help with your children s evening routine turn on the lamp in their room at bedtime and set lights out and devices off at the desired time to make sure they are not up late watching TV or playing on consoles in their bedroom Add a picture name and effective period for the scene to operate Add more than one device to create multiple actions that happen at the same time so you c...

Page 5: ...vent members that you have invited within the app from turning sockets on or off or changing any of your set timers or scenes This is ideal for sockets which you want to behave in a routine way and to prevent children turning devices on and off when you don t want them to To turn on the parental lock select function set from the menu and toggle the parental lock on or off as required Invite other ...

Page 6: ...h one instruction You will need to create your scene before adding this to Siri 1 Select scenes at the bottom of the home screen 2 Select Add to Siri 3 Choose a pre configured scene and enter the custom phrase you want to use to activate the scene Type in the phrase you want to say to activate the scene then add to Siri Choose the scene you want to add to Siri Select the operation on off or delay ...

Page 7: ...in application to enhance a user s interaction within that application and work on a principal of triggers and actions An IFTTT If This Then That applet also know as recipes perform one or a few simple functions An applet is triggered by changes that occur within other web services such as Gmail Weather and Maps Users can choose from pre configured applets or create their own to suit their persona...

Page 8: ... Scroll down and press Edit Add your IFTTT widgets to your widget list IFTTT Widgets on Android How do I add a Widget on Android On the Home screen tap and hold on any available space A menu will appear towards the bottom of the screen Tap Widgets or Shortcuts dependant on phone model Tap and hold IFTTT Large or IFTTT Small Create select the widget you would like to add The widget will now appear ...

Page 9: ...ay Ok Google turn my lamp on Installation and User Guide If you re new to Echo it s a super smart speaker from Amazon that responds to your voice Once you ve bought Amazon Echo and downloaded the BG Home App you ll just need to enable 1 Enable the BG Home App In your Alexa app tap Skills in the menu and search for BG Home Tap Enable 2 Link Account Enter your BG Home App username and password and f...

Page 10: ...tated on rear of the product If in doubt always consult a competent electrician This symbol is known as the Crossed out Wheelie Bin Symbol When this symbol is marked on a product or battery it means that it should not be disposed of with your general household waste Some chemicals contained within electrical electronic products or batteries can be harmful to health and the environment Only dispose...

Reviews: