background image

OWNER’S MANUAL

Important: Read all instructions carefully before using this product. Retain this owner’s manual for future reference.

BH North America | 20155 Ellipse, Foothill Ranch, California  92610 | p.949.206.0330 | f.949.206.0350 | www.BHFitnessUSA.com

LKT6

Summary of Contents for LKT6

Page 1: ... Read all instructions carefully before using this product Retain this owner s manual for future reference BH North America 20155 Ellipse Foothill Ranch California 92610 p 949 206 0330 f 949 206 0350 www BHFitnessUSA com LKT6 ...

Page 2: ...ety Information 04 Exercise Instruction 05 Training Guidelines 06 Workout and Stretching 10 Overview 12 Assembly Instructions 13 Belt Adjustments 15 Exploded View Drawing 16 Parts List 17 Console Operations 18 Maintenance and Cleaning 25 Warranty 26 ...

Page 3: ...ve any questions concerns or product issues please call our Customer Service at 1 866 325 2339 or email us at CustomerSupport BHNorthAmerica com Carefully read through the instructions contained in this manual They provide you with important information about assembly safety fitness and use of the machine Please read ALL the safety information contained on the following page CONGRATULATIONS ...

Page 4: ...ed for the purposes described in this manual DO NOT use accessories that are not recommended by BH Fitness 7 Do not place sharp objects near the machine 8 Any person with physical or coordination limitations should not use the machine without the assistance of a qualified person or doctor 9 Do warm up stretching exercises before using the equipment 10 Do not use the machine if it is not working co...

Page 5: ...If you feel any pain or discomfort stop exercising immediately and consult your doctor 4 Wear appropriate clothing and footwear for the exercise do not wear loose clothing do not wear leather soled shoes or footwear with high heels 5 It is advised that you do warm up stretches before working out 6 Step on to the equipment slowly and securely 7 Select the program or workout option that is most clos...

Page 6: ...without stopping FLEXIBILITY The range of motion of your joints Improving flexibility involves the stretching of muscles and tendons to maintain or increase suppleness and it provides increased resistance to muscle injury or soreness CARDIO RESPIRATORY ENDURANCE The most essential component of physical fitness It is the efficient functioning of the heart and lungs AEROBIC FITNESS Is an exercise of...

Page 7: ...reate an overload and therefore provide continued improvement SPECIFICS Different forms of exercise produce different results The type of exercise that is carried out is specific to the muscle groups being used and to the energy source involved There is little transfer of the effects of exercise i e from strength training to cardiovascular fitness That is why it is important to have an exercise pr...

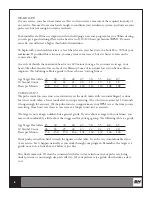
Page 8: ...unt 23 22 22 21 20 19 19 18 18 Beats per Minute 138 132 132 126 120 114 114 108 108 PULSE COUNT The pulse count on your wrist or carotid artery in the neck taken with two index fingers is done for ten seconds taken a few seconds after you stop exercising This is for two reasons a 10 seconds is long enough for accuracy b the pulse count is to approximate your BPM rate at the time you are exercising...

Page 9: ...ot restrict your movement in any way while exercising Clothes should be light enough to allow the body to cool Excessive clothing that causes you to perspire more than you normally would gives you no advantage The extra weight you lose is body fluid and will be replaced with the next glass of water you drink It is advisable to wear a pair athletic shoes BREATHING DURING EXERCISE Do not hold your b...

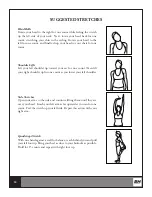
Page 10: ...or one count Then lift your right shoulder up for one count as you lower your left shoulder Side Stretches Open your arms to the side and continue lifting them until they are over your head Reach your left arm as far upward as you can for one count Feel the stretch up your left side Repeat this action with your right arm Quadriceps Stretch With one hand against a wall for balance reach behind you ...

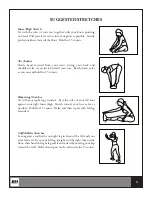
Page 11: ...nd hold for 15 counts Hamstring Stretches Sit with your right leg extended Rest the soles of your left foot against your right inner thigh Stretch toward your toes as far as possible Hold for 15 counts Relax and then repeat with left leg extended Calf Achilles Stretches Lean against a wall with your right leg in front of the left and your arms forward Keep your left leg straight and the right foot...

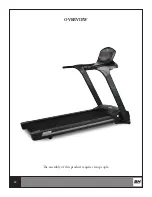
Page 12: ...12 OVERVIEW The assembly of this product requires two people ...

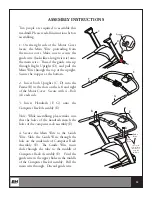
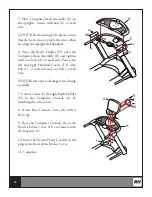
Page 13: ...n the left and right of the Motor Cover Secure with 4 Bolt A each side 3 Insert Handrails F G onto the Computer Rack Assembly E Note While assembling please make sure that the holes of the handrails match the holes of the computer rack assembly E 4 Secure the Main Wire to the Guide Wire Slide the Guide Wire through the hole on the underside of Computer Rack Assembly E The Guide Wire must slide thr...

Page 14: ...ide Fasten the left and right Handrail Covers I J with bolt e 2 each side and one bolt c each side NOTE Beware not to damage wires during assembly 7 Connect wires L through Bottle Holder H to the Computer Console A by matching the wire colors 8 Secure Rear Console Cover K with 4 Bolts g 9 Place the Computer Console A on the Bottle Holder Cover H and fasten with the four nuts f 10 Insert the Electr...

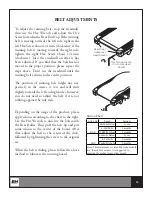
Page 15: ...u do not need to adjust the belt if it is not rubbing against the side rails Depending on the usage of the product please apply silicon according to the chart to the right Use the Hex Wrench to unscrew the bolt inside the Rear Roller Then pull the belt up and put some silicon to the center of the board After that adjust the belt to the center of the deck followed by tightening the screw to the ori...

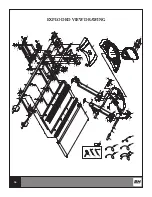
Page 16: ...8 1 34 34 34 59 40 40 40 81 81 77 98 77 98 97A 76 75 72 71 44 44 44 97A 84 84 85 72 71 71 72 74 56 80 79 82 43 44 44 44 18 22A 23A 14 21A 29A 19B 30 30 19B 29A 22A 23A 14 21A 51 48 30 40 44 88 2 61A 61A 61A 61A 89B 89B 7 1 7 44 44 34 34 34 34 34 ...

Page 17: ...18 Incline base 1 78 1 Foam sticker 2 19B Wheel 2 79 Front roller 1 20A Hex screw 8 80 Running belt 1 21A Hex screw 4 81 Plastic pedal 2 22A Plastic sleeve cover 2 82 Rear roller 1 23A Incline base fixing base 2 83A Counter sink hex screw 2 25 Truss cross self tapping screw 2 84 Foam sticker 2 29A Hex screw 2 85 Running board 1 30 Nylon nut 3 86 Power wire 1 34 Nylon nut 8 87 Lower control wire 1 ...

Page 18: ...18 CONSOLE OPERATIONS ...

Page 19: ...2 4 6 8 10 12 When the safety key is replaced after it has been removed the incline will remain at the set incline You have to press the start button and then the incline will reset When you turn the treadmill on the incline will not reset You have to press the start key and then the incline will reset Under Start Ready status hold the stop button for 5 seconds and the incline will reset at any po...

Page 20: ... set the time and it appears 0 then the computer will count up until it reaches 99 00 If you have set a time then the computer will count down until it reaches 0 00 Then motor will stop and incline will return to 0 8 When the motor is operating press STOP and the motor and incline motor will stop the time window display Stop If you press START again the treadmill will start after a 3 second countd...

Page 21: ...3 HILL CLIMB When you select this mode the program will require you to input the following values Time Preset Value 30min Range 20 99 min Increments of 1 min After you have selected the right values press ENTER to enter the setting of the next value The speed and incline windows will display the top speed and top incline ranges under this program At this time the speed window will blink and you ca...

Page 22: ...rease by degrees After selecting press ENTER and the incline window will blink You can increase or decrease the incline range by pressing the UP DOWN incline buttonse When the top incline shown in the window changes the additional preset program values will increase or decrease by degrees After selecting press ENTER or QUICK START and the exercise will begin P6 ROLLING RUN When you select this mod...

Page 23: ...st belt This program aims at exercising heart rate During use when your heart rate value reaches the value you set then the speed and incline will remain steady so that the heart rate can be kept in a certain range to reach the exercise effect After you have selected this mode the program will ask you to input values in the following order 1 AGE LED light blinks and you can press UP DOWN to adjust...

Page 24: ...0 85 25 185 117 117 43 168 106 106 61 151 95 95 79 134 90 85 26 184 116 116 44 167 106 106 62 150 95 95 80 133 90 84 27 183 116 116 45 166 105 105 63 149 94 94 28 182 115 115 46 165 104 104 64 148 94 94 29 181 115 115 47 164 104 104 65 147 93 93 30 181 114 114 48 163 103 103 66 146 92 92 P9 P10 CUSTOM When you have selected this mode then the program will require you to input the following values ...

Page 25: ...nstead seek service from an authorized service center However you may clean the outer surface Use a soft cloth dampened with warm water Do not use aerosol sprays or pump bottles as they may deposit sediments upon the console surface The use of harsh chemicals will destroy the protective coating and cause a static build up that may damage the some of the components MAINTENANCE AND CLEANING ...

Page 26: ...eplacement warranty coverage on frame and ten 10 years on other parts Labor warranty coverage is two 2 years Warranty covers the original consumer purchaser only THIS WARRANTY DOES NOT COVER Pre delivery set up Components that require replacement due to dirt or lack of regular maintenance Expendable items which become worn during normal use Repairs necessary because of operator abuse negligence or...

Reviews: