background image

COMMERCIAL UPRIGHT EXTRACTOR

MODEL DC100
64P8 SERIES

What’s in the Box? ..............................................3
Product View.........................................................3
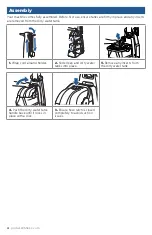
Assembly ................................................................4
Filling the Clean Water Tank...........................5
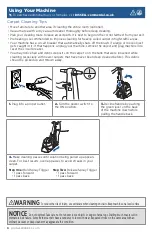
Using Your Machine ............................................6
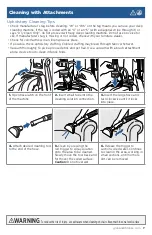
Cleaning with Attachments ............................7
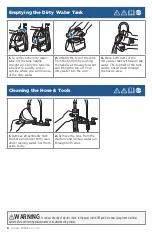
Emptying the Dirty Water Tank ....................8
Cleaning the Hose & Tools ...............................8
Maintaining the Brush Roll & Belt .................9
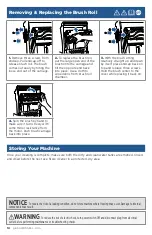
Removing & Replacing the Brush Roll......10
Storing Your Machine ......................................10
Troubleshooting .................................................. 11
Warranty ............................................................... 12
Service ................................................................... 12

Summary of Contents for 64P8 Series

Page 1: ...3 Assembly 4 Filling the Clean Water Tank 5 Using Your Machine 6 Cleaning with Attachments 7 Emptying the Dirty Water Tank 8 Cleaning the Hose Tools 8 Maintaining the Brush Roll Belt 9 Removing Replacing the Brush Roll 10 Storing Your Machine 10 Troubleshooting 11 Warranty 12 Service 12 ...

Page 2: ...leaning fluid section of this guide Keep openings free of dust lint hair etc Do not point attachment nozzle at people or animals Keep appliance on a level surface Do not use without intake screen filter in place Turn OFF all controls before unplugging Unplug before attaching the Upholstery Tool Be extra careful when cleaning stairs Close attention is necessary when used by or near children If your...

Page 3: ...y Handle 9 Clean Water Tank 10 Power Switch 11 Upper Handle Release 12 Back Carry Handle 13 Recline Handle Fully Assembled Machine Hose Tools vary by model What s in the Box Standard accessories may vary by model To identify what should be included with your purchase please refer to the Carton Contents list located on the carton top flap Product View 4 7 8 9 5 6 1 2 3 12 13 10 11 ...

Page 4: ...and any inserts are removed from the dirty water tank 1 Wrap cord around holder 2 Slide clean and dirty water tanks into place 3 Remove any inserts from the dirty water tank 4 Push the dirty water tank handle back until it locks in place with a click 5 Ensure hose latch is closed completely to avoid suction issues ...

Page 5: ...ance Carpet Cleaning Formula Keep plenty of BISSELL Commercial formulas on hand so you can clean whenever it fits your schedule Filling the Clean Water Tank View our full lineup of powerful carpet cleaning formulas at BISSELL commercial co uk 1 To remove the dirty water tank lift the tank handle straight up 2 Lift clean water tank from the base of machine 3 Remove cap and fill clean water tank to ...

Page 6: ... before This debris should be picked up and thrown away WARNING To reduce the risk of injury use extra care when cleaning on stairs Keep machine on a level surface NOTICE Do not overwet Take care not to run over loose objects or edges of area rugs Stalling brush may result in premature belt failure Some Berber carpets have a tendency to fuzz with wear Repeated strokes in the same area with an ordi...

Page 7: ... loose debris and pet hair Use a vacuum with a brush attachment and a crevice tool to clean in fabric folds WARNING To reduce the risk of injury use extra care when cleaning on stairs Keep machine on a level surface 1 Open hose latch on the front of the machine 2 Insert small tube into the cleaning solution connection 3 Insert the large hose and turn clockwise until it locks into place 4 Attach de...

Page 8: ...ink 3 Rinse both parts of the dirty water tank with warm tap water The top half of the tank can be rinsed clean through the nozzle area 1 Remove attachments from the hose and rinse them clean under running water Set them aside to dry 2 Remove the hose from the machine and run tap water run through both ends Emptying the Dirty Water Tank Cleaning the Hose Tools WARNING To reduce the risk of electri...

Page 9: ...access belt cover 4 Remove three screws from cover 5 Lift and remove to access brush carriage 6 Turn the belt inward towards the large pulley while lifting out 7 Place new belt over small pulley first and then slip the belt over the large pulley Note Test the brush roll to make sure it spins freely before moving to the next step 8 Replace the brush carriage and screws 9 Push brush carriage back in...

Page 10: ...om brush roll chamber 3 With the brush sitting relatively straight up and down by itself place endcap back on top and replace three screws Hold the brush center to the cover while placing it back on 4 Spin the brush by hand to make sure it turns freely with some minor resistance from the motor Push brush carriage back into place Storing Your Machine Once your cleaning is complete make sure both th...

Page 11: ...at them so they fit snugly on the machine Hose cap may not be snapped into place Turn the machine OFF Ensure hose cap is placed on machine tightly and will not come off Clean water tank is empty Check fluid levels in clean water tank and refill if necessary Dirty water tank has picked up the maximum amount Empty dirty water tank Red float door in the tank may have closed as a result of bumping an ...

Page 12: ...lity will not exceed the purchase price of the product Some countries do not allow the exclusion or limitation of incidental or consequential damages so the above limitation or exclusion may not apply to you Exceptions and Exclusions From the Terms of the Limited Warranty This warranty is exclusive and in lieu of any other warranties either oral or written Any implied warranties which may arise by...

Reviews: