

Blue Coat recommends connecting the cables and verifying the LEDs and LCD display to ensure
functionality before rack mounting the appliance.
If you want to install the appliance into a rack before performing any configuration tasks, begin with
Rack Mount the Appliance
.
Note
: Network deployment cables are not included and must be supplied by the user.
Figure 1 shows a typical Blue Coat MC-S400 network deployment:
The following installation assumes the network deployment shown in Figure 1 is in use. For other
deployment options, see the deployment guides
,
Available for viewing at:
https://bto.bluecoat.com/products/Management-Center
To function test your MC-S400 appliance in your deployment
(Figure 2)
:
1.
Remove the EULA (End User License Agreement) sticker located on the
rear of the appliance. Be aware that you are agreeing to the terms and
conditions of the EULA by removing the sticker and installing the
product.
2.
Connect a network cable between the
SYS MGMT 0:0
port network interface and the appliance.
The interface auto-negotiates 10/100/1000 Base-T speed and duplex settings.
Note
: You must use the
SYS MGMT 0:0
port to configure and access the appliance.
3.
Connect the null-modem serial cable between the MC-S400 appliance and a PC or serial
terminal for completing initial configuration.
4.
Connect the enclosed power cords into the power supply inlet on the MC-S400 and then into a
power source. The appliance automatically powers on and initializes.
Note:
Avoid shutting down the appliance by removing the power cords or using the soft power switch.
Configuration corruption issues can occur if the appliance power supply is abruptly cut.
3
Connect the Cables
2
Unpack the shipment package and verify the contents of the box.
The Blue Coat MC-S400 series appliance ships with the following components:
Blue Coat MC-S400 series appliance
Software License Agreement
Two AC power cords
Safety and Regulatory Compliance Guide
Null-modem serial cable
Quick Start Guide
(this document)
Two / four post slide-rail kit
Rack mount ears w/ installation hardware
3
Unpack the Appliance
1
Quick Start Guide
Management Center: MC-S400 Series
Flip over to complete the installation
You must remove the inner rail from Rail_A before starting the installation. For more
information on this task, refer to the
S400 Series Maintenance and Upgrade Guide.
Rail_B and Rail_A are
not
used in the four-post slide-rail installation. These items should
be set aside for future use.
The slide-rail rack mounting kit included with the appliance allows the appliance to be installed in
multiple configurations. This Quick Start Guide will show the tasks required to install the MC-S400
series appliance into a four-post rack.
Note
: For comprehensive information on the slide-rail rack mounting kit and additional installation
options, see the
S400 Series Maintenance and Upgrade Guide
at:
https://bto.bluecoat.com/blue-coat-hardware-documentation
To ensure safety before you begin rack mounting the appliance, follow these instructions:
1.
Gracefully shutdown the appliance from the CLI and disconnect all cables.
2.
Read the
Rack Mount Warnings
section of the included
Safety and Regulatory Compliance
Guide
.
3.
Take adequate safety and grounding measures to avoid creating an electric shock hazard and to
prevent bodily injury.
To install the MC-S400 into a four-post equipment rack, you may need the following tools and
hardware:
To install the MC-S400 into a four-post equipment rack, you need the following items:
Note
:
Rack Mount the Appliance
6
M4 Nut driver / Adjustable wrench
#2 Phillips head screwdriver
Equipment rack specific screws (please refer to your equipment rack guide for more information)
Install the License
1.
Access the CLI using your terminal emulation software if you exited the console after completing
the previous step.
2.
Enter
license get-from-bluecoat
to begin license download process.
3.
Enter
license view
to see the status of the license.
4.
When the license has finished installing, exit the CLI.
Note
: After the license has been successfully downloaded and installed, please wait a minute for
services to startup before verifying connectivity or shutting down the appliance.
5.
(Optional) If you need to shutdown the appliance, enter
shutdown
.
Verify Connectivity
1.
Verify that you can log in to the appliance via the Web browser. To log in to the Management
Center UI:
a.
Enter the MC-S400 IP address into your Web browser's
Address
or
Location
box using the
following format:
https://
MC_ipaddress
:8082
.
b.
Enter the default UI admin credentials (
admin | admin
) to access the management console.
The management console loads within your browser window.
Note:
The administrator UI account is wholly separate from the administrator SSHCLI account.
As such, it does not use the password that was set during initial configuration.
Gracefully Power Down the Appliance
1.
Access the MC-S400 command-line interface (see
Perform Initial Configuration
for more
information).
2.
Select
1) Command Line Interface
to access the CLI.
3.
Enter
enable
to turn on access to privileged commands.
4.
Enter
shutdown
to turn off the appliance.
Important! Do not shut down the appliance using the switch or by removing the power cables!
Abruptly removing power can result in irreparable data loss. Always use the shutdown
command from the CLI to power down the appliance.
3.
Configure the terminal emulation software to the following settings:
4.
Power on the MC-S400 appliance and then press <
Enter
> three times on the terminal emulator.
5.
Enter the network configuration parameters when prompted. If your MC-S400 appliance is
connected to the network, the configuration wizard will attempt to verify DNS server addresses
and auto-detect link settings.
Important:
As part of the MC first time startup sequence, the appliance requires approximately 5
minutes to initialize the RAID array. After RAID initialization, the appliance begins a one-time RAID
synchronization process that takes approximately 4 - 5 hours to complete.
The appliance is fully operational during this process.
You can view the status of the RAID sync by issuing the
show status
command from the CLI.
Baud rate:
9600 bps
Data bits:
8
Parity:
none
Stop bits:
1
Flow control:
none
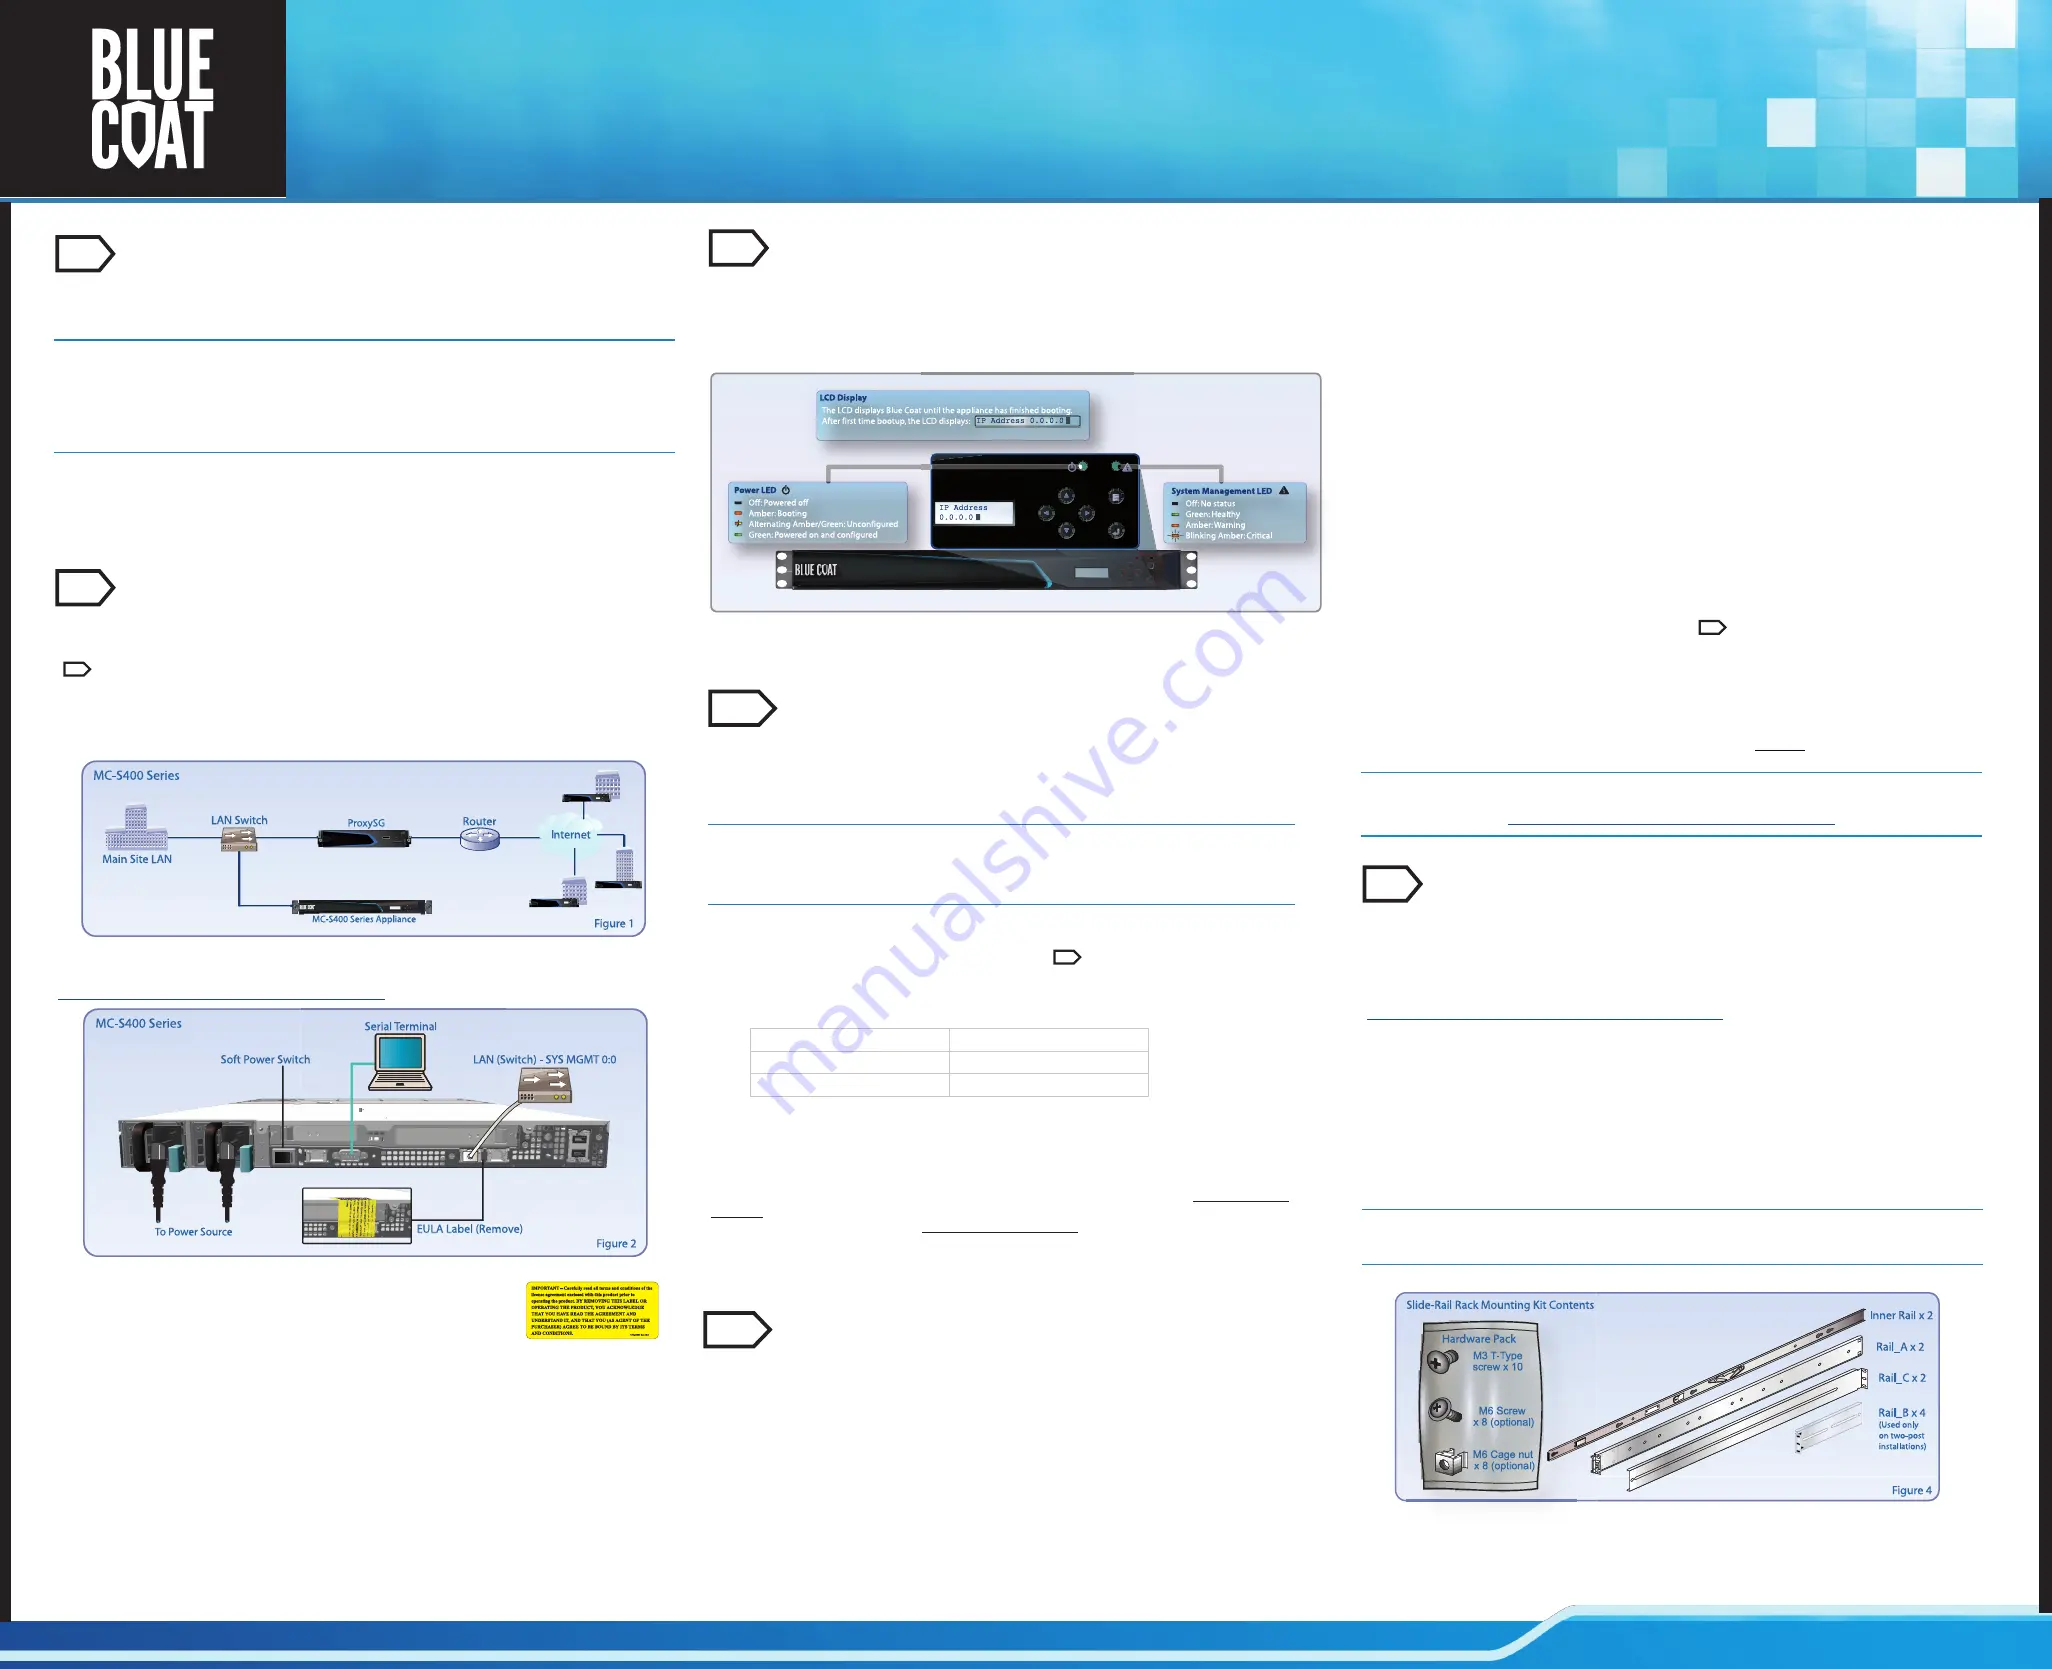
Verify the LEDs and LCD Display
3
To verify that the appliance has booted and is operational, check the following:
Figure 3 shows the location of all the major control functions located on the front panel of the MC-
S400 series appliance. After the appliance boots up, the
System Management LED
should be
Off
while the
Power LED
should alternate between
amber
and
green
, denoting an unconfigured state.
After the appliance has been configured for network access, the MC LCD displays the IP address and
various system statistics. You can use the left and right arrows to manually scroll through the statistics
modes.
3
Perform Initial Configuration
4
Configure the appliance for network access using the CLI. During this process, you will configure the
network settings of the appliance as well as set the console password used to access the SSH CLI.
The CLI admin is an independent account used only to access the CLI and cannot be used to log in to
the UI.
You must have the following network information on hand to perform initial configuration:
To access the MC-S400 command-line interface and run the configuration wizard:
1.
Confirm that a null-modem serial cable is connected from the MC-S400 appliance to your
workstation serial port. For cabling instructions, see
Connect the Cables
.
2.
Open a terminal emulation program such as Microsoft HyperTerminal
®
, PuTTY, Tera Term, or
Procomm
™
.
MC-S400 IP address
Default Gateway IP address
Primary DNS server IP address
Subnet mask
Console access password
After your MC-S400 appliance is configured for network access, complete the installation by verifying
network connectivity and activating the Management Center license engine through the CLI (command
line interface). Typical Management Center deployments require configuration of the HTTP proxy to
contact the Blue Coat licensing servers. If your deployment provides external access to the Internet,
you do not need to configure an HTTP Proxy.
Configure the HTTP Proxy (required if a proxy server is used to access the Internet)
1.
Access the CLI using your terminal emulation software.
2.
Select
1) Command Line Interface
to access the CLI.
3.
Enter
enable
to turn on access to privileged commands.
4.
Enter
http-proxy configure
and input the HTTP proxy server details when prompted.
5.
Enter
http-proxy enable
to enable use of the configured HTTP proxy server.
6.
Enter
show setupinfo
to verify your network configuration details.
3
License and Log-in to the MC-S400 Appliance
5
For additional installation details and configuration options, see the
Management Center
documentation available at:
https://bto.bluecoat.com/products/Management-Center
6
4
2


