background image


EX1000 SERIES  

IR LASER IP PTZ CAMERA  

HD/4K/STARLIGHT 


USER MANUAL 

VERSION: EXIP-M-06112017 


© 2017 Bolin Technology 


Summary of Contents for EX1020BHD-L5NXGA

Page 1: ...1 EX1000 SERIES IR LASER IP PTZ CAMERA HD 4K STARLIGHT USER MANUAL VERSION EXIP M 06112017 2017 Bolin Technology ...

Page 2: ...PART TWO NETWORK CAMERA USER MANUAL 17 NETWORK CONNECTION 17 LOGIN 17 LOGGING IN TO THE WEB INTERFACE 19 INTRODUCTION TO THE WEB INTERFACE 20 INITIAL CONFIGURATION 20 CONFIGURING PARAMETERS 21 LOCAL PARAMETERS 21 NETWORK CONFIGURATION 22 TCP IP 22 PPPOE 23 DHCP 23 PORT 23 IMAGE CONFIGURATION 25 IMAGE ADJUSTMENT 25 AUDIO AND VIDEO CONFIGURATION 33 VIDEO CONFIGURATION 33 VIDEO FORMAT 34 VIDEO COMPRE...

Page 3: ...M CONFIGURATION FILE 48 COLLECTING DIAGNOSTIC INFORMATION 49 DIGITAL ZOOM FOCUS CONFIGURATION 49 LIVE VIEW 50 LIVE VIEW TOOLBAR 51 VIEWING CERTAIN AREA OF IMAGES 52 USING 3D POSITIONING 52 VIDEO PLAYBACK AND DOWNLOAD WITH EDGE STORAGE 52 PTZ CONTROL 53 SETTING PATROL BY PRESETS 54 APPENDIX A GLOSSARY 58 SPECIFICATIONS 59 DIMENSIONS 62 MODEL BL PP80 80W POE POWER INJECTOR 64 ...

Page 4: ...constitute formal guarantee of any kind expressed or implied We shall not be held responsible for any technical or typographical errors in this manual The product appearance shown in this manual is for reference only and may be different from the actual appearance of your device This manual is a guide for multiple product models and so it is not intended for any specific product In this manual the...

Page 5: ...tions must be observed Symbols The symbols in the following table may be found in this manual Carefully follow the instructions indicated by the symbols to avoid hazardous situations and use the product properly WARNING Indicates a hazardous situation which if not avoided could result in bodily injury or death CAUTION Indicates a situation which if not avoided could result in damage data loss or m...

Page 6: ...pliance FCC Part 15 This equipment has been tested and found to comply with the limits for digital device pursuant to part 15 of the FCC Rules These limits are designed to provide reasonable protection against harmful interference when the equipment is operated in a commercial environment This equipment generates uses and can radiate radio frequency energy and if not installed and used in accordan...

Page 7: ...ression H 264 H 265 MJPEG ZDP Zero Deviation Positioning technology for high accuracy Adaptive IR laser illumination distance up to 500 Meters Outdoor Environmental Rating IP67 Corrosion Resistant treatment wind load durability 60m s Power Input AC 24V PoE 80W Bolin PoE 80W Injector needed optional Various Image Functionalities WDR BLC Defog Day Night Supports 120 tilt 360 pan range adaptive speed...

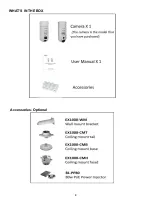
Page 8: ...8 WHAT S IN THE BOX Accessories Optional ...

Page 9: ... See Page 2 Lens BL PP80 80w PoE Power Injector Optional 1 Data Power Output Connect to the specific PoE camera Power Comsumption 80w port of speed 100 1000Mbps adaptive 2 Data in Connect to network switch 3 DC 48V Power Input Port 4 Power Indicator ...

Page 10: ...ctions separately The cables available may vary with the product model There are two types of Tail Cable available for EX1000 series PTZ camera 1 Type A Cable Full function cable with audio and alarm 2 Type N Cable Only IP video out and Power Cable Connection ...

Page 11: ...ype N Cable Connection Type A Cable Connection NOTE Use water proof IP67 rated junction box connection box to protect the RJ45 and other connections A water proof RJ45 connector is available on some models ...

Page 12: ...ces and RS485 interfaces Ground the terminal properly Cable Requirements Network Cable 10 100 Mbps Ethernet CAT 5 5E 6 UTP cables are applicable to the ANSI EIA TIA 568A B and ISO D Eight wires in the network cable need to be inserted in parallel into the top of the cable connector The cable connector needs to be crimped in position When the cable connector is in position ensure that the metal pie...

Page 13: ...d to a reliable grounding point PoE Power Injector Other than 24VAC power input Bolin PTZ camera provides PoE power as an optional power input For PoE power you must use Bolin 80W Power PoE Injector model BL PP80 It provides nonstandard power up to the PTZ camera Connect this PoE injector to a network switch and then run Ethernet cable for data transmission and power up the PoE PTZ camera Specific...

Page 14: ...f the bracket 7 Put the cover back to the bracket and screw in securely Laser Illuminator Adaptive IR Laser Illuminator The EX1000 PTZ series camera uses adaptive IR laser illuminator to provide up to 1000 ft 1500 ft of long range illumination IR laser uses diffused illumination that provide the long distance visibility Precaution Specs 1 This product uses Class 3B laser light product 2 Supports M...

Page 15: ...nt subnet set the gateway for your camera after you log in Accessing Your Camera For camera models with IP output you can manage and control through the web interface from a PC System Requirements for Your PC 1 Operating System Microsoft Windows 8 Windows 7 Windows XP 32 bit or 64 bit Microsoft Windows 7 32 bit is recommended 2 CPU 2 0 GHz or higher dual core Intel i3 CPU or higher are recommended...

Page 16: ...with Windows 7 if the system does not prompt you to install ActiveX follow these steps to turn off UAC Click the Start button and then click Control Panel In the search box type UAC and then click Change User Account Control Settings Move the slider to the Never Notify position and then click OK After UAC is turned off log in again If the installation fails open Internet Option in IE before login ...

Page 17: ...tion in accordance with the quick guide connect the camera to power to start it After the camera is started you can access the camera from a PC client installed with a web browser or the video management software Internet Explorer IE is a recommended web browser Please contact your dealer to get the video management software Please refer to the user manual of video management software for detailed...

Page 18: ...3 in this example is the default IP address Please replace it with the actual address of your camera if it has been changed Modify user access control settings Optional Before you access the camera follow the steps to set User Account Control Settings to Never notify 2 4 http 192 168 0 13 Clear the check box ...

Page 19: ...o set a strong password no less than eightcharacters The camera protects itself from illegal access by limiting the number of failed login attempts If login fails six times consecutively the camera locks automatically for tenminutes 4 Enter the username and password and then click Login For the first login use the default username admin and password 123456 or admin If you log in with Live View sel...

Page 20: ...nformation displayed on the screen as needed 6 Optional Manage users Change the default password and add common users as needed You can watch the live video after finishing the initial configuration Please configure other parameters as needed 1 Model Number 2 Menu 3 PTZ control area This area is available for PTZ dome cameras and PTZ cameras 4 Live view window 5 Live view toolbar NOTE The displaye...

Page 21: ...twork is in good condition ii Fluent Prior Recommended if you want short time lag for live video iii Ultra low Delay Recommended if you want the minimum time lag for live video b Video Pixel Format i Set the video format for images on the PC client It is recommended to choose YUV420 if the graphic card of your PC supports it RGB32 is only supported by some low version graphic cards c Protocol i Se...

Page 22: ... server are applicable when the device is accessed by domain name 1 Click Setup Network TCP IP 2 Select Static IP from the IP Obtain Mode drop down list 3 Enter the IP address subnet mask and default gateway address Make sure that the IP address of the camera is unique in the network 4 Click Save If a gatekeeper or firewall is used in the network Universal Network Passport UNP can be used to inter...

Page 23: ... when the camera is delivered If a DHCP server is deployed in the network the camera can automatically obtain an IP address from the DHCP server To manually configure DHCP follow the steps below 1 Click Setup Network TCP IP 2 Select DHCP from the IP Obtain Mode drop downlist 3 Click Save Port 1 Click Setup Network Port 2 Configure relevant port numbers 3 Click Save NOTE This function is not suppor...

Page 24: ... specified E mail address 1 Click Setup Network E mail 2 Configure relevant parameters of the sender and the recipient The following table describes some major parameters A SSL a When enabled the e mail will be sent through SSL encryption B Attach Image a When enabled the e mail will contain 3 instant snapshots as attachment according to the Capture Interval 3 Click Save Port Mapping 1 Click Setup...

Page 25: ...djustment NOTE The image parameters displayed and value ranges allowed may vary with camera model For the actual parameters and value ranges of your camera see the Web interface You may move the sliders to adjust settings or enter values in the text boxesdirectly Clicking Default will restore all the default imagesettings 1 Click Setup Image Image See the Image Adjustment page as bellow ...

Page 26: ...t for example it is used to reduce the car light to snapshot the licenseplate vi WDR recommended for scenes with high contrast lighting such as window corridor front door or other scenes that are bright outside but dim inside vii Custom set a scene name asneeded viii Standard default image settings ix Vivid increase the saturation of the image based on the standardmode x Bright increase the bright...

Page 27: ... a color C Contrast a Set the degree of difference between the blackest pixel and the whitest pixel D Hue a Overall tendency of colors in an image E Sharpness a Contrast of boundaries of objects in an image F 2D Noise Reduction a Reduce the noise of images The function may cause image blurring G 3D Noise Reduction a Reduce the noise of images The function may cause motion blur or ghosting in some ...

Page 28: ... the image iv You can set this parameter only when Exposure Mode is not set to Manual G Day Night Mode a Automatic The camera outputs the optimum images according to the light condition In this mode the camera can switch between night mode and daymode automatically b Night The camera provides high quality black and white images using the existing light c Day The camera provides high quality color ...

Page 29: ...verexposure Some areas might be dark if you select this option This option is recommended if clarity of the central part of the image and overexposure control are your first priority c Illumination Preset Road This mode offers strong illumination in whole and is recommended for monitoring wide ranging scenes for example road d Illumination Preset Park This mode offers uniform light and is recommen...

Page 30: ...ges under different color temperatures so as to output images that best suit human eyes NOTE This function is not supported by some models please see the actual model for details 1 Click Setup Image Image and then click White Balance 2 Select a white balance mode as required The following table describes some major parameters A White Balance Adjust the red or blue offset of the image a Auto The ca...

Page 31: ...al model for details When using the lens with P Iris control mode that supports Z F function connect the iris control cable to the Z F port of the camera When using the lens with DC Iris control mode that does not support Z F function connect the iris control cable to the IRIS port of thecamera 1 Click Setup Image Image and then click Advanced 2 Modify the settings as required The following table ...

Page 32: ...Content The drop down list provides Time Preset and Serial Info You may also select Custom and enter the content you want After you have set the position and OSD content the symbol appears in the Status column which means that the OSD is set successfully You may set multiple lines of contents for each area and use and to adjust the sequence ofdisplay 3 After you have completed the settings a messa...

Page 33: ...e cursor shape has changed drag the box to the intendedposition To mask an area Use the mouse to draw a box on the area you want tomask When privacy mask is configured the intended area is blocked The following shows an example Audio and Video Configuration Video Configuration You can set video parameters that your camera supports and view the current status of BNC output If available you may also...

Page 34: ...and improves image quality D Smoothing a Set the extent of smoothing Choosing Clear means disabling Smoothing Moving the slider toward Smooth increases the level of smoothing but will affect image quality i In a poor network environment you can enable smoothing to get more fluent video E BNC Output a BNC output supports NTSC and PAL 3 Click Save Video Format 1 You can select the video format from ...

Page 35: ...table describes some major parameters F Audio Input a No audio data will be encoded when Off is selected i It is recommended to select Off if you do not need audio This can improve device performance to some extent G Input Gain a Audio signal amplification for sampling The greater the gain the greater amplification 3 Click Save ROI When Region of Interest ROI is enabled the system ensures image qu...

Page 36: ... device to establish the media stream that has been configured before automatically after the restart select Yes for Persistent 3 To delete a stream click 4 Click Submit to complete the operations RTSP URL are as following Main Steam rtsp username password IP port media video1 Sub rtsp username password IP port media video2 Third rtsp username password IP port media video3 Note We recommend that y...

Page 37: ...pering detection alarm and audio detection alarm The supported alarms may vary with device model For the alarm types that your camera supports see the Web interface Configuring Motion Detection Alarm Motion Detection Motion detection detects the object motion in a specified rectangular area during a period You need to set a detection area sensitivity of detection object size and history for the ca...

Page 38: ...hen an alarm is reported the camera triggers alarm output so as to trigger actions by a third party device c PTZ to Preset i Select the check box and set the preset linked to motion detection alarm 1 Make sure you have set presets Otherwise you cannot set this parameter For details about how to set a preset see Setting Presets 2 When an alarm is reported the PTZ camera automatically goes to the pr...

Page 39: ...e reaches the threshold the camera reports an alarm and triggers the set actions Make sure that an audio input device is correctly connected to the camera and audio input is turned on in Configuring Alarm Input 1 Click Setup Events Common Alarm Audio Detection 2 Select Enable for Audio Detection select a detection type and set the difference or threshold To disable audio detection clear the Enable...

Page 40: ...iled steps see the descriptions of alarm triggered actions in Configuring Motion Detection Alarm 4 Click Save Configuring Alarm Input The camera can receive alarm information from a third party device To use this function you need to configure the following information for alarm input first port alarm name alarm type normally open or normally closed and alarm reporting time 1 Click Setup Events Al...

Page 41: ... the connection power on the alarm output device first and then power on the camera Configuring Capture With the function of capture configured when an alarm is triggered the camera will automatically upload the captured snapshots to the FTP server or send snapshots the specified email address 1 Click Setup Events Capture 2 Enable Capture and configure relevantparameters 3 Click Save Memory Card S...

Page 42: ...ned storage If planned storage is enabled the camera records video to the memory card during the specified periods 1 Click Setup Storage Storage 2 Select Planned Storage and then set the periods during which the camera records video to the memory card 3 Click Save NOTE To play recordings in the memory card see Video Playback and Download with Edge Storage System Maintenance NOTE This function is n...

Page 43: ...also supported to ensuresecurity 4 Click Save Next time you log in enter the address in https IP HTTPS port number format for example https 192 168 0 13 443 to enter secure channel mode If HTTPS uses a default port number enter the address in https IP directly RTSP Authentication RTSP Real Time Streaming Protocol is an application layer protocol To transmit and control the audio and video set RTSP...

Page 44: ...eoWatermark 2 Select Enable and set the watermarkcontent 3 Click Save Setting the System Time You can use the following methods to adjust the system time of your device Manually Setting or Synchronizing the System Time 1 Click Setup Common Time and then click the Timetab 2 Select Enable for Client TimeSynchronization 3 Set the correct time zone and system time You may also click Sync with Computer...

Page 45: ... models please see the actual model for details The actual displayed Web interface may vary with the devicemodel PTZ control To control a PTZ camera through a third party device you need to set Port Mode to PTZ Control By sending PELCO D compliant PTZ control commands through the RS485 port you can control the PTZ camera without using the PTZ control panel 1 Click Setup System Ports Devices and th...

Page 46: ...S485 serial port to achieve transparent data transmission with the third party device 1 Click Setup System Ports Devices and then click the Serial Porttab 2 Select Trans Channel from the Port Mode drop downlist 3 Click Save OSD To display information from the third party device on the OSD you need to select OSD as the port mode The camera receives information from the third party device through th...

Page 47: ...arent channel connects to 4 Click Save Wiper Control You can set the wiper parameters to control the housing and the PTZ wiper operation 1 Click Setup System Ports Devices and then click the External Devicetab 2 Set the wiper control mode and the parameters to enablewiper NOTE Serial Port The wiper is controlled through PELCO D instructions Please set the PTZ protocol to PELCO D Normally Open Clos...

Page 48: ...versions can be booted properly and the camera can be upgraded conveniently Ensure that the power supply is normal during upgrade The device will restart after the upgrade is completed Restarting the System 1 Click Setup System Maintenance 2 Under Device Restart click Restart The device will restart after you confirm the operation You may also enable auto restart by selecting Enable Auto Restart a...

Page 49: ...destination folder and then click Download to save the diagnostic information to the specifiedfolder NOTE Diagnostic information is exported to the local folder in form of a compressed file You need to decompress the file using a tool such as WinRAR and then open the file using a text editor Select Collect Image Debugging Info Then the recording and the debugging information can be displayed synch...

Page 50: ...tical zoom range 3 Click OK NOTE This digital zoom functionality is ONLY available in 3MP 4K H 265 models Live View Live view means playing live video real time audio and video received from a camera in a window through the Web interface If you log in with the Live View check box selected live video appears by default when you are logged in You may double click the window to enter or exit full scr...

Page 51: ...ositioning 12 Show hide the PTZ control panel 13 Reset the packet loss rate to zero After you move the mouse cursor on a live view window this button appears on the floating toolbar 14 Collect Expend Tool Bar 15 Display packet loss rate and bit rate information in the bottom a After you move the mouse cursor on a live view window this button appears on the floating toolbar Click this icon to displ...

Page 52: ...k on the toolbar 2 Click and hold the mouse button and then drag from up to down to specify an area that you want to watch PTZ will move and zoom in to the target automatically 3 Click and hold the mouse button and then drag from down to up to zoom out 4 To exit click Video Playback and Download with Edge Storage NOTE Edge storage refers to recording video to the memory card of a frontend device m...

Page 53: ... a box camera installed on a Pan Tilt motor NOTE Some of the lens control functions are applicable to cameras equipped with motorized lens The PTZ control buttons may vary with camera model For the PTZ control buttons that your camera supports see the Web interface PTZ Control Toolbar 1 Control the direction of the PTZ camera and release the control 2 Adjust the moving speed of the PTZ camera 3 Ad...

Page 54: ...the camera till it points toward the desired direction 3 Adjust zoom and focus as needed to obtain the optimalimage Click to add it as a preset Enter a number and name for the preset and then click Submit Go to a preset 1 On the Live View page click Preset on the controlpanel 2 Click for a preset The PTZ camera goes to the selected preset Delete a preset 1 On the Live View page click Preset on the...

Page 55: ... the route ID and name and then click Add to add a patrol action Use the buttons to adjust the sequence of the actions Patrol actions include Go to a preset and stay for a certain amount of time before going to the next preset Rotate at the set speed in the set direction for a certain amount of time zoom stay at a set position for a certain amount of time or patrol repeatedly if Keep Rotating isse...

Page 56: ...it and modify the settings as required Delete a patrol route 1 On the Live View page click Patrol on the control panel 2 Click for the patrol route you want to delete and then confirm the delete Setting Home Position PTZ camera will return to home position if no operation is made within a specified period 1 Click Setup PTZ Home Position 2 Select the desired preset as the home position and set the ...

Page 57: ...he address code in the instruction If it is the same as the address code on the Web the camera can parse the instruction Preset Snapshot When an alarm is triggered to the preset the camera can snapshot and upload images to the FTP server Please complete FTP settings and snapshot alarm settings before you enable this function 1 Click Setup PTZ Patrol 2 Select Enable 3 Click Save ...

Page 58: ...nterface HTTPS Hyper Text Transfer Protocol over SSL IE Internet Explorer IMOS IP Multimedia Operation System IP Internet Protocol IPC IP Camera MTU Maximum Transmission Unit NTP Network Time Protocol OSD On Screen Display PoE Power over Ethernet PPPoE Point to Point Protocol over Ethernet PTZ Pan Tilt Zoom ROI Region of Interest SMTP Simple Mail Transfer Protocol SSL Secure Socket Layer UNP Unive...

Page 59: ...59 Specifications All models and specifications are subject to change without notice HD Models ...

Page 60: ...60 STARLIGHT Models ...

Page 61: ...61 4K Models ...

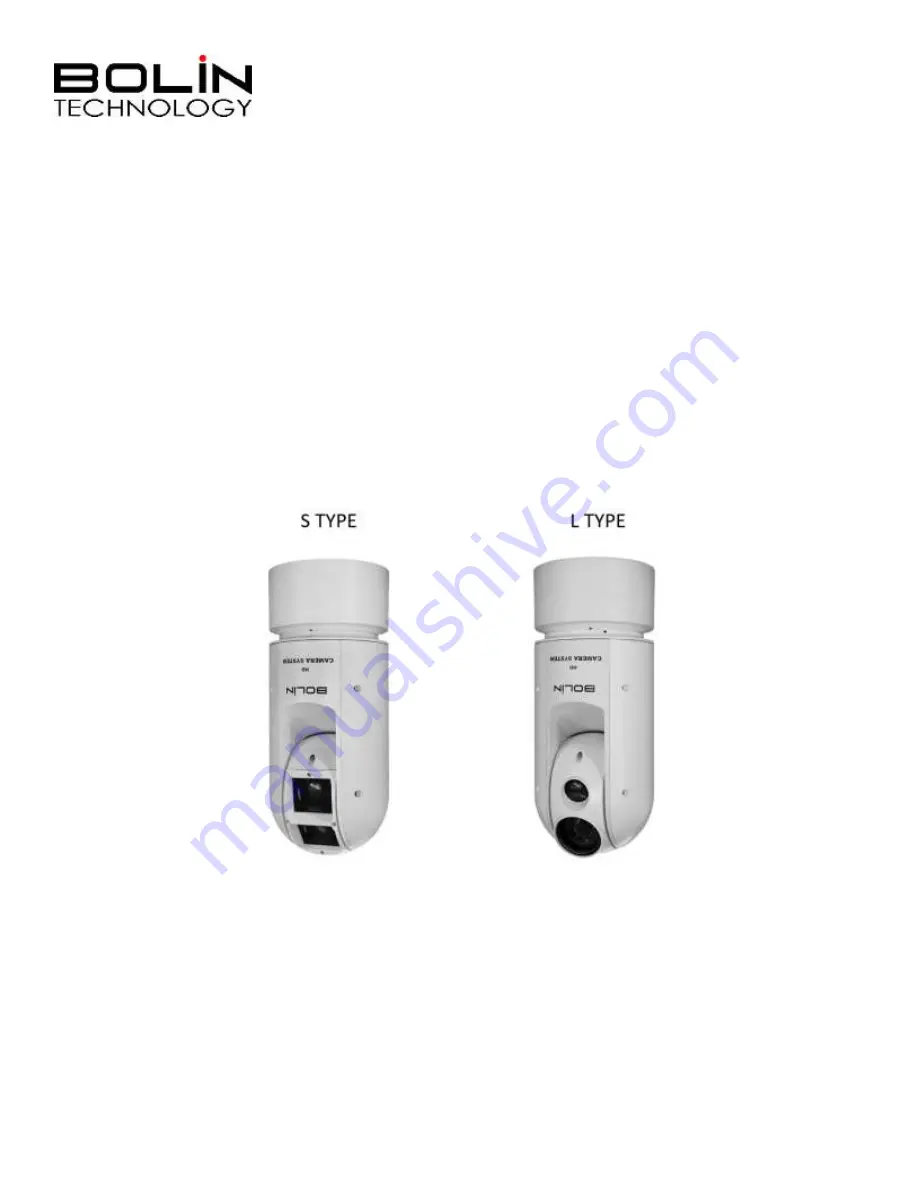
Page 62: ...62 Dimensions S Style Unit mm ...

Page 63: ...63 S Style Unit mm ...

Page 64: ...64 Model BL PP80 80w PoE Power injector Unit mm ...

Page 65: ...65 www bolintechnology com 2082 TECHNOLOGY LLC dba BOLIN TECHNOLOGY ...

Reviews: