background image

Installation

P.O. Box 309

Menomonee Falls, WI 53052 USA

800 BRADLEY (800 272 3539)

+1 262 251 6000

bradleycorp.com

215-1708 Rev. J; ECN 16-08-008

© 2016 Bradley

Page 1 of 13 

6/2/2016

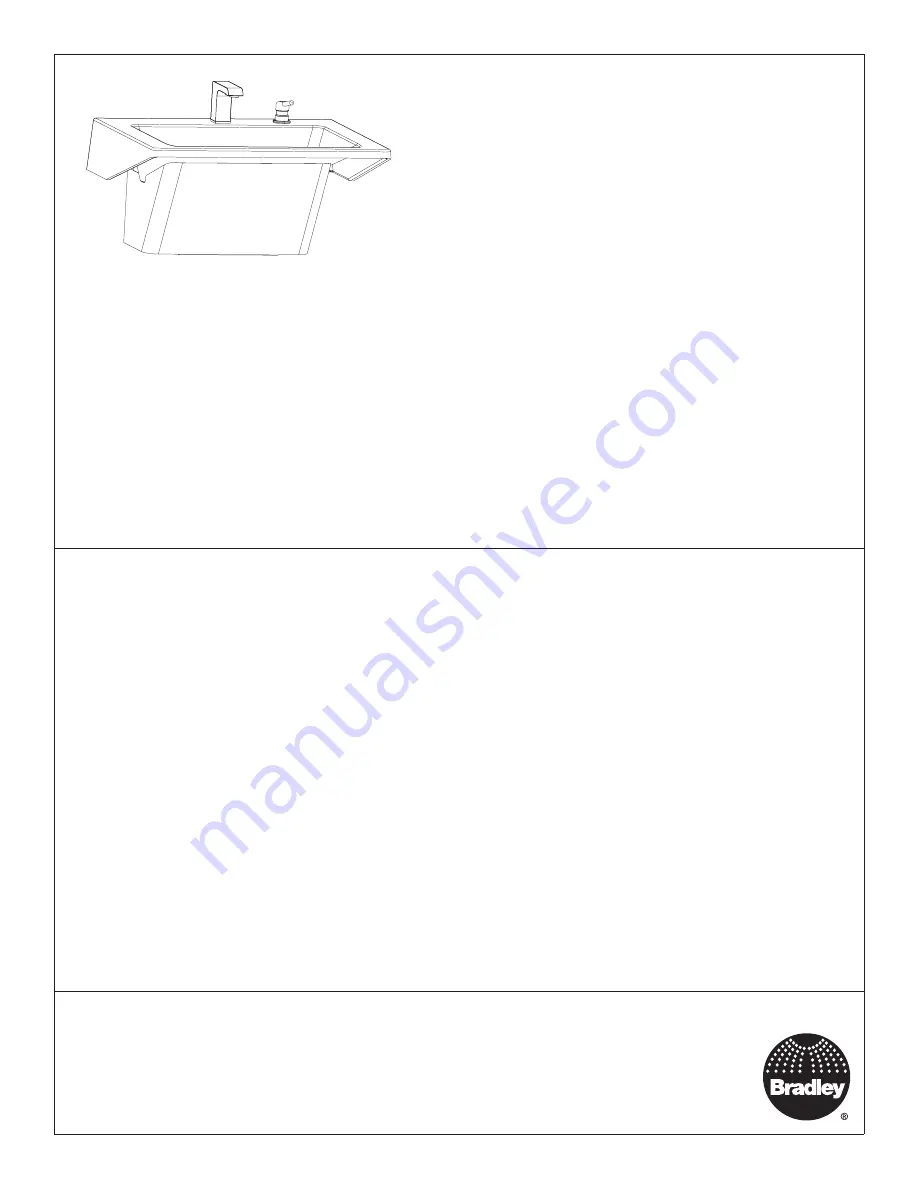
LVRD1

Verge

®

 Lavatory System – LVRD-Series 

with Evero

®

 Natural Quartz Material

Table of Contents

Components  .  .  .  .  .  .  .  .  .  .  .  .  .  .  .  .  .  .  .  .  .  .  .  .  .  .  .  .  .  .  .  .2–3

Supplies Required   .  .  .  .  .  .  .  .  .  .  .  .  .  .  .  .  .  .  .  .  .  .  .  .  .  .  .  .  .4

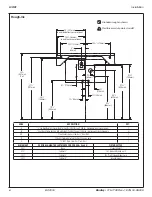
Dimensions    .  .  .  .  .  .  .  .  .  .  .  .  .  .  .  .  .  .  .  .  .  .  .  .  .  .  .  .  .  .  .  .4–5

Rough-Ins    .  .  .  .  .  .  .  .  .  .  .  .  .  .  .  .  .  .  .  .  .  .  .  .  .  .  .  .  .  .  .  .  .  .  .6

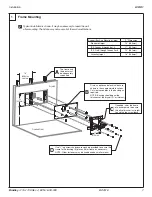
Frame Mounting  .  .  .  .  .  .  .  .  .  .  .  .  .  .  .  .  .  .  .  .  .  .  .  .  .  .  .  .  .  .  .7

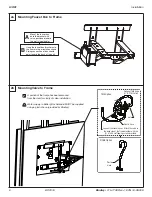
Faucet Box Mounting   .  .  .  .  .  .  .  .  .  .  .  .  .  .  .  .  .  .  .  .  .  .  .  .  .  .  .8

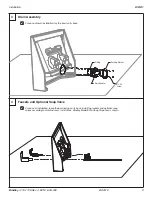
Drain Assembly   .  .  .  .  .  .  .  .  .  .  .  .  .  .  .  .  .  .  .  .  .  .  .  .  .  .  .  .  .  .  .9

Faucets and Optional Soap Valve    .  .  .  .  .  .  .  .  .  .  .  .  .  .  .  .  .9

Bowl Mounting   .  .  .  .  .  .  .  .  .  .  .  .  .  .  .  .  .  .  .  .  .  .  .  .  .  .  .  .  .  .  .10

Strainer and P-trap  .  .  .  .  .  .  .  .  .  .  .  .  .  .  .  .  .  .  .  .  .  .  .  .  .  .  .  .11

Adjust the Temperature    .  .  .  .  .  .  .  .  .  .  .  .  .  .  .  .  .  .  .  .  .  .  .  .11

Trap Cover   .  .  .  .  .  .  .  .  .  .  .  .  .  .  .  .  .  .  .  .  .  .  .  .  .  .  .  .  .  .  .  .  .  .12

Cleaning and Maintenance    .  .  .  .  .  .  .  .  .  .  .  .  .  .  .  .  .  .  .  .  .13

U .S . Pat . No . D629,877

WARNING

Turn OFF electrical power to the electrical outlets, then unplug all electrical units prior to installation. 
Electrical power MUST remain off until installation is complete. 

Installer’s hardware must be appropriate for wall construction. Wall anchors must have a minimum pull-out 
rating of 1,000 lbs.

NOTICE

Make sure that all water supply lines have been flushed and then completely turned off before beginning 
installation. Debris in supply lines can cause valves to malfunction.

IMPORTANT

Read this entire installation manual to ensure proper installation. When finished with the installation, file 
this manual with the owner or maintenance department. Compliance and conformity to local codes and 
ordinances is the responsibility of the installer. Product warranties may be found under “Products” on our 
Web site at bradleycorp.com.

Separate parts from packaging and make sure all parts are accounted for before discarding any packaging 
material. If any parts are missing, do not begin installation until you obtain the missing parts. 

For standard height mounting, do not exceed the recommended 34" distance from the top of the lav deck 
to the finished floor. To meet ADA requirements, the lav deck cannot exceed the 34" maximum height 
dimension.

Summary of Contents for Verge LVRD Series

Page 1: ...all anchors must have a minimum pull out rating of 1 000 lbs NOTICE Make sure that all water supply lines have been flushed and then completely turned off before beginning installation Debris in supply lines can cause valves to malfunction IMPORTANT Read this entire installation manual to ensure proper installation When finished with the installation file this manual with the owner or maintenance ...

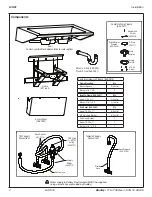
Page 2: ...e S45 2481 Qty Screw 20 x 3 1 extra Washer Flat O D 3 1 extra Trap Cover S45 2482 Qty Screw 10 24 x 6 2 extra 10 Finishing Washer 6 2 extra Trap Hook Bracket 1 Screw 10 24 x 3 8 1 Washer Flat 35 64 O D 1 Bowl Contact your Bradley Representative for color options Complete Drain Prepack S45 2471 Strainer and Screw S45 2479 O Ring 125 111 Drain Adapter Packing Washer 10 24 Screw Drain Adapter Prepack...

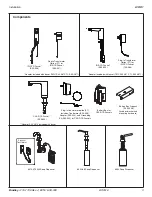
Page 3: ...8 Soap Dispenser 6334 Soap Dispenser Optional Transformer Plug In Transformer Option PT for IR DCD Faucet S53 337 Plug in transformer option PT includes Transformer S53 338 Adapter S53 339 and Grounding Kit S53 349 for CAP DCA Faucets IR DCG Faucet S53 350 Plug In Transformer Option PT for IR DCG Faucet 153 486 Adapter included with faucet TMV S45 2872 TL S45 2871 Adapter included with faucet TMV ...

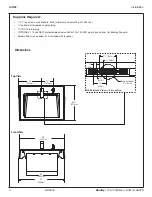
Page 4: ...se up View Dimensions Top View Front View Supplies Required 7 3 8 lag screws wall anchors bolts minimum pull out rating of 1 000 lbs hot cold or tempered supply piping 1 NPT drain piping OPTIONAL 110 volt GFCI protected electrical outlet for 100 120 VAC plug in transformer for Bradley Faucets Screen filter s as needed if not included with faucet s 15 381mm 7 197mm 22 572mm 29 737mm ...

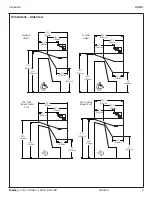
Page 5: ...59 16 395mm 8 216mm 19 483mm 30 775mm 29 749mm 22 572mm 157 16 392mm 8 216mm 16 406mm 28 724mm 29 749mm 22 572mm 157 16 392mm 8 216mm 15 381mm 30 775mm 22 572mm 157 16 392mm 8 216mm 17 432mm 31 800mm Standard Height Juvenile Height TAS Grades 6 through 8 or 9 TAS Pre K through Grades 5 or 6 159 16 395mm 159 16 395mm 159 16 395mm ...

Page 6: ...ugh 8 or 9 29 Subtract 4 TAS Pre K through Grades 5 or 6 30 Subtract 3 Juvenile Height CODE DESCRIPTION QTY A 3 8 Lav Deck Bowl Anchors with a Minimum Pull Out Force of 1 000 lbs reinforce walls at anchor points 2 B 3 8 Lav Deck Frame Anchors with a Minimum Pull Out Force of 1 000 lbs reinforce walls at anchor points 5 H C Hot Cold Supplies Stub Out 2 From Wall 1 D 110v GFI Protected Electrical Ou...

Page 7: ...crews and square washers provided to secure the frame to the backing 5 places Shim frame as necessary NOTE Other fasteners may be used based on wall material D Support Backing Mounting Height A Dimension Standard Height 19 483mm TAS Grades 6 through 8 or 9 17 432mm TAS Pre K through Grades 5 or 6 15 381mm Juvenile Height 16 406mm If needed shim the frame at anchor points to ensure the offset brack...

Page 8: ...e back of the unit B 2a Mounting Faucet Box to Frame 2b Mounting Valve to Frame Cold Hot Optional TMA Valve NPTM Outlet Connect the faucet hoses Attach the valve to the back side of the frame member with the 2 10 24 self tapping screws provided TMA Option NONE Option A portion of the frame has been removed from the view for clarity of valve installation Plastic Hose Plastic Hose Water supply to Ba...

Page 9: ...rain Assembly O Ring Drain Adapter Packing Washer 10 24 Screw For ease of drain installation lay the bowl on its back For ease of installation leave the bowl laying on its back Install the faucets and optional soap valves according to manufacturer s instructions Bradley Model 6315 Soap Dispenser is shown ...

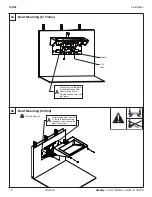
Page 10: ...l Mounting to Frame Washer 20 Screw 5b Bowl Mounting to Wall Reinforce behind the wall at the two bowl mounting locations then secure the bowl to the wall A Press firmly on the back of the bowl to seat the bowl into the frame Tighten the top screw on the frame A Bowl is heavy ...

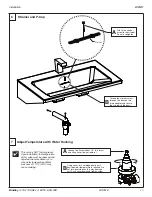
Page 11: ...t Temperature with Water Running H C A Loosen Cap Screw about 1 4 4 6 turns and lift up cover do not remove B Using cover turn cartridge gently until desired water temperature is reached Do not turn past stops as this may damage unit Push cover down and tighten screw This valve is NOT factory preset Upon installation the temperature of this valve must be checked and adjusted to ensure delivery of ...

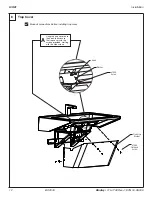
Page 12: ...CN 16 08 008 8 Trap Cover Hang the trap cover onto the hook then secure the trap cover with the screws provided starting with the side screws A Hook 10 24 Screw Washer 10 24 Flat Head Screw Finishing Washer Make all connections before installing trap cover ...

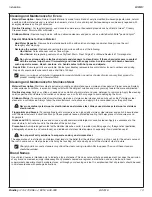
Page 13: ...complicated Routine cleaning Daily or as often as needed use a solution of warm water and soap detergent or ammonia Apply the cleaning solution per the manufacturer s instructions and always use a soft cloth or sponge to avoid damaging the finish Stubborn Stains To remove stains from stainless steel use a stainless steel cleaner and polish such as Ball stainless steel cleaner or a soft abrasive Al...

Reviews: