background image

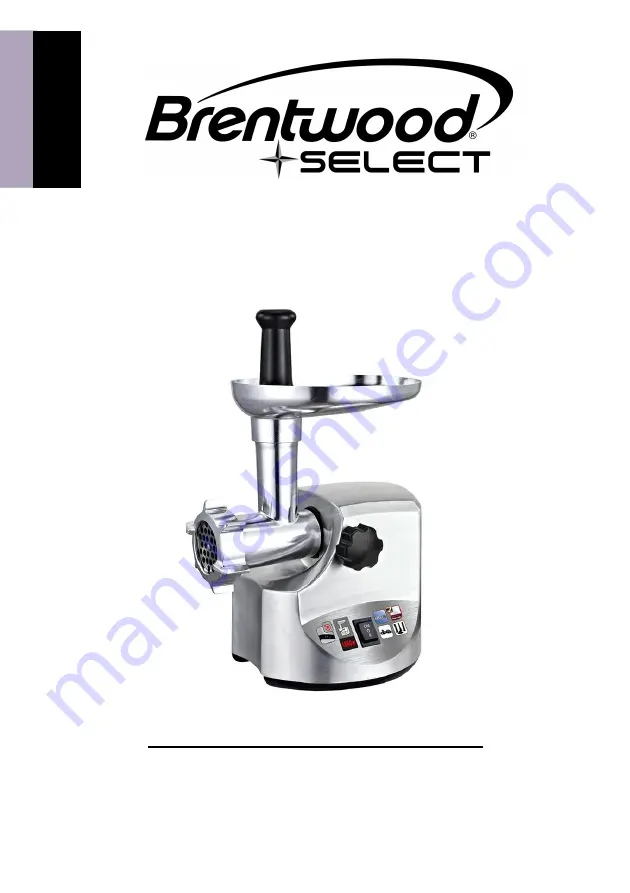
Electric Meat Grinder

MG-1800S

Operating and Safety Instructions

-FOR INDOOR HOUSEHOLD USE ONLY -

E

N

G

L

I

S

H

Summary of Contents for MG-1800S

Page 1: ...Electric Meat Grinder MG 1800S Operating and Safety Instructions FOR INDOOR HOUSEHOLD USE ONLY E N G L I S H ...

Page 2: ...ents not recommended or sold by the product manufacturer Attachments when furnished may become hot during use Allow any attachments to coolbefore handling them Continuous running ofmeatgrinder should be notmore than 10 minutes with the following10minutesinterval formotorcooling Do not place on or near a hot gas or electric burner in a heated oven or other heated surfaces Use the product in a well ...

Page 3: ...the product If the product is of a 3 prong grounding type the extension cord must be a grounding type 3 wire cord Arrange the extension cord so that it will not drape over the countertop or tabletop where itcan be tripped overorpulled WARNING This product is equipped with a polarized plug one blade is wider than the other blade to reduce the risk of electrical shock This is a safety feature The pl...

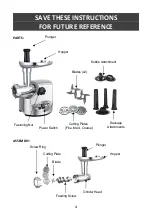
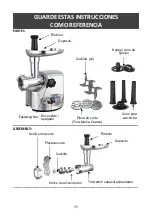
Page 4: ...FOR FUTURE REFERENCE PARTS ASSEMBLY Screw Ring Blade Cutting Plate Feeding Screw Grinder Head Plunger Hopper Blades x2 Kubbe Attachment Fastening Nut Power Switch Cutting Plates Fine Med Coarse Sausage Attachments Hopper Plunger ...

Page 5: ...rips Remove bones pieces of gristleand sinewsas muchas possible Note never use frozen meat Placethe meatontheHopper tray Use the plunger togentlypushthe meatintothe grinderhead MAKINGSAUSAGES 1 Mince the meatfirst see Mincing instructions 2 Switchoff the appliance 3 Press the release button on the appliance and turn the grinder head clockwise to remove it from the motor unit Note Make sure the app...

Page 6: ...re youremovethe parts ofthe appliance Donot attempttogrind bones nuts or other hard units Neverreach intothe cutter housing Always use the pusher Unplugthe appliance immediatelyafteruse Neveroperatethe appliance continuously formore than10 minutes at600W Children should besupervised toensure that theydonotplay with the appliance The use of this appliance by children orpersons witha physical sensor...

Page 7: ...XPRESS WARRANTY PERIOD STATED ABOVE NO OTHER EXPRESS PRODUCTS SHALL BE BINDING ON BRENTWOOD APPLIANCES INC REPAIR OR REPLACMENT IS THE EXCLUSIVE REMEDY OF THE CONSUMER BRENTWOOD APPLIANCES INC SHALL NOT BE LIABLE FOR ANY INCIDENTAL OR CONSEQUENTIAL DAMAGES CAUSED BY THE USE MISUSE OR INABILITY TO USE THE PRODUCT NOT WITHSTANDING THE FOREGOING CONSUMERS RECOVERY AGAINST BRENTWOOD SHALL NOT EXCEED T...

Page 8: ...8 TRITURADOR DE CARNE MG 1800S Instrucciones de Operación y Seguridad SOLO PARA USO DOMESTICO MEDIDAS DE SEGURIDAD IMPORTANTES E S P A Ñ O L ...

Page 9: ...en calentarse durante el uso Permitaque los accesoriosse enfríen antes de manipularlos Nocoloque electrodoméstico sobre o cerca de unahornillade gas o eléctrica en un hornocaliente u otras superficies calientes Tengamuchocuidadocuandomuevaun aparatoque contiene alimentos aguau otros líquidos Alcargar asegúrese desujetar el cuerpo con ambas manos Notransporte launidad por laplacao lacabeza de la to...

Page 10: ...3 patas el cable deextensión debe serun cable detoma de tierra de 3 patas Coloqueel cable de extensión de manera que nocuelgue del mostradoro de lamesa dondealguien se puedatropezar con él nitirar ADVERTENCIA Este producto está equipado con un enchufe polarizado una pata es más ancha que la otra para reducir el riesgo de descarga eléctrica Esta es una característica de seguridad El enchufe encajar...

Page 11: ...MBLY _____________________________________________________________________ Émbolo Deposito Cuchilla x2 Kubbe cono de fijación Fastening Nut Encendido apagado Placa de corte Fina Media Coarse Cono para salchicha Deposito Émbolo Anillo enroscable Cuchilla Placa de corte Hélice de alimentación Triturador cabezal alimentador ...

Page 12: ... elaparato está listoparapicar PICAR Cortarla carne en 3 pulgadas de largo yen tiras de 1 pulgadade grosor Eliminarhuesos trozos de cartílagoy tendón tantocomoseaposible Nota noutilicenuncala carnecongelada Coloquela carne enel deposito bandeja Utilice elémbolo paraempujar suavemente la carne en lacabeza trituradora __________________________________________________ Hacer embutidos 1 Primero picar...

Page 13: ...aparato está listo parahacer Kubbe TEMPERATURA PARAR REVERSA 1 Mantenga presionandoel botón R cuandoel aparatoestá encendido elaparato dejarán defuncionartemporalmente Suelte el botón y el aparatoreanuda eltrabajo 2 Si el aparatoestá bloqueado apagarel aparatoy luegooprima el botón R el tornillo de alimentación se enciende en ladirección inversa A continuación el aparatopuede continuarsu operación...

Page 14: ...o usarel aoarato más Tirar el aparato Apartede launidad de motor todas laspiezas desmontables se pueden lavaren aguacalientey jabón No utiliceproductos delimpieza o estropajos abrasivos o corrosivos No limpiarlas partes en el lavavajillas Limpieel motor con un paño húmedo Sequecompletamente con un paño antes de guardarlo HACHOIR À VIANDE MG 1800S Consignes de sécurité et de fonctionnement POUR USA...

Page 15: ...ssementdu moteur Lors du transport veillezà tenirle corps avecles deux mains Ne pas transporterl appareil parla plaque ou la tête de la trémie Nejamais pousser les produits à lamain Utiliser lepoussoir Gardezle produit loin des rideaux des revêtements muraux desvêtements des torchons ou d autres matériaux inflammables N utilisezpas d accessoiresqui ne sontpas recommandés ouvendus par lefabricant L...

Page 16: ...le doitêtre utilisée Lapuissance nominale indiquée surlacorde doitêtre au moins aussi grandeque celle de l appareil Si lecordon de l appareilestrelié à la terreà 3 fils lacorde derallonge doitaussi être reliée à laterre à 3 fils Installerla rallonge de façon à ce qu elle nepende pas ducomptoirou de la table où l on pourraits y accrocherou trébucher AVERTISSEMENT Cet appareil est muni d une fiche d...

Page 17: ...IÈCES ASSEMBLY Poussoir Entonnoir Lame coupante x2 Attachement Kubbe Fastening Nut Bouton La plaque couteau Fine Meyenne Coarse Corne de saucisse Poussoir Entonnoir Anneau de vissage Lame coupante La plaque couteau Vis d alimentation Le tuyau d alimentation ...

Page 18: ... en dévissant l écrou de fixation et en tournant le logement de la fraise dans le sens des aiguilles d une montre 3 Placezlatrémie bac dans la partieverticale du tuyau d alimentation 4 Maintenant l appareilestprêt auhachage HACHAGE Coupezla viande enbandelettes avec une longueur de 3 pouces etune épaisseur de1 pouce Retirezautant que possible les os les morceauxde cartilages etles tendons Remarque...

Page 19: ...du vis poussoir puis montez la fixation du créateur de Kubbe Assurez vous que la fixation de l encoche du Kubbe cône entre dans l ouverture dutuyau d alimentation 3 Montez l anneau de vissage sur le tuyau d alimentation en tournant la bague de la vis dans le sens des aiguilles d une montre jusquà ce qu ellesoitcorrectement fixée 4 Placezlatête du broyeur surle bloc d alimentationcomme pourles inst...

Page 20: ...ables de leur sécurité devraient donner des instructions explicites ou surveiller l utilisation de l appareil LE NETTOYAGE ET L ENTRETIEN Retirezle bouchon dela prise NETTOYEZ L APPAREIL IMMÉDIATEMENT APRÈS CHAQUE UTILISATION NE DÉMONTEZLES PIÈCESAMOVIBLES QUE LORSQUE TOUTESLES PIÈCES MOBILESONT CESSÉ DE FONCTIONNER ATTENTION NE PLONGEZPAS LE BLOC MOTEURDANS L EAU OU DANS TOUT AUTRE LIQUIDE SI CEL...

Reviews: