INSTALLATION GUIDE
Actual product characteristics may vary. Bright Light reserves the right to improve, modify or update the product designs without prior notice.
ENCAPSULATED LED RIBBON | LITE
COLOUR
CODE
LUMENS
WARM WHITE
3000K
BL-LS-4300-30
≥180lm/m
NATURAL WHITE
4000K
BL-LS-4300-40
≥250lm/m
LED WATTS
7.2W/m
INPUT VOLTS
24V DC constant voltage
OPERATING TEMP.
-25°C ~ +60°C
MAX. RUN PER
POWER FEED
15m using one feed
30m using two feeds
DIMENSIONS
W6 × H12mm
(W8mm for connectors)
CUTTING LENGTH
50mm
MINIMUM BEND
RADIUS
10mm
BEND DIRECTION
Horizontal bending
BEAM ANGLE
115°
SOURCE LIFE
50,000 hours
WARRANTY
3 years
INGRESS
PROTECTION
Protection established by use of
IP65 connections
CONTROL
Dimmable by PWM signal
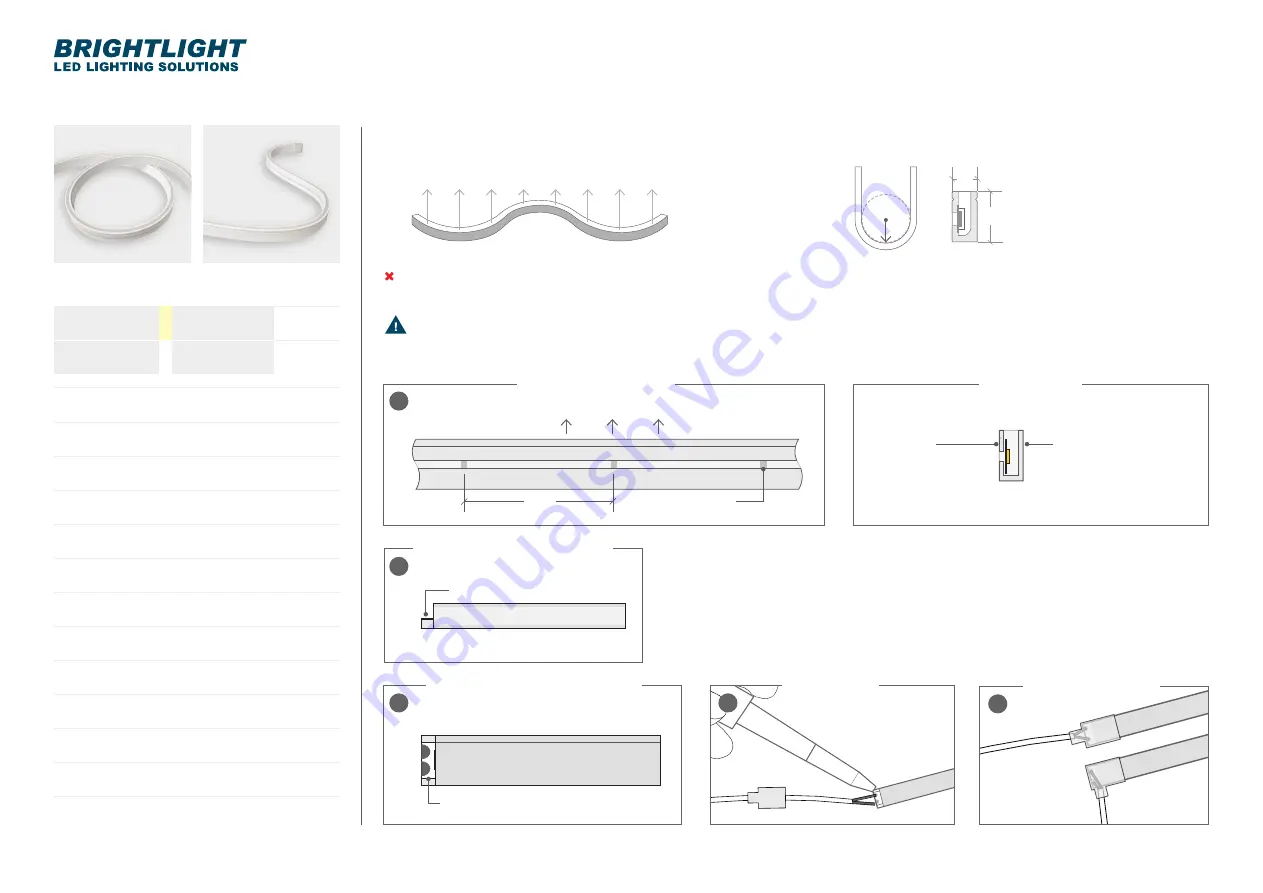
1. Cut Encapsulated LED Ribbon only
at the cut lines shown on
Side A
of
product.
2. To fit an end or bottom connector, cut
out a notch (approx 3 × 3mm) from
Side B
to expose the PCB solder
pads. Take care not to cut or damage
the PCB and LEDs in this step.
SIDE A
Cut mark are
visible on this side
SIDE B
When connecting cable,
notch out from this side
CUT OUT NOTCH TO EXPOSE SOLDER PADS
TOP VIEW - EXPOSE SOLDER PADS
CUT MARK
TOP / LIGHT DIRECTION
50
SIDE A VIEW - CUT MARKS
CROSS SECTION
SIDE B VIEW - EXPOSE SOLDER PADS
1
2A
2B
3.
Cut and trim the cable to the appropriate length and feed
through connector. Solder the wires onto the solder pads of the
Encapsulated LED Ribbon PCB ensuring the c/- polarity.
4.
Insert silicone into connector before fitting over connection. The
silicone is required to complete the IP65 rating.
Failure to do this
will result in warranty becoming void.
5.
Shortening ribbon / fitting new end cap:
Cut Encapsulated
LED Ribbon to length then fit end cap and silicone in place.
SAFETY NOTES
–
Before making any cuts, installation,
maintenance, or connection, be sure
the mains power is disconnected.
–
All connector joints must be connected
correctly to achieve connector IP rating.
–
Check the polarity of the connector
before inserting the front connector and
switching on the mains power.
–
Cut and connect Encapsulated
LED Ribbon correctly. Any incorrect
operation can cause damage.
–
Use a certified Bright Light 24V DC
power supply.
ENCAPSULATED LED RIBBON | LITE
CAN BE CURVED AS SHOWN BELOW:
DO NOT TWIST THE LIGHT OR BEND AGAINST THE LIGHT SURFACE
CUT OUT NOTCH TO EXPOSE
SOLDER PADS
0800 952 000 | www.brightlight.co.nz |
BRIGHT
LIGHT
12
6
CUTTING RIBBON & CONNECTING BOOT CONNECTORS
ADD SILICONE
INTO CONNECTOR
BEFORE FITTING
SOLDER WIRES
SILICONE CONNECTOR
3
4
BRIGHT LIGHT RECOMMENDS CONNECTIONS ARE MADE IN-HOUSE
LIGHT DIRECTION
HORIZONTAL BENDING
MINIMUM BEND RADIUS
10MM


