background image

Installation Instructions 

and User Guide

Opac Mini Thermostatic 
Recessed Shower Valve

Models covered: MINI2 TS1203 CL C 
& MINI2 TS1203 CH C

Please keep this booklet for future

Reference.

Installer, when you have read these

instructions please ensure you leave them

with the user.

Summary of Contents for MINI2 TS1203 CL C

Page 1: ...uide Opac Mini Thermostatic Recessed Shower Valve Models covered MINI2 TS1203 CL C MINI2 TS1203 CH C Please keep this booklet for future Reference Installer when you have read these instructions please ensure you leave them with the user ...

Page 2: ... information you need and if you need any further help please do not hesitate to give us a call on 0844 701 6273 Important Safety Information General Information Product Features Specifications Dimensions Pack Contents Installation Requirements Flow Regulators Installation Operation Commissioning Maintenance Troubleshooting Notes Guarantee 3 4 5 6 7 8 9 10 14 15 16 17 18 19 20 21 22 23 24 25 26 27...

Page 3: ...o hidden electrical wires cables or water supply pipes This can be checked with the aid of an electronic detector If power tools are used do not forget to Wear eye protection Unplug equipment after use The fitting of isolating valves is required as close as is practical to the supply inlet feeds of the thermostatic mixing valve Warning Before installing the new shower valve it is essential that yo...

Page 4: ... the underside of the cold tank should be at least 1 metre to ensure adequate performance Note Nominally equal balanced inlet supply pressures are recommended for optimum performance with mixer showers This shower valve should be installed in compliance with the Water Supply Water Fittings Regulations 1999 and the Scottish Byelaws 2004 If in doubt contact a registered plumber or you Local Water Au...

Page 5: ...i clockwise to turn the shower on and increase the temperature Turn the control clockwise to decrease the temperature and to turn the shower off 5 Need help Give us a call on 0844 701 6273 and speak to one of our trained advisors MINI2 TS1203 CL C shown Off cold On hot ...

Page 6: ...be re set to suit site conditions Supply Requirements Minimum cold water supply temperature 5ºC Maximum cold water supply temperature 25ºC Maximum hot water supply temperature 80ºC a maximum hot water supply temperature of 60 65ºC is recommended for ablutionary purposes Note The inlet hot water temperature must be at least 10ºC above the required blend temperature e g shower temperature 43ºC minim...

Page 7: ...Dimensions mm s 7 Need help Give us a call on 0844 701 6273 and speak to one of our trained advisors 99 97 97 43 58 43 58 MINI2 TS1203 CL C MINI2 TS1203 CH C 195 195 99 ...

Page 8: ...ling plate x1 3 Plastering shroud x1 4 7 lpm Green flow regulator x1 5 5 lpm Yellow flow regulator x1 6 Wall Outlet x1 7 Shower valve fixings x2 2 8 Hexagonal key x1 8 Need help Give us a call on 0844 701 6273 and speak to one of our trained advisors 3 2 ...

Page 9: ...1 3 Plastering shroud x1 4 7 lpm Green flow regulator x1 5 5 lpm Yellow flow regulator x1 6 Wall Outlet x1 7 Shower valve fixings x2 2 8 Hexagonal key x1 1 4 5 6 7 8 3 2 9 Need help Give us a call on 0844 701 6273 and speak to one of our trained advisors ...

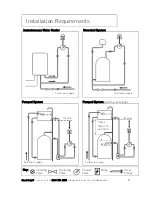
Page 10: ...must be a minimum head vertical distance from the underside of the cold water storage tank to the showerhead position of at least 1 metre Note Pumped system with Essex flange If you install this shower valve to a pumped gravity fed system where the minimum head vertical distance from the underside of the cold water storage tank to the top of the hot water cylinder is less than 1 metre we recommend...

Page 11: ...System with Essex flange Key Isolating Reducing Shower Pump Essex Valve Valve Valve Flange Cold mains supply Cold mains supply Cold mains supply Cold mains supply 1m min 1m min If less than 1m see note 50mm 11 Need help Give us a call on 0844 701 6273 and speak to one of our trained advisors ...

Page 12: ...ess effective backflow prevention device immediately upstream of the inlet b so that it draws water by gravity only from a cistern or cylinder having a permanently open vent pipe and the distributing pipe supplies no other fitting other than draining tap at a lower level For backflow protection in premises or installations up to and including Fluid Category 5 The vertical distance of the outlet ab...

Page 13: ...Note 46ºC is the maximum mixed water temperature from the bath tap The maximum temperature takes account of the allowable temperature tolerances inherent in thermostatic mixing valves and temperature losses in metal baths Warning It is not a safe bathing temperature for adults or children The British Burns Association recommends 37 to 37 5ºC as a comfortable bathing temperature for children In pre...

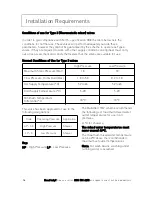
Page 14: ...ow Pressure Hot Cold Bar 1 0 to 5 0 0 2 to 1 0 Hot Supply Temperature ºC 52 to 65 52 to 65 Cold Supply Temperature ºC 5 20 5 20 Minimum Temperature Differential ºC 10ºC 10ºC This valve has been approved for use in the following designations The BuildCert TMV scheme recommends the following set maximum mixed water outlet temperatures for use in all premises 41ºC for showers The mixed water temperat...

Page 15: ...Mains 1 0 10 bar Gravity 0 1 to 0 5 bar Green 7 litre No Gravity Above 0 5 bar Green 7 litre Yellow 5 litre Unvented Mains Mains Pressurised Instantaneous Water Gas Heater Green 7 litre Yellow 5 litre Instantaneous Water Electric Heater Yellow 5 litre No Any vented open outlet Heater Gas Electric e g Electric Shower Do not use with a mixer valve This would be extremely dangerous See key over page ...

Page 16: ...g a flow stabiliser fitted prior to the heater and should be adjusted to give a temperature of between 45 50 C from the heater Study the table on the previous page and decide which flow regulators are required for your particular situation Remove both inlet elbows from the valve body and fit the flow regulators into the non return valve retainer Flow Regulators Flow Regulator Non Return Valve Reta...

Page 17: ...uld protrude through the finished wall surface to fit fully into the shower valve elbows 2 Attach shower valve to wall Position the shower valve in the wall cavity and secure using the fixings supplied Note It may be necessary to secure the shower valve to a baton if it is being installed in a stud partition Warning Please check for any hidden pipes and cables before drilling holes in the wall Onc...

Page 18: ...on the top Note The lever control knob will need to be removed to fit the concealing plate Slide the concealing plate over the shower valve body The concealing plate locks onto the concealing plate fixing Twist the concealing plate onto the fixing until a click is heard Secure the concealing plate into position by tightening the grub screw on the edge of the plate Installation cont 18 Need help Gi...

Page 19: ...ontrol Turn the lever anti clockwise to turn on and increase temperature Turn the lever clockwise to decrease temperature and turn off Off cold On hot 19 Need help Give us a call on 0844 701 6273 and speak to one of our trained advisors ...

Page 20: ... if water is still flowing check that the temperature is below 46ºC If there is no significant change to the set outlet temperature 2ºC or less change from the original settings and the fail safe shut off is functioning then the valve is working correctly and no further service work is required Notes If there is a residual flow during the commissioning or the annual verification cold water supply ...

Page 21: ...ants or those containing alcohol hydrochloric acid or phosphoric acid Isolate both hot and cold water supplies to the shower valve by either Turning the water supply off at the mains stopcock or Turning off the isolation valves to the shower valve 1 Remove the handle remove the plastic cap loosen the grub screw using the hexagonal key and carefully pull the handle off 2 Unscrew the cartridge anti ...

Page 22: ...handle remove the plastic cap loosen the grub screw using the hexagonal key and carefully pull the handle off 3 Using the hexagonal key turn the temperature adjusting screw to alter the temperature Turn clockwise for a cooler temperature Turn anti clockwise for a warmer temperature Note This will be the maximum temperature setting it is recommended that the temperature is set no higher than 43ºC 4...

Page 23: ... not use other water outlets when using the shower Make sure the maintained inlet pressures are nominally balanced and sufficient Refer to Installation Requirements section pages 10 14 Airlock or potential blockage of the pipework Flush through pipework to ensure removal of debris and any airlocks No hot or cold water reaching the shower valve Check hot and cold feeds the valve will shut down if e...

Page 24: ...is less than 10ºC above the required blend temperature Adjust hot water temperature or wait for water to reheat if stored system is used Instantaneous water heater not igniting because water flow rate is too low Increase water flow through the system Check cartridge inlet filters and clean or replace Refer to Maintenance section pages 21 22 Contact the boiler manufacturer Instantaneous water heate...

Page 25: ...elp Give us a call on 0844 701 6273 and speak to one of our trained advisors Notes Please use this space to add any notes you or your installer may have regarding the plumbing system installation of this product ...

Page 26: ...ng conditions The product was purchased within the United Kingdom or Republic of Ireland The guarantee applies solely to the o riginal purchaser with proof of purchase The installation must allow ready access to all products for the purpose of inspection maintenance or replacement Repair under this guarantee does not extend the original expiry date The guarantee on any replacement parts or product...

Page 27: ...el 0844 701 6273 with access to fully trained advisors who can offer installation advice talk you through quick maintenance checks or recommend the best course of action to fix any problems with a product Expert advice Find easy to follow how to video guides and technical FAQs online at www bristan com Our guides take you step by step through many product installations and you can find plenty of e...

Page 28: ...Bristan Group Ltd Birch Coppice Business Park Dordon Tamworth Staffordshire B78 1SG Web www bristan com Email enquire bristan com A Masco Company Part Number FI MINI2 1203 CL CH C Issue D1 ...

Reviews: