


Brother DCP-1000
Brother Fax 8070 P
Brother IntelliFAX-2800
Brother IntelliFAX-2900
Brother IntelliFAX-3800
Brother MFC-4800
Brother MFC-6800
Brother MFC-9030
Brother MFC-9070
Brother MFC-9160
Brother MFC-9180
Part Number: DR-250
Yield @ 20,000 pgs
Pages/Min.: 6
Resolution: 600x600 dpi
Technical Instructions
Machine Compatibility
OEM Info
Tools
1
E-mail: info@futuregraphicsllc.com
Website:
www.futuregraphicsllc.com
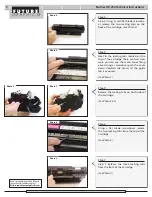
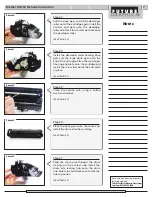
Step 1
Remove the two Philip screws from the
top of the drum unit.
(See Photo 1)
Photo 1
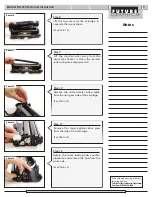
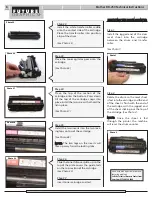
Photo 2
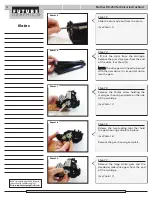
Photo 3
BRDR250TECH
Step 2
Locate the two locking tabs on the top of
the cartridge.
(See Photo 2)
Using a small
flat blade screw driver, squeeze the legs
of the two inserts together. These inserts
prevent the lock tabs on the top of the
cartridge from being released.
(See Photo 3)
Remove the inserts.
N
NO
OT
TE
E::
These inserts can go flying during
the removal process, be careful not to
lose the inserts as they will need to be
reinstalled.
Phillips Screwdriver
Small flat blade Screwdriver
S
Su
up
pp
plliie
es
s R
Re
eq
qu
uiirre
ed
d::
Cotton Swab
99% Alcohol
Replacement Drum
US 1 800 394.9900
Int’l +1 818 837.8100
FAX 1 800 394.9910
Int’l +1 818 838.7047
DALLAS, USA
US 1 877 499.4989
Int’l +1 972 840.4989
FAX 1 877 774.1750
Int’l +1 972 840.1750
ATLANTA, USA
US 1 877 676.4223
Int’l +1 770 516.9488
FAX 1 877 337.7976
Int’l +1 770 516.7794
MIAMI, USA
US 1 800 595.429
Int’l +1 305 594.3396
FAX 1 800 522.8640
Int’l +1 305 594.3309
SANFORD,USA
US 1 800 786.9049
Int’l +1 919 775.4584
FAX 1 800 786.9049
Int’l +1 919 775.4584
TORONTO, CAN
CAN 1 877 848.0818
Int’l +1 905 712.9501
FAX 1 877 772.6773
Int’l +1 905 712.9502
NEW YORK, USA
US 1 800 431.7884
Int’l +1 631 345.0121
FAX 1 800 431.8812
Int’l +1 631345.0690
SYDNEY, AUS
AUS 1 800 003.100
Int’l +62 02 9648.2630
FAX 1800 004.302
Int’l +62 02 9548.2635
BUENOS AIRES, ARG
ARG 0810 444.2656
Int’l +011 4583.5900
FAX +011 4584.3100
MONTEVIDEO,URY
URY 02 902.7206
Int’l +5982 900.8358
FAX +5982 908.3816
JOHANNESBURG, S.A.
S.A. +27 11 974.6155
FAX +27 11 974.3593
MELBOURNE, AUS
AUS 1 800 003. 100
Int’l +62 03 9561.8102
FAX 1 800 004.302
Int’l +62 03 9561-7751
CORPORATE
LOS ANGELES, USA


