For example, assume that point #1 on
the adjacent map is where you’ve
parked your car or vehicle. Save this
location as a new waypoint before
leaving the car by holding the [H] button.
Assume point #2 is where you setup
your campsite. Switch to waypoint 2 by
clicking the [H] button, and then hold
the [H] button to mark and save your
current location as a new waypoint.
Finally, assume point #3 is your favorite fishing spot. Switch
to waypoint 3 by clicking the [H] button, and then hold the [H]
button to mark and save your current location as a new
waypoint.
Now, from any location, you can switch to waypoint 1, 2 or 3 to
take the most direct route back to your
car (1), campsite (2) or fishing hole (3).
GET-BACK GPS USER’S GUIDE
Thank you for purchasing your Brunton GET-BACK GPS. Brunton’s heritage in
compasses comes full form combining precision navigation in an easy-to-understand,
compact package. This GPS device is not a substitute for backcountry expertise or
good common sense, and should not be your only form of navigation. This GPS unit
uses signals from satellites circling in Earth’s low orbit to determine the user’s current
location. Like all GPS equipment, it is subject to signal interruption due to atmospheric
conditions or settings with dense tree-cover or tall buildings. Please fully understand this
device’s use and limitations before taking it into the field.
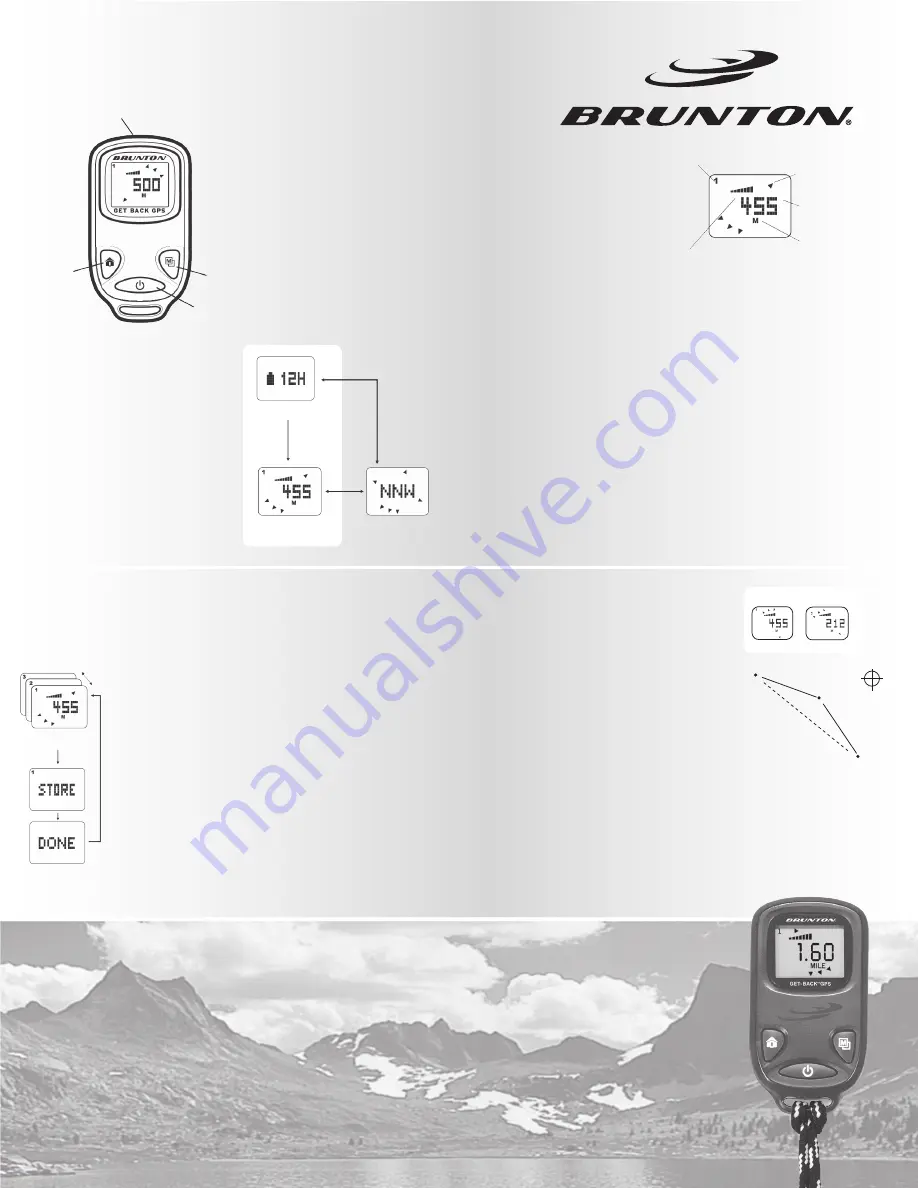
Major Operations
Power button [P]
Hold to turn the unit on/off
Press to toggle back-light on/off
* Note, be sure to turn back light
off when not in use to save
battery life
Mode button [M]
Press to toggle between
compass and navigation
modes
Hold to change units
of measure or calibrate
compass
Home button [H]
Press to toggle between
(3) saved waypoints
Hold to save a new
waypoint
Before entering the navigation mode, the GPS must have a
satellite signal. If there is no signal present, only the battery
level indicator will display. A strong satellite signal is best
received outdoors in open air. Dense tree-cover, tall buildings and
the metals inside your vehicle can interfere with the satellite
connection.
Your GET-BACK is optimized for outdoor use.
Your GET-BACK comes with factory set waypoints. When the
satellite signal is received the main navigation screen will display.
WAY-BACK arrow points to the saved waypoint you
have selected.
Unit of measure can be changed from Metric to
Standard by holding the [M]ode button
(see units of measure)
GPS signal bar shows the strength of the satellite
signal. A full, strong signal is (7) seven bars.
Navigation
Mode
Way
Back
Distance to
Waypoint
Unit of
Measure
GPS Signal
Bar
Waypoint No.
Navigation
Mode Display
Saving a Waypoint
When you are ready to make a new waypoint in a par-
ticular location (1, 2 or 3), you save over the previous
waypoint and the previous waypoint is lost. Keep this in
mind when saving a new location, and be sure that the
previous way point is no longer needed.
When a satellite signal has been received,
select the waypoint number that is oldest or
least important by pressing the [H]ome button.
Replace and save your current location as a new
waypoint by holding the [H] button. When the
word ‘STORE’ appears on the screen, release the
[H] button.
The word ‘DONE’ will appear on the screen, and
the arrival notification (alarm/beeping) will
begin. Dismiss the arrival notification by
pressing the [H] button and switching to a
different waypoint number.
Using GET-BACK
in the Field
GET-BACK GPS USER’S GUIDE
Without
GPS
Signal
(M)
Compass
Mode Display
Navigational
Mode Display
Battery Level Display
GPS
Signal
(M)
HOME
[H]
POWER
[P]
MODE
[M]
Front View
[H]
Navigation Mode
Display
hold [H]
USB
Port
or
From point #3, select waypoint
#1 to return to car, or #2
to return to camp.
point 1
point 2
point 3
212m
point 2
455m
Example Map
(starting point)
point 1
N


