background image

55" Full HD 1080p LED TV

Installation & Operating Instructions 

- Please keep for future reference

747/1498

LE-55GB2A

These instructions contain important information which will help you get the best from your
television and ensure safe and correct installation and operation.

For any help concerning set up and use of your TV please call the

Customer Helpline: 0845 604 0105

Lines open:

 9am - 8pm Monday to Saturday and 10am - 4pm Sunday

Important 

- Please read these instructions fully before installing or operating

Issue 1 - 8/11/12

BUSH-LE-55GB2 (TI12421)_IM V01.indd   1

2012/10/22   15:13:31

Summary of Contents for LE-55GB2A

Page 1: ...e best from your television and ensure safe and correct installation and operation For any help concerning set up and use of your TV please call the Customer Helpline 0845 604 0105 Lines open 9am 8pm Monday to Saturday and 10am 4pm Sunday Important Please read these instructions fully before installing or operating Issue 1 8 11 12 BUSH LE 55GB2 TI12421 _IM V01 indd 1 2012 10 22 15 13 31 ...

Page 2: ...BUSH LE 55GB2 TI12421 _IM V01 indd 2 2012 10 22 15 13 31 ...

Page 3: ...ons 16 VGA Connections 16 Connections 14 16 How to navigate menus 17 Electronic programme guide EPG DTV mode 17 Teletext ATV mode 18 Digital Teletext DTV mode 19 Time Shift Function DTV mode 19 20 Recording DTV Programme onto a USB Storage Device 20 Timer Programming 21 Play Recorded Programme 22 Channel management ATV DTV Mode 23 26 Picture management 27 Basic Features 17 38 Viewing Photo 39 List...

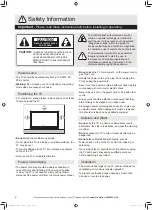
Page 4: ...in moderate climates 10cm 10cm 10cm Power cord and plug The power cord plug should be easily accessible In FDVH RI VWRUPV DQG OLJKWQLQJ ZKHQ JRLQJ RQ KROLGD or when the TV is not used for a long period of time disconnect the power cord from the mains power socket Do not SODFH WKH 79 IXUQLWXUH HWF RQ WKH SRZHU FRUG RU pinch the cord DQGOH WKH SRZHU FRUG E WKH SOXJ GR QRW XQSOXJ WKH TV by pulling th...

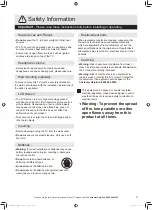
Page 5: ...h Batteries Warning Incorrect installation of batteries may cause EDWWHU OHDNDJH DQG FRUURVLRQ UHVXOWLQJ LQ GDPDJH WR the remote control Do not PL ROG DQG QHZ EDWWHULHV RU batteries of different types Do not GLVSRVH RI EDWWHULHV LQ D UH Do not dispose of batteries with normal household ZDVWH WDNH WR D ORFDO UHF FOLQJ FHQWUH Replacement parts KHQ UHSODFHPHQW SDUWV DUH UHTXLUHG PDNH VXUH WKDW WKH VH...

Page 6: ...RVW UHPRWH control Any other technical issues you may need DVVLVWDQFH ZLWK Call us today 0845 604 0105 Local call rates applies Lines open 9am 8pm Monday to Saturday and 10am 4pm Sunday Calls to Argos enquiry lines may attract a charge and set up fee from residential OLQHV GHSHQGLQJ RQ RXU FDOO SODQ WDULII 0RELOH DQG RWKHU SURYLGHUV FRVWV PD YDU see www bt com pricing for details RU 6HFXULW DQG WU...

Page 7: ...LFHV VXFK DV YLGHR YLGHR JDPHV DXGLR VHW HWF Stereo sound system 7HOHWH W IDVWH W 723 WH W Headphone connection Automatic programming system Forward or backward manual tuning Sleep timer Child lock AVL Automatic Volume Limiting PLL Frequency Search PC input 3OXJ 3OD IRU LQGRZV 0 3 9LVWD Getting Started TV Features Accessories included TV Stand Support CH LIST P MODE S MODE LANG SUBPAGE HOLD REVEAL...

Page 8: ...direct lighting is recommended for comfortable viewing Allow enough space between the TV and the wall to permit ventilation Avoid excessively warm locations to prevent possible damage to the cabinet or premature component failure WALL MOUNTING INSTALLATION GUIDELINES This television can be wall mounted as follows 1 Place the LCD Television onto a solid surface Please place some soft material over ...

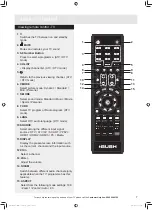
Page 9: ... mode 9 LANG Select DTV audio language DTV mode 10 SOURCE Select among the different input signal sources DTV ATV AV SCART YPbPr HDMI1 HDMI2 HDMI3 PC Media 11 DISPLAY Display the present screen information such as the current channel and the input source 12 CH Select a channel 13 VOL GMXVW WKH YROXPH 14 NICAM Switch between different audio channels only applicable when the TV programme has this fe...

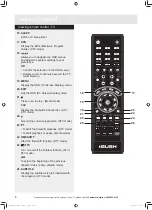
Page 10: ...o stop Media mode FAV Display the Favourite Channel list ATV DTV mode 22 Record the current programme DTV mode 23 To start the timeshift playback DTV mode To start playback or pause Media mode 24 TIMESHIFT Start the time shift function DTV mode 25 TTX Turn on and off the Teletext function ATV DTV mode To skip to the beginning of the previous chapter track photo Media mode 26 SUBTITLE Display the s...

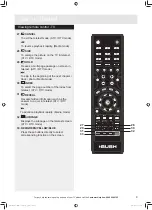
Page 11: ... 30 INDEX To select the page number of the index from teletext ATV DTV mode 31 REVEAL Reveals hidden information such as the answer to a quiz in teletext ATV DTV mode To advance playback rapidly Media mode 32 SUBPAGE Displays the subpage on the teletext screen ATV DTV mode 33 RED GREEN YELLOW BLUE Press these buttons directly to select corresponding function on the screen Getting Started CH LIST P...

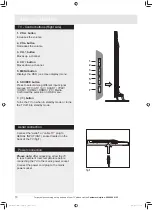
Page 12: ...MI1 HDMI2 HDMI3 PC Media Confirmed the selection on OSD menu 7 button Turns the TV on when in standby mode or turns the TV off into standby mode Getting Started Connect the aerial or cable TV plug to AERIAL INPUT ANT socket located on the back of the TV fig 1 3OHDVH QRWH After unpacking allow the TV to reach ambient room temperature before connecting the TV to the mains power socket Connect the po...

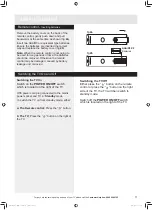
Page 13: ...ttery leakage and corrosion Getting Started 6ZLWFKLQJ WKH 79 2Q Switch on the POWER ON OFF switch which is located on the right of the TV With power cord plug connected to the mains power socket and TV in Standby mode To switch the TV on from standby mode either a The Remote control Press the button b The TV Press the button on the right of the TV 6ZLWFKLQJ WKH 79 2II Either press the button on th...

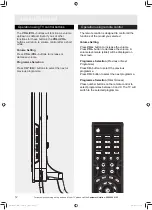
Page 14: ...ANG TV RD The remote control is designed to control all the functions of the model you selected Volume Setting Press VOL button to increase the volume Press VOL button to decrease the volume A volume level scale slider will be displayed on the screen Programme Selection Previous or Next Programme Press CH button to select the previous programme Press CH button to select the next programme Programm...

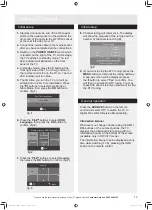
Page 15: ... Getting Started Initial setup OK Please select an OSD Language Español Français Português English fig 2 Country Menu UK fig 3 Press the SOURCE button on the remote control and select DTV to switch the TV to Digital Terrestrial Television Broadcasting Information Banner Whenever you change channel using the CH CH EXWWRQV RU WKH QXPEHU EXWWRQV WKH 79 displays the broadcast picture along with an inf...

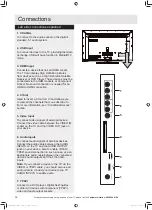
Page 16: ...QIRUPDWLRQ VHH RQGLWLRQDO FFHVV section 5 Video Input To connect video signals of external devices Connect the video cable between the VIDEO IN VRFNHW RQ WKH 79 DQG WKH 9 2 287 MDFN RQ your device 6 Audio Inputs To connect audio signals of external devices Connect the audio cable between the AUDIO INPUTS on the TV and the AUDIO OUTPUT MDFNV RQ RXU GHYLFH OVR WR HQDEOH 9 2 3E3U VRXQG FRQQHFWLRQ LQ ...

Page 17: ...nput VGA PC AUDIO Connects a personal computer to the TV Connect the PC cable between the PC INPUT on the TV and the PC output on the PC 1RWH If you connect a device to the TV via the PC cable you should also use an audio cable to connect your device to the PC AUDIO INPUT to enable audio 10 RF Input ANT Connects to aerial antenna or cable TV If you XVH D GHFRGHU RU D PHGLD UHFRUGHU RX VKRXOG conne...

Page 18: ... the TV and the device before making any connections RU PRUH LQIRUPDWLRQ UHIHU WR RXU GHYLFH V RZQ instruction book 1RWH The Scart cable is not supplied You can connect a computer PC to the TV to display your computer s screen image on the TV Power off both computer and TV before making any connections Use a 15 pin D sub display cable to connect a PC to the TV Use an audio cable between PC AUDIO i...

Page 19: ... Die Frauen des Grafen von Gleichen 5 France 5 2 France 2 3 France 3 21 45 23 15 Donna Leon Sanft entschlafen 23 15 23 45 Lebensläufe 23 45 01 25 Genesung 801 MDR FERNSEHEN 02 Sep 2007 21 45 23 15 02 Sep 2007 21 56 Spielfilm Deutschiand 2004 Im Altenpflegeheim St Leonardo das auch Commissario Brunettis Mutter beherbergt kommen Menschen offenbar nicht nur auf natürliche Weise zu Tode 02 Sep Record ...

Page 20: ... pages of information that are listed in the teletext index To Turn on Teletext Function Q 79 PRGH SUHVV WKH TEXT button to enter Teletext mode Press the INDEX button to display the index page Press the TEXT button once to exit and the TV will return to the channel you were watching To select a page of text Find the number of the page in the index and enter it using the 0 9 buttons The number of t...

Page 21: ...programme will show on the screen The video and sound may have a little bit of delay or be out of sync for a few seconds when the unit starts to playback the missed broadcast programme It will soon turn to normal fig 1 2 Press the 0 9 buttons to select a page number 3 Follow the instructions on digital teletext and move onto the next step by pressing OK RED GREEN YELLOW BLUE or 0 9 buttons etc 4 7...

Page 22: ...in to resume playback XULQJ IDVW IRUZDUG IDVW EDFNZDUG VWDWH SUHVV WKH button to return to normal playback OK XULQJ SOD EDFN SUHVV WKH OK button to display a still screen and then press the button again to resume playback If you want to exit the PVR Time Shift progress bar and UHWXUQ WR WKH FXUUHQW OLYH EURDGFDVW SUHVV WKH button and then press the button to confirm Time Shift Function DTV mode Re...

Page 23: ...onfirm your settings A Timer Save Success screen will display fig 3 4 The Schedule List will then be displayed with your preset reminders shown fig 4 5 Press the YELLOW button to return to the EPG 6 Press the EXIT button to exit EPG Timer Programming 7 ARTE 13 LCP 20 France Ô 800 arte PROGRAMME GUIDE 21 00 21 45 Ehe zu Dritt Die Frauen des Grafen von Gleichen 5 France 5 2 France 2 3 France 3 21 45...

Page 24: ...ress the OK button fig 3 5 Press the buttons to select your recorded programme A tick box will be GLVSOD HG I RX ZDQW WR GHOHWH WKH ILOH SUHVV the RED button to enter the Sub Menu and then press the button to confirm Press the button to view 6 Press the OK button or DISPLAY button to display the function bar Press the buttons and then press the OK button to select the function Pause FB FF Prev Nex...

Page 25: ... Tune Type ATV DTV Germany France Italy Spain Portugal Menu Other fig 1 fig 2 ATV Manual Tuning ATV Mode Allows you to make manual fine tuning DGMXVWPHQWV LI WKH FKDQQHO UHFHSWLRQ LV SRRU under ATV mode 1 1 WKH 11 PHQX SUHVV buttons to select ATV Manual Tuning and then press button or the OK button to enter sub menu fig 1 and fig 2 a Press buttons to select channel number you want to store b Press...

Page 26: ...e DTV Manual Tuning DTV mode Allows you to make manual fine tuning DGMXVWPHQWV LI WKH FKDQQHO UHFHSWLRQ LV SRRU under DTV mode 1 1 WKH 11 PHQX SUHVV buttons to select DTV Manual Tuning and then press button or the OK button to enter sub menu fig 1 2 Press the buttons to select channel and then press the OK button to search program fig 2 DTV 0 Programme VHF CH 21 DTV Manual Tuning Bad Freq 474 MHz ...

Page 27: ...V 0RGXOH HQVXUH that the TV is switched off and the viewing card is inserted LQ DFFRUGDQFH ZLWK WKH 6HUYLFH 3URYLGHU V LQVWUXFWLRQV 2 Insert the Common Access Module into the slot Flip the Common Access Module to another side and try again if you feel resistance 3 Switch the TV on To remove the Common Access Module 1 HIRUH RX UHPRYH WKH RPPRQ FFHVV 0RGXOH ensure that the TV is switched off 2 Pull ...

Page 28: ...79 ZLOO automatically upgrade the software fig 4 7 KHQ WKH XSGDWH LV FRPSOHWH WKH 79 ZLOO return to standby mode 8 Press the button on the front right side panel of the TV or the button on the remote control to switch on the TV Channel management ATV DTV Mode Yes No New Fireware is avaliable TV Version v1 00 Stream Version v1 01 Yes to upgrade No to exit the upgrade fig 2 I RX GR QRW SUHVV DQ EXWW...

Page 29: ...H HQWLUH SLFWXUH LW ZLOO HIIHFW WKH GDUN region of the picture Colour 7KLV LWHP FDQ DGMXVW WKH VDWXUDWLRQ RI WKH colour based on your own like Tint This item may use in compensating color changed with the transmission in the NTSC code Sharpness 7KLV LWHP FDQ DGMXVW WKH SHDNLQJ LQ the detail of the picture fig 1 PICTURE Picture Mode Standard Contrast 50 Brightness 50 Colour 50 Tint 50 Sharpness 30 ...

Page 30: ...HS ULFK EDVV GLDORJXH FODULW IRU EHWWHU LQWHOOLJLELOLW RI YRFDOV DQG GHILQLWLRQ FRQWURO IRU PD LPXP KLJK frequency clarity Press the buttons to select On Off 656 7UX6XUURXQG FUHDWHV DQ LPPHUVLYH feature rich surround sound experience from WZR VSHDNHUV FRPSOHWH ZLWK ULFK EDVV KLJK frequency detail and clear dialogue 7UX6XUURXQG 656 DQG WKH V PERO DUH WUDGHPDUNV RI 656 DEV QF SPDIF Mode Select the d...

Page 31: ... Copenhagen GMT 1 Paris GMT 1 Prague GMT 1 Bern GMT 1 Luxembourg GMT 1 Oslo GMT 1 Time Zone Move Menu fig 2 Sleep Timer 1 Press the MENU button to display the main menu Press the buttons to select TIME LQ WKH PDLQ PHQX WKHQ SUHVV WKH or OK EXWWRQ LW ZLOO KLJKOLJKW WKH ILUVW RSWLRQ 2 Press the buttons to select the Sleep Timer and then press the or OK button fig 1 3 Press the buttons to select Avai...

Page 32: ...er 1 Press the MENU button to display the main menu Press the buttons to select TIME LQ WKH PDLQ PHQX WKHQ SUHVV WKH or OK EXWWRQ LW ZLOO KLJKOLJKW WKH ILUVW RSWLRQ 2 Press the buttons to select the OSD Timer and then press the or OK button fig 1 3 Press the buttons to time 5 10 15 20 25 30s fig 2 4 Press the OK button to save the setting and return back to the previous menu 5 Press the EXIT butto...

Page 33: ...Q WKH PDLQ PHQX WKHQ SUHVV WKH or OK EXWWRQ LW ZLOO KLJKOLJKW WKH ILUVW RSWLRQ 2 Press the buttons to select the Set Password and then press OK button fig 1 3 Use the 0 9 buttons to input the old password and then input the new 4 digit password Re enter new password for confirmation fig 2 4 Press the EXIT button to exit the menu fig 1 LOCK Lock System On Set Password Block Program Parental Guidanc...

Page 34: ...CK Lock System On Set Password Block Program Parental Guidance Off Key Lock Off Block Program 1 S 07 2 S 08 ATV ATV Lock Menu fig 2 Parental Guidance 1 Press the MENU button to display the main menu Press the buttons to select LOCK LQ WKH PDLQ PHQX WKHQ SUHVV WKH or OK EXWWRQ LW ZLOO KLJKOLJKW WKH ILUVW RSWLRQ 2 Press the buttons to select the RFN System and then press the OK button 3 Use the 0 9 ...

Page 35: ... System On Set Password Block Program Parental Guidance Off Key Lock Off OSD Language 1 Press the MENU button to display the main menu Press the buttons to select SETUP LQ WKH PDLQ PHQX WKHQ SUHVV WKH or OK EXWWRQ LW ZLOO KLJKOLJKW WKH ILUVW RSWLRQ 2 Press the buttons to select the OSD Language and then press the OK button The default on screen menu language is English fig 1 3 Press the buttons to...

Page 36: ...uage West East Russian Arabic Farsi Menu Audio Languages DTV Mode 1 Press the MENU button to display the main menu Press the buttons to select SETUP LQ WKH PDLQ PHQX WKHQ SUHVV WKH or OK EXWWRQ LW ZLOO KLJKOLJKW WKH ILUVW RSWLRQ 2 Press the buttons to select the Audio Languages and then press the OK button fig 1 3 Press the buttons to select the Primary and Secondary Audio Language Press the butto...

Page 37: ...Español 6XEWLWOH DQJXDJH 3ULPDU Hearing Impaired 1 Press the MENU button to display the main menu Press the buttons to select SETUP LQ WKH PDLQ PHQX WKHQ SUHVV WKH or OK EXWWRQ LW ZLOO KLJKOLJKW WKH ILUVW RSWLRQ 2 Press the buttons to select the Hearing Impaired and then press the OK button to select On Off fig 1 3 Press the EXIT button to exit the menu fig 1 SETUP OSD Language TT Language Audio L...

Page 38: ...Type PVR File System Size SD 101 Mins FAT32 All HD 28 Mins Warning All data will be lost Start Exit Format disk Format disk Do not unplug USB device Formatting Please wait Format disk Time Shift Size After formatting the Time Shift Size menu will appear if you have selected HiSpeed FS in PVR File System Type This option cannot be chosen if you have selected FAT32 in PVR File System Type Press the ...

Page 39: ... on both the left and right of the screen 16 9 This selection will allow you to DGMXVW WKH SLFWXUH KRUL RQWDOO LQ OLQHDU SURSRUWLRQ WR ILOO WKH entire screen This selection will allow you to view a picture with an original 16 9 aspect ratio Zoom1 This selection will allow you to zoom in the picture ZLWKRXW DQ DOWHUDWLRQ ZKLOH ILOOLQJ WKH HQWLUH VFUHHQ however the four sides of the picture will be ...

Page 40: ... Hearing Impaired PVR File System Aspect Ratio Blue Screen First Time Installation Reset Software Update USB English West English English Off Auto On First Time Installation 1 Press the MENU button to display the main menu Press the buttons to select SETUP LQ WKH PDLQ PHQX WKHQ SUHVV WKH or OK EXWWRQ LW ZLOO KLJKOLJKW WKH ILUVW RSWLRQ 2 Press the buttons to select the First Time Installation and t...

Page 41: ...ick box will be displayed If you want WR GHOHWH WKH ILOH SUHVV WKH RED button to enter the Sub Menu and then press the button to confirm 5 Press the button to view 6 Press the OK button or DISPLAY button to display the function bar Press the buttons and then press the OK button to select the function Pause Prev Next Stop Repeat Repeat All Repeat None Repeat 1 Music Playlist Info Rotate clockwise R...

Page 42: ...buttons to select the music file A tick box will be displayed If you want WR GHOHWH WKH ILOH SUHVV WKH RED button to enter the Sub Menu and then press the button to confirm 5 6HOHFW WKH PXVLF RX ZDQW WR SOD LW ZLOO VKRZ the music information Album Title Bit Rate Artist Sampling Year Size Then press the button to play 6 Press the buttons and then press the OK button to select the function Pause FB ...

Page 43: ...ect the movie file A tick box will be displayed If you want WR GHOHWH WKH ILOH SUHVV WKH RED button to enter the Sub Menu and then press the button to confirm 5 Press the button to view 6 Press the OK button or DISPLAY button to display the function bar Press the buttons and then press the OK button to select the function Pause FB FF Prev Next Stop Repeat Repeat All Repeat None Repeat 1 Set A Play...

Page 44: ... WH W ILOH press the buttons to select the text file A tick box will be displayed If you want WR GHOHWH WKH ILOH SUHVV WKH RED button to enter the Sub Menu and then press the button to confirm 5 Press the button to view 6 Press the OK button or DISPLAY button to display the function bar Press the buttons and then press OK button to select the function Prev page Next page Prev Next Stop Music Playl...

Page 45: ...nergy Consumption Data EEI B 2Q 0RGH 3RZHU RQVXPSWLRQ 130W Standby Mode W 0 36W 0D LPXP 3RZHU W 140W Standby Mode After 4 Hours Other Information Digital reception MHEG 5 ENGINE compliant with ISO IEC 13522 5 UK engine Profile 1 for UK 2EMHFW FDURXVHO VXSSRUW FRPSOLDQW ZLWK 62 DQG 8 77 SURILOH IRU 8 Frequency range 474 850 MHz for UK models 170 862 MHz for EU models Transmission standard DVB T MPE...

Page 46: ...I WKH SRZHU OHDG LV GDPDJHG LW PXVW EH UHSODFHG E D TXDOL HG HOHFWULFLDQ Plug replacement UK and Ireland only Connect blue lead to N Neutral Connect brown lead to L Live N L 5 7KLV LV FDOOHG WKH SURGXFW LFKH WKH LQIRUPDWLRQ QHHGV WR EH SUHVHQWHG LQ WKH IROORZLQJ RUGHU DOVR WKLV PD EH LQ WKH IRUP RI D FRS RI WKH ODEHO LQ FRORXU RU EODFN DQG ZKLWH WKH ODEHO KRZHYHU PXVW display all the information b...

Page 47: ...een in still picture mode for extended periods No power I RXU 79 KDV QR SRZHU SOHDVH FKHFN WKH SRZHU FRUG plug is connect to the mains power socket No picture 1 No Picture means that your TV is not receiving a transmission Have you selected the correct button on the remote control Try once more Also make sure the correct input source has been selected 2 Is the aerial connected properly 3 Are the p...

Page 48: ...equipment with these symbols should not be disposed of as general household waste If you want to dispose of the SURGXFW RU EDWWHU SOHDVH FRQVLGHU WKH FROOHFWLRQ systems or facilities for appropriate recycling 1RWLFH The sign Pb below the symbol for batteries indicates that this battery contains lead Information for Users on Disposal of old Equipment and Batteries European Union only 7KH FROG FDWKR...

Page 49: ...PRODUCT GUARANTEE BUSH LE 55GB2 TI12421 _IM V01 indd 47 2012 10 22 15 14 15 ...

Page 50: ...BUSH LE 55GB2 TI12421 _IM V01 indd 48 2012 10 22 15 14 15 ...

Page 51: ...BUSH LE 55GB2 TI12421 _IM V01 indd 49 2012 10 22 15 14 15 ...

Page 52: ...BUSH LE 55GB2 TI12421 _IM V01 indd 50 2012 10 22 15 14 15 ...

Reviews: